Page 26 of 569
25 At a glance
Cockpit
ItemPage
1Cruise control lever258
2Instrument cluster26
3Multifunction steering
wheel30
4Horn
5Steering wheel gearshift
buttons201
6Gear selector lever for
automatic transmission53
7Front Parktronic* warning
indicators283
8Overhead control panel33
9Glove box release
Glove box lock304
305
ItemPage
aGlove box
CD changer*
AUX-socket304
304
304
bCenter console31
cPower outlet314
dStarter switch39
eSteering wheel adjustment,
manual46
fSteering wheel adjustment,
electrical*47
Heated steering wheel*318
gHood lock release356
hParking brake release56
ItemPage
jParking brake pedal65
kDoor control panel36
lExterior lamp switch143
mCombination switch
�High beam58
�Turn signals59
�Windshield wipers59
�Rear window wiper61
Page 31 of 569
30 At a glance
Multifunction steering wheel
ItemPage
1Multifunction display157
Operating the control
system158
2Selecting the submenu or
setting the volume:
Press button
æup / to increase
çdown / to decrease
3Telephone*:
Press button187,
319
sto take a call
to dial
to redial
tto end a call
to reject an
incoming call
ItemPage
4Moving within a menu:
Press button
jfor next display
kfor previous display
5Menu systems:
Press button
èfor next menu
ÿfor previous menu
6! Voice Control
System* on1, see
separate operating
instructions
70 Voice Control
System* off1, see
separate operating
instructions
1Vehicles without Voice Control System*: Button
without function.
Page 36 of 569
35 At a glance
Storage compartments
ItemPage
1Parcel net in front
passenger footwell307
2Glove box304
3Door pocket
4Parcel net on front
passenger seat backrest307
5Door pocket
6Cup holder308
7Third-row storage
compartment304
8First aid kit, vehicle tool kit,
spare wheel467
9Third-row storage
compartment304
aCup holder308
bDoor pocket
ItemPage
cParcel net on driver’s seat
backrest307
dDoor pocket
eStorage compartment in
center console304
fAshtray311
gCupholders308
hFront armrest storage
compartment/telephone
tray304
jCup holders
Rear storage compartment
Rear seat ashtray308
304
311
kCup holders*308
lRear armrest storage
compartment*304
Page 44 of 569

43 Getting started
Adjusting
�Adjusting
Seats
Warning!G
All seat, head restraint, steering wheel, and
rear view mirror adjustments, as well as
fastening of seat belts, must be done before
the vehicle is put into motion.
Warning!G
Do not adjust the driver’s seat while driving.
Adjusting the seat while driving could cause
the driver to lose control of the vehicle.
Never ride in a moving vehicle with the seat
back in an excessively reclined position as
this can be dangerous. You could slide
under the seat belt in a collision. If you slide
under it, the belt would apply force at the
abdomen or neck. That could cause serious
or fatal injuries. The seat backrest and seat
belts provide the best restraint when the
wearer is in a position that is as upright as
possible and belts are properly positioned
on the body.
Your seat must be adjusted so that you can
correctly fasten your seat belt (
�page 50).
Observe the following points:
�Adjust the seat backrest until your arms
are slightly angled when holding the
steering wheel.
�Adjust the seat to a comfortable seating
position that still allows you to reach the
accelerator/brake pedal safely.
The position should be as far to the rear
as possible, consistent with ability to
properly operate controls.
�Adjust head restraint so that it is as
close to the head as possible and the
center of the head restraint supports
the back of the head at eye level.
�Never place hands under the seat or
near any moving parts while a seat is
being adjusted.
Failure to do so could result in an accident
and/or serious personal injury.
Warning!G
When leaving the vehicle, always remove the
SmartKey or SmartKey with KEYLESS-GO*
from the starter switch, take it with you, and
lock the vehicle.
Even with the SmartKey or the SmartKey
with KEYLESS-GO* removed from the
starter switch or the SmartKey with
KEYLESS-GO* removed from the vehicle,
the power seats can be operated.
Therefore, do not leave children unattended
in the vehicle, or with access to an unlocked
vehicle. A child’s unsupervised access to a
vehicle could result in an accident and/or
serious personal injury.
Page 45 of 569

44 Getting started
Adjusting
Seat adjustment
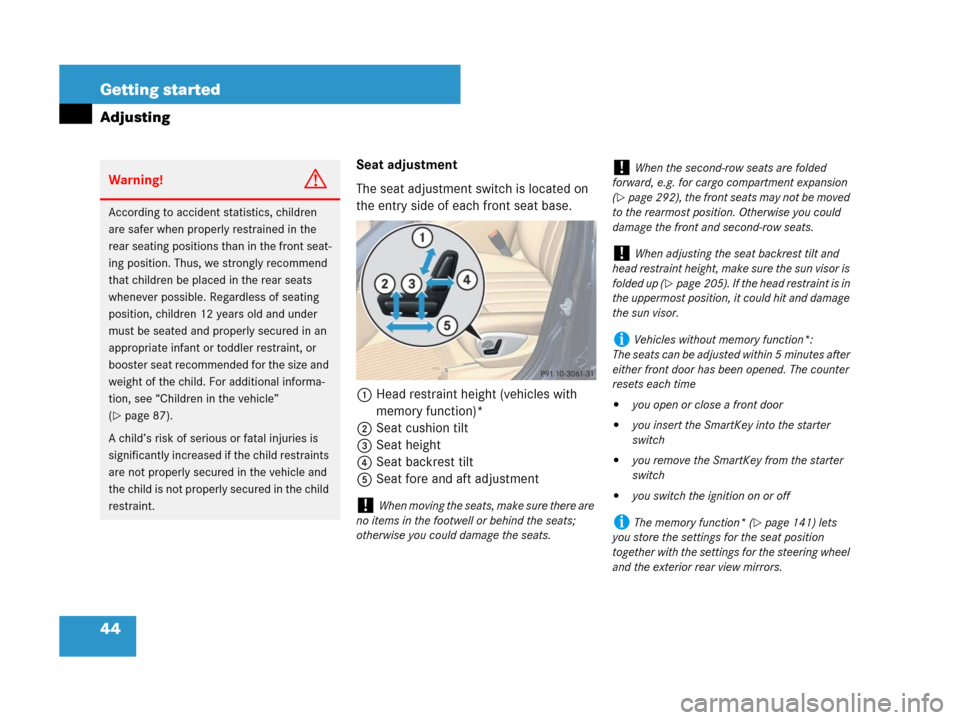
The seat adjustment switch is located on
the entry side of each front seat base.
1 Head restraint height (vehicles with
memory function)*
2Seat cushion tilt
3Seat height
4Seat backrest tilt
5 Seat fore and aft adjustment
Warning!G
According to accident statistics, children
are safer when properly restrained in the
rear seating positions than in the front seat-
ing position. Thus, we strongly recommend
that children be placed in the rear seats
whenever possible. Regardless of seating
position, children 12 years old and under
must be seated and properly secured in an
appropriate infant or toddler restraint, or
booster seat recommended for the size and
weight of the child. For additional informa-
tion, see “Children in the vehicle”
(
�page 87).
A child’s risk of serious or fatal injuries is
significantly increased if the child restraints
are not properly secured in the vehicle and
the child is not properly secured in the child
restraint.
!When moving the seats, make sure there are
no items in the footwell or behind the seats;
otherwise you could damage the seats.
!When the second-row seats are folded
forward, e.g. for cargo compartment expansion
(
�page 292), the front seats may not be moved
to the rearmost position. Otherwise you could
damage the front and second-row seats.
!When adjusting the seat backrest tilt and
head restraint height, make sure the sun visor is
folded up (
�page 205). If the head restraint is in
the uppermost position, it could hit and damage
the sun visor.
iVehicles without memory function*:
The seats can be adjusted within 5 minutes after
either front door has been opened. The counter
resets each time
�you open or close a front door
�you insert the SmartKey into the starter
switch
�you remove the SmartKey from the starter
switch
�you switch the ignition on or off
iThe memory function* (�page 141) lets
you store the settings for the seat position
together with the settings for the steering wheel
and the exterior rear view mirrors.
Page 47 of 569

46 Getting started
Adjusting
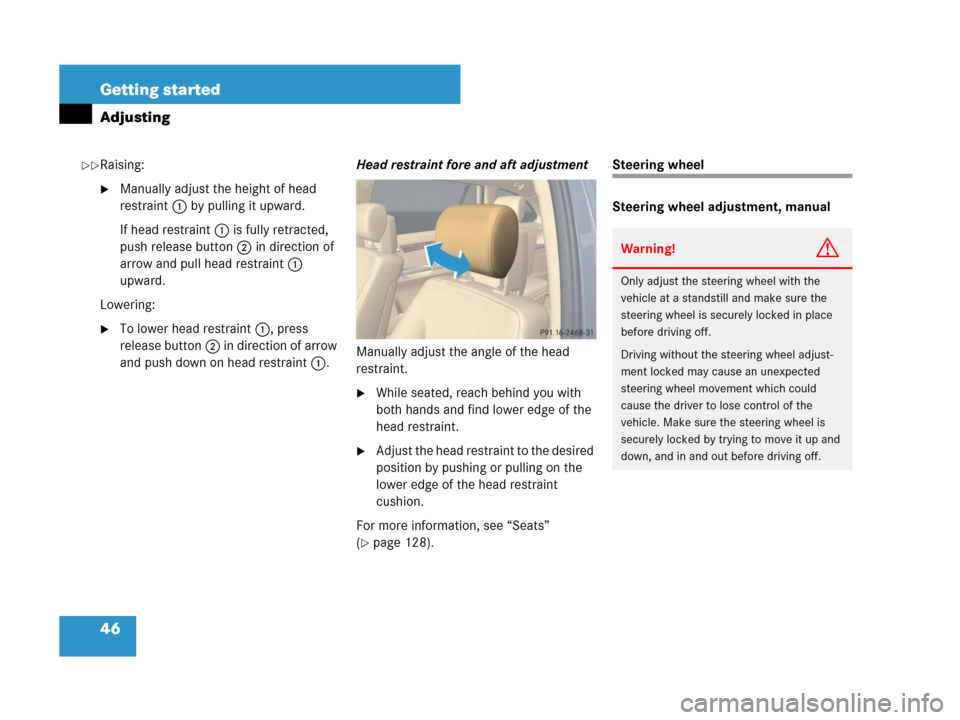
Raising:
�Manually adjust the height of head
restraint 1 by pulling it upward.
If head restraint 1 is fully retracted,
push release button 2 in direction of
arrow and pull head restraint 1
upward.
Lowering:
�To lower head restraint 1, press
release button 2 in direction of arrow
and push down on head restraint 1.Head restraint fore and aft adjustment
Manually adjust the angle of the head
restraint.
�While seated, reach behind you with
both hands and find lower edge of the
head restraint.
�Adjust the head restraint to the desired
position by pushing or pulling on the
lower edge of the head restraint
cushion.
For more information, see “Seats”
(
�page 128).
Steering wheel
Steering wheel adjustment, manual
Warning!G
Only adjust the steering wheel with the
vehicle at a standstill and make sure the
steering wheel is securely locked in place
before driving off.
Driving without the steering wheel adjust-
ment locked may cause an unexpected
steering wheel movement which could
cause the driver to lose control of the
vehicle. Make sure the steering wheel is
securely locked by trying to move it up and
down, and in and out before driving off.
��
Page 48 of 569

47 Getting started
Adjusting
Make sure that
�you can reach the steering wheel with
your arms slightly bent at the elbows
�you can move your legs freely
�all displays (including malfunction and
indicator lamps) on the instrument
cluster are clearly visible
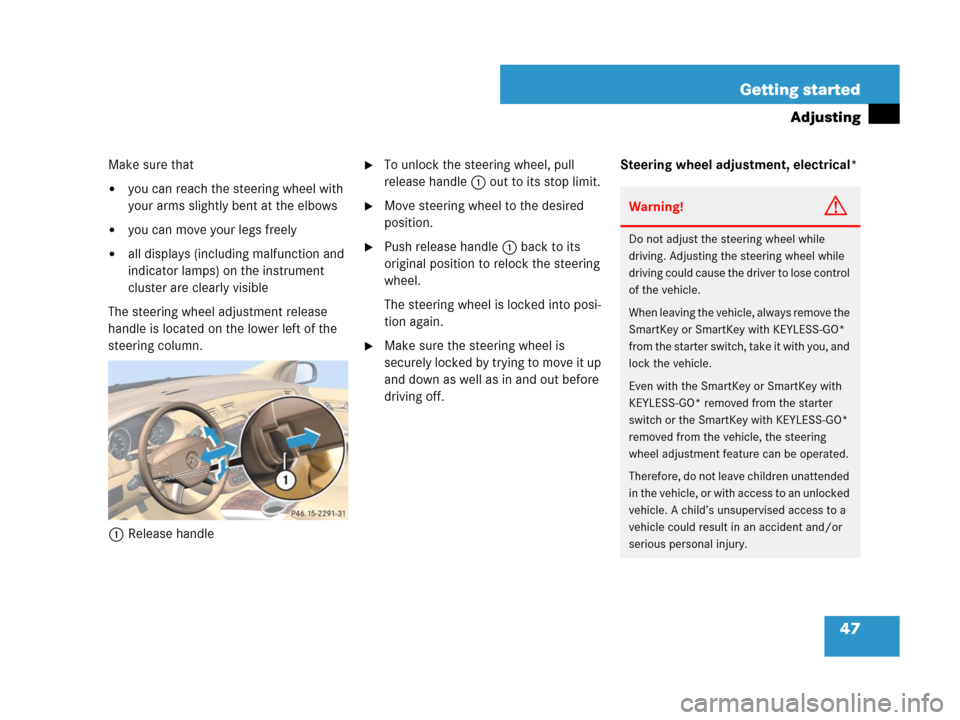
The steering wheel adjustment release
handle is located on the lower left of the
steering column.
1Release handle
�To unlock the steering wheel, pull
release handle 1 out to its stop limit.
�Move steering wheel to the desired
position.
�Push release handle 1 back to its
original position to relock the steering
wheel.
The steering wheel is locked into posi-
tion again.
�Make sure the steering wheel is
securely locked by trying to move it up
and down as well as in and out before
driving off.Steering wheel adjustment, electrical*
Warning!G
Do not adjust the steering wheel while
driving. Adjusting the steering wheel while
driving could cause the driver to lose control
of the vehicle.
When leaving the vehicle, always remove the
SmartKey or SmartKey with KEYLESS-GO*
from the starter switch, take it with you, and
lock the vehicle.
Even with the SmartKey or SmartKey with
KEYLESS-GO* removed from the starter
switch or the SmartKey with KEYLESS-GO*
removed from the vehicle, the steering
wheel adjustment feature can be operated.
Therefore, do not leave children unattended
in the vehicle, or with access to an unlocked
vehicle. A child’s unsupervised access to a
vehicle could result in an accident and/or
serious personal injury.
Page 49 of 569

48 Getting started
Adjusting
Make sure that
�you can reach the steering wheel with
your arms slightly bent at the elbows
�you can move your legs freely
�all displays (including malfunction and
indicator lamps) on the instrument
cluster are clearly visible
The steering wheel adjustment stalk is
located on the lower left of the steering
column.1Adjusting steering wheel, in or out
2Adjusting steering wheel, up or down
Adjusting steering wheel in or out
�Move stalk forward or back in direction
of arrow1.
Adjusting steering wheel up or down
�Move stalk up or down in direction of
arrow2.
Mirrors
Adjust the interior and exterior rear view
mirrors before driving so that you have
a good view of the road and traffic
conditions.
Interior rear view mirror
�Manually adjust the interior rear view
mirror.
For more information, see “Rear view
mirrors” (
�page 203).
Exterior rear view mirrors
iThe memory function* (�page 141) lets
you store the settings for the steering wheel
together with the settings for seat positions and
the exterior rear view mirrors.
Warning!G
Exercise care when using the
passenger-side exterior rear view mirror.
The mirror surface is convex (outwardly
curved surface for a wider field of view).
Objects in mirror are closer than they ap-
pear. Check your interior rear view mirror or
glance over your shoulder before changing
lanes.