Page 457 of 561

456 Practical hints
Unlocking/locking in an emergency
Locking the vehicle
If you cannot lock the vehicle with the
SmartKey or KEYLESS-GO*, lock the vehi-
cle carrying out the following steps.
�Close the front passenger door, the
rear right door and the tailgate.
�Open the driver’s door and the rear left
door.
�Press the central locking switch on the
driver’s door (
�page 126).
The locking knobs of the front passen-
ger door and the rear doors move
down.
If the vehicle battery is disconnected or
drained:
�Press down the locking knobs of
the front passenger door and the
rear doors manually.
�Exit the vehicle.
�Close the driver’s door.
�Enter the vehicle through the rear left
door.
�Press down the locking knob of the
driver’s door.
�Exit the vehicle.
�Close the rear left door.
The vehicle is locked.
Unlocking and opening the tailgate
A minimum height clearance of 7.2 ft
(2.20 m) is required to open the tailgate.If the tailgate can no longer be unlocked
and opened using the Œbutton on the
SmartKey or the KEYLESS-GO* function,
use the emergency release lever to unlock
and open the tailgate.
The emergency release lever is located on
the inside of the tailgate.
1Emergency release lever
2Cover�Remove cover2 from the trim on the
tailgate.
�Push release lever1 all the way to the
left.
�Lift the tailgate.
!To prevent inadvertent lockout, make sure
to have the SmartKey or SmartKey with
KEYLESS-GO* with you before proceeding with
the next step. The next step will lock the vehicle.
iThis procedure does not arm the anti-theft
alarm system, nor does it lock the fuel filler flap.
Page 458 of 561
.
The fuel filler flap release is located behind
a cover in the right side trim panel of the
carg")
457 Practical hints
Unlocking/locking in an emergency
Fuel filler flap
�Open the tailgate (�page 119).
The fuel filler flap release is located behind
a cover in the right side trim panel of the
cargo compartment.
1Lock
2Cover
�Insert a suitable object such as a coin
into the slot of lock1.
�Turn lock1 by 90° in direction of
arrow.
�Remove cover2.3Fuel filler flap release
�Pull yellow fuel filler flap release3 in
direction of arrow.
The fuel filler flap is unlocked.
�Open the fuel filler flap (�page 337).
!Always make sure there is sufficient over-
head clearance.
iIf the vehicle has previously been locked
from the outside using the SmartKey or
KEYLESS-GO*, opening the tailgate from the
inside using the emergency release lever will
trigger the anti-theft alarm system.
To cancel the alarm, do one of the following:
�Insert the SmartKey or the SmartKey with
KEYLESS-GO* in the starter switch.
�Press buttonŒ or‹ on the
SmartKey or the SmartKey with
KEYLESS-GO*.
In vehicles with KEYLESS-GO*:
�Pull an outside door handle.
The SmartKey with KEYLESS-GO* must be
within 3 ft (1 m) of the vehicle.
�Press the KEYLESS-GO* start/stop button
(
�page 41).
The SmartKey with KEYLESS-GO must be
inside the vehicle.
Page 462 of 561

461 Practical hints
Replacing SmartKey batteries
�Replacing SmartKey batteries
If the batteries in the SmartKey or the
SmartKey with KEYLESS-GO* are dis-
charged, the vehicle can no longer be
locked or unlocked. It is recommended to
have the batteries replaced at an autho-
rized Mercedes-Benz Light Truck Center.
Batteries contain materials that can harm
the environment if disposed of improperly.
Recycling of batteries is the preferred
method of disposal. Many states require
sellers of batteries to accept old batteries
for recycling.Replacement batteries: Lithium, type
CR 2025 or equivalent.
�Remove mechanical key1 from the
SmartKey or SmartKey with
KEYLESS-GO* (
�page 455).1Mechanical key
2Battery compartment
�Insert mechanical key1 into opening.
�Press mechanical key1 in direction of
arrow.
The battery compartment2 is
unlatched.
�Pull battery compartment2 out of the
SmartKey housing.
Warning!G
Keep the batteries out of reach of children.
If a battery is swallowed, seek medical help
immediately.
iWhen inserting the batteries, make sure
they are clean and free of lint.
iWhen replacing batteries, always replace
both batteries.
The required replacement batteries are available
at any Mercedes-Benz Light Truck Center.
��
Page 463 of 561
462 Practical hints
Replacing SmartKey batteries
3Batteries
4Contact spring
�Pull out batteries3.
�Using a line-free cloth, insert new
batteries3 under contact springs4
with the positive terminal (+) side
facing up.
�Return battery compartment2 into
housing until it locks into place.
�Slide mechanical key1 back into the
SmartKey or SmartKey with
KEYLESS-GO*.
�Check the operation of the SmartKey
or SmartKey with KEYLESS-GO*.
��
Page 476 of 561

475 Practical hints
Replacing wiper blades
�Replacing wiper blades
Front wiper blades
Removing
�Remove the SmartKey from the starter
switch.
Vehicles with KEYLESS-GO*:
�Make sure the vehicle’s on-board
electronics have status0
(
�page 42).
�Fold the wiper arms forward until they
engage.
1Wiper blade
2Cover
3Attachment
4Tab
5Removing
�Press tabs4 together and tilt wiper
blade1 to detach tabs4 on both
recesses of attachment3.
Wiper blade1 is released on one end.
�Maintaining its tilted position, slide
wiper blade1 out of attachment3 in
direction of arrow5.
Warning!G
For safety reasons, switch off wipers and
remove SmartKey from starter switch
(vehicles with KEYLESS-GO*: Make sure the
vehicle’s on-board electronics have
status
0) before replacing a wiper blade.
Otherwise the motor could suddenly turn on
and cause injury.
Warning!G
Wiper blades are components that are sub-
ject to wear and tear. Replace the wiper
blades twice a year, preferably in the spring
and fall. Otherwise the windows will not be
properly wiped. As a result, you may not be
able to observe surrounding traffic condi-
tions and could cause an accident.
!Never open the hood when the wiper arms
are folded forward.
Hold on to the wiper when folding the wiper arm
back. If released, the force of the impact from
the tensioning spring could crack the windshield.
Do not allow the wiper arms to contact the wind-
shield glass without a wiper blade inserted.
Make sure the wiper blades are properly
installed. Improperly installed wiper blades may
cause windshield damage.
For your convenience, we recommend that you
have this work carried out by an authorized
Mercedes-Benz Light Truck Center.
!Do not pull on the wiper blade inserts. They
could tear.
Page 477 of 561

476 Practical hints
Replacing wiper blades
Installing
1Installing
2Tab
3Attachment
4Guide tab
5Cover
�Slide the wiper blade into
attachment3 in direction of
arrow1.
�Make sure guide tab4 will be placed
under cover5 when fully inserting the
wiper blade into attachment.
�Let tab2 latch into both recesses of
attachment3.
�Check if the wiper blade is securely
fastened.
�Fold the wiper arm backward to rest on
the windshield.
Make sure you hold on to the wiper arm
when folding it back.
Rear wiper blade
Warning!G
For safety reasons, switch off wipers and
remove SmartKey from starter switch
(vehicles with KEYLESS-GO*: Make sure the
vehicle’s on-board electronics have
status
0) before replacing a wiper blade.
Otherwise the motor could suddenly turn on
and cause injury.
!Hold on to the wiper when folding the wiper
arm back. If released, the force of the impact
from the tensioning spring could crack the rear
window.
Do not allow the wiper arm to contact the rear
window glass without a wiper blade inserted.
Make sure the wiper blade is properly installed.
Improperly installed wiper blades may cause
rear window damage.
For your convenience, we recommend that you
have this work carried out by an authorized
Mercedes-Benz Light Truck Center.
Page 478 of 561
477 Practical hints
Replacing wiper blades
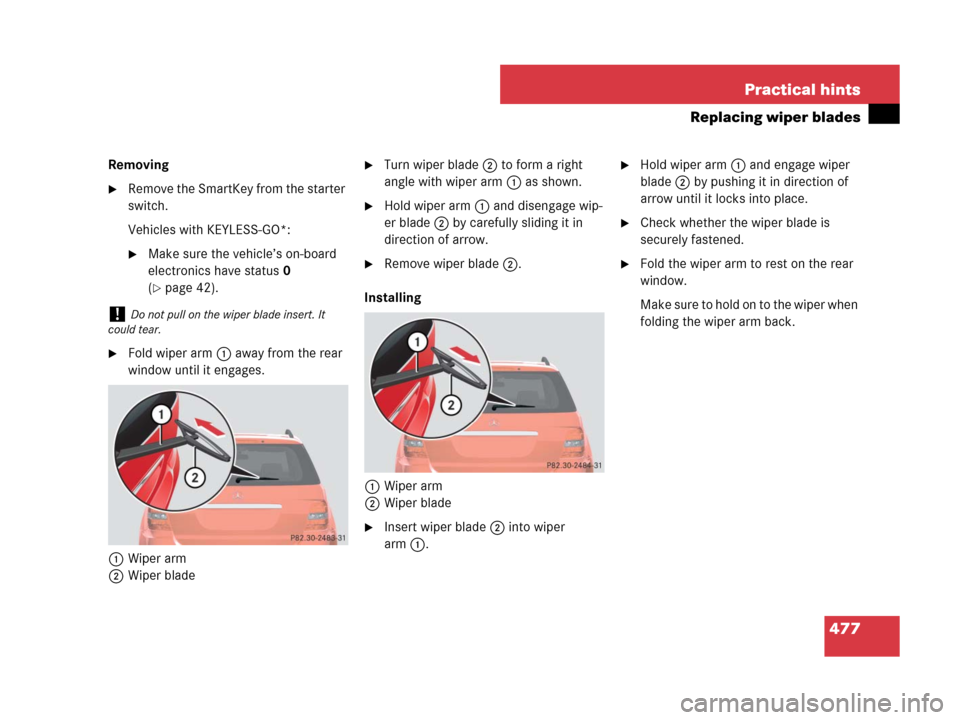
Removing
�Remove the SmartKey from the starter
switch.
Vehicles with KEYLESS-GO*:
�Make sure the vehicle’s on-board
electronics have status0
(
�page 42).
�Fold wiper arm1 away from the rear
window until it engages.
1Wiper arm
2Wiper blade
�Turn wiper blade2 to form a right
angle with wiper arm1 as shown.
�Hold wiper arm1 and disengage wip-
er blade2 by carefully sliding it in
direction of arrow.
�Remove wiper blade2.
Installing
1Wiper arm
2Wiper blade
�Insert wiper blade2 into wiper
arm1.
�Hold wiper arm1 and engage wiper
blade2 by pushing it in direction of
arrow until it locks into place.
�Check whether the wiper blade is
securely fastened.
�Fold the wiper arm to rest on the rear
window.
Make sure to hold on to the wiper when
folding the wiper arm back.
!Do not pull on the wiper blade insert. It
could tear.
Page 479 of 561
.
�Park the vehicle in a safe distance from
mov")
478 Practical hints
Flat tire
Preparing the vehicle
�Vehicles with air suspension program*:
Make sure the vehicle level is set to
highway (
�page 257).
�Park the vehicle in a safe distance from
moving traffic on a hard, flat surface
when possible.
�Turn on the hazard warning flasher
(
�page 141).
�Turn the steering wheel so that the
front wheels are in a straight-ahead
position.
�Set the parking brake (�page 57).
�Set the automatic transmission to park
positionP (
�page 185).
�Turn off the engine (�page 39).
�Have any passenger exit the vehicle at
a safe distance from the roadway.
�Vehicles with SmartKey: Remove the
SmartKey from the starter switch.
Vehicles with KEYLESS-GO*: Open the
driver’s door (this puts the starter
switch in position0, same as with the
SmartKey removed from the starter
switch). The driver’s door then can be
closed again.
�Remove the KEYLESS-GO*
start/stop button from the starter
switch.
Warning!G
The dimensions of the spare wheel
(Minispare wheel or collapsible tire) are dif-
ferent from those of the road wheels. As a
result, the vehicle handling characteristics
change when driving with a spare wheel
mounted. Adapt your driving style accord-
ingly.
The spare wheel is for temporary use only.
When driving with a spare wheel mounted,
ensure proper tire pressure and do not ex-
ceed a vehicle speed of 50 mph (80 km/h).
Drive to the nearest Mercedes-Benz Light
Truck Center as soon as possible to have the
spare wheel replaced with a regular road
wheel.
Never operate the vehicle with more than
one spare wheel mounted.
Do not switch off the ESP
® when a
Minispare wheel is mounted.
Warning!G
Vehicles with air suspension program*:
Do not open or close any doors or the
tailgate while mounting a spare wheel. The
vehicle could rise or lower to a previously
selected level. You or others could be
injured as a result.
iOpen door only when conditions are safe to
do so.