Page 476 of 561

475 Practical hints
Replacing wiper blades
�Replacing wiper blades
Front wiper blades
Removing
�Remove the SmartKey from the starter
switch.
Vehicles with KEYLESS-GO*:
�Make sure the vehicle’s on-board
electronics have status0
(
�page 42).
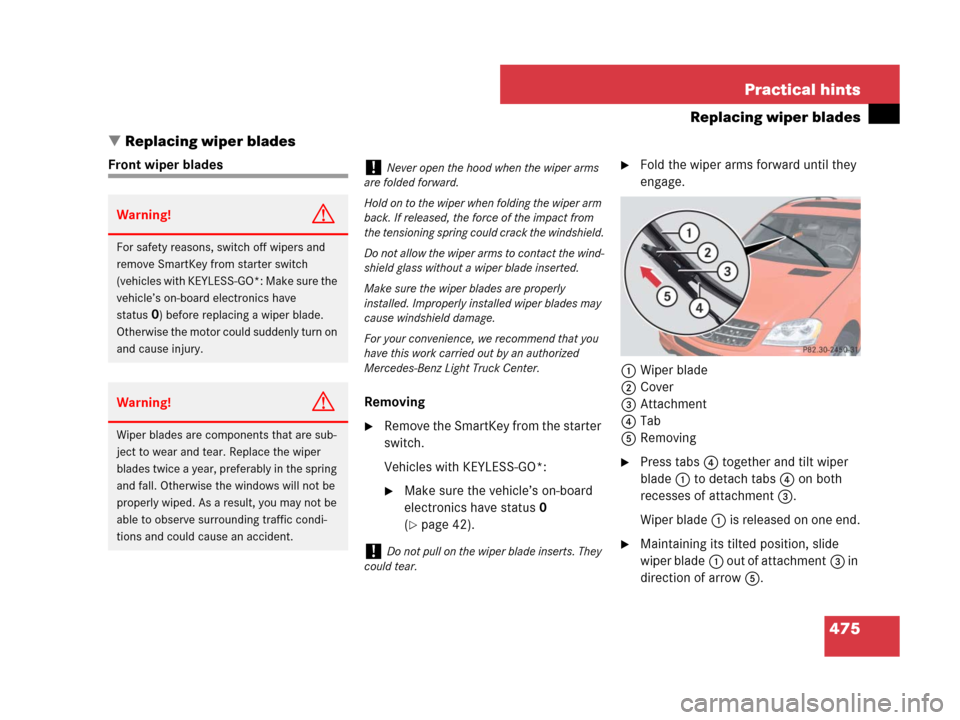
�Fold the wiper arms forward until they
engage.
1Wiper blade
2Cover
3Attachment
4Tab
5Removing
�Press tabs4 together and tilt wiper
blade1 to detach tabs4 on both
recesses of attachment3.
Wiper blade1 is released on one end.
�Maintaining its tilted position, slide
wiper blade1 out of attachment3 in
direction of arrow5.
Warning!G
For safety reasons, switch off wipers and
remove SmartKey from starter switch
(vehicles with KEYLESS-GO*: Make sure the
vehicle’s on-board electronics have
status
0) before replacing a wiper blade.
Otherwise the motor could suddenly turn on
and cause injury.
Warning!G
Wiper blades are components that are sub-
ject to wear and tear. Replace the wiper
blades twice a year, preferably in the spring
and fall. Otherwise the windows will not be
properly wiped. As a result, you may not be
able to observe surrounding traffic condi-
tions and could cause an accident.
!Never open the hood when the wiper arms
are folded forward.
Hold on to the wiper when folding the wiper arm
back. If released, the force of the impact from
the tensioning spring could crack the windshield.
Do not allow the wiper arms to contact the wind-
shield glass without a wiper blade inserted.
Make sure the wiper blades are properly
installed. Improperly installed wiper blades may
cause windshield damage.
For your convenience, we recommend that you
have this work carried out by an authorized
Mercedes-Benz Light Truck Center.
!Do not pull on the wiper blade inserts. They
could tear.
Page 499 of 561

498 Practical hints
Jump starting
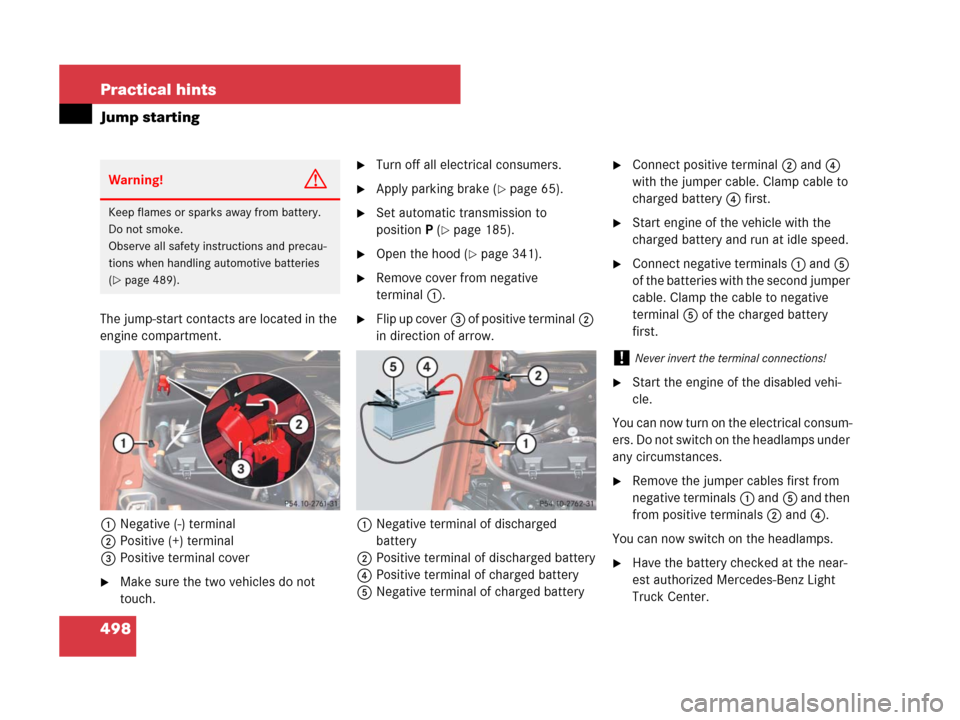
The jump-start contacts are located in the
engine compartment.
1Negative (-) terminal
2Positive (+) terminal
3Positive terminal cover
�Make sure the two vehicles do not
touch.
�Turn off all electrical consumers.
�Apply parking brake (�page 65).
�Set automatic transmission to
positionP (
�page 185).
�Open the hood (�page 341).
�Remove cover from negative
terminal1.
�Flip up cover3 of positive terminal2
in direction of arrow.
1Negative terminal of discharged
battery
2Positive terminal of discharged battery
4Positive terminal of charged battery
5Negative terminal of charged battery
�Connect positive terminal2 and4
with the jumper cable. Clamp cable to
charged battery4 first.
�Start engine of the vehicle with the
charged battery and run at idle speed.
�Connect negative terminals1 and5
of the batteries with the second jumper
cable. Clamp the cable to negative
terminal5 of the charged battery
first.
�Start the engine of the disabled vehi-
cle.
You can now turn on the electrical consum-
ers. Do not switch on the headlamps under
any circumstances.
�Remove the jumper cables first from
negative terminals1 and5 and then
from positive terminals2 and4.
You can now switch on the headlamps.
�Have the battery checked at the near-
est authorized Mercedes-Benz Light
Truck Center.
Warning!G
Keep flames or sparks away from battery.
Do not smoke.
Observe all safety instructions and precau-
tions when handling automotive batteries
(
�page 489).
!Never invert the terminal connections!
Page 506 of 561
505 Practical hints
Fuses
Fuse box in engine compartment
The fuse box is located on the passenger
side of the engine compartment.
�Open the hood (�page 341).
Example illustration fuse box ML 350
(ML 320 CDI, ML 550, ML 63 AMG similar)
1Fuse box cover
2Clamps
�Pull clamps2 in direction of arrow.
�Lift fuse box cover1 up.
�Install fuse box cover in reverse order.
�Close the hood after checking or
replacing fuses (
�page 343).
Fuse box in cargo compartment
The fuse box is located in the cargo com-
partment behind the passenger side trim
panel.
1Lock
2CoverRemoving/installing cover
�Open the tailgate (�page 119).
�Insert a suitable object such as a coin
into the slot of lock1 (
�page 505).
�Turn lock1 counterclockwise by 90°
in direction of arrow.
�Remove cover2.
�Install cover2 in reverse order.
!The fuse box cover must be installed
properly to prevent moisture and/or dirt from
entering the fuse box and possibly impairing fuse
operation.
Page 541 of 561

540 Index
High beam flasher 59, 140
High beam headlamps
Indicator lamp 29
Messages in the multifunction
display 439
Replacing bulbs 464, 466, 467
Switching on 59, 139
High mounted brake lamp 464
Hood 341
Messages in the multifunction
display 435
Opening 341
Hooks
Loading 269
Horn 25
HVAC see Climate control or
automatic climate control (3-zone)*
Hydroplaning 316I
Identification labels see Labels
Ignition 40, 42, 55
Immobilizer 106
Infant and child restraint systems see
Children in the vehicle
Inflation pressure see Tires,
Inflation pressures
Information button see Tele Aid
Infrared reflecting windshield* 308
Inside door handle 118
Instrument cluster 26, 28, 145
Illumination brightness 145
Lamps 400
Messages in display see Multifunction
display messages
Multifunction display 147
Outside temperature indicator 146
Selecting language 167
Instrument lighting see Instrument cluster,
Illumination brightness 145
Instrument panel see Instrument cluster
Instruments and controls see CockpitInterior lighting 142
Delayed shut-off 172
Interior rear view mirror 49
Antiglare positions 199
Auto-dimming mirrors* 199
Interior storage spaces see
Storage compartments
Intermittent wiping
Windshield wipers 61
J
Jack 450, 451
Lifting the vehicle 479
Jump starting 497
K
Key, Mechanical 455
Key, SmartKey 110
Batteries 461
Battery check lamp 110
Closing the power windows
(Convenience closing feature) 238
Closing the tilt/sliding sunroof
(Convenience closing feature) 238
Closing, Power tailgate* 123
Factory setting 112
Page:
< prev 1-8 9-16 17-24