Page 469 of 561

468 Practical hints
Replacing bulbs
�Turn cover1 counterclockwise.
�Remove cover1.
�Turn bulb socket2 counterclockwise.
�Pull bulb socket2 out of the
headlamp housing.
�Pull the high beam bulb out of bulb
socket2.
�Insert the new high beam bulb into bulb
socket2.
�Insert bulb socket2 into the
headlamp housing.
�Turn bulb socket2 clockwise until it
engages.
�Place cover1 on the opening in the
headlamp housing.
�Turn cover1 clockwise until it engag-
es.Turn signal lamp bulb
1Bulb socket for turn signal lamp
�Turn bulb socket1 counterclockwise.
�Pull bulb socket1 out of the
headlamp housing.
�Pull the turn signal bulb out of bulb
socket1.
�Insert the new turn signal bulb into bulb
socket1.
�Insert bulb socket1 into the
headlamp housing.
�Turn bulb socket1 clockwise until it
engages.Parking and standing lamp bulb
�Turn bulb socket3 (�page 466)
counterclockwise.
�Pull bulb socket3 out of the
headlamp housing.
�Pull the bulb out of bulb socket3.
�Insert the new bulb into bulb
socket3.
�Insert bulb socket3 into the
headlamp housing.
�Turn bulb socket3 clockwise until it
engages.
Page 470 of 561

counterclockwise.
�Pull bulb socket5 out of the
headlamp housing.
�Pull the side marker bulb out of bulb
soc")
469 Practical hints
Replacing bulbs
Side marker lamp bulb
�Turn bulb socket5 (�page 466)
counterclockwise.
�Pull bulb socket5 out of the
headlamp housing.
�Pull the side marker bulb out of bulb
socket5.
�Insert the new side marker bulb into
bulb socket5.
�Insert bulb socket5 into the
headlamp housing.
�Turn bulb socket5 clockwise until it
engages.Front fog lamp bulbs
Removing front fog lamp cover:
1Cover
2Front fog lamp or corner-illuminating
front fog lamp*
�Insert a suitable object (e.g. screwdriv-
er) at point indicated by the arrow and
pry out cover1.
Cover1 is released.
�Swing cover1 outwards and take it
off.
Removing front fog lamp cover (Vehicles
with AMG Sport Package* or ML 63 AMG):
1Cover
2Front fog lamp
�Use a suitable object (e.g. hook or a
screwdriver) and place the hook or
screwdriver carefully between lower
end of cover and bumper.
!If not done carefully and properly, damage
to the bumper can result. We therefore recom-
mend that you have this work carried out by an
authorized Mercedes-Benz Light Truck Center.
��
Page 471 of 561

470 Practical hints
Replacing bulbs
�Turn the hook or screwdriver 90°.
�Hold the cover1 and pull the hook or
screwdriver outwards.
You can now access the front fog lamp.
Example illustration ML350 (Sport Package
similar)
3Retaining screws
�Turn retaining screws3 counterclock-
wise.
�Remove front fog lamp2 out of the
bumper.
�Pull electrical connector off.4Bulb socket of front fog lamp bulb
�Turn bulb socket4 counterclockwise.
�Pull bulb socket4 out of the housing.
�Pull the front fog lamp bulb out of bulb
socket4.
�Insert the new front fog lamp bulb into
bulb socket4.
�Insert bulb socket4 into the housing.
�Turn bulb socket4 clockwise until it
engages.
�Plug in the electrical connector.
�Insert front fog lamp2 back into
bumper.
�Fasten retaining screws3.
�Reinsert cover1 and press it in until it
engages.
Additional turn signal lamps bulbs
The additional turn signal lamps in the
exterior rear view mirrors have LEDs.
If a malfunction occurs or LEDs fail to func-
tion, the entire turn signal unit must be re-
placed. Have the turn signal unit replaced
by an authorized Mercedes-Benz Light
Truck Center.
��
Page 472 of 561
471 Practical hints
Replacing bulbs
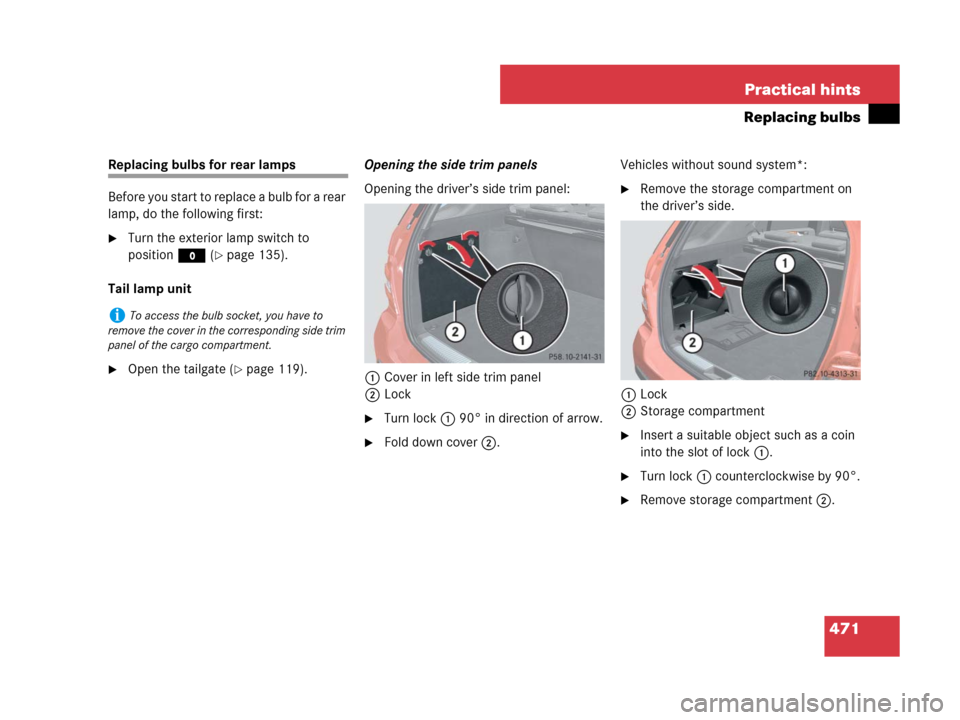
Replacing bulbs for rear lamps
Before you start to replace a bulb for a rear
lamp, do the following first:
�Turn the exterior lamp switch to
positionM (
�page 135).
Tail lamp unit
�Open the tailgate (�page 119).Opening the side trim panels
Opening the driver’s side trim panel:
1Cover in left side trim panel
2Lock
�Turn lock1 90° in direction of arrow.
�Fold down cover2.Vehicles without sound system*:
�Remove the storage compartment on
the driver’s side.
1Lock
2Storage compartment
�Insert a suitable object such as a coin
into the slot of lock1.
�Turn lock1 counterclockwise by 90°.
�Remove storage compartment2.
iTo access the bulb socket, you have to
remove the cover in the corresponding side trim
panel of the cargo compartment.
Page 473 of 561
472 Practical hints
Replacing bulbs
Opening the passenger side trim panel:
1Lock
2Cover in right side trim panel
�Insert a suitable object such as a coin
into the slot of lock1.
�Turn lock1 counterclockwise by 90°
in direction of arrow.
�Remove cover2.Replacing bulbs
Example illustration rear lamp passen-
ger-side
1Brake lamp
2Backup lamp
3Rear fog lamp (only driver’s side), tail
lamp, parking and standing lamp
4Side marker lamp
5Turn signal lamp
�Depending on which bulb needs to be
replaced, turn the respective bulb
socket1-5 counterclockwise.
�Press gently onto the respective bulb
and turn counterclockwise out of its
bulb socket.
�Press the new bulb gently into its bulb
socket and turn clockwise until it en-
gages.
�Align the respective bulb
socket1-5 and turn it clockwise.
�Make sure bulb socket is attached
properly.
�Close the respective cover in the cargo
compartment.
�Close the tailgate (�page 119).
Page 475 of 561
474 Practical hints
Replacing bulbs
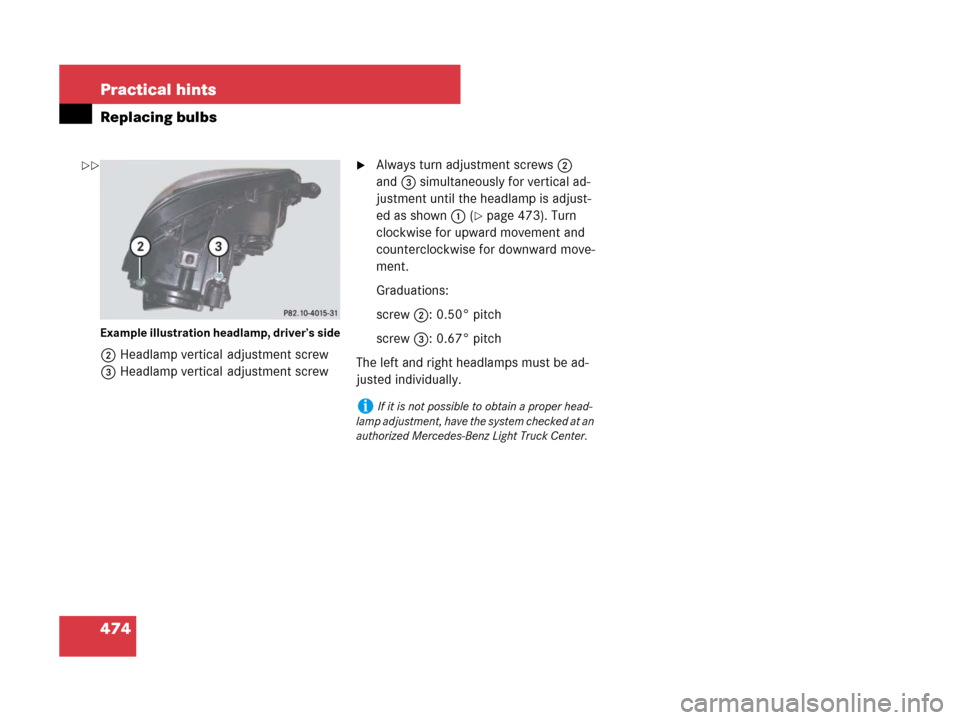
Example illustration headlamp, driver’s side
2Headlamp vertical adjustment screw
3Headlamp vertical adjustment screw
�Always turn adjustment screws2
and3 simultaneously for vertical ad-
justment until the headlamp is adjust-
ed as shown1 (
�page 473). Turn
clockwise for upward movement and
counterclockwise for downward move-
ment.
Graduations:
screw2: 0.50° pitch
screw3: 0.67° pitch
The left and right headlamps must be ad-
justed individually.
iIf it is not possible to obtain a proper head-
lamp adjustment, have the system checked at an
authorized Mercedes-Benz Light Truck Center.
��
Page 478 of 561
477 Practical hints
Replacing wiper blades
Removing
�Remove the SmartKey from the starter
switch.
Vehicles with KEYLESS-GO*:
�Make sure the vehicle’s on-board
electronics have status0
(
�page 42).
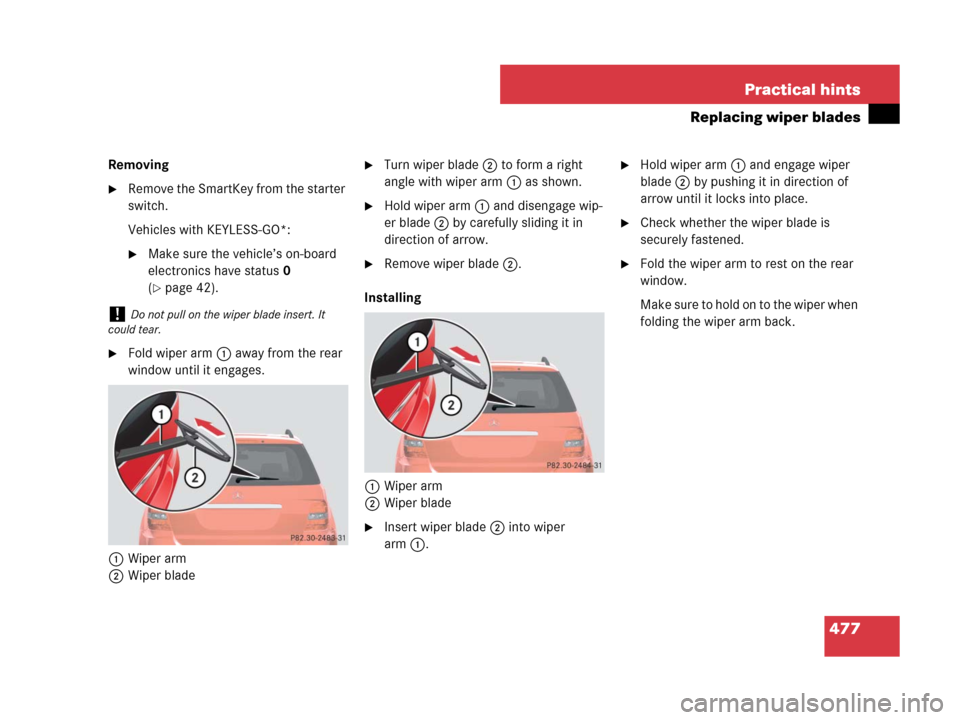
�Fold wiper arm1 away from the rear
window until it engages.
1Wiper arm
2Wiper blade
�Turn wiper blade2 to form a right
angle with wiper arm1 as shown.
�Hold wiper arm1 and disengage wip-
er blade2 by carefully sliding it in
direction of arrow.
�Remove wiper blade2.
Installing
1Wiper arm
2Wiper blade
�Insert wiper blade2 into wiper
arm1.
�Hold wiper arm1 and engage wiper
blade2 by pushing it in direction of
arrow until it locks into place.
�Check whether the wiper blade is
securely fastened.
�Fold the wiper arm to rest on the rear
window.
Make sure to hold on to the wiper when
folding the wiper arm back.
!Do not pull on the wiper blade insert. It
could tear.
Page 481 of 561

480 Practical hints
Flat tire
�Prevent the vehicle from rolling away
by blocking wheels with wheel chocks
or other sizeable objects.One collapsible wheel chock is includ-
ed with the vehicle tool kit
(
�page 448). For information on set-
ting up the collapsible wheel chock,
see (
�page 452).
Changing wheel on a level surface
Changing rear wheel on passenger side
(Example illustration)
�Place the wheel chock in front of and
another sizeable object behind the
wheel that is diagonally opposite to the
wheel being changed.
Changing wheel on a slight decline
Always try lifting the vehicle using the jack
on a level surface. However, should
circumstances require you to do so on a
slight decline, place the wheel chock and
another sizeable object as follows:
Changing wheel on passenger side
(Example illustration)
Always firmly set parking brake and block
wheels with wheel chocks or other sizeable
objects before raising vehicle with jack. Do
not disengage parking brake while the vehi-
cle is raised.
Make sure that the ground on which the ve-
hicle is standing and where you place the
jack is solid, level and not slippery. If neces-
sary, use a large underlay. On slippery sur-
faces, such as tiled floors, you should use a
non-slip underlay, for example a rubber mat.
Do not use wooden blocks or similar objects
to support the jack. Otherwise the jack may
not be able to achieve its load-bearing ca-
pacity if it is not at its full height.
Never start the engine when the vehicle is
raised.
Also observe the notes on the jack.
Warning!G
Only jack up the vehicle on level ground or
on slight inclines/declines. Otherwise, the
vehicle could fall off the jack and injure you
or others.
��