Page 446 of 561
445 Practical hints
What to do if …
Display symbolDisplay messagePossible cause/consequencePossible solution
HTire Pressure(s)
Please CorrectVehicles with Advanced TPMS*:
The pressure is too low in one or
more tires.�Check and correct tire inflation pressure as
required.
Tire Pressure
Caution - Tire DefectOne or more tires are deflating.�Carefully bring the vehicle to a halt, avoiding
abrupt steering and braking maneuvers.
�If necessary, change the wheel.
Caution: Tire DefectOne or more tires are deflating.
Vehicles with Advanced TPMS*:
The respective tire is indicated in
the multifunction display.�Carefully bring the vehicle to a halt, avoiding
abrupt steering and braking maneuvers.
�If necessary, change the wheel.
Warning!G
Do not drive with a flat tire. A flat tire affects
the ability to steer or brake the vehicle. You
may lose control of the vehicle. Continued
driving with a flat tire will cause excessive
heat build-up and possibly a fire.
Page 447 of 561

446 Practical hints
What to do if …
Display symbolDisplay messagePossible cause/consequencePossible solution
HTire Pressure
Check TiresThe tire pressure in one or more tires is
already below the minimum value.�Carefully bring the vehicle to a halt, avoiding
abrupt steering and braking maneuvers.
�Check and adjust tire pressure as required
(
�page 359).
�If necessary, change the wheel
(
�page 478).
Check TiresThe tire pressure in one or more tires is
already below the minimum value.
Vehicles with Advanced TPMS*:
The respective tire is indicated in the
multifunction display.�Carefully bring the vehicle to a halt, avoiding
abrupt steering and braking maneuvers.
�Check and adjust tire pressure as required
(
�page 359).
�If necessary, change the wheel
(
�page 478).
Warning!G
Do not drive with a flat tire. A flat tire affects
the ability to steer or brake the vehicle.
You may lose control of the vehicle. Contin-
ued driving with a flat tire will cause exces-
sive heat build-up and possibly a fire.
Page 453 of 561

452 Practical hints
Where will I find ...?
Setting up the collapsible wheel chock
The collapsible wheel chock serves to ad-
ditionally secure the vehicle, e.g. while
changing the wheel.
1Tilt the plate upward
2Fold the lower plate outward
3Insert the plate�Tilt both plates upward1.
�Fold the lower plate outward2.
�Guide the tabs of the lower plate all the
way into the openings of base plate3.
For information on where to place wheel
chocks when changing a wheel, see “Lift-
ing the vehicle” (
�page 479).
Minispare wheel (except ML 63 AMG)
Warning!G
The dimensions of the Minispare wheel are
different from those of the road wheels. As
a result, the vehicle handling characteristics
change when driving with a Minispare wheel
mounted. Adapt your driving style accord-
ingly.
The Minispare wheel is for temporary use
only. When driving with a Minispare wheel
mounted, ensure proper tire inflation
pressure and do not exceed a vehicle speed
of 50 mph (80 km/h).
Drive to the nearest Mercedes-Benz Light
Truck Center as soon as possible to have the
Minispare wheel replaced with a regular
road wheel.
Never operate the vehicle with more than
one spare wheel mounted.
Do not switch off the ESP
® when a
Minispare wheel is mounted.
Page 454 of 561
.
Removing Minispare wheel
1Retaining screw
2Storage well casing
3Minispa")
453 Practical hints
Where will I find ...?
The Minispare wheel is located underneath
the cargo compartment floor
(
�page 448).
Removing Minispare wheel
1Retaining screw
2Storage well casing
3Minispare wheelFor access the Minispare wheel, see “Vehi-
cle tool kit” (
�page 448).
�Loosen retaining screw1 by turning it
counterclockwise.
�Remove storage well casing2.
�Remove Minispare wheel3.
Collapsible tire (ML 63 AMG only)
iFor information on how to mount the
Minispare wheel, see “Mounting the spare
wheel” (
�page 479).
iRemove Minispare wheel to gain access to
remaining tools in the vehicle tool kit
(
�page 448).
Warning!G
The dimensions of the collapsible tire are
different from those of the road wheels. As
a result, the vehicle handling characteristics
change when driving with a collapsible tire
mounted. Adapt your driving style accord-
ingly.
The collapsible tire is for temporary use
only. When driving with a collapsible tire
mounted, ensure proper tire inflation
pressure and do not exceed a vehicle speed
of 50 mph (80 km/h).
Drive to the nearest Mercedes-Benz Light
Truck Center as soon as possible to have the
collapsible tire replaced with a regular road
wheel.
Never operate the vehicle with more than
one collapsible tire mounted.
Do not switch off the ESP
® when a
collapsible tire is mounted.
Page 472 of 561
471 Practical hints
Replacing bulbs
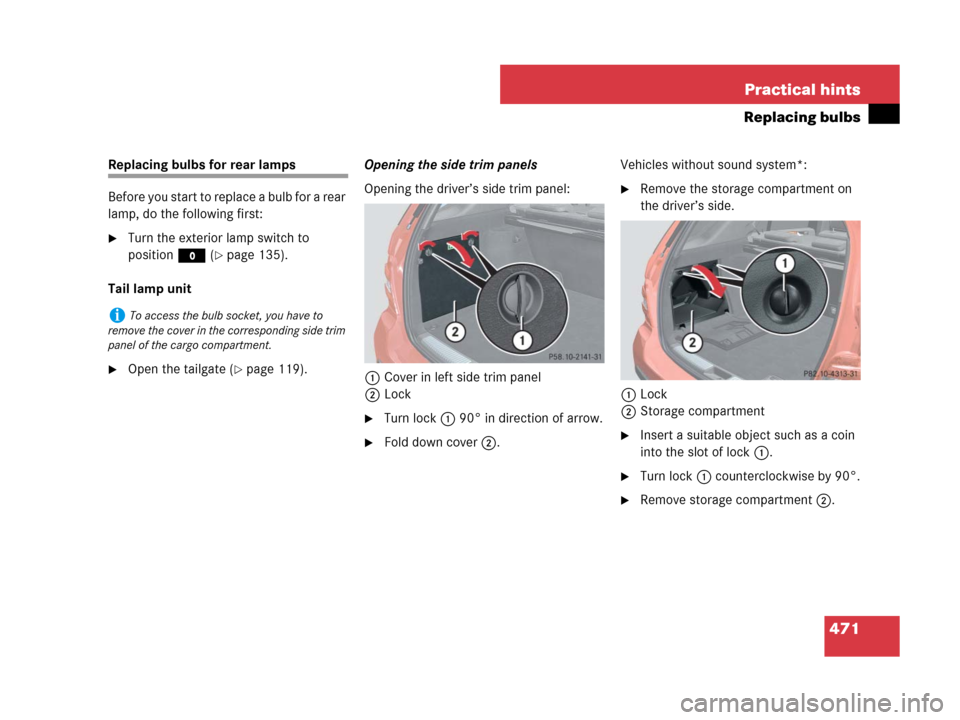
Replacing bulbs for rear lamps
Before you start to replace a bulb for a rear
lamp, do the following first:
�Turn the exterior lamp switch to
positionM (
�page 135).
Tail lamp unit
�Open the tailgate (�page 119).Opening the side trim panels
Opening the driver’s side trim panel:
1Cover in left side trim panel
2Lock
�Turn lock1 90° in direction of arrow.
�Fold down cover2.Vehicles without sound system*:
�Remove the storage compartment on
the driver’s side.
1Lock
2Storage compartment
�Insert a suitable object such as a coin
into the slot of lock1.
�Turn lock1 counterclockwise by 90°.
�Remove storage compartment2.
iTo access the bulb socket, you have to
remove the cover in the corresponding side trim
panel of the cargo compartment.
Page 473 of 561
472 Practical hints
Replacing bulbs
Opening the passenger side trim panel:
1Lock
2Cover in right side trim panel
�Insert a suitable object such as a coin
into the slot of lock1.
�Turn lock1 counterclockwise by 90°
in direction of arrow.
�Remove cover2.Replacing bulbs
Example illustration rear lamp passen-
ger-side
1Brake lamp
2Backup lamp
3Rear fog lamp (only driver’s side), tail
lamp, parking and standing lamp
4Side marker lamp
5Turn signal lamp
�Depending on which bulb needs to be
replaced, turn the respective bulb
socket1-5 counterclockwise.
�Press gently onto the respective bulb
and turn counterclockwise out of its
bulb socket.
�Press the new bulb gently into its bulb
socket and turn clockwise until it en-
gages.
�Align the respective bulb
socket1-5 and turn it clockwise.
�Make sure bulb socket is attached
properly.
�Close the respective cover in the cargo
compartment.
�Close the tailgate (�page 119).
Page 479 of 561
.
�Park the vehicle in a safe distance from
mov")
478 Practical hints
Flat tire
Preparing the vehicle
�Vehicles with air suspension program*:
Make sure the vehicle level is set to
highway (
�page 257).
�Park the vehicle in a safe distance from
moving traffic on a hard, flat surface
when possible.
�Turn on the hazard warning flasher
(
�page 141).
�Turn the steering wheel so that the
front wheels are in a straight-ahead
position.
�Set the parking brake (�page 57).
�Set the automatic transmission to park
positionP (
�page 185).
�Turn off the engine (�page 39).
�Have any passenger exit the vehicle at
a safe distance from the roadway.
�Vehicles with SmartKey: Remove the
SmartKey from the starter switch.
Vehicles with KEYLESS-GO*: Open the
driver’s door (this puts the starter
switch in position0, same as with the
SmartKey removed from the starter
switch). The driver’s door then can be
closed again.
�Remove the KEYLESS-GO*
start/stop button from the starter
switch.
Warning!G
The dimensions of the spare wheel
(Minispare wheel or collapsible tire) are dif-
ferent from those of the road wheels. As a
result, the vehicle handling characteristics
change when driving with a spare wheel
mounted. Adapt your driving style accord-
ingly.
The spare wheel is for temporary use only.
When driving with a spare wheel mounted,
ensure proper tire pressure and do not ex-
ceed a vehicle speed of 50 mph (80 km/h).
Drive to the nearest Mercedes-Benz Light
Truck Center as soon as possible to have the
spare wheel replaced with a regular road
wheel.
Never operate the vehicle with more than
one spare wheel mounted.
Do not switch off the ESP
® when a
Minispare wheel is mounted.
Warning!G
Vehicles with air suspension program*:
Do not open or close any doors or the
tailgate while mounting a spare wheel. The
vehicle could rise or lower to a previously
selected level. You or others could be
injured as a result.
iOpen door only when conditions are safe to
do so.
Page 490 of 561

489 Practical hints
Battery
�Battery
The battery is located under the front
passenger seat.
The battery should always be sufficiently
charged in order to achieve its rated ser-
vice life.
If you use your vehicle mostly for
short-distance trips, you will need to have
the battery charge checked more
frequently.
When replacing the battery, always use
batteries approved by Mercedes-Benz.
If you do not intend to operate your vehicle
for an extended period of time, consult an
authorized Mercedes-Benz Light Truck
Center about steps you need to observe.Batteries contain materials that can harm
the environment if disposed of improperly.
Recycling of batteries is the preferred
method of disposal. Many states require
sellers of batteries to accept old batteries
for recycling.
iMercedes-Benz recommends to have the
battery replaced at an authorized
Mercedes-Benz Light Truck Center.
Warning!G
Observe all safety instructions and precau-
tions when handling automotive batteries.
Risk of explosion.
Fire, open flames and smoking
are prohibited when handling
batteries. Avoid creating sparks.
Battery acid is caustic. Do not
allow it to come into contact
with skin, eyes or clothing.
Wear suitable protective cloth-
ing, especially gloves, apron and
faceguard.
Wear eye protection.
Rinse any acid spills immediate-
ly with clear water. Contact a
physician if necessary.
Keep children away.
Follow the instructions in this
Operator’s Manual.

Please CorrectVehicles with Advanced TPMS*:
The pressure is too low in")