Page 68 of 561

67 Getting started
Parking and locking
Turning off with the SmartKey
�Turn the SmartKey in the starter switch
to position0 (
�page 39).
�Remove the SmartKey from the starter
switch.
The immobilizer is activated.Turning off with KEYLESS-GO*
�Press the KEYLESS-GO start/stop
button (
�page 41) to turn off the
engine.
With the driver’s door closed, the start-
er switch is now in position1. With the
driver’s door opened, the starter switch
is set to position0, same as SmartKey
removed from starter switch
(
�page 39).If you have started the engine with the
KEYLESS-GO start/stop button and can-
not turn it off as described above:
�Remove the KEYLESS-GO start/stop
button from the starter switch.
�Insert the SmartKey with KEYLESS-GO
into the starter switch.
The engine turns off. The starter switch
is in position0 (
�page 39).
!Observe instructions when taking the
vehicle through an automatic conveyor type
car wash (
�page 392).
!If you turn off the engine using the
SmartKey and
�remove the SmartKey from the starter
switch
or
�open a front door
the automatic transmission will shift to park
positionP automatically.
Keep in mind that turning off the engine with the
SmartKey alone only will automatically shift the
automatic transmission to neutral positionN.
iIn an emergency you can turn off the engine
while driving by pressing and holding the
KEYLESS-GO start/stop button for
approximately 3 seconds.
!If you turn off the engine using the
KEYLESS-GO start/stop button and open a front
door, the automatic transmission will shift to
park positionP automatically.
Keep in mind that turning off the engine using
the KEYLESS-GO start/stop button alone only
will automatically shift the automatic transmis-
sion to neutral positionN.
Page 69 of 561

68 Getting started
Parking and locking
Releasing seat belts
�Press the seat belt release button
(
�page 52).
Allow the retractor to completely re-
wind the seat belt by guiding the latch
plate.
Locking
�Exit the vehicle and close all doors and
the tailgate.
!Make sure the seat belt retracts fully so that
the seat belt and/or latch plate cannot get
caught or pinched in the door or in the seat
mechanism. This can damage the seat belt and
impair the effectiveness of the seat belt, and/or
cause damage to the door and/or door trim
panel. Such damage is not covered by the
Mercedes-Benz Limited Warranty.
Damaged seat belts must be replaced. Contact
an authorized Mercedes-Benz Light Truck
Center.
Warning!G
To prevent possible personal injury, always
keep hands and fingers away from the door
openings when closing the doors. Be espe-
cially careful when small children are
around.
Before closing doors, make sure there is no
possibility of someone getting caught in a
door during closing.
Warning!G
When leaving the vehicle, always remove the
SmartKey from the starter switch, take the
SmartKey with KEYLESS-GO* with you, and
lock your vehicle. Do not leave children un-
attended in the vehicle, or with access to an
unlocked vehicle. A child’s unsupervised
access to a vehicle could result in an
accident and/or serious personal injury.
iThe exterior lamps switch off automatically
when you remove the SmartKey from the starter
switch or open the driver’s door.
When the parking lamps or the rear fog lamp are
switched on and you remove the SmartKey from
the starter switch and open the driver’s door, an
acoustic signal sounds.
In addition the message
Switch Off Lights
appears in the multifunction display.
Switch off the parking lamps or the rear fog
lamp.
!Failure to switch off the parking lamps or the
rear fog lamp when leaving the vehicle may
result in a discharged battery.
Page 70 of 561
69 Getting started
Parking and locking
Locking with the SmartKey
�Press lock button‹ on the
SmartKey (
�page 38).
With the tailgate and all doors closed,
the turn signal lamps flash three times.
The locking knobs on the doors move
down. The anti-theft alarm system is
armed.
For more information, see “Locking and
unlocking” (
�page 110).Locking with KEYLESS-GO*
1Lock button on the outside door handle
�Press lock button1 on an outside
door handle.
With the tailgate and all doors closed,
the turn signal lamps flash three times.
The locking knobs on the doors move
down. The anti-theft alarm system is
armed.
For more information, see “Locking and
unlocking” (
�page 110).
Page 111 of 561

110 Controls in detail
In the “Controls in detail” section you will
find detailed information on how to oper-
ate the equipment installed in your vehicle.
If you are already familiar with the basic
functions of your vehicle, this section will
be of particular interest to you.
To quickly familiarize yourself with the ba-
sic functions of the vehicle, refer to the
“Getting started” section of this manual.
The corresponding page numbers are
given at the beginning of each segment.
Locking and unlocking
For more information on locking and un-
locking, see the “Getting started” section
(
�page 38) and (�page 68).
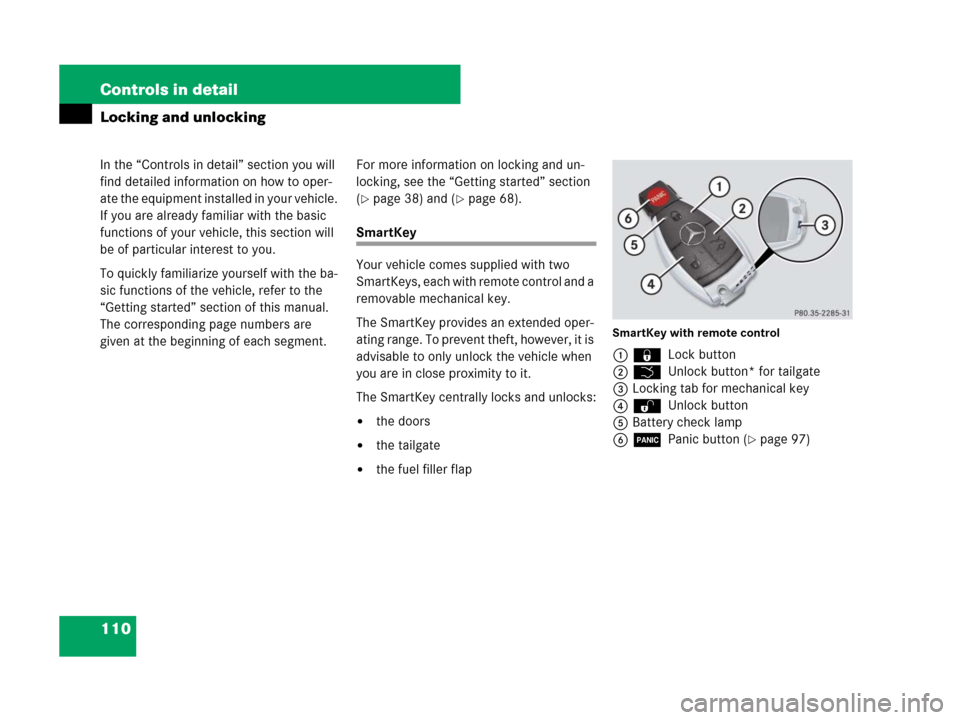
SmartKey
Your vehicle comes supplied with two
SmartKeys, each with remote control and a
removable mechanical key.
The SmartKey provides an extended oper-
ating range. To prevent theft, however, it is
advisable to only unlock the vehicle when
you are in close proximity to it.
The SmartKey centrally locks and unlocks:
�the doors
�the tailgate
�the fuel filler flap
SmartKey with remote control
1‹ Lock button
2Š Unlock button* for tailgate
3Locking tab for mechanical key
4ΠUnlock button
5Battery check lamp
6Â Panic button (
�page 97)
Page 128 of 561

127 Controls in detail
Seats
�Seats
For information on seat adjustment, see
the “Getting started” section (
�page 43).
For more information on seats, see “Load-
ing” (
�page 266).
Front seat active head restraintsYou cannot remove the active head
restraints on the driver’s and front
passenger’s seat.
For removal of the active head restraints
we recommend that you contact an
authorized Mercedes-Benz Light Truck
Center.
For information on head restraint adjust-
ment, see “Seats” (
�page 43).
For information on active head restraints,
see “Active head restraint” (
�page 88).
Rear seat head restraints
Warning!G
For your protection, drive only with properly
positioned head restraints.
Adjust the head restraint so that it is close
to the head as possible and the center of the
head restraint supports the back of the head
at eye level. This will reduce the potential for
injury to the head and neck in the event of
an accident or similar situation.
Warning!G
Do not drive the vehicle without the seat
head restraints installed when the rear seats
are occupied. Head restraints are intended
to help reduce injuries during an accident.
With a rear seat occupied, make sure to
move the respective head restraint up from
the lowest non-use position and have the oc-
cupant adjust the head restraint properly.
For your protection, drive only with properly
positioned head restraints.
Adjust the head restraint in such a way that
it is as close to the head as possible and the
center of the head restraint supports the
back of the head at eye level. This will re-
duce the potential for injury to the head and
neck in the event of an accident or similar
situation.
Page 130 of 561

129 Controls in detail
Seats
Installing
�Insert head restraint1 into openings
on the seat backrest.
�Push head restraint1 down until it au-
dibly engages.
�Press release button2 and adjust
head restraint1 to the desired posi-
tion (
�page 128).
For more information on seats, see the
“Getting started” section (
�page 43).
Lumbar support
The curvature of the driver’s seat can be
adjusted to help enhance lower back sup-
port and seating comfort.
The lever for lumbar support adjustment is
located on the right hand side of the
driver’s seat backrest.
1Adjustment lever
�Move adjustment lever1 in direction
of arrows until you have reached a
comfortable seating position.
Multicontour seat*
The multicontour seat has an extendable
seat cushion and inflatable air chambers
built into the backrest to provide additional
lumbar and side support.
The seat cushion depth, seat backrest
cushion-height and curvature can be con-
tinuously varied with switches on the in-
side of each front seat base after the
ignition is switched on (
�page 39).
1Seat cushion depth
2Backrest side bolsters
3Backrest center
4Backrest bottom
Page 507 of 561

506 Practical hints
Fuses
Fuse box in passenger compartment
The fuse box is located behind a cover in
the dashboard on the front passenger side.
1CoverOpening
�Open the front passenger door.
�Open the glove box (�page 279).
�Insert flat, blunt object as a lever into
the edge of the cover1 at the position
indicated by the arrow.
�Loosen cover1 from dashboard using
lever.
�Using your hands, pull cover1 out
and remove.
Closing
�Hook cover1 into the opening at the
front.
�Press cover1 back on until it engag-
es.
Emergency engine shut-down
If the engine cannot be turned off as de-
scribed in the “Getting started” section
(
�page 66), you may use the following
emergency procedure.
�Take the fuse chart from the vehicle
tool kit (
�page 450).
�Open the fuse box in engine compart-
ment (
�page 505).
�Remove fuse 120.
Find its location in the fuse chart.
!Do not use sharp objects such as a screw-
driver to open the fuse box cover1 in the dash-
board, as this could damage the fuse box cover
or the dashboard.