Page 126 of 561

125 Controls in detail
Locking and unlocking
Automatic central locking
The doors and the tailgate lock automati-
cally when the ignition is switched on and
the wheels are turning at vehicle speeds of
approximately 9 mph (15 km/h) or more.
For information on towing the vehicle, see
“Towing the vehicle” (
�page 499).
You can deactivate the automatic central
locking mode using the control system
(
�page 175).
Warning!G
Monitor the closing procedure carefully to
make sure no one is in danger of being in-
jured. To prevent possible personal injury,
always keep hands and fingers away from
the cargo compartment opening when clos-
ing the tailgate. Be especially careful when
small children are around. To stop the clos-
ing procedure, do one of the following:
�Press tailgate closing switch1
(
�page 123).
�Press KEYLESS-GO* locking/closing
switch*1 (
�page 124).
�Press the Šbutton on the SmartKey
with KEYLESS-GO* (
�page 113).
�Press or pull the remote tailgate switch
on the driver’s door (
�page 122).
Even with the SmartKey with KEYLESS-GO*
removed from the vehicle, the tailgate
closing switch can be operated. Therefore,
do not leave children unattended in the vehi-
cle, or with access to an unlocked vehicle. A
child’s unsupervised access to a vehicle
could result in an accident and/or serious
personal injury.
iTo prevent a possible inadvertent lockout,
the tailgate will open automatically if a SmartKey
with KEYLESS-GO* is recognized inside the
vehicle.
iYou can open a locked door from the inside.
Open door only when conditions are safe to do
so.
iThe doors unlock automatically after an
accident if the force of the impact exceeds a
preset threshold.
The vehicle automatically locks when the ignition
is switched on and the wheels are turning at
vehicle speeds of approximately 9 mph
(15 km/h) or more. You could therefore lock
yourself out when the vehicle
�is pushed or towed
�is on a test stand
Page 130 of 561

129 Controls in detail
Seats
Installing
�Insert head restraint1 into openings
on the seat backrest.
�Push head restraint1 down until it au-
dibly engages.
�Press release button2 and adjust
head restraint1 to the desired posi-
tion (
�page 128).
For more information on seats, see the
“Getting started” section (
�page 43).
Lumbar support
The curvature of the driver’s seat can be
adjusted to help enhance lower back sup-
port and seating comfort.
The lever for lumbar support adjustment is
located on the right hand side of the
driver’s seat backrest.
1Adjustment lever
�Move adjustment lever1 in direction
of arrows until you have reached a
comfortable seating position.
Multicontour seat*
The multicontour seat has an extendable
seat cushion and inflatable air chambers
built into the backrest to provide additional
lumbar and side support.
The seat cushion depth, seat backrest
cushion-height and curvature can be con-
tinuously varied with switches on the in-
side of each front seat base after the
ignition is switched on (
�page 39).
1Seat cushion depth
2Backrest side bolsters
3Backrest center
4Backrest bottom
Page 131 of 561
130 Controls in detail
Seats
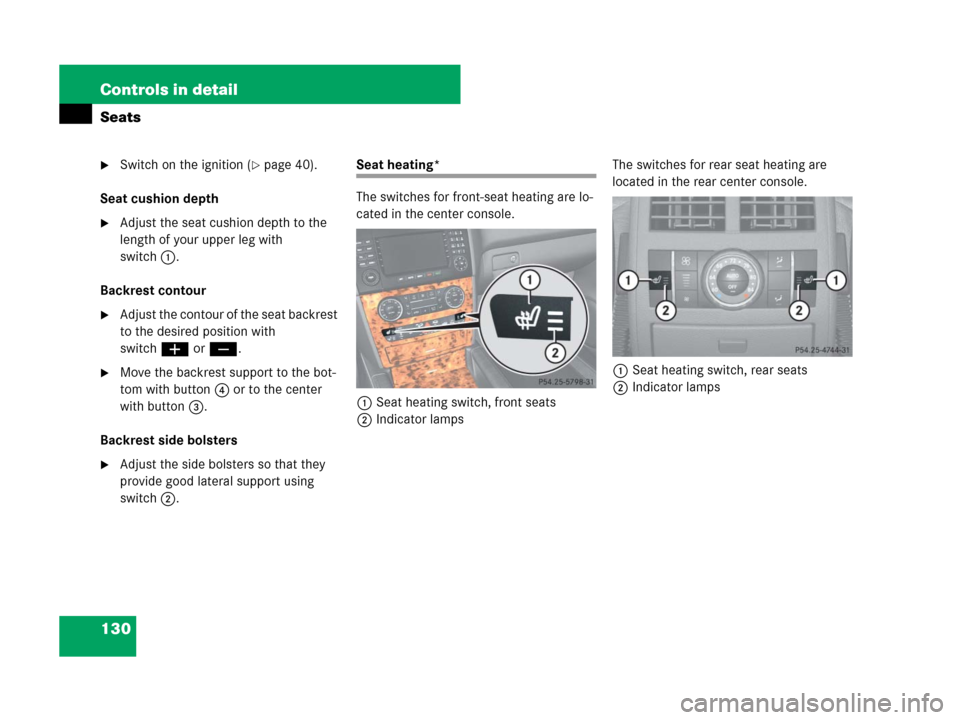
�Switch on the ignition (�page 40).
Seat cushion depth
�Adjust the seat cushion depth to the
length of your upper leg with
switch1.
Backrest contour
�Adjust the contour of the seat backrest
to the desired position with
switchæ orç.
�Move the backrest support to the bot-
tom with button4 or to the center
with button3.
Backrest side bolsters
�Adjust the side bolsters so that they
provide good lateral support using
switch2.
Seat heating*
The switches for front-seat heating are lo-
cated in the center console.
1Seat heating switch, front seats
2Indicator lampsThe switches for rear seat heating are
located in the rear center console.
1Seat heating switch, rear seats
2Indicator lamps
Page 132 of 561
.
Switching on
�Press switch1.
Three red in")
131 Controls in detail
Seats
The red indicator lamps in the switch come
on to show which heating level you have
selected.�Switch on the ignition (�page 40).
Switching on
�Press switch1.
Three red indicator lamps2 in the
switch come on.
�Continue pressing switch1 until
desired seat heating level is reached.
Switching off
�Press switch1 repeatedly until all
indicator lamps2 go out.
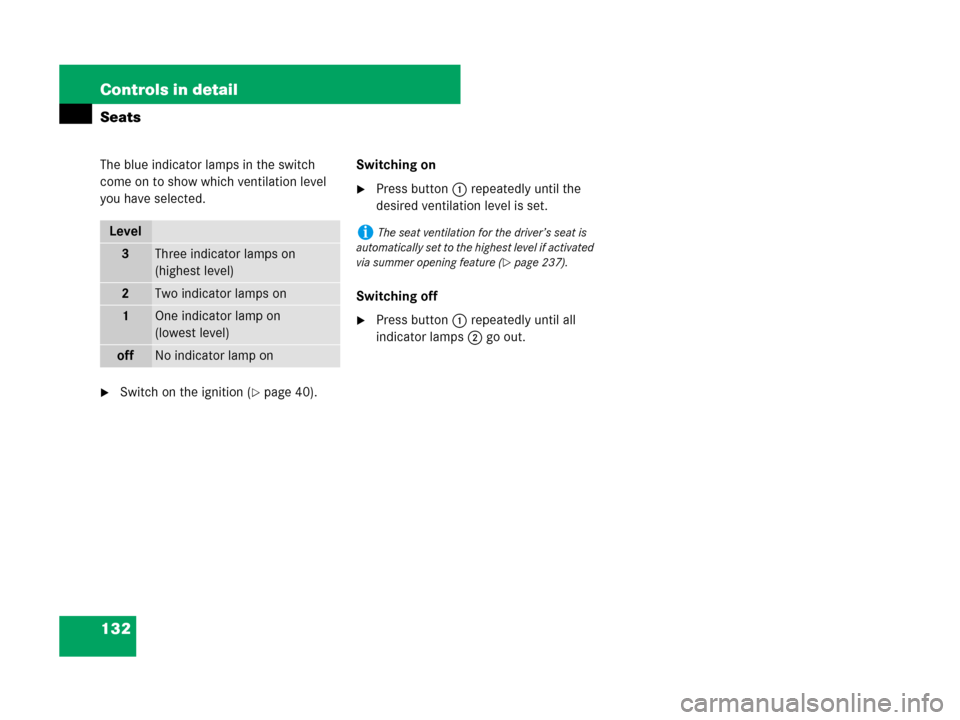
Seat ventilation*
The switches for the seat ventilation are
located in the center console.
1Seat ventilation switch, front seats
2Indicator lamps
Level
3Three indicator lamps on
(highest level)
The seat heating automatically
switches to level 2 after approx-
imately 5 minutes.
2Two indicator lamps on
The seat heating automatically
switches to level 1 after approx-
imately 10 minutes.
1One indicator lamp on
(lowest level)
The seat heating automatically
switches off after approximately
20 minutes.
offNo indicator lamp on
iIf one or more of the indicator lamps2 on
seat heating switch1 (
�page 130) are flash-
ing, there is insufficient voltage available since
too many electrical consumers are switched on.
The seat heating switches off automatically.
The seat heating will switch back on again
automatically as soon as sufficient voltage is
available.
Page 133 of 561
132 Controls in detail
Seats
The blue indicator lamps in the switch
come on to show which ventilation level
you have selected.
�Switch on the ignition (�page 40).Switching on
�Press button1 repeatedly until the
desired ventilation level is set.
Switching off
�Press button1 repeatedly until all
indicator lamps2 go out.
Level
3Three indicator lamps on
(highest level)
2Two indicator lamps on
1One indicator lamp on
(lowest level)
offNo indicator lamp on
iThe seat ventilation for the driver’s seat is
automatically set to the highest level if activated
via summer opening feature (
�page 237).
Page 136 of 561

and “Turn signals” (
�page 60)")
135 Controls in detail
Lighting
�Lighting
For information on how to switch on the
headlamps and use the turn signals, see
“Switching on headlamps” (
�page 59)
and “Turn signals” (
�page 60).
Exterior lamp switch
iIf you drive in countries where vehicles drive
on the other side of the road than the country in
which the vehicle is registered, you must have
the headlamps modified for symmetrical low
beams. Relevant information can be obtained at
any authorized Mercedes-Benz Light Truck
Center.
iVehicles equipped with active Bi-Xenon*
headlamps:
The active Bi-Xenon* headlamps monitor the
vehicles steering angle and vehicle speed, then
automatically shift their beams to either side to
better follow the curvature of the road ahead,
increasing usable illumination over conventional
headlamps.1‚Standing lamps, left (turn left two
stops)
2ˆStanding lamps, right (turn left
one stop)
3MOff
Daytime running lamp mode
(
�page 137)
4UAutomatic headlamp mode
Daytime running lamp mode
(
�page 137)
5CParking lamps (also side marker
lamps, tail lamps, license plate
lamps, instrument panel lamps)
6BLow beam headlamps or high
beam headlamps
7‡Front fog lamps
8†Rear fog lamp
iThe exterior lamps switch off automatically
when you remove the SmartKey from the starter
switch or open the driver’s door with the ignition
switched off.
When the parking lamps or the rear fog lamp are
switched on and you remove the SmartKey from
the starter switch or open the driver’s door, an
acoustic signal sounds.
In addition the message
Switch Off Lights
appears in the multifunction display.
Switch off the parking lamps or the rear fog lamp
manually.
!Failure to switch off the parking lamps when
leaving the vehicle may result in a discharged
battery.
Page 143 of 561

142 Controls in detail
Lighting
Switching on hazard warning flasher
�Press hazard warning flasher
switch1.
All turn signals are flashing.
Switching off hazard warning flasher
�Press hazard warning flasher switch1
again.
Interior lighting
The controls for interior lighting are locat-
ed in the overhead control panel.1Front left reading lamp switch
2Rear interior lighting switch
3Automatic control switch
4Front interior lighting switch
5Front right reading lamp switch
6Front right interior lamp
7Front right reading lamp
8Front left reading lamp
9Front left interior lampAutomatic control
Deactivating
�Press switch3.
The switch engages in the recessed
position.
The interior lighting and the locator
lighting (
�page 171) remain switched
off even when you
�unlock the vehicle
�open a door
�open the tailgate
�remove the SmartKey from the
starter switch
iWith the hazard warning flasher activated
and the combination switch set for either left or
right turn, only the respective turn signals will
operate when the ignition is switched on.
iIf the hazard warning flasher has been
activated automatically, press hazard warning
flasher switch1 once to switch it off.
!An interior lamp switched on manually does
not go out automatically.
Leaving an interior lamp switch in the ON
position for extended periods of time with the
engine turned off could result in a discharged
battery.
iThe interior lighting is factory-set to
automatic mode.
Page 146 of 561
.
1To dim instrument cluster illuminatio")
145 Controls in detail
Instrument cluster
�Instrument cluster
For a full view illustration of the instrument
cluster, see “Instrument cluster”
(
�page 26).
1To dim instrument cluster illumination
2Reset button
3To brighten instrument cluster
illumination
The instrument cluster is activated when
you
�open a door
�switch on the ignition (�page 40)
�press reset button2
�switch on the exterior lamps
(
�page 135)For information on changing the instru-
ment cluster settings, e.g. the language,
see “Instrument cluster submenu”
(
�page 167).Adjusting instrument cluster illumina-
tion
Use button1 or3 to adjust the illumina-
tion brightness for the instrument cluster.
To brighten illumination
�Press and hold button3 until the
desired level of illumination is reached.
To dim illumination
�Press and hold button1 until the
desired level of illumination is reached.
iOpening a front door or pressing the reset
button without switching on the ignition or the
exterior lighting activates the multifunction
display illumination only for 30 seconds.
Warning!G
No messages will be displayed if either the
instrument cluster or the multifunction
display is inoperative.
As a result, you will not be able to see infor-
mation about your driving conditions, such
as speed or outside temperature, warn-
ing/indicator lamps, malfunction/warning
messages or the failure of any systems.
Driving characteristics may be impaired.
If you must continue to drive, do so with
added caution. Contact an authorized
Mercedes-Benz Light Truck Center as soon
as possible.
iThe instrument cluster illumination is
dimmed or brightened automatically to suit am-
bient light conditions.
The instrument cluster illumination will also be
adjusted automatically when you switch on the
vehicle’s exterior lamps.
iWith the exterior lighting switched on, the
brightness of the switches in the center console
will also be adjusted when using button
1 or3.