Page 262 of 561

261 Controls in detail
Driving systems
Range of the sensors
To function properly, the sensors must be
free of dirt, ice, snow and slush. Clean the
sensors regularly, being careful not to
scratch or damaging the sensors, see
“Cleaning the Parktronic* system sensors”
(
�page 394).Front sensors
Rear sensors
Minimum distance
If the system detects an obstacle in this
range, all the distance warning segments
illuminate and you hear a warning signal. If
the obstacle is closer than the minimum
distance, the actual distance may no
longer be indicated by the system.
!During parking maneuvers, pay special
attention to objects located above or below the
height of the sensors (e.g. planters or trailer
hitches). The Parktronic system will not detect
such objects at close range and damage to your
vehicle or the object may result.
Ultrasonic signals from outside sources (e.g.
working jackhammers, car wash or the air brakes
of trucks) may impair the operation of the
Parktronic system.
Centerapprox. 40 in (100 cm)
Cornersapprox. 24 in (60 cm)
Centerapprox. 48 in (120 cm)
Cornersapprox. 32 in (80 cm)
Centerapprox. 8in (20cm)
Cornersapprox. 6in (15cm)
Page 264 of 561

263 Controls in detail
Driving systems
Switching the Parktronic system*
on/off
You can switch off the Parktronic system
manually.
The Parktronic switch is located in the
upper part of the center console.
1Parktronic switch
2Indicator lampSwitching off
�Press Parktronic switch1.
Indicator lamp2 comes on.
Switching on
�Press Parktronic switch1 once more.
Indicator lamp2 goes out.Parktronic system* malfunction
If only the red distance segments illumi-
nate and an acoustic warning sounds,
there is a malfunction in the Parktronic
system. The Parktronic system will auto-
matically switch off after 20 seconds and
the indicator lamp in the Parktronic switch
comes on.
�Have the Parktronic system checked
by an authorized Mercedes-Benz Light
Truck Center as soon as possible.
If only the red distance segments illumi-
nate and no acoustic warning sounds, the
Parktronic system sensors are dirty (e.g.
slush, snow or ice) or there is an interfer-
ence from other radio or ultrasonic signals
(e.g. working jackhammers, car wash or
the air brakes of trucks). The Parktronic
system will automatically switch off after
20 seconds and the indicator lamp in the
Parktronic switch comes on.iThe Parktronic system switches on
automatically when you switch on the ignition
(
�page 40).
Vehicles with original equipment Mercedes-Benz
Trailer Hitch Kit:
The rear Parktronic sensor will automatically
disengage when towing a trailer.
Page 265 of 561
.
�Clean the Parktronic system sensors
(
�page 394).
�Switch on the ignition (�page 40).
or
�Check the Parktronic system oper")
264 Controls in detail
Driving systems
�Switch off the ignition (�page 40).
�Clean the Parktronic system sensors
(
�page 394).
�Switch on the ignition (�page 40).
or
�Check the Parktronic system operation
at another location to rule out interfer-
ence from outside radio or ultrasonic
signals.
Rear view camera*
Warning!G
The rear view camera is only an aid and may
display obstacles from a distorted perspec-
tive or inaccurately, or may not display ob-
stacles at all. The rear view camera does not
relieve you of the responsibility to be cau-
tious, take care and pay careful attention.
The rear view camera may not show objects
which are:
�very close to the rear bumper
�under the rear bumper
�above the tailgate handle
You are responsible for safety at all times
and must continue to pay attention to the
immediate surroundings when parking and
maneuvering. This includes the area behind,
in front of and beside the vehicle. Otherwise
you could endanger yourself or others.
Warning!G
Make sure that no persons or animals are in
or near the area in which you are
parking/maneuvering. Otherwise, they
could be injured.
Warning!G
The rear view camera either will not function
or will not function to its full capability if:
�the tailgate is open
�it is raining very hard, snowing or foggy
�it is night or you are parking/maneuver-
ing your vehicle in an area where it is
very dark
�the camera is exposed to a very bright
white light
�the immediate surroundings are illumi-
nated with fluorescent light (the display
may flicker)
Page 266 of 561

265 Controls in detail
Driving systems
The rear view camera is an optical parking
aid. It shows you the area behind the vehi-
cle in the COMAND system display when
reverse gearR is engaged, for example
during parallel parking.
The rear view camera is located near the
tailgate handle.
1Rear view cameraSwitching the rear view camera on and
off
�Switch on the ignition (�page 40).
�Shift the automatic transmission in
positionR (
�page 185).
The area behind the vehicle appears in
the COMAND system display.
�Shift the automatic transmission
intoP,N orD to switch off the rear
view camera.
�there is a sudden change in tempera-
ture, e.g. if you drive into a heated ga-
rage from the cold (lens condensation)
�the camera lens is dirty or covered
�the rear of your vehicle is damaged
In this case, have the position and set-
ting of the camera checked by a quali-
fied specialist workshop.
Mercedes-Benz recommends that you
visit a Mercedes-Benz Light Truck
Center for this purpose.
Do not use the rear view camera in these sit-
uations. Otherwise you could injure yourself
or others and/or damage property including
your vehicle while parking/maneuvering.
iThe area behind the vehicle is shown in the
COMAND system display as a mirror image, like
in the rear view mirror.
iThe image from the rear view camera will no
longer be displayed if you select another
function on the COMAND system while reverse
gearR is engaged. To display the image again,
disengage and reengage reverse gearR.
Page 268 of 561

267 Controls in detail
Loading
Load distribution
The gross vehicle weight which is the
weight of the vehicle including fuel, tools,
spare wheel, installed accessories, pas-
sengers and luggage/cargo must never
exceed the load limit and Gross Vehicle
Weight Rating (GVWR) for your vehicle as
specified on the placard located on the
driver’s door B-pillar (
�page 510). In addi-
tion, the load must be distributed in such a
way so that the weight on each axle never
exceeds the Gross Axle Weight Rating
(GAWR) for the front and rear axle. The
GVWR and GAWR for your vehicle are indi-cated on the certification label which can
be found on the driver’s door B-pillar
(
�page 510).
For more information, see “Tire and Load-
ing Information” (
�page 352).
The handling characteristics of a fully load-
ed vehicle depend greatly on the load dis-
tribution. It is therefore recommended to
load the vehicle according to the illustra-
tions shown, with the heaviest items being
placed towards the front of the vehicle.
Please pay attention to and comply with
the following instructions when loading the
vehicle and transporting cargo:
�Always place items being carried
against front or rear seat backrests,
and fasten them as securely as possi-
ble.
�The heaviest portion of the cargo
should always be kept as low as possi-
ble against front or rear seat backrests.For additional safety when transporting
cargo while the rear seats are unoccupied,
fasten the outer seat belts crosswise into
the opposite side buckles.
iThe cargo compartment is the preferred
place to carry objects. The expanded cargo com-
partment (
�page 269) should only be used for
items which do not fit in the cargo compartment
alone.
Page 269 of 561
268 Controls in detail
Loading
Cargo tie-down rings
Your vehicle is equipped with six cargo
tie-down rings.
Carefully secure cargo by applying even
load on all rings with rope of sufficient
strength to hold down the cargo.Cargo compartment
Four cargo tie-down rings are located in
the cargo compartment.
1Cargo tie-down ringBehind front seats
Two cargo tie-down rings are located in the
footwell behind the driver’s and passenger
seat.
1Cargo tie-down ring
iWhile the cargo net* (�page 272) will help
protect you from smaller objects, it cannot pre-
vent the movement of large, heavier objects into
the passenger compartment in an accident, dur-
ing hard braking or sudden maneuvers. Such
items must be properly secured using the cargo
tie-down rings in the cargo compartment floor.
Page 270 of 561

269 Controls in detail
Loading
Hooks
Four hooks are located on the rear com-
partment trim panels, two on each side.
1Hook
Use the hooks to secure light weight items
only. The maximum permissible weight per
hook is 9lb(4kg).Expanding cargo compartment
You can separately fold the left and right
rear seat backrests to expand the cargo
compartment.
Folding the rear seat backrest forward
Warning!G
When expanding the cargo compartment,
always fully fold the corresponding seats
and, if so equipped, always use the
cargo net* (
�page 272) when transporting
cargo.
Unless you are transporting cargo, the back-
rests must remain properly locked in the up-
right position.
In an accident, during hard braking or sud-
den maneuvers, loose items will be thrown
around inside the vehicle, and can cause
injury to vehicle occupants unless the items
are securely fastened in the vehicle.
Always use the cargo tie down rings
(
�page 268).
Warning!G
Never drive the vehicle with the tailgate
open. Deadly carbon monoxide (CO) gases
may enter vehicle interior resulting in un-
consciousness and death.
!Always release the seat cushion and fold it
up before folding the seat backrest forward. The
covering on the seat backrest may otherwise be
damaged.
When the seat backrest are folded forward, the
front seats may not be moved to the rearmost
position. Otherwise you could damage the front
and second-row seats.
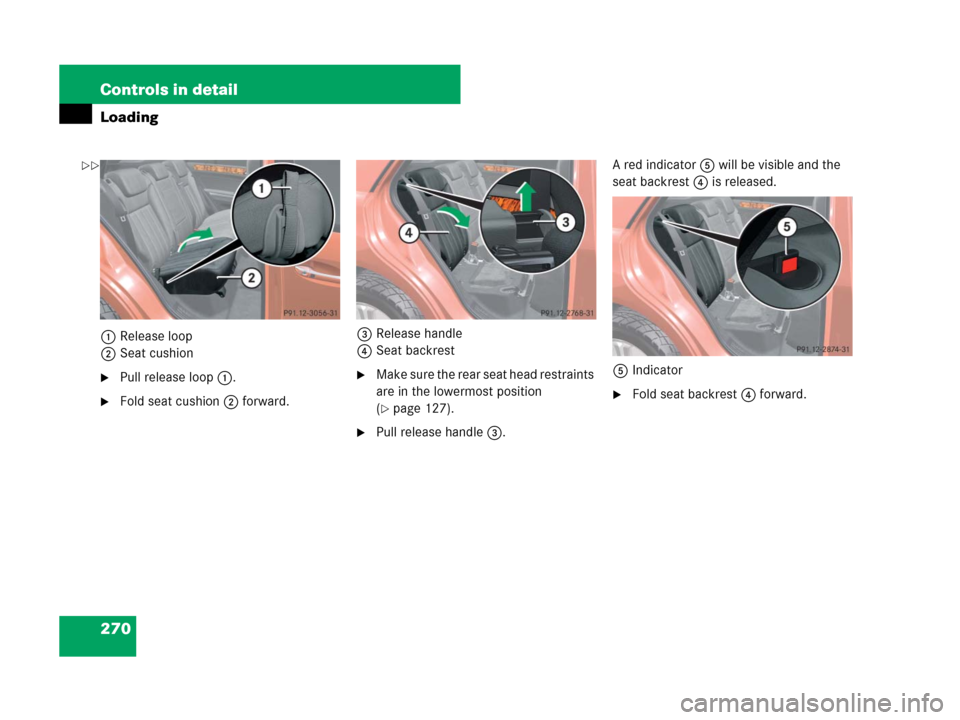
��
Page 271 of 561
270 Controls in detail
Loading
1Release loop
2Seat cushion
�Pull release loop1.
�Fold seat cushion2 forward.3Release handle
4Seat backrest
�Make sure the rear seat head restraints
are in the lowermost position
(
�page 127).
�Pull release handle3.A red indicator5 will be visible and the
seat backrest4 is released.
5Indicator
�Fold seat backrest4 forward.
��