Page 108 of 561

107 Safety and Security
Anti-theft systems
Arming the alarm system
The alarm system indicator lamp is located
to the lower left of the hazard warning
flasher.
1Alarm system indicator lamp
�Lock the vehicle with the SmartKey or
with KEYLESS-GO* (
�page 68).
The turn signal lamps flash three times
to indicate that the vehicle is locked.
The alarm system is armed within ap-
proximately 10 seconds. Alarm system
indicator lamp1 flashes.Disarming the alarm system
�Unlock the vehicle with the SmartKey
or with KEYLESS-GO* (
�page 38).
The turn signal lamps flash once to
indicate that the alarm system is
disarmed. Indicator lamp1 goes out.Canceling the alarm
To cancel the alarm:
With the SmartKey
�Insert the SmartKey in the starter
switch.
or
�Press theŒ or ‹button on the
SmartKey.
With KEYLESS-GO*
�Grasp an outside door handle.
The SmartKey with KEYLESS-GO must
be within 3 ft (1 m) of the vehicle.
or
�Press the KEYLESS-GO start/stop
button (
�page 41).
The SmartKey with KEYLESS-GO must
be inside the vehicle.
iIf the turn signal lamps do not flash three
times, one of the following elements may not be
properly closed:
�a door
�the tailgate
Close the respective element and lock the
vehicle again.
iThe alarm system will rearm automatically
again after approximately 40 seconds if neither a
door nor the tailgate is opened.
Page 113 of 561

112 Controls in detail
Locking and unlocking
Factory setting
Global unlocking
�Press buttonŒ.
All turn signal lamps flash once. The
locking knobs in the doors move up.
The anti-theft alarm system is
disarmed.
The vehicle will lock again automatically
and rearm the anti-theft alarm system
within approximately 40 seconds of un-
locking if
�neither door nor tailgate is opened
�the SmartKey is not inserted in the
starter switch
�the central locking switch is not
activatedGlobal locking
�Press button‹.
With the tailgate and all doors closed,
the turn signal lamps flash three times.
The locking knobs in the doors move
down. The anti-theft alarm system is
armed.
Selective setting
If you frequently travel alone, you may wish
to reprogram the SmartKey so that
pressing buttonΠonly unlocks the
driver’s door and the fuel filler flap.
�Press and hold buttonsŒ and‹
simultaneously for about 5 seconds
until battery check lamp5
(
�page 110) flashes twice.
The SmartKey will then function as
follows:Unlocking driver’s door and fuel filler
flap
�Press buttonŒ once.
All turn signal lamps flash once. The
locking knob in the driver’s door moves
up. The anti-theft alarm system is
disarmed.
Global unlocking
�Press buttonŒ twice.
All turn signal lamps flash once. The
locking knobs in the doors move up.
The anti-theft alarm system is
disarmed.
Page 117 of 561

116 Controls in detail
Locking and unlocking
�If the SmartKey with KEYLESS-GO is
removed from the vehicle (e.g. if a
passenger exits the vehicle with the
SmartKey with KEYLESS-GO)
�when pressing the KEYLESS-GO
start/stop button or trying to lock
the vehicle with the look button on
an outside door handle the mes-
sage
Key Not Detected appears in
the multifunction display
�with the engine running, the mes-
sage
Key Not Detected appears in
the multifunction display while
driving off.
Find the SmartKey with KEYLESS-GO or
change its present location immediate-
ly (e.g. place it on the front passenger
seat or insert it in shirt pocket).
�Remember that the engine can be
started by anyone with a SmartKey
with KEYLESS-GO that is left inside the
vehicle.
Possibility 1 (One SmartKey with
KEYLESS-GO in the vehicle, one
SmartKey with KEYLESS-GO outside
the vehicle):
If you leave the SmartKey with
KEYLESS-GO behind when exiting and
locking the vehicle, no message
appears in the multifunction display.
Possibility 2 (One SmartKey with
KEYLESS-GO in the vehicle, no
SmartKey with KEYLESS-GO outside
the vehicle):
When exiting and trying to lock the
vehicle, the message
Key Detected In
Vehicle
will appear in the multifunction
display. The vehicle will not be locked.Factory setting
Global unlocking
�Grasp an outside door handle.
All turn signal lamps flash once. The
locking knobs in the doors move up.
The anti-theft alarm system is dis-
armed.
The vehicle will lock again automatically
and rearm the anti-theft alarm system
within approximately 40 seconds of
unlocking if
�neither a door nor the tailgate is
opened
�the central locking switch is not
activated
iThe vehicle could be inadvertently unlocked
if the SmartKey with KEYLESS-GO is within 3 ft
(1 m) of the vehicle and
�an outside door handle is splashed with
water
or
�you attempt to clean an outside door handle
Page 131 of 561
130 Controls in detail
Seats
�Switch on the ignition (�page 40).
Seat cushion depth
�Adjust the seat cushion depth to the
length of your upper leg with
switch1.
Backrest contour
�Adjust the contour of the seat backrest
to the desired position with
switchæ orç.
�Move the backrest support to the bot-
tom with button4 or to the center
with button3.
Backrest side bolsters
�Adjust the side bolsters so that they
provide good lateral support using
switch2.
Seat heating*
The switches for front-seat heating are lo-
cated in the center console.
1Seat heating switch, front seats
2Indicator lampsThe switches for rear seat heating are
located in the rear center console.
1Seat heating switch, rear seats
2Indicator lamps
Page 136 of 561

135 Controls in detail
Lighting
�Lighting
For information on how to switch on the
headlamps and use the turn signals, see
“Switching on headlamps” (
�page 59)
and “Turn signals” (
�page 60).
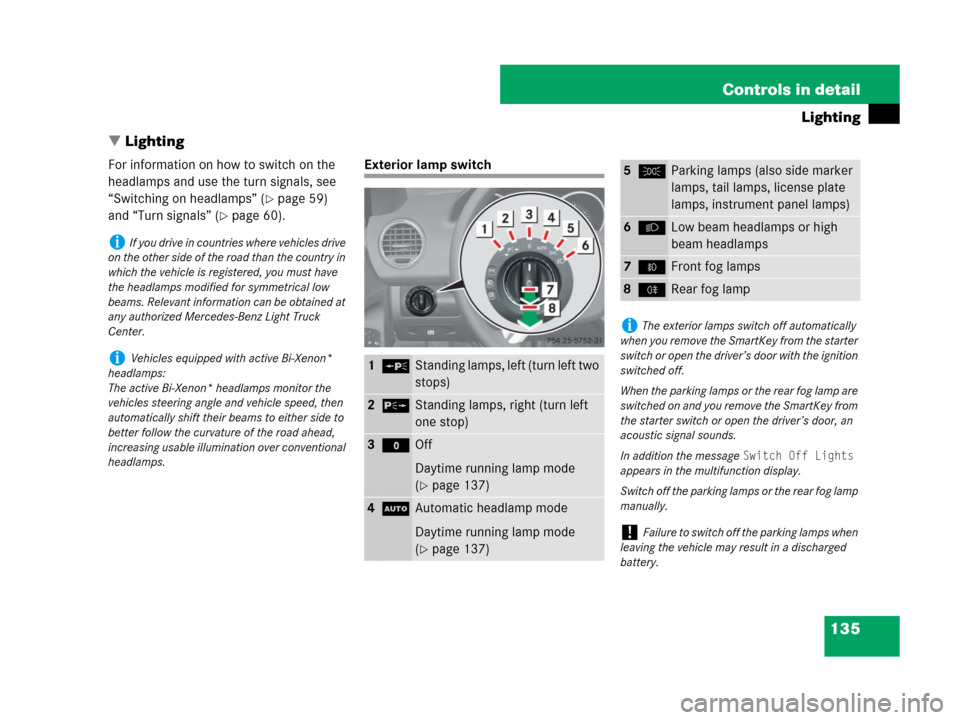
Exterior lamp switch
iIf you drive in countries where vehicles drive
on the other side of the road than the country in
which the vehicle is registered, you must have
the headlamps modified for symmetrical low
beams. Relevant information can be obtained at
any authorized Mercedes-Benz Light Truck
Center.
iVehicles equipped with active Bi-Xenon*
headlamps:
The active Bi-Xenon* headlamps monitor the
vehicles steering angle and vehicle speed, then
automatically shift their beams to either side to
better follow the curvature of the road ahead,
increasing usable illumination over conventional
headlamps.1‚Standing lamps, left (turn left two
stops)
2ˆStanding lamps, right (turn left
one stop)
3MOff
Daytime running lamp mode
(
�page 137)
4UAutomatic headlamp mode
Daytime running lamp mode
(
�page 137)
5CParking lamps (also side marker
lamps, tail lamps, license plate
lamps, instrument panel lamps)
6BLow beam headlamps or high
beam headlamps
7‡Front fog lamps
8†Rear fog lamp
iThe exterior lamps switch off automatically
when you remove the SmartKey from the starter
switch or open the driver’s door with the ignition
switched off.
When the parking lamps or the rear fog lamp are
switched on and you remove the SmartKey from
the starter switch or open the driver’s door, an
acoustic signal sounds.
In addition the message
Switch Off Lights
appears in the multifunction display.
Switch off the parking lamps or the rear fog lamp
manually.
!Failure to switch off the parking lamps when
leaving the vehicle may result in a discharged
battery.
Page 140 of 561

139 Controls in detail
Lighting
Front fog lamps
�Turn the exterior lamp switch to
positionC orB (
�page 135).
�Pull out the exterior lamp switch to first
stop.
The front fog lamps switch on.
The green indicator lamp‡ in the
exterior lamp switch comes on.
�Push in the exterior lamp switch.
The front fog lamps switch off.
The green indicator lamp‡ in the
exterior lamp switch goes out.Rear fog lamp (driver’s side only)
�Turn the exterior lamp switch to
positionB (
�page 135).
�Pull out the exterior lamp switch to
second stop.
The rear fog lamp switches on.
The yellow indicator lamp† in the
exterior lamp switch comes on.
�Push in the exterior lamp switch to first
stop.
The rear fog lamp switches off.
The yellow indicator lamp† in the
exterior lamp switch goes out.
The front fog lamps remain lit.
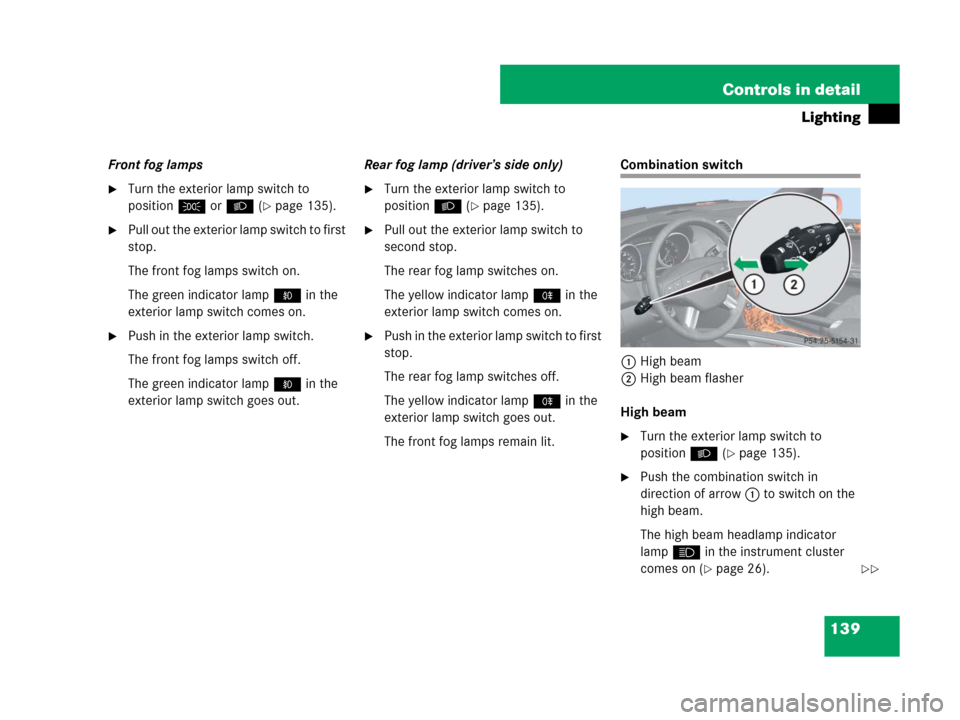
Combination switch
1High beam
2High beam flasher
High beam
�Turn the exterior lamp switch to
positionB (
�page 135).
�Push the combination switch in
direction of arrow1 to switch on the
high beam.
The high beam headlamp indicator
lampA in the instrument cluster
comes on (
�page 26).��
Page 144 of 561

143 Controls in detail
Lighting
Activating
�Press switch3.
The switch disengages from its
recessed position back to its original
position.
The interior lighting and the locator
lighting (
�page 171) come on when
you
�unlock the vehicle
�open a door
�open the tailgate
�remove the SmartKey from the
starter switch
The interior lamps go out following an
adjustable time delay (
�page 172).Manual control
Switching front/rear interior lighting on
and off
�Press front/rear interior lighting
switch4 or2 to switch on the
respective interior light.
�Press front/rear interior lighting
switch4 or2 again to switch off the
respective interior light.
Switching front reading lamps on and off
�Press front reading lamp switch1
or5 to switch on the respective front
reading lamp.
�Press front reading lamp switch1
or5 again to switch off the respective
front reading lamp.Switching rear interior reading lamps on
and off
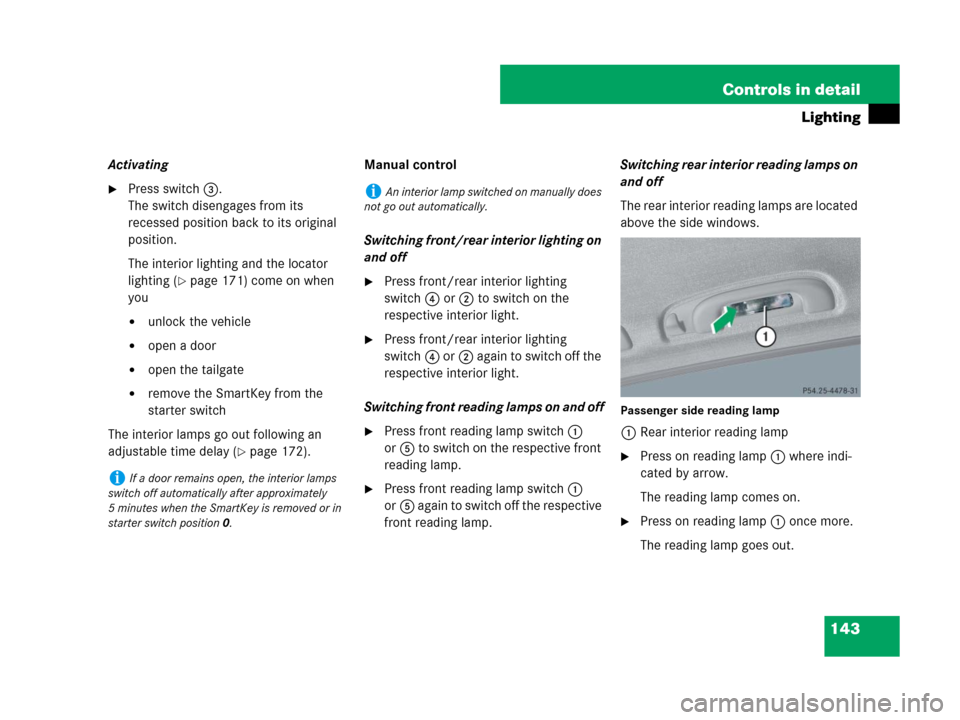
The rear interior reading lamps are located
above the side windows.
Passenger side reading lamp
1Rear interior reading lamp
�Press on reading lamp1 where indi-
cated by arrow.
The reading lamp comes on.
�Press on reading lamp1 once more.
The reading lamp goes out.
iIf a door remains open, the interior lamps
switch off automatically after approximately
5 minutes when the SmartKey is removed or in
starter switch position0.
iAn interior lamp switched on manually does
not go out automatically.
Page 200 of 561

199 Controls in detail
Good visibility
�Good visibility
For information on windshield wipers, see
“Windshield wipers” (
�page 60).
Headlamp cleaning system*
The headlamps will automatically be
cleaned with a high-pressure water jet
when you have
�switched on the headlamps
and
�operated the windshield wipers with
windshield washer fluid five times
When you switch off the headlamps, the
counter resets.
For information on filling up the washer
reservoir, see “Windshield/rear window
washer system and headlamp cleaning
system*” (
�page 346).
Rear view mirrors
For more information on setting the rear
view mirrors, see “Mirrors” (
�page 49).
Interior rear view mirror, antiglare
position
1Lever
�Tilt the mirror to the antiglare position
by moving lever1 towards the wind-
shield.
The interior rear view mirror is dimmed.Auto-dimming rear view mirrors*
The reflection brightness of the exterior
rear view mirror on the driver’s side and
the interior rear view mirror will respond
automatically to glare when
�the ignition is switched on
and
�incoming light from headlamps falls on
the sensor in the interior rear view
mirror
The rear view mirror will not react if
�the automatic transmission is set to
positionR
�the interior lighting is turned on