Page 459 of 561

458 Practical hints
Resetting activated head restraints
If the active head restraints have been trig-
gered in a rear-end collision, the active
head restraints must be reset. Otherwise,
the active head restraints cannot offer any
additional protection in the event of anoth-
er rear-end collision.
You can tell that the head restraints have
been activated when they have been
moved forward and cannot be adjusted.
Vehicles without Rear seat entertain-
ment system*1Pull
2Adjust downward
3Press
�Pull the top of the head restraint cush-
ion in direction of arrow1 as far as it
will go.
�Adjust the head restraint cushion
downward in direction of arrow2 as
far as it will go.
�Firmly press the top of the active head
restraint cushion towards the head
restraint cover in direction of arrow3
until it engages.
Warning!G
For safety reasons, have the active head re-
straints checked by an authorized
Mercedes-Benz Light Truck Center after a
rear-end collision.
Warning!G
When pushing back the head restraint cush-
ion, take care that your fingers do not be-
come caught between the head restraint
cushion and the cover. Failing to do so may
lead to injury.
!Be careful not to damage upholstery.
iFor your convenience, we recommend that
you have this work carried out by an authorized
Mercedes-Benz Light Truck Center.
iPressing the head restraint cushion back
requires high force. If you encounter difficulties
when pushing the head restraint back please
have the procedure performed at an authorized
Mercedes-Benz Light Truck Center.
Page 460 of 561
459 Practical hints
Resetting activated head restraints
�Repeat this procedure on the active
head restraint for the second front
seat.
For information on active head restraints,
see “Active head restraint” (
�page 88).
For information on head restraint adjust-
ment, see “Seats” (
�page 43).Vehicles with Rear seat entertainment
system*
�Take the reset tool out of the
Mercedes-Benz vehicle literature
pouch.
1Reset tool
2Active head restraint1Reset tool
2Active head restraint
3Rectangular opening
�Guide reset tool1 into rectangular
opening3 of active head restraint2.
�Press reset tool1 downward in
direction of arrow until you hear the
head restraint release mechanism
audibly disengage.
�Pull out reset tool1.��
Page 461 of 561
460 Practical hints
Resetting activated head restraints
�Firmly press the active head restraint
cushion backward towards the head
restraint cover in direction of arrow
until it engages.
�Repeat this procedure on the active
head restraint for the second front
seat.
�After resetting the active head
restraints store reset tool1 in the
Mercedes-Benz vehicle literature
pouch.
For information on active head restraints,
see “Active head restraint” (
�page 88).
For information on head restraint adjust-
ment, see “Seats” (
�page 43).
��
Page 464 of 561
463 Practical hints
Replacing bulbs
�Replacing bulbs
Bulbs
Safe vehicle operation depends on proper
exterior lighting and signaling. It is there-
fore essential that all bulbs and lamp as-
semblies are in good working order at all
times.
Correct headlamp adjustment is extremely
important. Have headlamps checked and
readjusted at regular intervals and when a
bulb has been replaced. See an authorized
Mercedes-Benz Light Truck Center for
headlamp adjustment.iIf the headlamps or front fog lamps are
fogged up on the inside as a result of high humid-
ity, driving the vehicle a distance with the lights
on should clear up the fogging.iSubstitute bulbs will be brought into use
when the following lamps malfunction:
�Turn signal lamps
�Brake lamps
�Parking lamps
�Tail lamps
Read and observe the messages in the multi-
function display (
�page 438).
Page 466 of 561

465 Practical hints
Replacing bulbs
Notes on bulb replacement
�Only use 12-volt bulbs of the same type
and with the specified watt rating.
�Switch lights off before changing a bulb
to prevent short circuits.
�Always use a clean lint-free cloth when
handling bulbs.
�Your hands should be dry and free of oil
and grease.
�If the newly installed bulb does not
come on, visit an authorized
Mercedes-Benz Light Truck Center.Have the LEDs and bulbs for the following
lamps replaced by an authorized
Mercedes-Benz Light Truck Center:
�the additional turn signal lamps in the
exterior rear view mirrors
�the high mounted brake lamp
�the Bi-Xenon* low beam lamps
�the Bi-Xenon high beam flasher spot-
light*
Warning!G
Bulbs and bulb sockets can be very hot.
Allow the lamp to cool down before chang-
ing a bulb.
Keep bulbs out of reach of children.
Halogen lamps contain pressurized gas.
A bulb can explode if you:
�touch or move it when hot
�drop the bulb
�scratch the bulb
Wear eye and hand protection.
Because of high voltage in Xenon lamps, it is
dangerous to replace the bulb or repair the
lamp and its components. We recommend
that you have such work done by a qualified
technician.
!Do not replace the LEDs yourself. You could
otherwise damage the LEDs or parts of the vehi-
cle. Only have the LEDs replaced by a an autho-
rized Mercedes-Benz Light Truck Center.
iReplacing the bulbs for the front lamps is a
technically complex process. For your conve-
nience, we recommend that you have this work
carried out by an authorized Mercedes-Benz
Light Truck Center.
Have the headlamp adjustment checked
regularly.
Page 474 of 561
473 Practical hints
Replacing bulbs
License plate lamp
1License plate lamp cover
2Screws
�Loosen screws2.
�Remove license plate lamp cover1.
�Replace the tubular bulb.
�Reinstall license plate lamp cover1.
�Retighten screws2.
Adjusting headlamp aim
VVertical centerline
HHeadlamp mounting height, measured
from the centerCorrect headlamp adjustment is extremely
important. To check and readjust a head-
lamp, follow the steps described:
�Park the vehicle on a level surface
25 feet (7.6 m) from a vertical test
screen or wall.
�Switch the headlamps on
(
�page 135).
If the beam does not show a beam pattern
as indicated in the figure left, then follow
the steps below:
�Open hood (�page 341).
iHigh beam adjustments simultaneously aim
the low beam.
Vehicle should have a normal tailgate load.
��
Page 475 of 561
474 Practical hints
Replacing bulbs
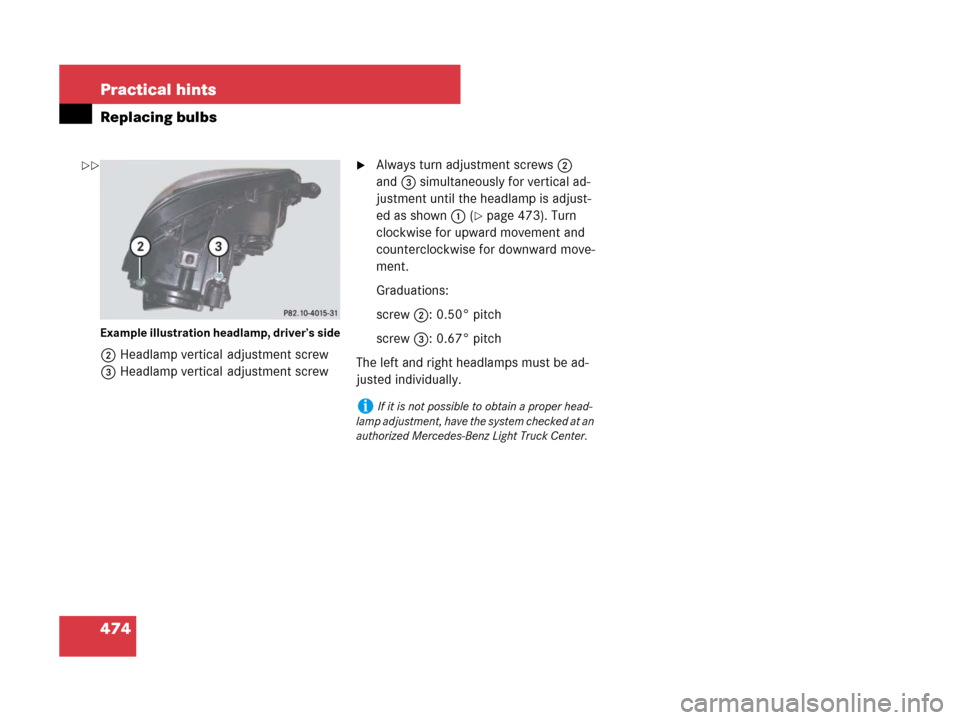
Example illustration headlamp, driver’s side
2Headlamp vertical adjustment screw
3Headlamp vertical adjustment screw
�Always turn adjustment screws2
and3 simultaneously for vertical ad-
justment until the headlamp is adjust-
ed as shown1 (
�page 473). Turn
clockwise for upward movement and
counterclockwise for downward move-
ment.
Graduations:
screw2: 0.50° pitch
screw3: 0.67° pitch
The left and right headlamps must be ad-
justed individually.
iIf it is not possible to obtain a proper head-
lamp adjustment, have the system checked at an
authorized Mercedes-Benz Light Truck Center.
��
Page 516 of 561

515 Technical data
Rims and tires
�Rims and tires
!Only use tires which have been tested and
approved by Mercedes-Benz. Tires approved by
Mercedes-Benz are developed to provide best
possible performance in conjunction with the
driving safety systems on your vehicle such as
ABS or ESP
®. Tires specially developed for your
vehicle and tested and approved by
Mercedes-Benz can be identified by finding the
following on the tire’s sidewall:
�MO = Mercedes-Benz Original equipment
tires
AMG vehicles:
Does not apply to all approved tires on AMG
vehicles. For information on tested and
approved tires for AMG vehicles, contact an
authorized Mercedes-Benz Light Truck
Center.
Using tires other than those approved by
Mercedes-Benz may result in damage that is not
covered by the Mercedes-Benz Limited
Warranty.
!Using tires other than those approved by
Mercedes-Benz can have detrimental effects,
such as
�poor handling characteristics
�increased noise
�increased fuel consumption
Moreover, tires and rims not approved by
Mercedes-Benz may, under load, exhibit dimen-
sional variations and different tire deformation
characteristics that could cause them to come
into contact with the vehicle body or axle parts.
Damage to the tires or the vehicle may be the
result.
iFurther information on tires and rims is
available at any authorized Mercedes-Benz Light
Truck Center. A placard with the recommended
tire inflation pressure is located on the driver’s
door B-pillar (
�page 510). Some vehicles may
have supplemental tire inflation pressure infor-
mation for driving at high speeds (
�page 358)
or for vehicle loads less than the maximum
loaded vehicle condition (
�page 358). If such
information is provided, it can be found on the
placard located on the inside of the fuel filler
flap.The tire inflation pressure should be checked
regularly and should only be adjusted on cold
tires. Follow tire manufacturer’s maintenance
recommendation included with vehicle.
iThe following pages also list the approved
wheel rim and tire sizes for equipping your
vehicles with winter tires. Winter tires are not
available as standard or optional factory equip-
ment, but can be purchased from an authorized
Mercedes-Benz Light Truck Center.
Depending on vehicle model and the standard or
optional factory-equipped wheel rim/tire
configuration on your vehicle (Appearance
Package, Sport Package etc.), equipping your
vehicle with winter tires approved for your
vehicle model may also require the purchase of
two or four wheel rims of the recommended size
for use with these winter tires. See an authorized
Mercedes-Benz Light Truck Center for more
information.