Page 437 of 561

436 Practical hints
What to do if …
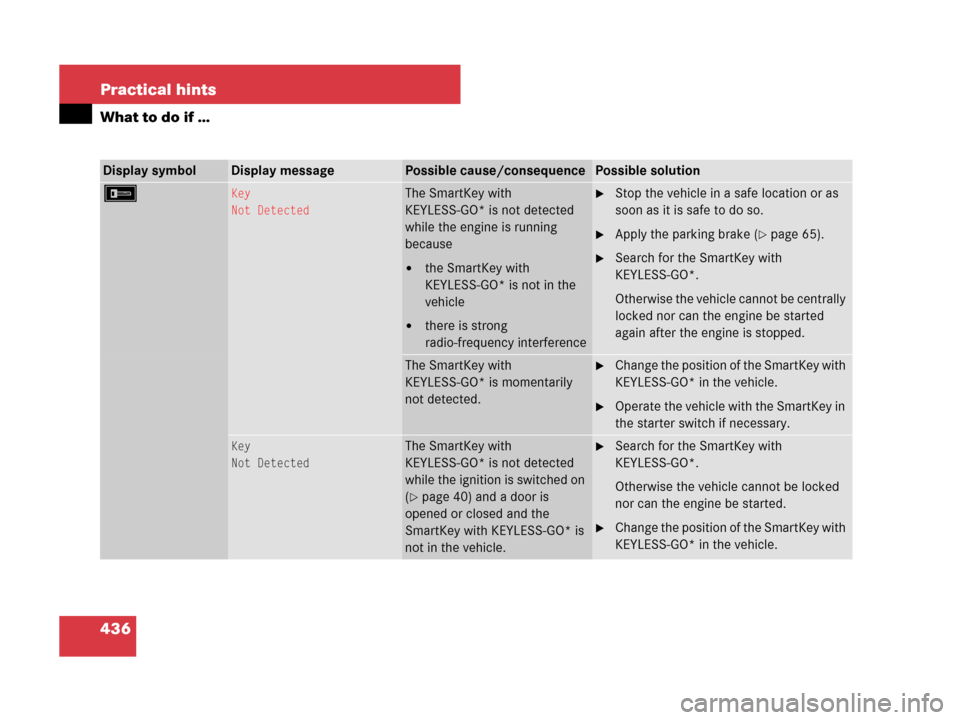
Display symbolDisplay messagePossible cause/consequencePossible solution
FKey
Not DetectedThe SmartKey with
KEYLESS-GO* is not detected
while the engine is running
because
�the SmartKey with
KEYLESS-GO* is not in the
vehicle
�there is strong
radio-frequency interference
�Stop the vehicle in a safe location or as
soon as it is safe to do so.
�Apply the parking brake (�page 65).
�Search for the SmartKey with
KEYLESS-GO*.
Otherwise the vehicle cannot be centrally
locked nor can the engine be started
again after the engine is stopped.
The SmartKey with
KEYLESS-GO* is momentarily
not detected.�Change the position of the SmartKey with
KEYLESS-GO* in the vehicle.
�Operate the vehicle with the SmartKey in
the starter switch if necessary.
Key
Not DetectedThe SmartKey with
KEYLESS-GO* is not detected
while the ignition is switched on
(
�page 40) and a door is
opened or closed and the
SmartKey with KEYLESS-GO* is
not in the vehicle.
�Search for the SmartKey with
KEYLESS-GO*.
Otherwise the vehicle cannot be locked
nor can the engine be started.
�Change the position of the SmartKey with
KEYLESS-GO* in the vehicle.
Page 438 of 561

437 Practical hints
What to do if …
Display symbolDisplay messagePossible cause/consequencePossible solution
FKey Detected
In VehicleA SmartKey with KEYLESS-GO*
left in the vehicle was detected
while trying to lock the vehicle
from the outside.�Take the SmartKey with KEYLESS-GO*
out of the vehicle.
Remove KeyYou have forgotten to remove
the SmartKey.�Remove the SmartKey from the starter
switch.
You need a new key.There is no additional code avail-
able for SmartKey or SmartKey
with KEYLESS-GO*.�Contact an authorized Mercedes-Benz
Light Truck Center as soon as possible.
Key
Does Not Belong to VehicleThe SmartKey or SmartKey with
KEYLESS-GO* in the starter
switch does not belong to the
vehicle.�Find the SmartKey or SmartKey with
KEYLESS-GO* that belongs to the
vehicle to operate the vehicle.
Change
Key BatteriesThe batteries in the SmartKey
with KEYLESS-GO* are dis-
charged.�Replace the batteries (�page 461).
Don’t Forget
Your KeyThis message appears for a
maximum of 60 seconds if the
driver’s door is opened with the
engine shut off and no SmartKey
in the starter switch.
This message is only a reminder.�Insert the SmartKey in the starter
switch (
�page 40).
or
�Take the SmartKey with KEYLESS-GO*
with you when leaving the vehicle.
Page 443 of 561
442 Practical hints
What to do if …
Display symbolDisplay messagePossible cause/consequencePossible solution
. Switch Off LightsYou have removed the SmartKey
from the starter switch and
opened the driver’s door or
removed the SmartKey with
KEYLESS-GO* from the vehicle
and left the parking lamps or the
rear fog lamp on.�Turn the exterior lamp switch toM
(
�page 135).
Tail Lamp
LeftThe left tail lamp is malfunction-
ing. A substitute bulb is being
used.�Replace the bulb as soon as possible
(
�page 471).
Tail Lamp
RightThe right tail lamp is malfunc-
tioning. A substitute bulb is be-
ing used.�Replace the bulb as soon as possible
(
�page 471).
Page 456 of 561
455 Practical hints
Unlocking/locking in an emergency
�Unlocking/locking in an emergency
Unlocking the vehicle
If you cannot unlock the vehicle with the
SmartKey or KEYLESS-GO*, open the
driver’s door using the mechanical key.Removing the mechanical key
1Mechanical key locking tab
2Mechanical key
�Move locking tab1 in direction of
arrow.
The mechanical key2 comes out.
�Slide mechanical key2 out of the
housing.Unlocking the driver’s door
�Insert mechanical key2 into the
driver’s door lock until it stops.
�Turn mechanical key2 counterclock-
wise to position1 and hold it there.
�Pull the door handle until the locking
knob moves up (
�page 118).
The driver’s door is unlocked.
�Pull the door handle once more to open
the driver’s door.
iUnlocking the driver’s door with the
mechanical key will trigger the anti-theft alarm
system.
To cancel the alarm, insert the SmartKey or
SmartKey with KEYLESS-GO* in the starter
switch.
1Unlocking
2Mechanical key
Page 458 of 561

457 Practical hints
Unlocking/locking in an emergency
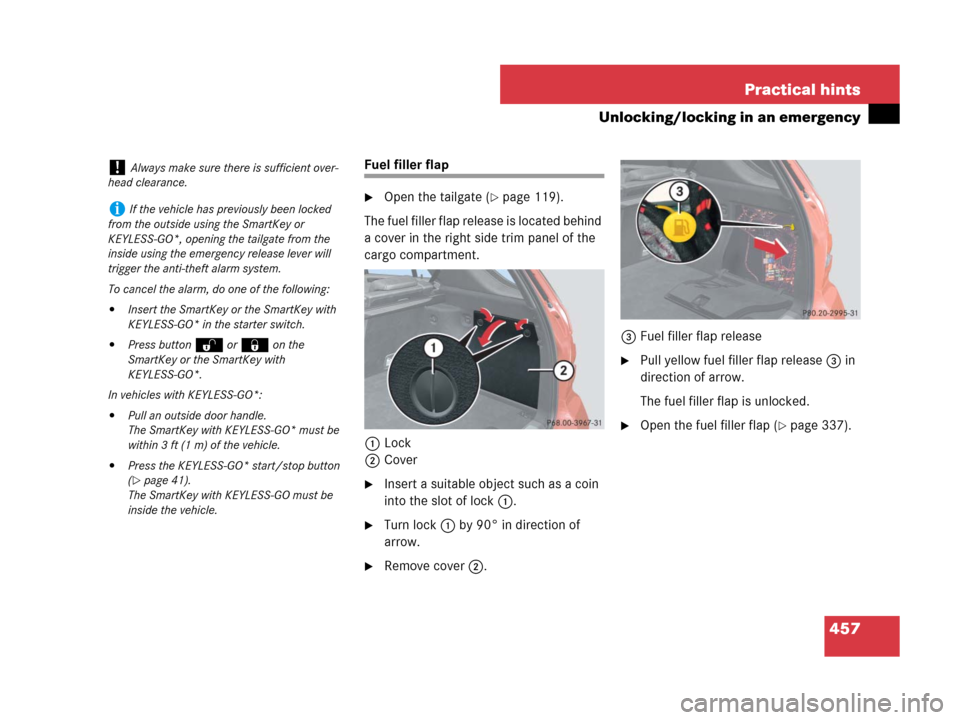
Fuel filler flap
�Open the tailgate (�page 119).
The fuel filler flap release is located behind
a cover in the right side trim panel of the
cargo compartment.
1Lock
2Cover
�Insert a suitable object such as a coin
into the slot of lock1.
�Turn lock1 by 90° in direction of
arrow.
�Remove cover2.3Fuel filler flap release
�Pull yellow fuel filler flap release3 in
direction of arrow.
The fuel filler flap is unlocked.
�Open the fuel filler flap (�page 337).
!Always make sure there is sufficient over-
head clearance.
iIf the vehicle has previously been locked
from the outside using the SmartKey or
KEYLESS-GO*, opening the tailgate from the
inside using the emergency release lever will
trigger the anti-theft alarm system.
To cancel the alarm, do one of the following:
�Insert the SmartKey or the SmartKey with
KEYLESS-GO* in the starter switch.
�Press buttonŒ or‹ on the
SmartKey or the SmartKey with
KEYLESS-GO*.
In vehicles with KEYLESS-GO*:
�Pull an outside door handle.
The SmartKey with KEYLESS-GO* must be
within 3 ft (1 m) of the vehicle.
�Press the KEYLESS-GO* start/stop button
(
�page 41).
The SmartKey with KEYLESS-GO must be
inside the vehicle.
Page 476 of 561

475 Practical hints
Replacing wiper blades
�Replacing wiper blades
Front wiper blades
Removing
�Remove the SmartKey from the starter
switch.
Vehicles with KEYLESS-GO*:
�Make sure the vehicle’s on-board
electronics have status0
(
�page 42).
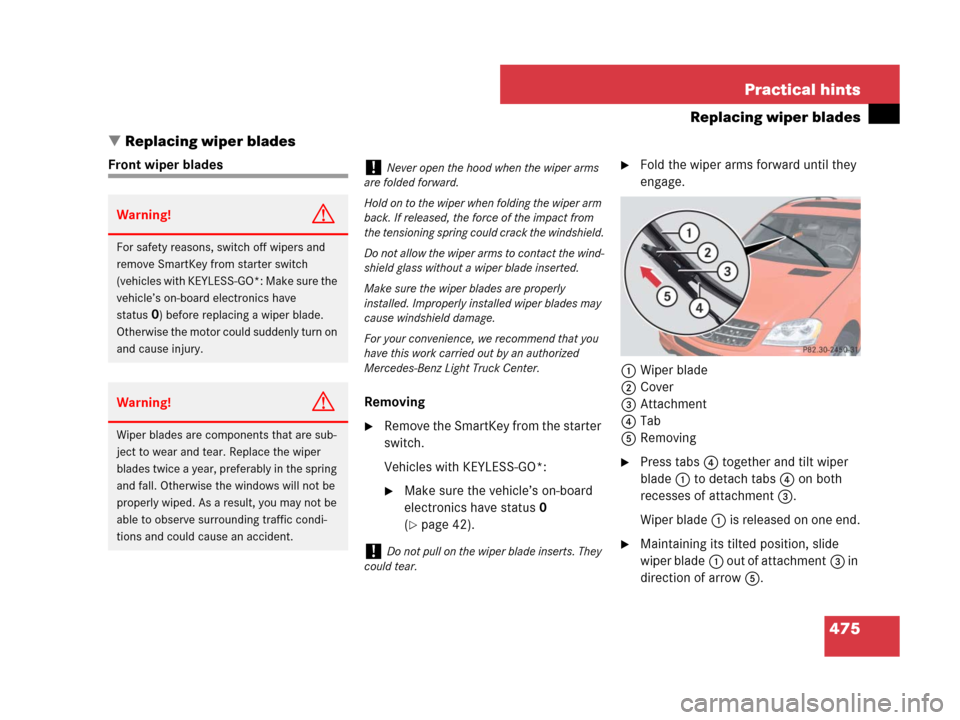
�Fold the wiper arms forward until they
engage.
1Wiper blade
2Cover
3Attachment
4Tab
5Removing
�Press tabs4 together and tilt wiper
blade1 to detach tabs4 on both
recesses of attachment3.
Wiper blade1 is released on one end.
�Maintaining its tilted position, slide
wiper blade1 out of attachment3 in
direction of arrow5.
Warning!G
For safety reasons, switch off wipers and
remove SmartKey from starter switch
(vehicles with KEYLESS-GO*: Make sure the
vehicle’s on-board electronics have
status
0) before replacing a wiper blade.
Otherwise the motor could suddenly turn on
and cause injury.
Warning!G
Wiper blades are components that are sub-
ject to wear and tear. Replace the wiper
blades twice a year, preferably in the spring
and fall. Otherwise the windows will not be
properly wiped. As a result, you may not be
able to observe surrounding traffic condi-
tions and could cause an accident.
!Never open the hood when the wiper arms
are folded forward.
Hold on to the wiper when folding the wiper arm
back. If released, the force of the impact from
the tensioning spring could crack the windshield.
Do not allow the wiper arms to contact the wind-
shield glass without a wiper blade inserted.
Make sure the wiper blades are properly
installed. Improperly installed wiper blades may
cause windshield damage.
For your convenience, we recommend that you
have this work carried out by an authorized
Mercedes-Benz Light Truck Center.
!Do not pull on the wiper blade inserts. They
could tear.
Page 477 of 561

476 Practical hints
Replacing wiper blades
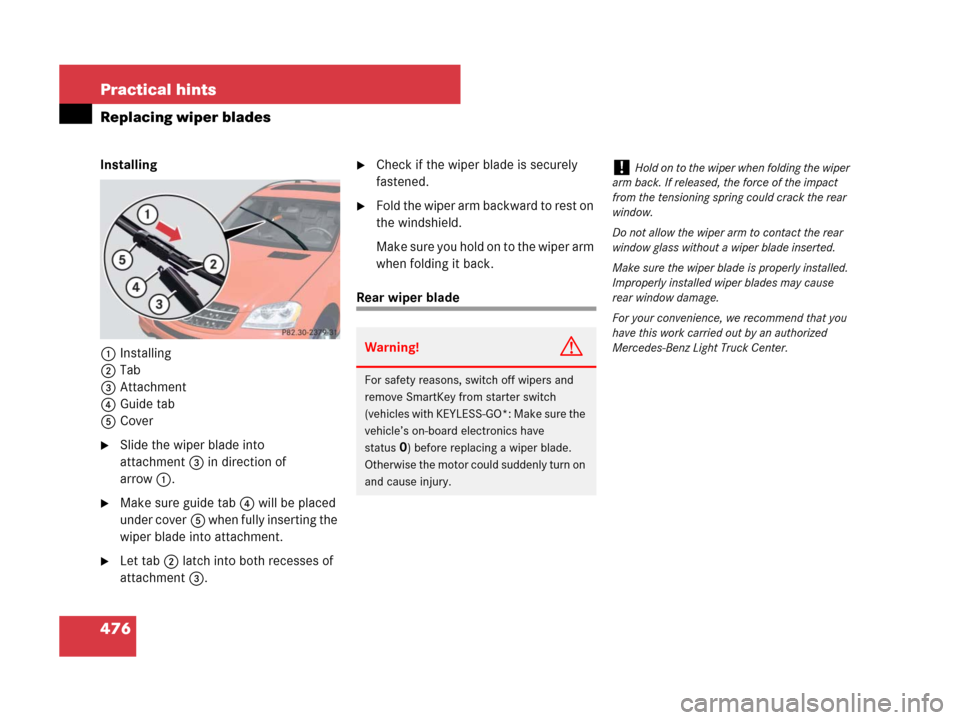
Installing
1Installing
2Tab
3Attachment
4Guide tab
5Cover
�Slide the wiper blade into
attachment3 in direction of
arrow1.
�Make sure guide tab4 will be placed
under cover5 when fully inserting the
wiper blade into attachment.
�Let tab2 latch into both recesses of
attachment3.
�Check if the wiper blade is securely
fastened.
�Fold the wiper arm backward to rest on
the windshield.
Make sure you hold on to the wiper arm
when folding it back.
Rear wiper blade
Warning!G
For safety reasons, switch off wipers and
remove SmartKey from starter switch
(vehicles with KEYLESS-GO*: Make sure the
vehicle’s on-board electronics have
status
0) before replacing a wiper blade.
Otherwise the motor could suddenly turn on
and cause injury.
!Hold on to the wiper when folding the wiper
arm back. If released, the force of the impact
from the tensioning spring could crack the rear
window.
Do not allow the wiper arm to contact the rear
window glass without a wiper blade inserted.
Make sure the wiper blade is properly installed.
Improperly installed wiper blades may cause
rear window damage.
For your convenience, we recommend that you
have this work carried out by an authorized
Mercedes-Benz Light Truck Center.
Page 478 of 561
477 Practical hints
Replacing wiper blades
Removing
�Remove the SmartKey from the starter
switch.
Vehicles with KEYLESS-GO*:
�Make sure the vehicle’s on-board
electronics have status0
(
�page 42).
�Fold wiper arm1 away from the rear
window until it engages.
1Wiper arm
2Wiper blade
�Turn wiper blade2 to form a right
angle with wiper arm1 as shown.
�Hold wiper arm1 and disengage wip-
er blade2 by carefully sliding it in
direction of arrow.
�Remove wiper blade2.
Installing
1Wiper arm
2Wiper blade
�Insert wiper blade2 into wiper
arm1.
�Hold wiper arm1 and engage wiper
blade2 by pushing it in direction of
arrow until it locks into place.
�Check whether the wiper blade is
securely fastened.
�Fold the wiper arm to rest on the rear
window.
Make sure to hold on to the wiper when
folding the wiper arm back.
!Do not pull on the wiper blade insert. It
could tear.