Page 332 of 561
.
�Set the parking brake for the vehicle
(
�page 65).
�Start the engine (�page 54).
�Vehicles with air")
331 Operation
Driving instructions
�Make sure the automatic transmission
is set toP (
�page 185).
�Set the parking brake for the vehicle
(
�page 65).
�Start the engine (�page 54).
�Vehicles with air suspension program*:
Set the vehicle level to Highway
(
�page 255).
�Vehicles with air suspension program*:
Set the ADS* to AUTO or COMFORT
(
�page 255).
�Turn off the engine (�page 66).
�Close all doors and the tailgate.
�Attach the trailer.
�Plug in all electrical connectors.Towing a trailer
There are many different laws, including
speed limit restrictions, having to do with
trailer towing. Make sure your rig will be le-
gal, not only for where you reside, but also
for where you will be driving. A good
source for this information can be the po-
lice or local authorities.
Note the following points, when driving
with the trailer:
�In order to gain skill and an understand-
ing of the vehicle’s behavior, you
should practice turning, stopping and
backing up in an area which is free from
traffic.
�Before you start driving check the
�trailer hitch
�break-away switch
�safety chains
�electrical connections
�lighting and tires
!Do not connect a trailer brake system (if
trailer is so equipped) directly to the vehicle’s
hydraulic brake system, as your vehicle is
equipped with antilock brakes. If you do, neither
the vehicle’s brakes nor the trailer’s brakes will
function properly.
iThe provided vehicle electrical wiring
harness for trailer towing has a brake signal wire
for hook-up to a brake controller.
You should consider using a trailer sway control
system. For further information, contact an
authorized Mercedes-Benz Light Truck Center.
iVehicles with air suspension program*:
When you are towing a trailer, the vehicle level
always remains in the Highway setting.
The following applies additionally when towing a
trailer:
�The vehicle is lowered to the highway level
when it reaches a speed of 5 mph (8 km/h)
if not set to highway level.
�The high-speed level is not available.
The restrictions that apply to towing also apply
when using accessories that are connected to
the trailer power socket, such as a bicycle rack.
Page 334 of 561

333 Operation
Driving instructions
�Extreme care must be exercised since
your vehicle with a trailer will require
additional passing distance ahead than
when driving without a trailer.
Because your vehicle and trailer is
longer than your vehicle alone, you will
also need to go much farther ahead of
the passed vehicle before you can re-
turn to your lane.
Uncoupling the trailer
�Make sure the automatic transmission
is set toP (
�page 185).
�Set the parking brake for the vehicle
(
�page 65).
�Start the engine (�page 54).
�Close all doors and the tailgate.
�Set the parking brake for the trailer.
�Disconnect all electrical plug connec-
tors.
�Uncouple the trailer.
�Make sure that the trailer coupling is
free of load.
�Turn off the engine (�page 66).
Warning!G
Vehicles with air suspension program*:
While you are coupling or decoupling a trail-
er, make sure that you do not
�lock or unlock
�open or close
a vehicle door or the tailgate.
The vehicle’s level could change and you
could endanger yourself and/or others as a
result.
Make sure that you do not operate the ADS
button* (
�page 255) or the vehicle level
control system* (
�page 255) when cou-
pling/decoupling the trailer.
Warning!G
Vehicles with air suspension program*:
As soon as you disconnect the electrical
connection between the trailer and the
vehicle, the vehicle will lower. To help avoid
personal injury, make sure no one is near
the wheel housing or underneath the vehicle
before the electrical connection is discon-
nected.
When you uncouple the trailer, the vehicle is
temporarily raised because the springs are
relieved of load. Be especially careful during
this process, as you could otherwise injure
yourself and/or others. Make sure that any
persons remaining in the vehicle do not
press the switches for vehicle level control
or the ADS*.
Page 436 of 561

435 Practical hints
What to do if …
Display symbolDisplay messagePossible cause/consequencePossible solution
c You are driving with one or more
doors open.�Stop the vehicle in a safe location or as
soon as it is safe to do so.
�Close the door(s).
] Clean
Fuel Filter�Contact an authorized Mercedes-Benz
Light Truck Center.
AGas Cap OpenA loss of pressure has been
detected in the fuel system. The
fuel cap may not be closed
properly or the fuel system may
be leaky.�Check the fuel cap (�page 337).
If it is not closed properly:
�Close the fuel cap.
If it is closed properly:
�Have the fuel system checked by an
authorized Mercedes-Benz Light Truck
Center.
aYou are driving with the hood or
the tailgate open.�Carefully bring the vehicle to a halt as
soon as it is safe to do so in a safe
location.
�Close the hood (�page 341) or the
tailgate (
�page 119).
You are trying to lock the vehicle
with the KEYLESS-GO* function
with a door or the tailgate open.�Close all doors and/or the tailgate
(
�page 119).
Page 449 of 561
448 Practical hints
Where will I find ...?
First aid kit
The first aid kit is located on the driver’s
side in the cargo compartment behind the
cover.
1Cover in left side trim panel
2Lock
�Turn lock1 90° in direction of arrow.
�Fold down cover2.
The first aid kit can be removed.
Vehicle tool kit
The vehicle tool kit is stored under the
cargo compartment floor.
The vehicle tool kit includes:
�Towing eye bolt
�Wheel wrench
�Alignment bolt
�Vehicle jack
�Fuse chart
�Collapsible wheel chock
�Wheel bolts for spare wheel1Cargo compartment floor, lowered
2Handle cover
�Open the tailgate (�page 119).
�Push in handle cover2 and pull han-
dle in direction of arrow.
�Lift cargo compartment floor1.
iCheck expiration dates and contents for
completeness at least once a year and replace
missing/expired items.
Page 451 of 561

450 Practical hints
Where will I find ...?
Example illustration1
6Wheel wrench
7Vehicle jack2
8Collapsible wheel chock
9Fuse chart
aTowing eye bolt
bAlignment bolt
cSpare wheel boltsVehicle jack
The vehicle jack is located underneath the
cargo compartment floor.
�Remove vehicle jack (�page 450).
1Depending on production date, your vehicle may
be equipped with a scissors-type vehicle jack.
Thus, appearance and alignment of the items may
vary.
2If your vehicle is equipped with a scissors-type
vehicle jack, a reversible ratchet is also included.
!Depending on vehicle production date your
vehicle may be equipped with a scissors-type
jack (located under the cargo compartment
floor). If so equipped, only use this jack when
jacking up the vehicle as otherwise the vehicle’s
underbody can be damaged. See separate
instructions for scissors-type jack.
!To prevent damage, always disengage the
strap of the securing hook and lower the cargo
compartment floor (
�page 448) before closing
the tailgate.
Warning!G
Only use the jack supplied with your vehicle
to lift the vehicle briefly for wheel changes.
If you use the jack for any other purpose,
you or others could be inj ure d, as the ja ck is
designed only for the purpose of changing a
wheel.
When using the jack, observe the safety
notes in the “Mounting the spare wheel”
section (
�page 479) and the notes on the
jack.
Page 457 of 561

456 Practical hints
Unlocking/locking in an emergency
Locking the vehicle
If you cannot lock the vehicle with the
SmartKey or KEYLESS-GO*, lock the vehi-
cle carrying out the following steps.
�Close the front passenger door, the
rear right door and the tailgate.
�Open the driver’s door and the rear left
door.
�Press the central locking switch on the
driver’s door (
�page 126).
The locking knobs of the front passen-
ger door and the rear doors move
down.
If the vehicle battery is disconnected or
drained:
�Press down the locking knobs of
the front passenger door and the
rear doors manually.
�Exit the vehicle.
�Close the driver’s door.
�Enter the vehicle through the rear left
door.
�Press down the locking knob of the
driver’s door.
�Exit the vehicle.
�Close the rear left door.
The vehicle is locked.
Unlocking and opening the tailgate
A minimum height clearance of 7.2 ft
(2.20 m) is required to open the tailgate.If the tailgate can no longer be unlocked
and opened using the Œbutton on the
SmartKey or the KEYLESS-GO* function,
use the emergency release lever to unlock
and open the tailgate.
The emergency release lever is located on
the inside of the tailgate.
1Emergency release lever
2Cover�Remove cover2 from the trim on the
tailgate.
�Push release lever1 all the way to the
left.
�Lift the tailgate.
!To prevent inadvertent lockout, make sure
to have the SmartKey or SmartKey with
KEYLESS-GO* with you before proceeding with
the next step. The next step will lock the vehicle.
iThis procedure does not arm the anti-theft
alarm system, nor does it lock the fuel filler flap.
Page 458 of 561
.
The fuel filler flap release is located behind
a cover in the right side trim panel of the
carg")
457 Practical hints
Unlocking/locking in an emergency
Fuel filler flap
�Open the tailgate (�page 119).
The fuel filler flap release is located behind
a cover in the right side trim panel of the
cargo compartment.
1Lock
2Cover
�Insert a suitable object such as a coin
into the slot of lock1.
�Turn lock1 by 90° in direction of
arrow.
�Remove cover2.3Fuel filler flap release
�Pull yellow fuel filler flap release3 in
direction of arrow.
The fuel filler flap is unlocked.
�Open the fuel filler flap (�page 337).
!Always make sure there is sufficient over-
head clearance.
iIf the vehicle has previously been locked
from the outside using the SmartKey or
KEYLESS-GO*, opening the tailgate from the
inside using the emergency release lever will
trigger the anti-theft alarm system.
To cancel the alarm, do one of the following:
�Insert the SmartKey or the SmartKey with
KEYLESS-GO* in the starter switch.
�Press buttonŒ or‹ on the
SmartKey or the SmartKey with
KEYLESS-GO*.
In vehicles with KEYLESS-GO*:
�Pull an outside door handle.
The SmartKey with KEYLESS-GO* must be
within 3 ft (1 m) of the vehicle.
�Press the KEYLESS-GO* start/stop button
(
�page 41).
The SmartKey with KEYLESS-GO must be
inside the vehicle.
Page 472 of 561
471 Practical hints
Replacing bulbs
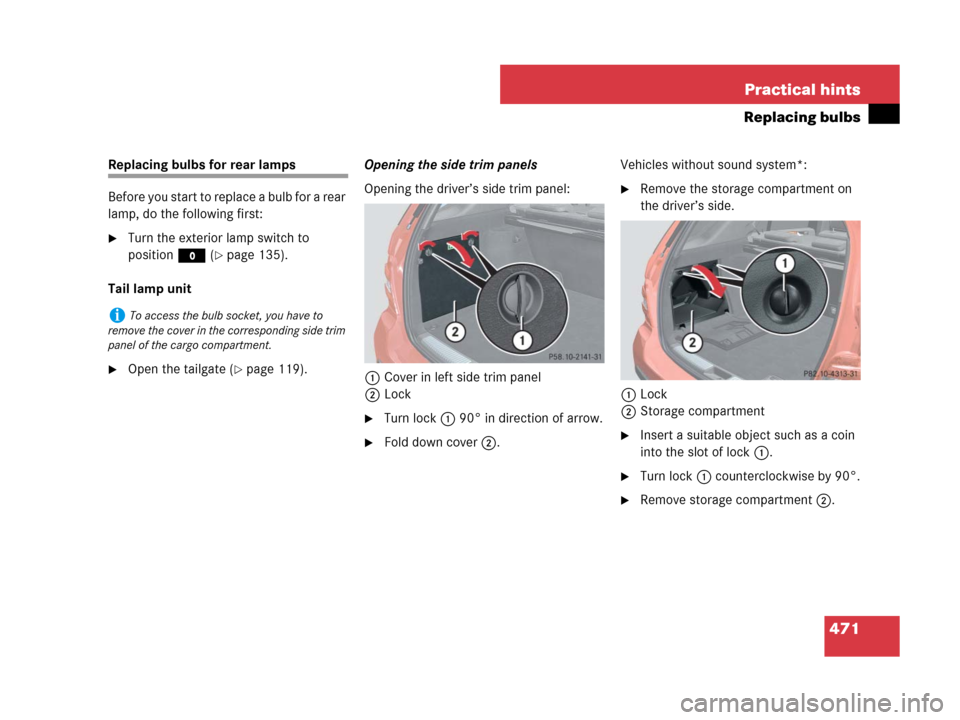
Replacing bulbs for rear lamps
Before you start to replace a bulb for a rear
lamp, do the following first:
�Turn the exterior lamp switch to
positionM (
�page 135).
Tail lamp unit
�Open the tailgate (�page 119).Opening the side trim panels
Opening the driver’s side trim panel:
1Cover in left side trim panel
2Lock
�Turn lock1 90° in direction of arrow.
�Fold down cover2.Vehicles without sound system*:
�Remove the storage compartment on
the driver’s side.
1Lock
2Storage compartment
�Insert a suitable object such as a coin
into the slot of lock1.
�Turn lock1 counterclockwise by 90°.
�Remove storage compartment2.
iTo access the bulb socket, you have to
remove the cover in the corresponding side trim
panel of the cargo compartment.