Page 264 of 561

263 Controls in detail
Driving systems
Switching the Parktronic system*
on/off
You can switch off the Parktronic system
manually.
The Parktronic switch is located in the
upper part of the center console.
1Parktronic switch
2Indicator lampSwitching off
�Press Parktronic switch1.
Indicator lamp2 comes on.
Switching on
�Press Parktronic switch1 once more.
Indicator lamp2 goes out.Parktronic system* malfunction
If only the red distance segments illumi-
nate and an acoustic warning sounds,
there is a malfunction in the Parktronic
system. The Parktronic system will auto-
matically switch off after 20 seconds and
the indicator lamp in the Parktronic switch
comes on.
�Have the Parktronic system checked
by an authorized Mercedes-Benz Light
Truck Center as soon as possible.
If only the red distance segments illumi-
nate and no acoustic warning sounds, the
Parktronic system sensors are dirty (e.g.
slush, snow or ice) or there is an interfer-
ence from other radio or ultrasonic signals
(e.g. working jackhammers, car wash or
the air brakes of trucks). The Parktronic
system will automatically switch off after
20 seconds and the indicator lamp in the
Parktronic switch comes on.iThe Parktronic system switches on
automatically when you switch on the ignition
(
�page 40).
Vehicles with original equipment Mercedes-Benz
Trailer Hitch Kit:
The rear Parktronic sensor will automatically
disengage when towing a trailer.
Page 265 of 561
.
�Clean the Parktronic system sensors
(
�page 394).
�Switch on the ignition (�page 40).
or
�Check the Parktronic system oper")
264 Controls in detail
Driving systems
�Switch off the ignition (�page 40).
�Clean the Parktronic system sensors
(
�page 394).
�Switch on the ignition (�page 40).
or
�Check the Parktronic system operation
at another location to rule out interfer-
ence from outside radio or ultrasonic
signals.
Rear view camera*
Warning!G
The rear view camera is only an aid and may
display obstacles from a distorted perspec-
tive or inaccurately, or may not display ob-
stacles at all. The rear view camera does not
relieve you of the responsibility to be cau-
tious, take care and pay careful attention.
The rear view camera may not show objects
which are:
�very close to the rear bumper
�under the rear bumper
�above the tailgate handle
You are responsible for safety at all times
and must continue to pay attention to the
immediate surroundings when parking and
maneuvering. This includes the area behind,
in front of and beside the vehicle. Otherwise
you could endanger yourself or others.
Warning!G
Make sure that no persons or animals are in
or near the area in which you are
parking/maneuvering. Otherwise, they
could be injured.
Warning!G
The rear view camera either will not function
or will not function to its full capability if:
�the tailgate is open
�it is raining very hard, snowing or foggy
�it is night or you are parking/maneuver-
ing your vehicle in an area where it is
very dark
�the camera is exposed to a very bright
white light
�the immediate surroundings are illumi-
nated with fluorescent light (the display
may flicker)
Page 266 of 561

265 Controls in detail
Driving systems
The rear view camera is an optical parking
aid. It shows you the area behind the vehi-
cle in the COMAND system display when
reverse gearR is engaged, for example
during parallel parking.
The rear view camera is located near the
tailgate handle.
1Rear view cameraSwitching the rear view camera on and
off
�Switch on the ignition (�page 40).
�Shift the automatic transmission in
positionR (
�page 185).
The area behind the vehicle appears in
the COMAND system display.
�Shift the automatic transmission
intoP,N orD to switch off the rear
view camera.
�there is a sudden change in tempera-
ture, e.g. if you drive into a heated ga-
rage from the cold (lens condensation)
�the camera lens is dirty or covered
�the rear of your vehicle is damaged
In this case, have the position and set-
ting of the camera checked by a quali-
fied specialist workshop.
Mercedes-Benz recommends that you
visit a Mercedes-Benz Light Truck
Center for this purpose.
Do not use the rear view camera in these sit-
uations. Otherwise you could injure yourself
or others and/or damage property including
your vehicle while parking/maneuvering.
iThe area behind the vehicle is shown in the
COMAND system display as a mirror image, like
in the rear view mirror.
iThe image from the rear view camera will no
longer be displayed if you select another
function on the COMAND system while reverse
gearR is engaged. To display the image again,
disengage and reengage reverse gearR.
Page 287 of 561

1Ashtray
2Ashtray coverOpening rear ashtray
�Briefly press ashtray cover2.
The ashtray1 opens automatically.
R")
286 Controls in detail
Useful features
Rear center console ashtray (front of
rear seats)
1Ashtray
2Ashtray coverOpening rear ashtray
�Briefly press ashtray cover2.
The ashtray1 opens automatically.
Removing rear ashtray insert
�Grip the insert on the sides and pull it
out upwards.
Reinstalling rear ashtray insert
�Install ashtray insert.
�Close the ashtray.
Cigarette lighter
�Switch on the ignition (�page 40).
�Push in cigarette lighter.
The cigarette lighter will pop out auto-
matically when hot.
Cigarette lighter
Depending on vehicle configuration your
vehicle is equipped with a cigarette lighter
and an ashtray (
�page 285) located in the
front center console and an ashtray locat-
ed in front of the rear seats (
�page 286).
!Close the ashtray when not in use and be-
fore folding the rear seats
Warning!G
Never touch the heating element or sides of
the cigarette lighter; they are extremely hot.
Hold the knob only.
Make sure that any children traveling with
you do not injure themselves or start a fire
with the hot cigarette lighter.
When leaving the vehicle always remove the
SmartKey or SmartKey with KEYLESS-GO*
from the starter switch, take it with you, and
lock the vehicle. Do not leave children unat-
tended in the vehicle, or with access to an
unlocked vehicle. A child’s unsupervised
access to a vehicle could result in an
accident and/or serious personal injury.
Page 288 of 561
.
1Cigarette lighter
�Open the ashtray (�page 285).
�Push in cigarette lighter1.
The cigarette lighter will pop out auto-
matic")
287 Controls in detail
Useful features
�Switch on the ignition (�page 40).
1Cigarette lighter
�Open the ashtray (�page 285).
�Push in cigarette lighter1.
The cigarette lighter will pop out auto-
matically when hot.
Power outlets!The lighter socket can accommodate
12V DC electrical accessories (up to a maximum
of 180 W) designed for use with the standard
“cigarette lighter” plug type. Keep in mind, how-
ever, that connecting accessories to the lighter
socket (for example extensive connecting and
disconnecting, or using plugs that do not fit prop-
erly) can damage the lighter socket. With the
socket damaged, the lighter may no longer be
able to be placed in the heating (pushed-in) posi-
tion, or the lighter may pop out too early with the
lighter not hot enough.
To help avoid damaging the cigarette lighter
socket, we recommend connecting 12V DC elec-
trical accessories designed for use with the stan-
dard “cigarette lighter” plug type to the 12V
power outlets (
�page 287) in your vehicle
whenever possible.
iIf the engine is off, and the cigarette lighter
is being used extensively, the vehicle battery
may become discharged.
!If you use all power outlets in the vehicle,
make sure that the maximum current drawn
does not exceed 55 A.
iThe power outlets can be used to
accommodate 12V DC electrical accessories
(e.g. air pump, auxiliary lamps) up to a maximum
of 240 W.
If the engine is off, the battery may become dis-
charged if used for long periods of time.
iYou can use the power outlets, except for
the power outlet in the front center console,
even if the ignition is switched off.
An emergency shut-off feature ensures that the
vehicle’s electrical voltage does not fall below a
minimum level. If the voltage drops to this mini-
mum level, the power outlets are automatically
switched off. This ensures that enough power re-
mains to start the engine.
Page 289 of 561
288 Controls in detail
Useful features
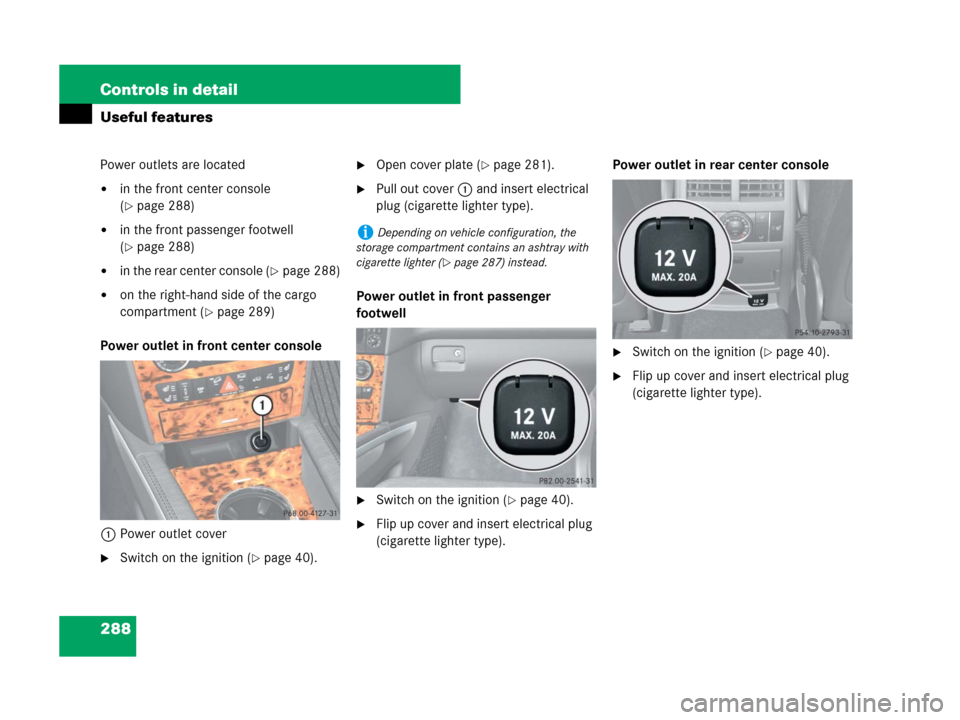
Power outlets are located
�in the front center console
(
�page 288)
�in the front passenger footwell
(
�page 288)
�in the rear center console (�page 288)
�on the right-hand side of the cargo
compartment (
�page 289)
Power outlet in front center console
1Power outlet cover
�Switch on the ignition (�page 40).
�Open cover plate (�page 281).
�Pull out cover1 and insert electrical
plug (cigarette lighter type).
Power outlet in front passenger
footwell
�Switch on the ignition (�page 40).
�Flip up cover and insert electrical plug
(cigarette lighter type).Power outlet in rear center console
�Switch on the ignition (�page 40).
�Flip up cover and insert electrical plug
(cigarette lighter type).
iDepending on vehicle configuration, the
storage compartment contains an ashtray with
cigarette lighter (
�page 287) instead.
Page 290 of 561
.
�Flip up cover and insert electrical plug
(cigarette lighter type).
Floormats
1Retainer pi")
289 Controls in detail
Useful features
Power outlet in cargo compartment
�Switch on the ignition (�page 40).
�Flip up cover and insert electrical plug
(cigarette lighter type).
Floormats
1Retainer pin
2Eyelet
Removing
�Pull floormat off of retainer pins1.
�Remove the floormat.
Installing
�Lay down the floormat in the respective
footwell.
�Press the floormat eyelets2 onto re-
tainer pins1.
Warning!G
Whenever you are using floormats, make
sure there is enough clearance and that the
floormats are securely fastened.
Floormats should always be securely fas-
tened using eyelets2 and retainer pins1
(
�page 289).
Before driving off, check that the floormats
are securely in place and adjust them if nec-
essary. A loose floormat could slip and
hinder proper functioning of the pedals.
Do not place several floormats on top of
each other as this may impair pedal move-
ment.
iTo install or remove the floormat more easi-
ly, move the driver’s seat or front passenger seat
as far to the rear as possible (
�page 44).
Page 291 of 561

290 Controls in detail
Useful features
Heated steering wheel*
The steering wheel heating warms up the
leather area of the steering wheel.
The stalk is on the lower left-hand side of
the steering wheel.
1Switching on
2Indicator lamp
3Switching offSwitching on
�Switch on the ignition (�page 39).
�Turn switch at the tip of stalk in the
direction of arrow1.
The steering wheel is heated. Indicator
lamp2 comes on.Switching off
�Turn switch at the tip of stalk in the
direction of arrow3.
The heated steering wheel is switched
off. Indicator lamp2 goes out.
For information on the steering wheel, see
“Multifunction steering wheel”
(
�page 148).
iThe steering wheel heating is turned off tem-
porarily and the indicator lamp2 remains on
when
�the temperature of the vehicle interior is
above 86°F (30°C)
�the temperature of the steering wheel is
above 95°F (35°C)
When these conditions do not apply anymore,
steering wheel heating continues.
iIndicator lamp2 flashes or goes out
�in case of power surge or undervoltage
�in case of a steering wheel heating malfunc-
tion
iThe steering wheel heating switches off
automatically when you remove the SmartKey
from the starter switch or, on vehicles with
KEYLESS-GO*, when you switch off the ignition
(
�page 39) and open the driver’s door.