Page 470 of 561

counterclockwise.
�Pull bulb socket5 out of the
headlamp housing.
�Pull the side marker bulb out of bulb
soc")
469 Practical hints
Replacing bulbs
Side marker lamp bulb
�Turn bulb socket5 (�page 466)
counterclockwise.
�Pull bulb socket5 out of the
headlamp housing.
�Pull the side marker bulb out of bulb
socket5.
�Insert the new side marker bulb into
bulb socket5.
�Insert bulb socket5 into the
headlamp housing.
�Turn bulb socket5 clockwise until it
engages.Front fog lamp bulbs
Removing front fog lamp cover:
1Cover
2Front fog lamp or corner-illuminating
front fog lamp*
�Insert a suitable object (e.g. screwdriv-
er) at point indicated by the arrow and
pry out cover1.
Cover1 is released.
�Swing cover1 outwards and take it
off.
Removing front fog lamp cover (Vehicles
with AMG Sport Package* or ML 63 AMG):
1Cover
2Front fog lamp
�Use a suitable object (e.g. hook or a
screwdriver) and place the hook or
screwdriver carefully between lower
end of cover and bumper.
!If not done carefully and properly, damage
to the bumper can result. We therefore recom-
mend that you have this work carried out by an
authorized Mercedes-Benz Light Truck Center.
��
Page 474 of 561
473 Practical hints
Replacing bulbs
License plate lamp
1License plate lamp cover
2Screws
�Loosen screws2.
�Remove license plate lamp cover1.
�Replace the tubular bulb.
�Reinstall license plate lamp cover1.
�Retighten screws2.
Adjusting headlamp aim
VVertical centerline
HHeadlamp mounting height, measured
from the centerCorrect headlamp adjustment is extremely
important. To check and readjust a head-
lamp, follow the steps described:
�Park the vehicle on a level surface
25 feet (7.6 m) from a vertical test
screen or wall.
�Switch the headlamps on
(
�page 135).
If the beam does not show a beam pattern
as indicated in the figure left, then follow
the steps below:
�Open hood (�page 341).
iHigh beam adjustments simultaneously aim
the low beam.
Vehicle should have a normal tailgate load.
��
Page 475 of 561
474 Practical hints
Replacing bulbs
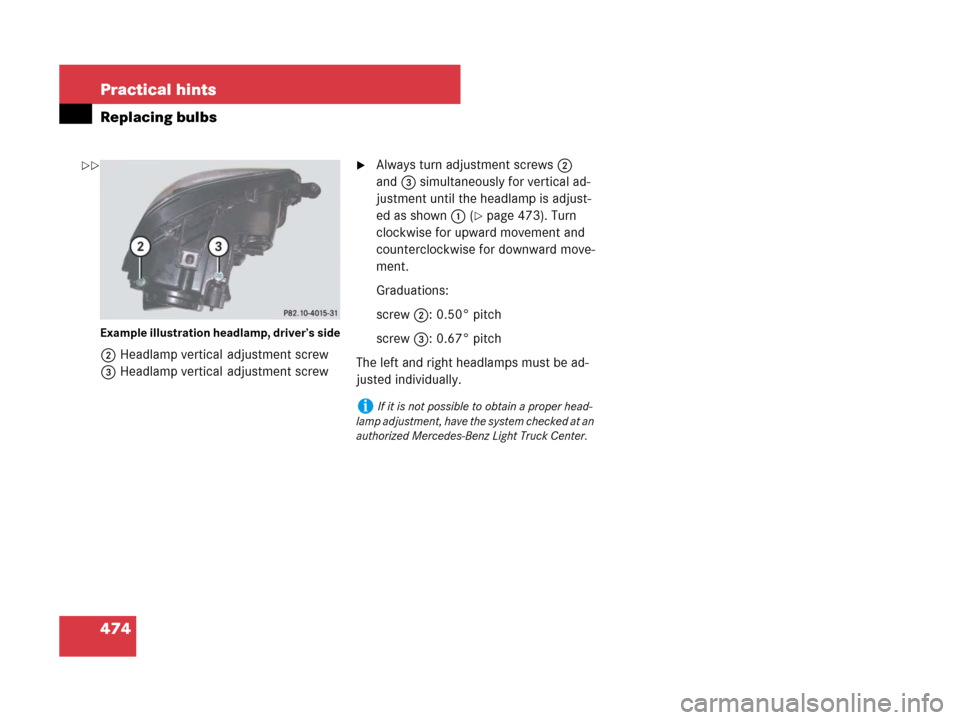
Example illustration headlamp, driver’s side
2Headlamp vertical adjustment screw
3Headlamp vertical adjustment screw
�Always turn adjustment screws2
and3 simultaneously for vertical ad-
justment until the headlamp is adjust-
ed as shown1 (
�page 473). Turn
clockwise for upward movement and
counterclockwise for downward move-
ment.
Graduations:
screw2: 0.50° pitch
screw3: 0.67° pitch
The left and right headlamps must be ad-
justed individually.
iIf it is not possible to obtain a proper head-
lamp adjustment, have the system checked at an
authorized Mercedes-Benz Light Truck Center.
��
Page 499 of 561
 terminal
2Positive (+) terminal
3Positive terminal cover
�Make sure the two vehicles do")
498 Practical hints
Jump starting
The jump-start contacts are located in the
engine compartment.
1Negative (-) terminal
2Positive (+) terminal
3Positive terminal cover
�Make sure the two vehicles do not
touch.
�Turn off all electrical consumers.
�Apply parking brake (�page 65).
�Set automatic transmission to
positionP (
�page 185).
�Open the hood (�page 341).
�Remove cover from negative
terminal1.
�Flip up cover3 of positive terminal2
in direction of arrow.
1Negative terminal of discharged
battery
2Positive terminal of discharged battery
4Positive terminal of charged battery
5Negative terminal of charged battery
�Connect positive terminal2 and4
with the jumper cable. Clamp cable to
charged battery4 first.
�Start engine of the vehicle with the
charged battery and run at idle speed.
�Connect negative terminals1 and5
of the batteries with the second jumper
cable. Clamp the cable to negative
terminal5 of the charged battery
first.
�Start the engine of the disabled vehi-
cle.
You can now turn on the electrical consum-
ers. Do not switch on the headlamps under
any circumstances.
�Remove the jumper cables first from
negative terminals1 and5 and then
from positive terminals2 and4.
You can now switch on the headlamps.
�Have the battery checked at the near-
est authorized Mercedes-Benz Light
Truck Center.
Warning!G
Keep flames or sparks away from battery.
Do not smoke.
Observe all safety instructions and precau-
tions when handling automotive batteries
(
�page 489).
!Never invert the terminal connections!
Page 525 of 561
524 Technical data
Fuels, coolants, lubricants
ModelCapacityFuels, coolants, lubricants etc.
Fuel tankAll models25.1 US gal (95.0 l)Gasoline engine:
Premium unleaded gasoline
Minimum Posted Octane 91
(Avg. of 96 RON/86 MON)
Diesel engine:
ULTRA-LOW SULFUR HIGHWAY DIESEL FUEL
(15 ppm SULFUR MAXIMUM)
including a reserve ofAll except
ML 63 AMGapprox. 3.5 US gal (13.0 l)
including a reserve ofML 63 AMGapprox. 4.0 US gal (15.0 l)
Air conditioning systemAll modelsR-134a refrigerant and special PAG lubricant
oil (never R-12)
Windshield washer system and
headlamp cleaning system*All models8.1 US qt (7.7 l)MB Windshield Washer Concentrate1
1Use MB Windshield Washer Concentrate “MB SummerFit” and water for temperatures above freezing or MB Windshield Washer Concentrate “MB SummerFit” and
commercially available premixed windshield washer solvent/antifreeze for temperatures below freezing point. Follow suggested mixing ratios (�page 530).
Page 531 of 561

530 Technical data
Fuels, coolants, lubricants
Windshield washer system and
headlamp cleaning system*
Both the windshield washer system and
headlamp cleaning system* are supplied
from the windshield washer reservoir.
The windshield washer reservoir has a ca-
pacity of approximately 8.1 US qt (7.7 l).
�Refill the reservoir with MB Windshield
Washer Concentrate and water (or con-
centrate and commercially available
premixed windshield washer sol-
vent/antifreeze, depending on ambient
temperatures).Windshield and headlamp washer fluid
mixing ration
For temperatures above freezing point, use
MB Windshield Washer Concentrate
“MB SummerFit” and water:
�1 part “MB SummerFit” to 100 parts
water
(1.34 fl oz [40 ml] “MB SummerFit” to
1gal [4.0l] water)
For temperatures below freezing point, use
MB Windshield Washer Concentrate
“MB SummerFit ” and commercially avail-
able premixed windshield washer
solvent/antifreeze:
�1 part “MB SummerFit” to 100 parts
solvent
(1.34 fl oz [40 ml] “MB SummerFit” to
1 gal [4.0 l] solvent)Warning!G
Washer solvent/antifreeze is highly flamma-
ble. Do not spill washer solvent/antifreeze
on hot engine parts, because it may ignite
and burn. You could be seriously burned.
Page 533 of 561
* 218
Air conditioning, Cooling 229
Air distribution, Front 224
Air distribution, Rear 233
Air recirculation mode 227
Air vents, Front 224
Air volume 225
Co")
532 Index
Automatic climate control (3-zone)* 218
Air conditioning, Cooling 229
Air distribution, Front 224
Air distribution, Rear 233
Air recirculation mode 227
Air vents, Front 224
Air volume 225
Control panel, Front 220
Control panel, Rear 231
Deactivating system 222
Defogging 225
Defrosting 225
Maximum cooling, MAXCOOL 226
Rear passenger compartment 231
Rear window defroster 203
Residual engine heat (REST) 230
Using driver-side settings for
all temperature zones 229
Automatic headlamp mode 136
Automatic lighting control, Interior
lighting 142
Automatic locking when driving 125
Automatic shift program
(ML 63 AMG only) 195Automatic transmission 54
Accelerator position 190
Automatic shift program
(ML 63 AMG only) 195
Emergency operation
(Limp-Home Mode) 197
Gear ranges 192
Gear selector lever 54, 183
Gear shifting malfunctions 197
Hill start assist system 191
Kickdown 190
Kickdown, manual shift program
(ML 63 AMG only) 196
Manual shift progam
(ML 63 AMG only) 195
Program mode selector switch
(ML 63 AMG only) 194
Shift program (ML 63 AMG only) 194
Shifting procedure 186
Starting the engine 54
Steering wheel gearshift control 193
Towing a trailer 191
Transmission fluid level 345
Transmission positions 187
Automatic Transmission Fluid see ATFB
Backrest
Seat 44
Seat, Lumbar support 129
Seat, Multicontour* 129
Backup lamps
Messages in the multifunction
display 438
Replacing bulbs 471
Bar 380
BAS 100
Lamps in instrument cluster 400
Messages in the multifunction
display 415
Basic carrier bars* 266
Batteries, SmartKey
Check lamp 110, 113
Messages in the multifunction
display 427
Replacing 461
Battery, Vehicle 489
Charging 496
Disconnecting and connecting 491
Jump starting 497
Removing and installing 491
Page 539 of 561

538 Index
Fluids
Automatic transmission fluid 345
Brake fluid 340, 523, 525
Capacities 522
Engine coolant 340, 345, 528
Engine oil 343, 525
Power steering fluid 523
Windshield washer and headlamp
cleaning system* 340, 524, 530
Fog lamps 138, 139
Corner-illuminating front fog
lamps* 140
Messages in the multifunction
display 439
Rear fog lamp 139
Replacing bulbs 469
4-ETS 104
Off-road - 4-ETS 105
Front air bags 77
Front defroster 210, 225
Front lamps see HeadlampsFront passenger front air bag 72, 77
Messages in the multifunction
display 421, 422, 423, 424
Front passenger front air bag off indicator
lamp 31, 83
Front seat head restraints see
Head restraints
Front towing eye 501
Fuel 338
Additives 527
Capacities, Fuel tank 524
Consumption statistics 179
Diesel fuel 524
Filling the tank 337
Fuel filler flap and cap 337, 457
Fuel gauge 29
Fuel tank reserve warning lamp 29,
410
Premium unleaded gasoline 338,
526
Requirements, Octane rating 526Fuel cap
Messages in the multifunction
display 435
Fuel consumption statistics
Since last reset 179
Since start 179
Fuel filler flap 337
Locking/unlocking 337
Opening 337
Opening in an emergency 457
Fuel tank
Capacity 524
Filler flap 337
Fuel, Premium unleaded gasoline 524
Fuels, coolants, lubricants etc. 522
Fuses 504
Fuse box in cargo compartment 505
Fuse box in engine compartment 505
Fuse box in passenger
compartment 506
Fuse chart 448
Replacing 504

Gasoline engine:
Premium unleaded gasoline
Minimum Posted Octane 91")