Page 244 of 561
.
�Remove the SmartKey from the starter
switch.
Vehicles with KEYLESS-GO*:
�Switch off the ignition (�page 41).
�O")
243 Controls in detail
Power tilt/sliding sunroof
�Switch off the ignition (�page 40).
�Remove the SmartKey from the starter
switch.
Vehicles with KEYLESS-GO*:
�Switch off the ignition (�page 41).
�Open the driver’s door (this puts
the starter switch in position0,
same as with the SmartKey
removed from the starter switch).
The driver’s door then can be
closed again.
�Remove the fuse for the tilt/sliding
sunroof from the fuse box
(
�page 504).
�Reinsert the fuse in the main box.
�Switch on the ignition (�page 40).
�Press and hold the sunroof switch in
the direction of arrow3 (
�page 241)
until the tilt/sliding sunroof is fully
raised at the rear.
�Hold the sunroof switch in the direction
of arrow3 for approximately
1 second.
�Open the tilt/sliding sunroof using the
Express-open feature (
�page 242).
If the tilt/sliding sunroof opens
completely, it is synchronized.
If the tilt/sliding sunroof does not open
completely:
�Repeat the above steps.
iFor information on which fuse box contains
the fuse for the power tilt/sliding sunroof, see
the fuse chart provided with the vehicle tool kit
(
�page 448).
Page 249 of 561
.
�Release the cruise control lever.
The vehicle speed i")
248 Controls in detail
Driving systems
�Briefly lift the cruise control lever up
past the resistance point in direction of
arrow1 (
�page 245).
�Release the cruise control lever.
The vehicle speed increases in incre-
ments of 5 mph (Canada: 10 km/h).
Setting a lower speedYou can reduce the speed in two ways.
Adjustment in 1 mph (Canada: 1 km/h)
increments
�Briefly press the cruise control lever
down to the resistance point in direc-
tion of arrow2 (
�page 245).
�Release the cruise control lever.
The vehicle speed decreases in incre-
ments of 1 mph (Canada: 1 km/h).Adjustment in 5 mph
(Canada: 10 km/h) increments
�Briefly press the cruise control lever
down past the resistance point in direc-
tion of arrow2 (
�page 245).
�Release the cruise control lever.
The vehicle speed decreases in incre-
ments of 5 mph (Canada: 10 km/h).
iThe new speed is set and the vehicle will
accelerate. Keep in mind that it may take a brief
moment until the vehicle has reached the set
speed.
Warning!G
If you decrease the set vehicle speed, keep
in mind that it may take a brief moment until
the vehicle has reached the set speed.
Decelerate the set vehicle speed to a value
that the prevailing road conditions and legal
speed limits permit. Otherwise, sudden and
unexpected deceleration of the vehicle
could cause an accident and/or serious in-
jury to you and others.
iWhen you use the cruise control lever to
decelerate, the brake system will automatically
brake the vehicle if the engine’s braking power
does not brake the vehicle sufficiently.
iThe set value is decreased in 1 mph
(Canada: 1 km/h) increments each time you
press the cruise control lever down to the resis-
tance point.
iThe set value is decreased in 5 mph
(Canada: 10 km/h) increments each time you
press the cruise control lever down past the
resistance point.
iThe new speed is set and the vehicle will
decelerate. Keep in mind that it may take a brief
moment until the vehicle has reached the set
speed.
Page 254 of 561
.
Each time the set speed is changed,
DSR will appear i")
253 Controls in detail
Driving systems
�Release the cruise control lever.
The vehicle speed decreases in incre-
ments of 5 mph (Canada: 10 km/h).
Each time the set speed is changed,
DSR will appear in the multifunction dis-
play and the newly set speed is shown.
Off-road driving program
The off-road driving program is designed to
assist the driver when driving off-road in
terrain and crossing water. The off-road
driving program adjusts the engine power
and shifting of the automatic transmission
to be more suitable for the off-road use of
the vehicle. In addition, the ABS, ESP
®, and
4-ETS designed for off-road use are
automatically activated.
In the following situations you should
switch to the off-road driving program:
�during off-road driving
�when crossing water (�page 324)
�when towing up or down on steep
gradientsThe switch is located on the upper part of
the center console.
1Switch for off-road driving program
2Indicator lamp
iThe new speed is set and the vehicle will
accelerate or decelerate. Keep in mind that it
may take a brief moment until the vehicle has
reached the new set speed.
iThe set speed is canceled when DSR is
switched off. If DSR is switched on again, DSR
will use the programmed default speed
(
�page 178).
iIn the ML 63 AMG, the off-road driving
program is switched on and off via the control
system (
�page 159).
Page 286 of 561

285 Controls in detail
Useful features
Removing and reinstalling cup holder
The front cup holder can be removed for
cleaning purposes.
1Cup holder
2Bridge with card, ticket holder
�Hold cup holder at its bridge2 and
pull out bridge in direction of arrow.
�Pull cup holder1 out in direction of ar-
row.
�First, insert the cup holder1 and then
insert bridge2.
Ashtrays
Depending on vehicle configuration, your
vehicle is equipped with an ashtray and a
cigarette lighter (
�page 287) located in
the front center console and an ashtray lo-
cated in front of the rear seats
(
�page 286).
Ashtray in the center console
1Ashtray insert
2Cover plateOpening the ashtray
�Briefly touch cover plate2.
The ashtray opens automatically.
Removing ashtray insert
�Grip the ashtray insert1 on the sides
and pull it out upwards.
Reinstalling ashtray insert
�Install ashtray insert1.
�Close ashtray cover plate2.
iIf your vehicle is not equipped with an ash-
tray, it has a storage compartment (
�page 281)
with a power outlet (
�page 288) instead.
Warning!G
Remove ashtray only with vehicle standing
still. Set the parking brake to secure vehicle
from movement. Set automatic transmis-
sion toP. With the automatic transmission
set toP, turn off the engine.
Page 288 of 561
.
1Cigarette lighter
�Open the ashtray (�page 285).
�Push in cigarette lighter1.
The cigarette lighter will pop out auto-
matic")
287 Controls in detail
Useful features
�Switch on the ignition (�page 40).
1Cigarette lighter
�Open the ashtray (�page 285).
�Push in cigarette lighter1.
The cigarette lighter will pop out auto-
matically when hot.
Power outlets!The lighter socket can accommodate
12V DC electrical accessories (up to a maximum
of 180 W) designed for use with the standard
“cigarette lighter” plug type. Keep in mind, how-
ever, that connecting accessories to the lighter
socket (for example extensive connecting and
disconnecting, or using plugs that do not fit prop-
erly) can damage the lighter socket. With the
socket damaged, the lighter may no longer be
able to be placed in the heating (pushed-in) posi-
tion, or the lighter may pop out too early with the
lighter not hot enough.
To help avoid damaging the cigarette lighter
socket, we recommend connecting 12V DC elec-
trical accessories designed for use with the stan-
dard “cigarette lighter” plug type to the 12V
power outlets (
�page 287) in your vehicle
whenever possible.
iIf the engine is off, and the cigarette lighter
is being used extensively, the vehicle battery
may become discharged.
!If you use all power outlets in the vehicle,
make sure that the maximum current drawn
does not exceed 55 A.
iThe power outlets can be used to
accommodate 12V DC electrical accessories
(e.g. air pump, auxiliary lamps) up to a maximum
of 240 W.
If the engine is off, the battery may become dis-
charged if used for long periods of time.
iYou can use the power outlets, except for
the power outlet in the front center console,
even if the ignition is switched off.
An emergency shut-off feature ensures that the
vehicle’s electrical voltage does not fall below a
minimum level. If the voltage drops to this mini-
mum level, the power outlets are automatically
switched off. This ensures that enough power re-
mains to start the engine.
Page 289 of 561
288 Controls in detail
Useful features
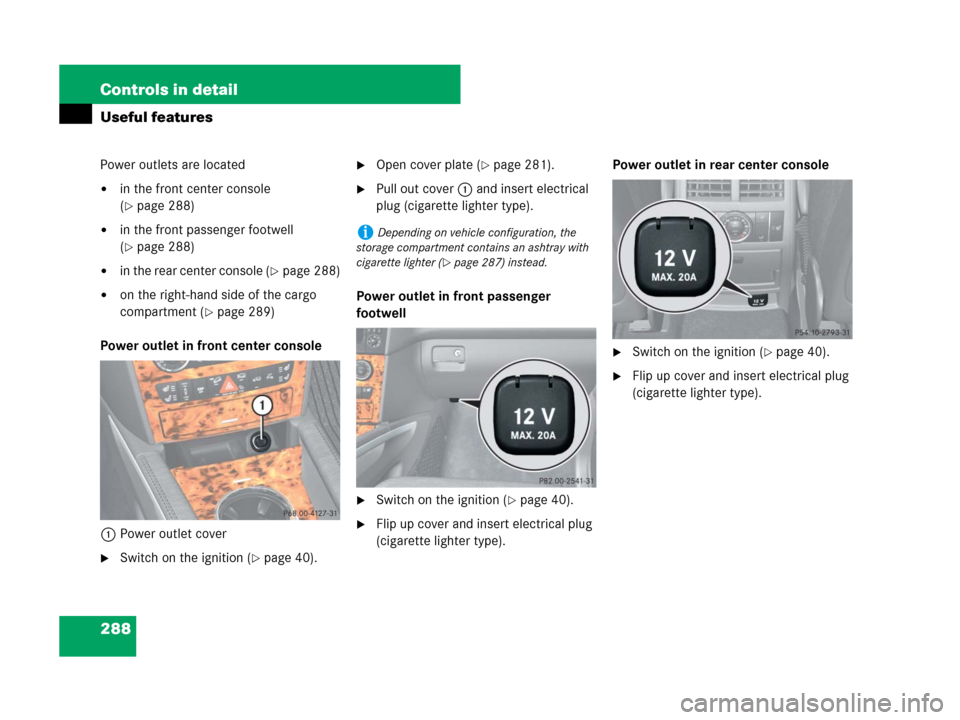
Power outlets are located
�in the front center console
(
�page 288)
�in the front passenger footwell
(
�page 288)
�in the rear center console (�page 288)
�on the right-hand side of the cargo
compartment (
�page 289)
Power outlet in front center console
1Power outlet cover
�Switch on the ignition (�page 40).
�Open cover plate (�page 281).
�Pull out cover1 and insert electrical
plug (cigarette lighter type).
Power outlet in front passenger
footwell
�Switch on the ignition (�page 40).
�Flip up cover and insert electrical plug
(cigarette lighter type).Power outlet in rear center console
�Switch on the ignition (�page 40).
�Flip up cover and insert electrical plug
(cigarette lighter type).
iDepending on vehicle configuration, the
storage compartment contains an ashtray with
cigarette lighter (
�page 287) instead.
Page 290 of 561
.
�Flip up cover and insert electrical plug
(cigarette lighter type).
Floormats
1Retainer pi")
289 Controls in detail
Useful features
Power outlet in cargo compartment
�Switch on the ignition (�page 40).
�Flip up cover and insert electrical plug
(cigarette lighter type).
Floormats
1Retainer pin
2Eyelet
Removing
�Pull floormat off of retainer pins1.
�Remove the floormat.
Installing
�Lay down the floormat in the respective
footwell.
�Press the floormat eyelets2 onto re-
tainer pins1.
Warning!G
Whenever you are using floormats, make
sure there is enough clearance and that the
floormats are securely fastened.
Floormats should always be securely fas-
tened using eyelets2 and retainer pins1
(
�page 289).
Before driving off, check that the floormats
are securely in place and adjust them if nec-
essary. A loose floormat could slip and
hinder proper functioning of the pedals.
Do not place several floormats on top of
each other as this may impair pedal move-
ment.
iTo install or remove the floormat more easi-
ly, move the driver’s seat or front passenger seat
as far to the rear as possible (
�page 44).
Page 291 of 561

290 Controls in detail
Useful features
Heated steering wheel*
The steering wheel heating warms up the
leather area of the steering wheel.
The stalk is on the lower left-hand side of
the steering wheel.
1Switching on
2Indicator lamp
3Switching offSwitching on
�Switch on the ignition (�page 39).
�Turn switch at the tip of stalk in the
direction of arrow1.
The steering wheel is heated. Indicator
lamp2 comes on.Switching off
�Turn switch at the tip of stalk in the
direction of arrow3.
The heated steering wheel is switched
off. Indicator lamp2 goes out.
For information on the steering wheel, see
“Multifunction steering wheel”
(
�page 148).
iThe steering wheel heating is turned off tem-
porarily and the indicator lamp2 remains on
when
�the temperature of the vehicle interior is
above 86°F (30°C)
�the temperature of the steering wheel is
above 95°F (35°C)
When these conditions do not apply anymore,
steering wheel heating continues.
iIndicator lamp2 flashes or goes out
�in case of power surge or undervoltage
�in case of a steering wheel heating malfunc-
tion
iThe steering wheel heating switches off
automatically when you remove the SmartKey
from the starter switch or, on vehicles with
KEYLESS-GO*, when you switch off the ignition
(
�page 39) and open the driver’s door.