2008 MERCEDES-BENZ GLK SUV engine
[x] Cancel search: enginePage 62 of 261
X
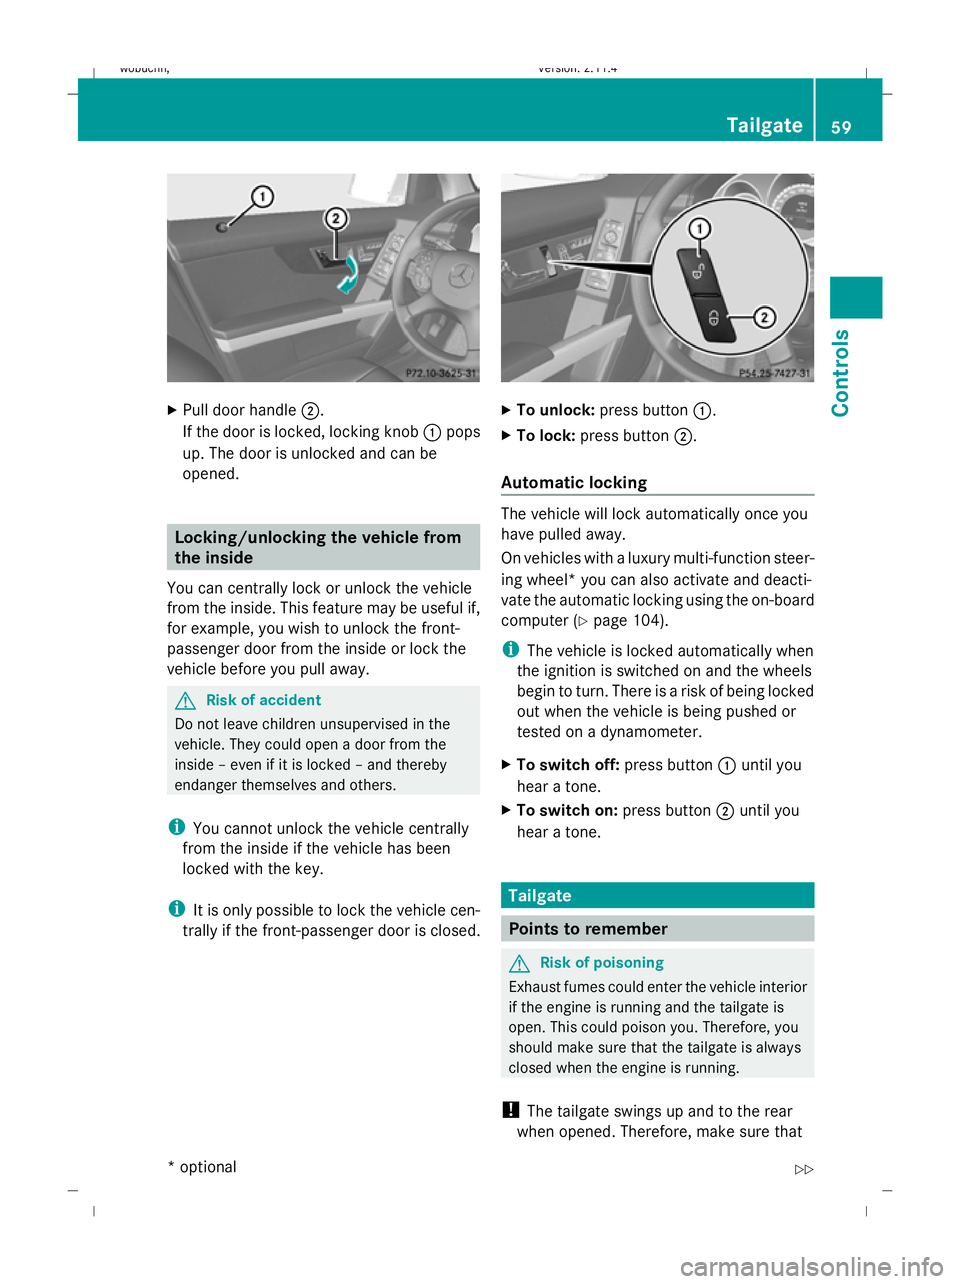
Pull door handle ;.
If the door is locked, locking knob :pops
up. The door is unlocked and can be
opened. Locking/unlocking the vehicle from
the inside
You can centrally lock or unlock the vehicle
from the inside. This feature may be useful if,
for example, you wish to unlock the front-
passenger door from the inside or lock the
vehicle before you pull away. G
Risk of accident
Do not leave children unsupervised in the
vehicle. They could open a door from the
inside – even if it is locked – and thereby
endanger themselves and others.
i You cannot unlock the vehicle centrally
from the inside if the vehicle has been
locked with the key.
i It is only possible to lock the vehicle cen-
trally if the front-passenger door is closed. X
To unlock: press button :.
X To lock: press button ;.
Automatic locking The vehicle will lock automatically once you
have pulled away.
On vehicles with a luxury multi-function steer-
ing wheel* you can also activate and deacti-
vate the automatic locking using the on-board
computer (Y
page 104).
i The vehicle is locked automatically when
the ignition is switched on and the wheels
begin to turn. There is a risk of being locked
out when the vehicle is being pushed or
tested on a dynamometer.
X To switch off: press button:until you
hear a tone.
X To switch on: press button;until you
hear a tone. Tailgate
Points to remember
G
Risk of poisoning
Exhaust fumes could enter the vehicle interior
if the engine is running and the tailgate is
open. This could poison you. Therefore, you
should make sure that the tailgate is always
closed when the engine is running.
! The tailgate swings up and to the rear
when opened. Therefore, make sure that Tailgate
59Controls
* optional
X204_AKB; 1; 5, en-GB
wobuchh,
Version: 2.11.4 2008-10-15T13:20:56+02:00 - Seite 59 ZDateiname: 6515_0671_02_buchblock.pdf; preflight
Page 65 of 261
g
To remove the key
1 Power supply for some consumers, such
as the windscreen wipers
2 Ignition (power supply for all consumers)
and drive position
3 To start the engine
i Even if the key is not for the vehicle in
question, it will still turn in the ignition lock.
The ignition is not switched on. The engine
cannot be started. Seats
Points to remember
For information about folding the rear bench
seat forwards, see the "Luggage compart-
ment enlargement" section (Y page 132).
Depending on the vehicle's equipment, the
seats can adjusted either manually/electri-
cally or electrically*. G
Risk of injury
The seats can still be adjusted when there is
no key in the ignition lock. For this reason,
children should never be left unsupervised in
the vehicle. They could become trapped when
adjusting a seat. G
Risk of accident
Only adjust the driver's seat when the vehicle
is stationary. You will otherwise be distracted
from the road and traffic conditions and you
could lose control of the vehicle as a result of
the seat moving. This could cause an acci-
dent. G
Risk of injury
Make sure that nobody can become trapped
when you adjust the seat.
Observe the notes concerning the airbag sys-
tem.
Secure children as recommended; see "Chil-
dren in the vehicle" section. G
Risk of injury
Make sure that the central area of the head
restraint supports the back of your head at
about eye level. You could seriously injure
your neck if your head is not correctly sup-
ported by the head restraint in the event of an
accident. Never travel without a correctly
adjusted and engaged head restraint.
! When you move the seats, make sure that
there are no objects in the footwell or
behind the seats. Otherwise, you could
damage the seats and the objects.
i The head restraints in the front seats are
fitted with the NECK-PRO system
(Y page 40). For this reason, it is not pos-
sible to remove the head restraints from
the front seats.
The rear-compartment head restraints can
be removed (Y page 64).
Please contact a Mercedes-Benz Service
Centre for more information. Adjusting the seats manually and
electrically
Seat fore-and-aft adjustment
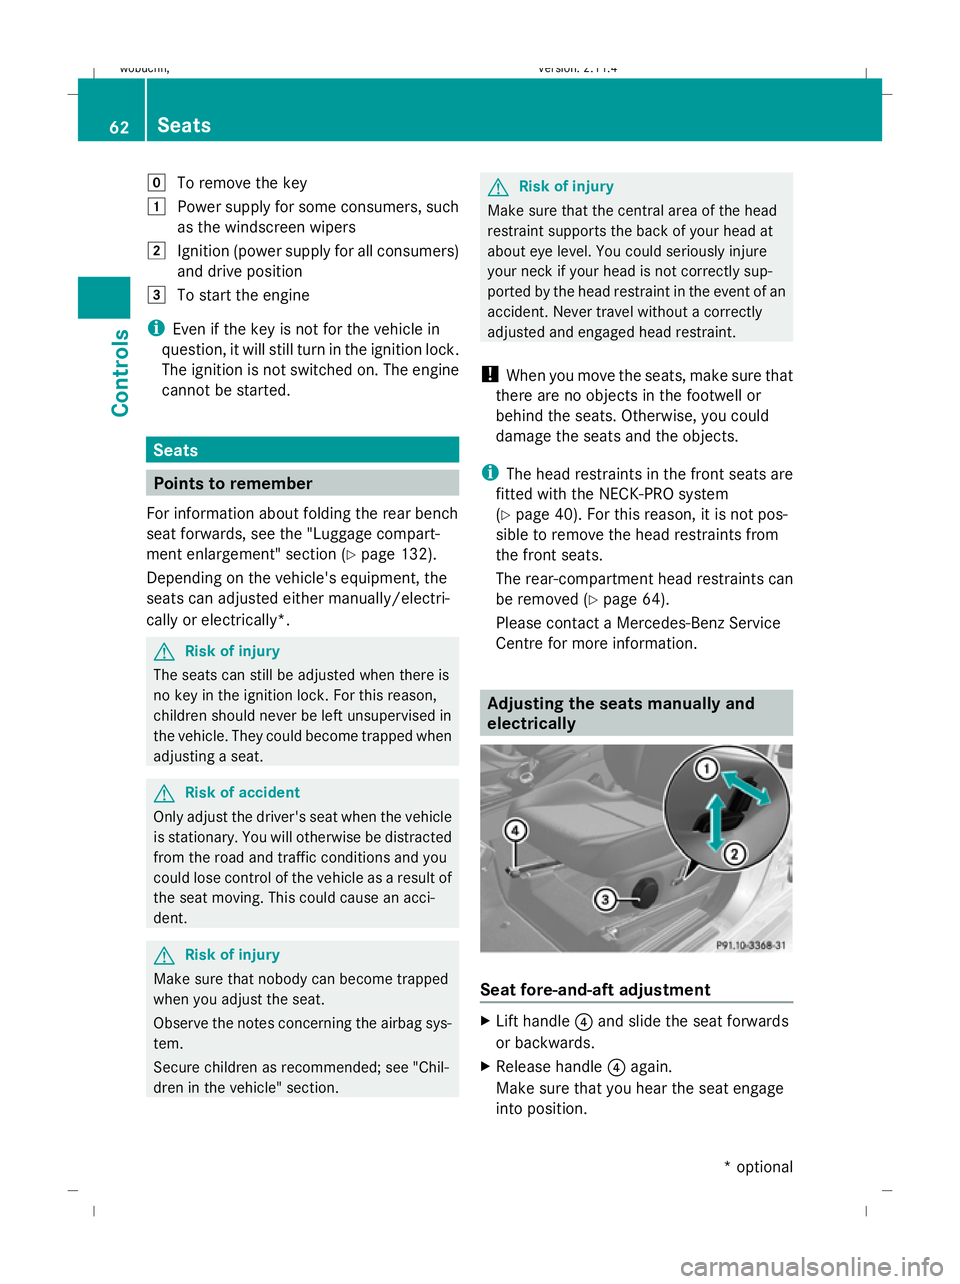
X
Lift handle ?and slide the seat forwards
or backwards.
X Release handle ?again.
Make sure that you hear the seat engage
into position. 62 SeatsControls
* optional
X204_AKB; 1; 5, en-GB
wobuchh,
Version: 2.11.4 2008-10-15T13:20:56+02:00 - Seite 62Dateiname: 6515_0671_02_buchblock.pdf; preflight
Page 75 of 261
Fastening the belt
X
Adjust the seat and move the backrest to
an almost vertical position (Y page 62).
X Pull the belt smoothly through belt sash
guide :.
X Route the belt over the centre of the shoul-
der without twisting it.
X Engage belt tongue ;in buckle =.
X If necessary, adjust the belt to the appro-
priate height (Y page 72).
X If necessary, pull upwards on the shoulder
section of the belt to tighten the belt across
your body.
Wearing the rear centre seat belt If the right-hand rear seat backrest is folded
down and back up again, the rear centre seat
belt may lock. Then, the seat belt cannot be
pulled out.
X To release the rear centre seat belt: pull
out the seat belt at the belt outlet on the
rear seat backrest approximately 20 mm
and release it again.
The seat belt is retracted and released.
Unfastening the belt X
Press release button ?and guide belt
tongue ;back towards belt sash
guide :. Belt warning for driver and front
passenger
The 7 seat belt warning lamp in the instru-
ment cluster reminds you that all occupants
should fasten their seat belts. It is either lit
continuously or flashes. Additionally, there
may be a warning tone.
The 7 seat belt warning lamp goes out and
the warning tone ceases as soon as the driver
and front passenger have fastened their seat
belts. For certain countries only: regardless of
whether the driver or the front passenger
already have their seat belt fastened, the
7
seat belt warning lamp lights up for six
seconds after the engine has been started. It
then goes out if both the driver and the front
passenger have fastened their seat belt.
i Further information about the 7seat
belt warning lamp . Belt height adjustment
You can adjust the seat belt height on the
driver's seat and front-passenger seat.
Adjust the belt to a height that allows it to be
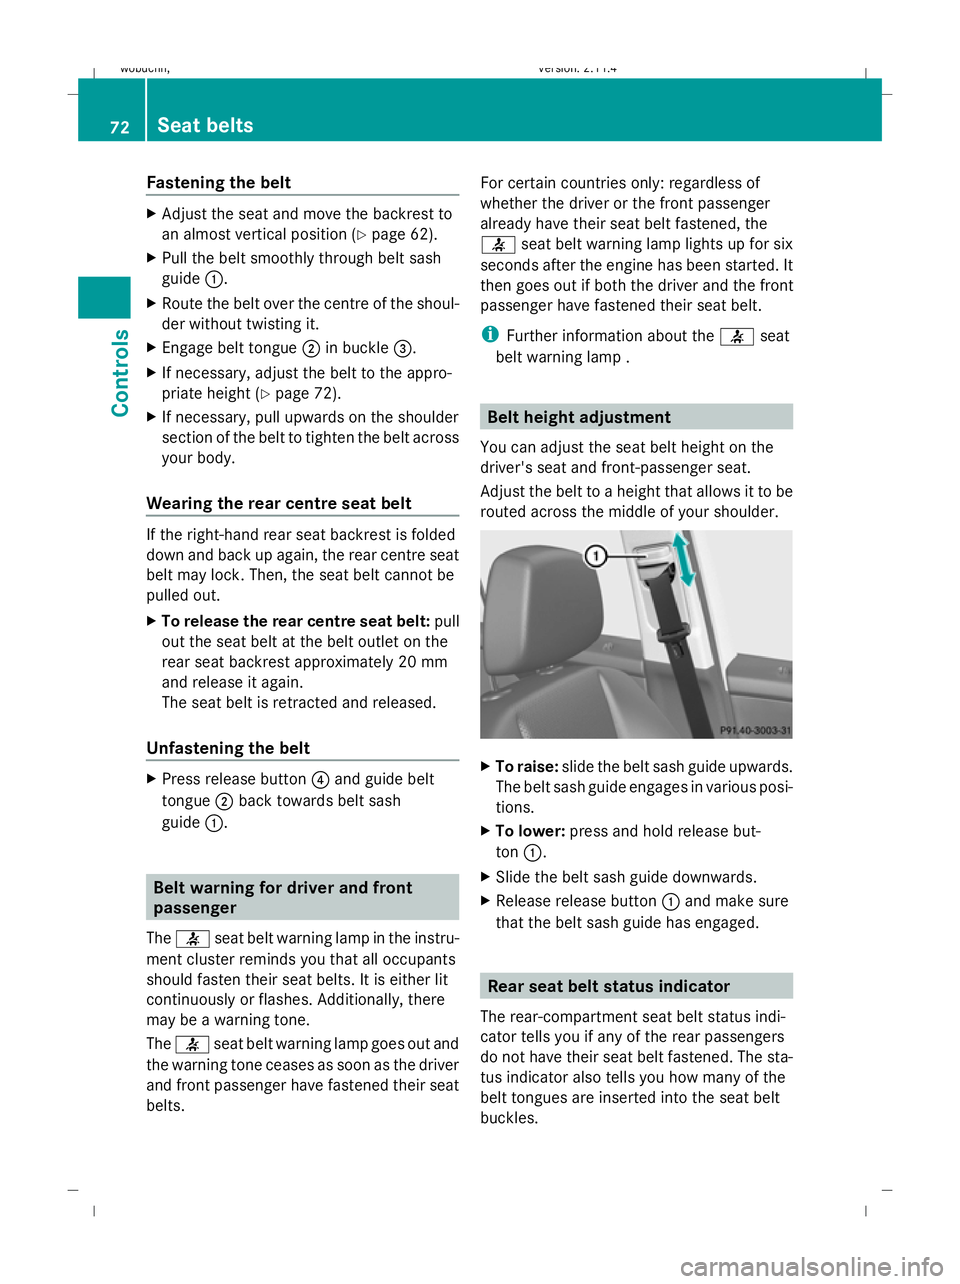
routed across the middle of your shoulder. X
To raise: slide the belt sash guide upwards.
The belt sash guide engages in various posi-
tions.
X To lower: press and hold release but-
ton :.
X Slide the belt sash guide downwards.
X Release release button :and make sure
that the belt sash guide has engaged. Rear seat belt status indicator
The rear-compartment seat belt status indi-
cator tells you if any of the rear passengers
do not have their seat belt fastened. The sta-
tus indicator also tells you how many of the
belt tongues are inserted into the seat belt
buckles. 72 Seat beltsCont
rols
X204_AKB; 1; 5, en-GB
wobuchh, Version: 2.11.4 2008-10-15T13:20:56+02:00 - Seite 72Dateiname: 6515_0671_02_buchblock.pdf; preflight
Page 77 of 261
Make sure that:
R
you are as far away from the driver's front
airbag as possible.
R you are sitting in a normal upright posi-
tion.
R you can fasten the seat belt properly.
R you have moved the backrest to an
almost vertical position.
R you have set the seat angle so that your
thighs are gently supported.
R you can depress the pedals properly.
R you have adjusted the head restraint so
that the back of your head is supported
at eye level by the central area of the
head restraint.
X Check whether steering wheel :is adjus-
ted properly (Y page 66).
Make sure that:
R you can hold the steering wheel with your
arms slightly bent.
R you can move your legs freely.
R you can see all the displays in the instru-
ment cluster clearly.
X Check whether you have fastened seat
belt ;properly (Y page 70).
It should:
R fit snugly across your body.
R be routed across the middle of your
shoulder.
R be routed in your pelvic area across the
hip joints. Lights
Light switch
For safety reasons, Mercedes-Benz recom-
mends that you drive with the lights switched
on even during the daytime. In some coun-
tries, daytime operation of headlamps varies
due to legal and voluntary requirements. In these countries, daytime driving lights are
automatically switched on when the engine is
started.
i
If you drive in countries in which traffic
drives on the opposite side of the road to
the country where the vehicle is registered,
oncoming traffic may be dazzled by the
asymmetrical dipped-beam headlamps.
Have the headlamps changed to symmet-
rical dipped beam when driving in these
countries. You can obtain information
about this from any Mercedes-Benz Service
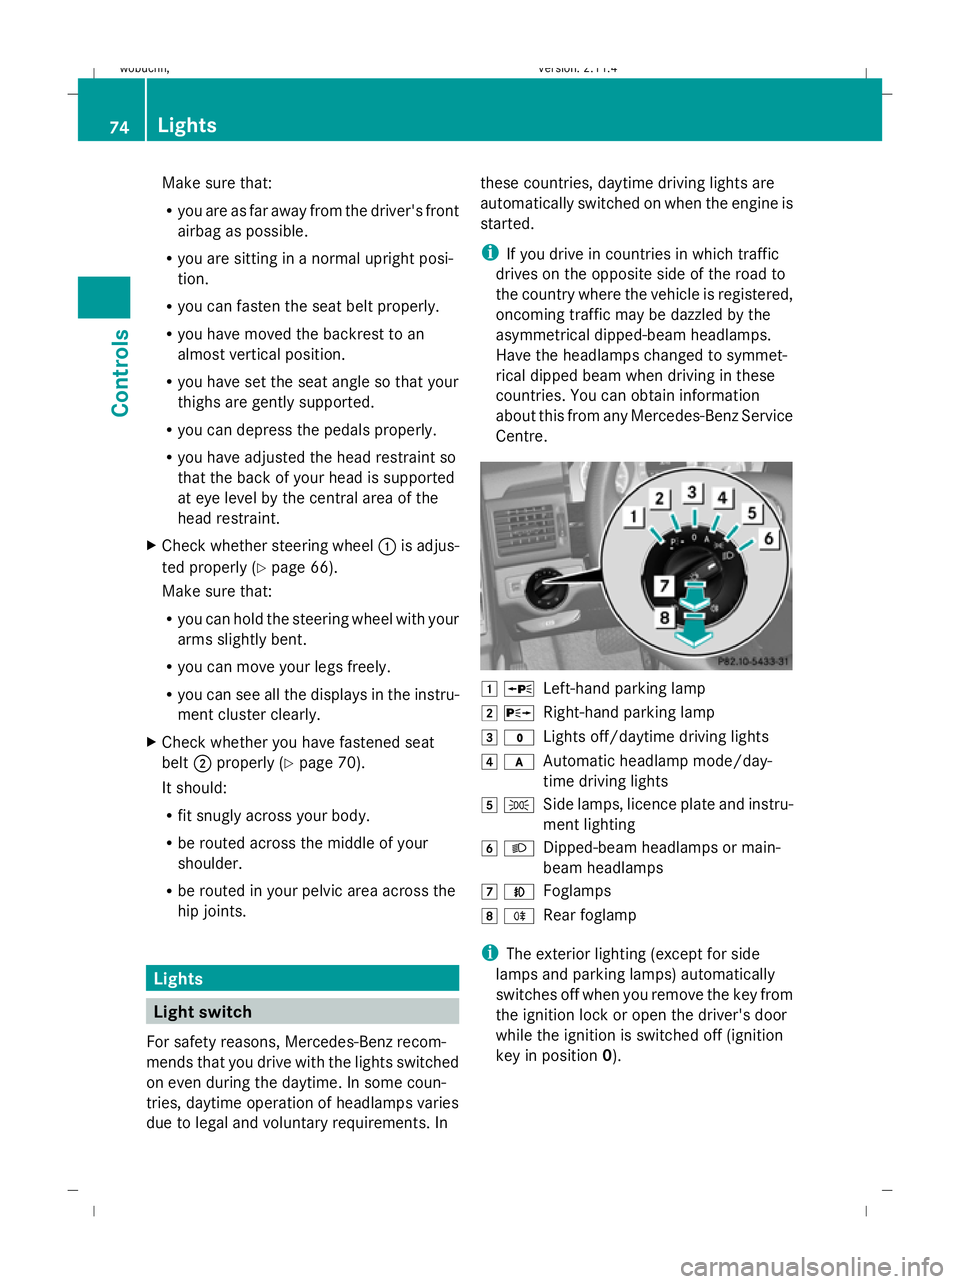
Centre. 1
W
Left-hand parking lamp
2 X
Right-hand parking lamp
3 $
Lights off/daytime driving lights
4 c
Automatic headlamp mode/day-
time driving lights
5 T
Side lamps, licence plate and instru-
ment lighting
6 L
Dipped-beam headlamps or main-
beam headlamps
7 N
Foglamps
8 R
Rear foglamp
i The exterior lighting (except for side
lamps and parking lamps) automatically
switches off when you remove the key from
the ignition lock or open the driver's door
while the ignition is switched off (ignition
key in position 0). 74 LightsControls
X204_AKB; 1; 5, en-GB
wobuchh,
Version: 2.11.4 2008-10-15T13:20:56+02:00 - Seite 74Dateiname: 6515_0671_02_buchblock.pdf; preflight
Page 78 of 261
!
Switch off the side lamps and parking
lamp when you leave the vehicle. This pre-
vents the battery from discharging.
Dipped-beam headlamps X
Turn the ignition key to position 2in the
ignition lock or start the engine.
X To switch on: turn the light switch to
L.
The side lamp indicator lamp next to the
light switch and the Lindicator lamp in
the instrument cluster light up.
Daytime driving lights On vehicles with a luxury multi-function steer-
ing wheel*, you can activate or deactivate the
daytime driving light function using the on-
board computer (Y page 102).
X To switch on: turn the light switch to
$ orc.
Engine start: the dipped-beam headlamps
are switched on.
Automatic headlamp mode G
Risk of accident
If the light switch is set to the cposition,
the light will not come on automatically in
foggy conditions. This could endanger you
and others. Therefore, turn the light switch to
L in the dark or in fog.
The automatic headlamp feature is only an
aid. The driver is responsible for the vehicle's
lighting at all times. G
Risk of accident
When it is dark or foggy, turn the light switch
from c toL in good time. Otherwise,
the headlamps could switch off temporarily
and you could cause an accident.
X To switch on: turn the light switch to
c.
Key in position 1in the ignition lock: the
side lamp is switched on or off automati- cally depending on the brightness of the
ambient light.
Engine start: depending on the ambient
light conditions, the side lamp and the
dipped-beam headlamps are switched on
or off automatically.
When the dipped-beam headlamps are
switched on, the indicator lamp next to the
light switch and the Lindicator lamp in
the instrument cluster light up.
Foglamps G
Risk of accident
If you suspect that driving conditions will be
foggy, turn the light switch to Lbefore you
start your journey. Otherwise, your vehicle
may not be visible and you could endanger
yourself and others.
X Turn the key to position 2in the ignition
lock.
X To switch on: turn the light switch to
L orT. If the light switch is set to
c, you cannot switch on the foglamp.
X Pull the light switch out to the first detent.
The N green indicator lamp next to the
light switch lights up.
X To switch off: press the light switch in as
far as it will go.
The N green indicator lamp next to the
light switch goes out.
Rear foglamp X
Turn the key to position 2in the ignition
lock.
X To switch on: turn the light switch to
L orT. When the light switch is set
to c you cannot switch on the rear fog-
lamp. Lights
75Controls
* optional
X204_AKB; 1; 5, en-GB
wobuchh,
Version: 2.11.4 2008-10-15T13:20:56+02:00 - Seite 75 ZDateiname: 6515_0671_02_buchblock.pdf; preflight
Page 79 of 261
X
Pull the light switch out to the second stop.
Yellow indicator lamp Rnext to the light
switch lights up.
X To switch off: press the light switch in as
far as it will go.
The R yellow indicator lamp next to the
light switch goes out. Combination switch (turn signals,
main-beam headlamps and headlamp
flasher) Turn signal lamp
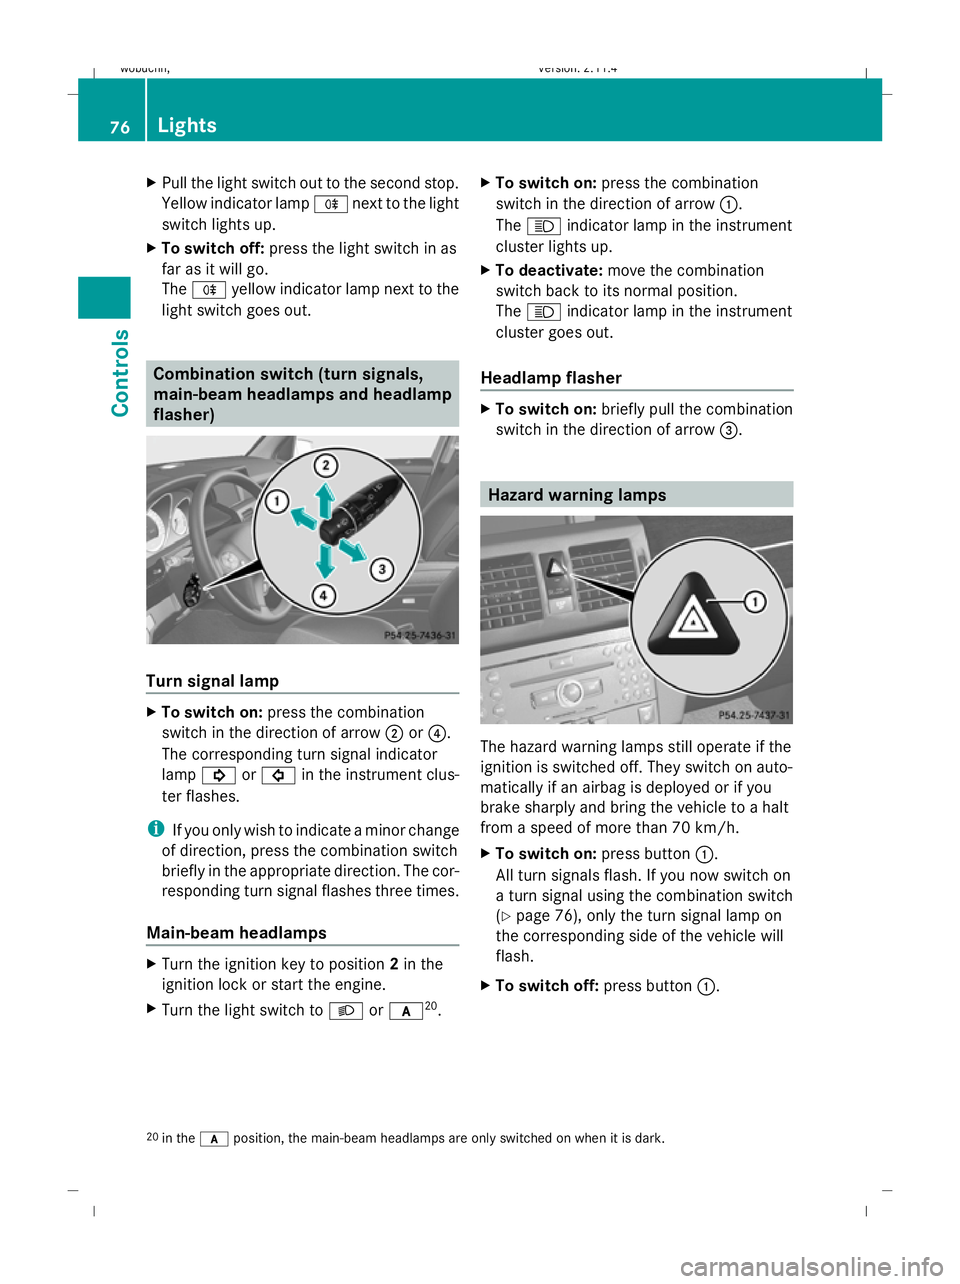
X
To switch on: press the combination
switch in the direction of arrow ;or?.
The corresponding turn signal indicator
lamp ! or# in the instrument clus-
ter flashes.
i If you only wish to indicate a minor change
of direction, press the combination switch
briefly in the appropriate direction. The cor-
responding turn signal flashes three times.
Main-beam headlamps X
Turn the ignition key to position 2in the
ignition lock or start the engine.
X Turn the light switch to Lorc 20
. X
To switch on: press the combination
switch in the direction of arrow :.
The K indicator lamp in the instrument
cluster lights up.
X To deactivate: move the combination
switch back to its normal position.
The K indicator lamp in the instrument
cluster goes out.
Headlamp flasher X
To switch on: briefly pull the combination
switch in the direction of arrow =. Hazard warning lamps
The hazard warning lamps still operate if the
ignition is switched off. They switch on auto-
matically if an airbag is deployed or if you
brake sharply and bring the vehicle to a halt
from a speed of more than 70 km/h.
X
To switch on: press button:.
All turn signals flash. If you now switch on
a turn signal using the combination switch
(Y page 76), only the turn signal lamp on
the corresponding side of the vehicle will
flash.
X To switch off: press button:.
20 in the cposition, the main-beam headlamps are only switched on when it is dark. 76 LightsControls
X204_AKB; 1; 5, en-GB
wobuchh,
Version: 2.11.4 2008-10-15T13:20:56+02:00 - Seite 76Dateiname: 6515_0671_02_buchblock.pdf; preflight
Page 80 of 261
Adjusting the headlamp range (halo-
gen headlamps)
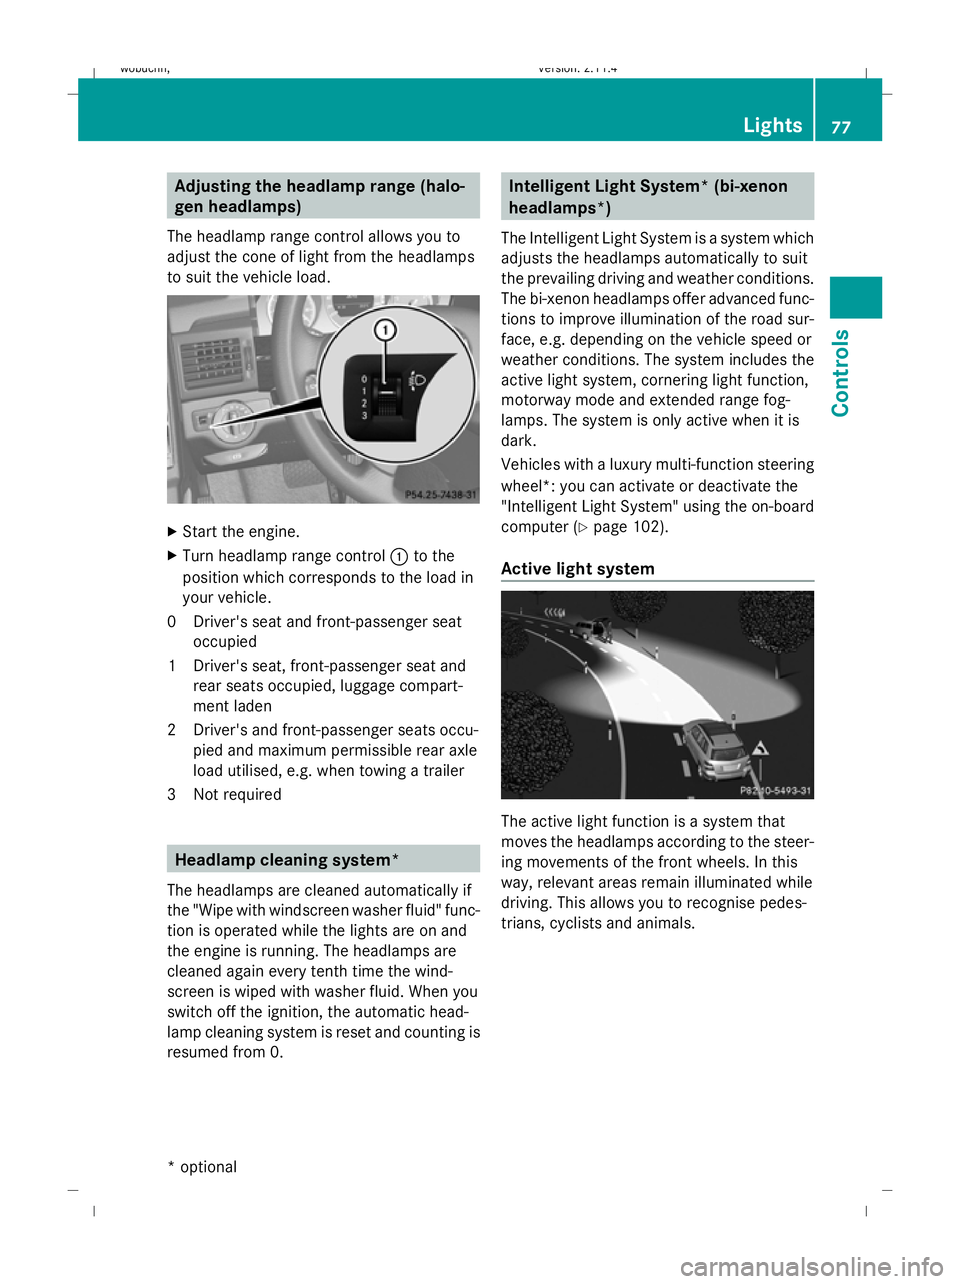
The headlamp range control allows you to
adjust the cone of light from the headlamps
to suit the vehicle load. X
Start the engine.
X Turn headlamp range control :to the
position which corresponds to the load in
your vehicle.
0D river's seat and front-passenger seat
occupied
1D river's seat, front-passenger seat and
rear seats occupied, luggage compart-
ment laden
2D river's and front-passenger seats occu-
pied and maximum permissible rear axle
load utilised, e.g. when towing a trailer
3N ot required Headlamp cleaning system*
The headlamps are cleaned automatically if
the "Wipe with windscreen washer fluid" func-
tion is operated while the lights are on and
the engine is running. The headlamps are
cleaned again every tenth time the wind-
screen is wiped with washer fluid. When you
switch off the ignition, the automatic head-
lamp cleaning system is reset and counting is
resumed from 0. Intelligent Light System* (bi-xenon
headlamps*)
The Intelligent Light System is a system which
adjusts the headlamps automatically to suit
the prevailing driving and weather conditions.
The bi-xenon headlamps offer advanced func-
tions to improve illumination of the road sur-
face, e.g. depending on the vehicle speed or
weather conditions. The system includes the
active light system, cornering light function,
motorway mode and extended range fog-
lamps. The system is only active when it is
dark.
Vehicles with a luxury multi-function steering
wheel*: you can activate or deactivate the
"Intelligent Light System" using the on-board
computer (Y page 102).
Active light system The active light function is a system that
moves the headlamps according to the steer-
ing movements of the front wheels. In this
way, relevant areas remain illuminated while
driving. This allows you to recognise pedes-
trians, cyclists and animals. Lights
77Controls
* optional
X204_AKB; 1; 5, en-GB
wobuchh,
Version: 2.11.4 2008-10-15T13:20:56+02:00 - Seite 77 ZDateiname: 6515_0671_02_buchblock.pdf; preflight
Page 84 of 261
G
Risk of injury
Do not leave children unsupervised in the
vehicle, even if they are secured in a child
restraint system. The children could:
R be seriously or even fatally injured on parts
of the vehicle
R be seriously or even fatally injured by pro-
longed exposure to extremely high or
extremely low temperatures
If children open a door, they could:
R seriously or even fatally injure other people
R get out of the vehicle, thereby injuring
themselves or be seriously or even fatally
injured by a passing vehicle
Activate the child-proof locks/override fea-
ture if children are travelling in the vehicle.
They could otherwise open doors or side win-
dows while the vehicle is in motion and
thereby injure themselves or others.
i Related topics:
R convenience opening from the outside
(Y page 82) or from the inside
(Y page 126)
R convenience closing from the outside
(Y page 82) or from the inside
(Y page 126)
R disabling the controls in the rear com-
partment (override feature) (Y page 50)
R automatic closing of the side windows
(PRE-SAFE ®
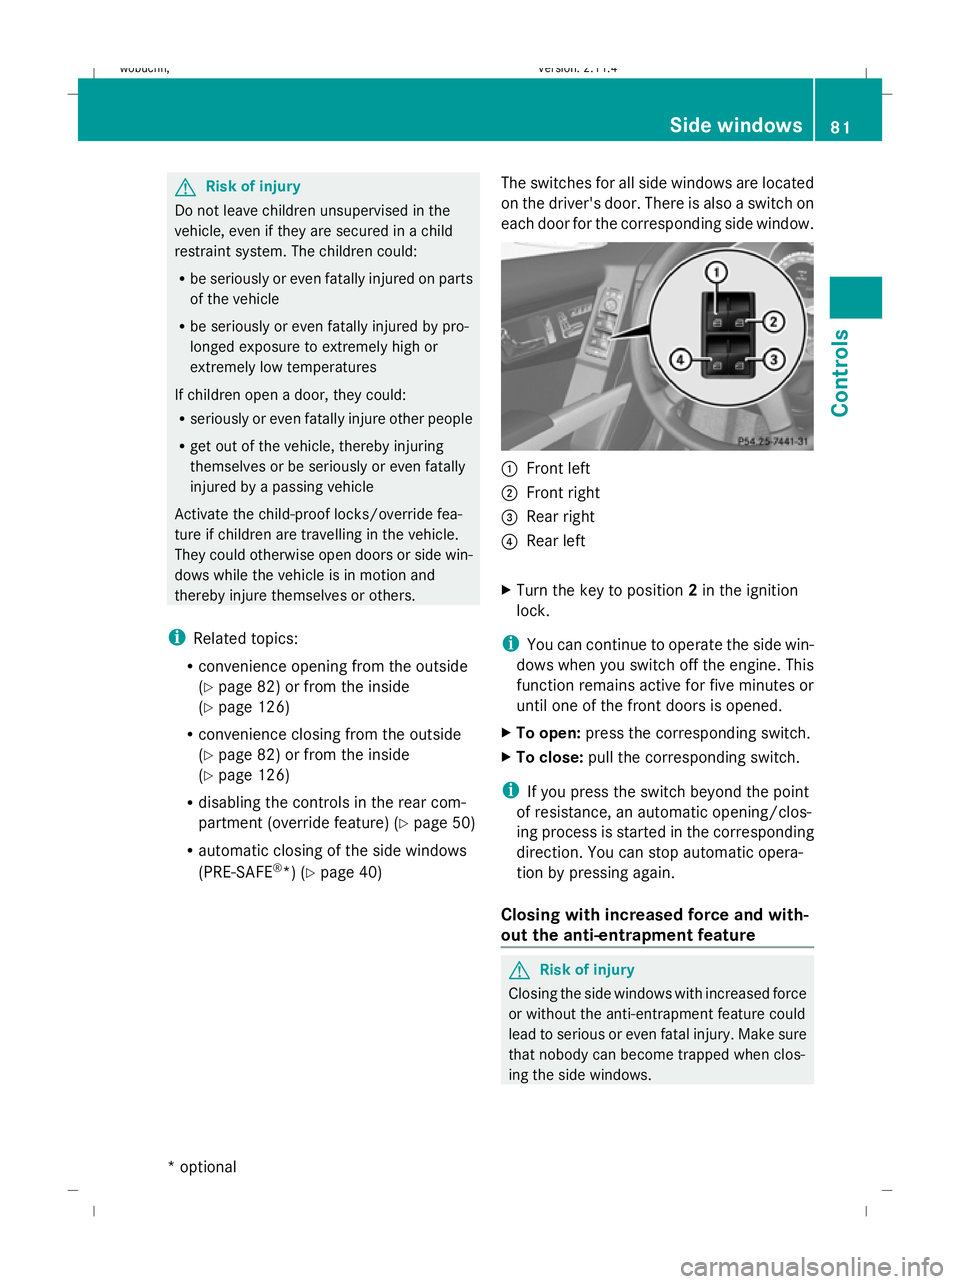
*) (Y page 40) The switches for all side windows are located
on the driver's door. There is also a switch on
each door for the corresponding side window. :
Front left
; Front right
= Rear right
? Rear left
X Turn the key to position 2in the ignition
lock.
i You can continue to operate the side win-
dows when you switch off the engine. This
function remains active for five minutes or
until one of the front doors is opened.
X To open: press the corresponding switch.
X To close: pull the corresponding switch.
i If you press the switch beyond the point
of resistance, an automatic opening/clos-
ing process is started in the corresponding
direction. You can stop automatic opera-
tion by pressing again.
Closing with increased force and with-
out the anti-entrapment feature G
Risk of injury
Closing the side windows with increased force
or without the anti-entrapment feature could
lead to serious or even fatal injury. Make sure
that nobody can become trapped when clos-
ing the side windows. Side windows
81Controls
* optional
X204_AKB; 1; 5, en-GB
wobuchh,
Version: 2.11.4
2008-10-15T13:20:56+02:00 - Seite 81 ZDateiname: 6515_0671_02_buchblock.pdf; preflight