Page 312 of 601
311 Controls in detail
Loading
�Remove cover3 by pulling its lower
edge out of the side trim.
�Place left side of blind2 (�page 311)
in left mount.
�Position right side of blind2 over right
mount.
�Press release button1 (�page 311)
and guide cover2 into mount.
�Make sure the cargo compartment
cover blind is securely fastened.Removing blind
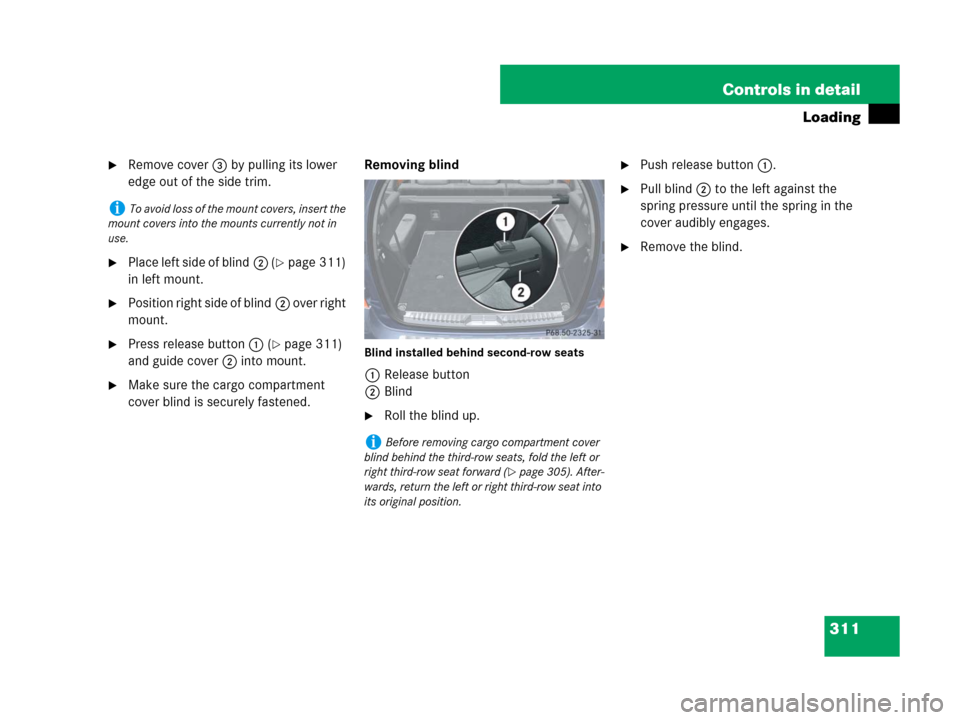
Blind installed behind second-row seats
1Release button
2Blind
�Roll the blind up.
�Push release button1.
�Pull blind2 to the left against the
spring pressure until the spring in the
cover audibly engages.
�Remove the blind.
iTo avoid loss of the mount covers, insert the
mount covers into the mounts currently not in
use.
iBefore removing cargo compartment cover
blind behind the third-row seats, fold the left or
right third-row seat forward (
�page 305). After-
wards, return the left or right third-row seat into
its original position.
164.boo Seite 311 Freitag, 30. März 2007 12:54 12
Page 313 of 601

312 Controls in detail
Loading
Cargo net*Use of the cargo net is a particularly impor-
tant safety factor when the vehicle is load-
ed higher than the top of the seat
backrests with smaller objects. For your
safety, always use the cargo net when
transporting cargo.
The cargo net can be installed in two
locations:
1Holder in B-pillar
2Holder in C-pillar�With the cargo compartment expanded
in part (
�page 305), use holders
above C-pillars2 and the cargo
tie-down rings behind the third-row
seat backrest (
�page 303).
�With the cargo compartment fully ex-
panded (
�page 306), use holders
above B-pillars1 and the cargo
tie-down rings in the second-row foot-
well (
�page 303).
�Open the hook and loop fasteners on
the cargo net package.
�Roll out the cargo net.
�Unfold the cargo net.
The cargo net bars must audibly
engage.
Warning!G
Make sure the cargo net is properly engaged
top and bottom position and the tightening
belts are securely fastened.
Never use a damaged cargo net.
To help avoid personal injury from smaller
objects being thrown around in the occu-
pant compartment during a collision or sud-
den maneuver, always use cargo net when
transporting cargo.
The cargo net cannot prevent the movement
of large, heavier objects into the passenger
compartment in an accident. Such items
must be properly secured using the cargo
tie-down rings (
�page 302) in the cargo
compartment floor.
Passenger use of seats behind installed
cargo net is restricted because of the
footwell being taken up by the net.
164.boo Seite 312 Freitag, 30. März 2007 12:54 12
Page 319 of 601
318 Controls in detail
Useful features
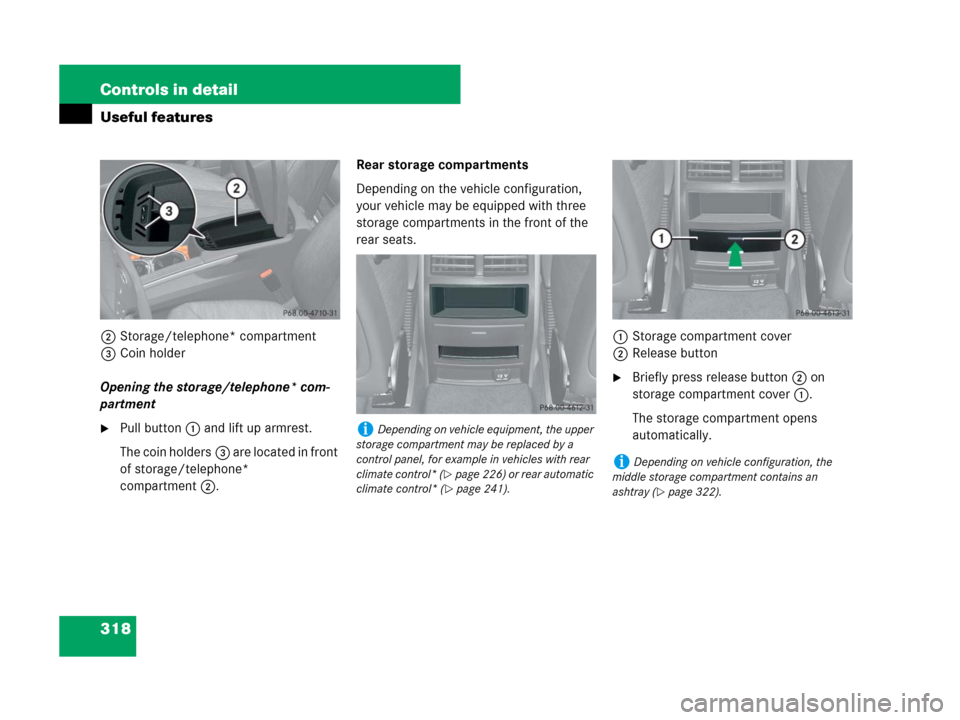
2Storage/telephone* compartment
3Coin holder
Opening the storage/telephone* com-
partment
�Pull button1 and lift up armrest.
The coin holders3 are located in front
of storage/telephone*
compartment2.Rear storage compartments
Depending on the vehicle configuration,
your vehicle may be equipped with three
storage compartments in the front of the
rear seats.
1Storage compartment cover
2Release button
�Briefly press release button2 on
storage compartment cover1.
The storage compartment opens
automatically.
iDepending on vehicle equipment, the upper
storage compartment may be replaced by a
control panel, for example in vehicles with rear
climate control* (
�page 226) or rear automatic
climate control* (
�page 241).
iDepending on vehicle configuration, the
middle storage compartment contains an
ashtray (
�page 322).
164.boo Seite 318 Freitag, 30. März 2007 12:54 12
Page 321 of 601

320 Controls in detail
Useful features
Cup holders
Cup holder in front of armrest
A cup holder and a card/ticket holder are
located in the front center console.
1Cup holderCup holder in rear armrest (second-row
seats)
1Cup holder
�Pull the armrest down by its top.
Warning!G
In order to help prevent spilling liquids on
vehicle occupants and/or vehicle equip-
ment, only use containers that fit into the
cup holder. Use lids on open containers and
do not fill containers to a height where the
contents, especially hot liquids, could spill
during braking, vehicle maneuvers, or an
accident. Liquids spilled on vehicle occu-
pants may cause serious personal injury.
Liquids spilled on vehicle equipment may
cause damage not covered by the
Mercedes-Benz Limited Warranty.
When not in use, keep rear cup holder
closed. An open cup holder may cause injury
to you or others when contacted during
braking, vehicle maneuvers, or in an acci-
dent.
Keep in mind that objects placed in a cup
holder may come loose during braking,
vehicle maneuvers, or an accident and be
thrown around in the vehicle interior.
Objects thrown around in the vehicle interi-
or may cause an accident and/or serious
personal injury.
iThe front cup holder can be removed for
cleaning purposes (
�page 321).
!Close the cup holder before folding the arm-
rest upwards.
164.boo Seite 320 Freitag, 30. März 2007 12:54 12
Page 322 of 601
321 Controls in detail
Useful features
Cup holders in third-row side trim
Cup holders are located in the side trims of
the third-row seats.
1Cup holderRemoving and reinstalling cup holder
The front cup holder can be removed for
cleaning purposes.
1Cup holder
2Bridge with card, ticket holder
�Hold cup holder at its bridge2 and
pull out bridge in direction of arrow.
�Pull cup holder1 out in direction of ar-
row.
�First, insert the cup holder1 and then
insert bridge2.
Ashtrays
Depending on vehicle configuration your
vehicle is equipped with an ashtray and a
cigarette lighter (
�page 323) located in
the front center console and an ashtray lo-
cated in front of the second-row seats
(
�page 322).
Ashtray in the center console
1Ashtray insert
2Cover plate
iIf your vehicle is not equipped with an ash-
tray, it has a storage compartment (
�page 317)
with a power outlet (
�page 324) instead.
164.boo Seite 321 Freitag, 30. März 2007 12:54 12
Page 323 of 601

322 Controls in detail
Useful features
Opening the ashtray
�Briefly touch cover plate2.
The ashtray opens automatically.
Removing ashtray insert
�Grip the ashtray insert1 on the sides
and pull it out upwards.
Reinstalling ashtray insert
�Install ashtray insert1.
�Close ashtray cover plate2.Rear center console ashtray
(second-row)
1Ashtray
2Ashtray coverOpening rear ashtray
�Briefly press ashtray cover2.
The ashtray1 opens automatically.
Removing rear ashtray insert
�Grip the insert on the sides and pull it
out upwards.
Reinstalling rear ashtray insert
�Install ashtray insert.
�Close the ashtray.
Cigarette lighter
�Switch on the ignition (�page 42).
�Push in cigarette lighter.
The cigarette lighter will pop out auto-
matically when hot.
Warning!G
Remove ashtray only with vehicle standing
still. Set the parking brake to secure vehicle
from movement. Set automatic transmis-
sion toP. With the automatic transmission
set toP, turn off the engine.
!Close the ashtray when not in use and be-
fore folding the second-row seats
164.boo Seite 322 Freitag, 30. März 2007 12:54 12
Page 324 of 601
 located in the
front center")
323 Controls in detail
Useful features
Cigarette lighter
Depending on vehicle configuration your
vehicle is equipped with a cigarette lighter
and an ashtray (
�page 321) located in the
front center console and an ashtray locat-
ed in front of the second-row seats
(
�page 322).
�Switch on the ignition (�page 42).
1Cigarette lighter
�Open the ashtray (�page 322).
�Push in cigarette lighter1.
The cigarette lighter will pop out auto-
matically when hot.
Warning!G
Never touch the heating element or sides of
the cigarette lighter; they are extremely hot.
Hold the knob only.
Make sure that any children traveling with
you do not injure themselves or start a fire
with the hot cigarette lighter.
When leaving the vehicle always remove the
SmartKey or SmartKey with KEYLESS-GO*
from the starter switch, take it with you, and
lock the vehicle. Do not leave children unat-
tended in the vehicle, or with access to an
unlocked vehicle. A child’s unsupervised
access to a vehicle could result in an
accident and/or serious personal injury.
!The lighter socket can accommodate
12V DC electrical accessories (up to a maximum
of 180 W) designed for use with the standard
“cigarette lighter” plug type. Keep in mind, how-
ever, that connecting accessories to the lighter
socket (for example extensive connecting and
disconnecting, or using plugs that do not fit prop-
erly) can damage the lighter socket. With the
socket damaged, the lighter may no longer be
able to be placed in the heating (pushed-in) posi-
tion, or the lighter may pop out too early with the
lighter not hot enough.
To help avoid damaging the cigarette lighter
socket, we recommend connecting 12V DC elec-
trical accessories designed for use with the stan-
dard “cigarette lighter” plug type to the 12V
power outlets (
�page 324) in your vehicle
whenever possible.
iIf the engine is off, and the cigarette lighter
is being used extensively, the vehicle battery
may become discharged.
164.boo Seite 323 Freitag, 30. März 2007 12:54 12
Page 327 of 601
326 Controls in detail
Useful features
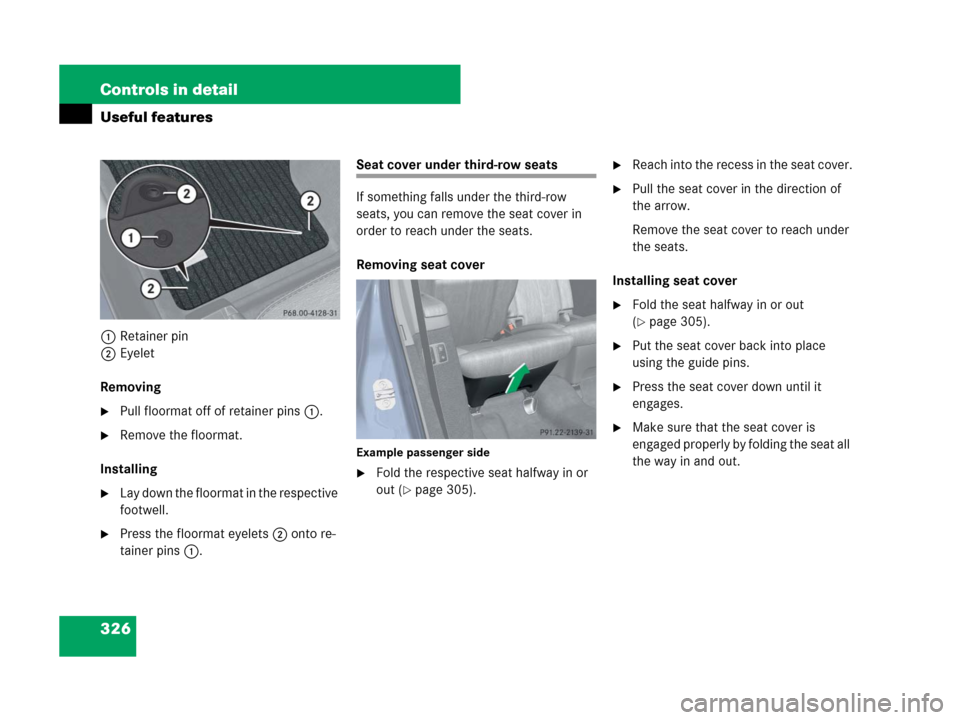
1Retainer pin
2Eyelet
Removing
�Pull floormat off of retainer pins1.
�Remove the floormat.
Installing
�Lay down the floormat in the respective
footwell.
�Press the floormat eyelets2 onto re-
tainer pins1.
Seat cover under third-row seats
If something falls under the third-row
seats, you can remove the seat cover in
order to reach under the seats.
Removing seat cover
Example passenger side
�Fold the respective seat halfway in or
out (
�page 305).
�Reach into the recess in the seat cover.
�Pull the seat cover in the direction of
the arrow.
Remove the seat cover to reach under
the seats.
Installing seat cover
�Fold the seat halfway in or out
(
�page 305).
�Put the seat cover back into place
using the guide pins.
�Press the seat cover down until it
engages.
�Make sure that the seat cover is
engaged properly by folding the seat all
the way in and out.
164.boo Seite 326 Freitag, 30. März 2007 12:54 12