Page 542 of 601
541 Practical hints
Towing the vehicle
1Cover
Example illustration front bumper
2Towing eye bolt
Removing cover
�Press mark on cover1 as indicated by
the arrow.
�Lift off cover1 to reveal the threaded
hole for towing eye bolt.Installing towing eye bolt
�Take the towing eye bolt and wheel
wrench from the vehicle tool kit
(
�page 490).
�Screw towing eye bolt2 in clockwise
to its stop and tighten with wheel
wrench.
Removing towing eye bolt
�Loosen towing eye bolt2 counter-
clockwise with wheel wrench.
�Unscrew towing eye bolt2.
�Store the towing eye bolt and wheel
wrench back into the vehicle tool kit
(
�page 490).
Installing cover
�Engage cover1 at top and press at
bottom.
Warning!G
In order to avoid possible serious burns or
injury, use extreme caution when removing
the rear cover, because the rear exhaust
pipe is extremely hot.
iCover1 is secured to the bumper by a
plastic cord.
164.boo Seite 541 Freitag, 30. März 2007 12:54 12
Page 544 of 601

543 Practical hints
Fuses
�Fuses
The electrical fuses in your vehicle serve to
switch off malfunctioning power circuits.
If a fuse is blown, the components and sys-
tems secured by that fuse will stop operat-
ing.If a newly inserted fuse blows again, have
the cause determined and rectified by an
authorized Mercedes-Benz Light Truck
Center.
A fuse chart explains the fuse allocation
and fuse amperages. It is located in the
cargo compartment with the vehicle tool
kit (
�page 490).
The electrical fuses are located in different
fuse boxes:
�Fuse box in engine compartment
(
�page 544)
�Fuse box in cargo compartment
(
�page 544)
�Fuse box in passenger compartment
(
�page 545)Before replacing fuses:
�Apply parking brake (�page 67).
�Make sure the automatic transmission
is set toP (
�page 191).
The gear position indicator in the multi-
function display should be on
P.
�Turn off all electrical consumers.
�Turn off the engine (�page 41).
�Remove the SmartKey from the starter
switch.
Vehicles with KEYLESS-GO*:
�Open the driver’s door (this puts
the starter switch in position0,
same as with the SmartKey re-
moved from the starter switch). The
driver’s door then can be closed
again.
Warning!G
Only use fuses approved by Mercedes-Benz
with the specified amperage for the system
in question and do not attempt to repair or
bridge a blown fuse. Using other than ap-
proved fuses or using repaired or bridged
fuses may cause an overload leading to a
fire, and/or cause damage to electrical
components and/or systems. Have the
cause determined and remedied by an au-
thorized Mercedes-Benz Light Truck Center.
iA blown fuse must be replaced by an appro-
priate spare fuse (recognizable by its color or the
fuse rating given on the fuse) of the amperage
recommended in the fuse chart. Any
Mercedes-Benz Light Truck Center will be glad to
advise you on this subject.
164.boo Seite 543 Freitag, 30. März 2007 12:54 12
Page 545 of 601
544 Practical hints
Fuses
Fuse box in engine compartment
The fuse box is located on the passenger
side of the engine compartment.
�Open the hood (�page 378).
Fuse box GL 450 (GL 320 CDI, GL 550
similar)
1Fuse box cover
2Clamps
�Pull clamps2 in direction of arrow.
�Lift fuse box cover1 up.
�Install fuse box cover in reverse order.
�Close the hood after checking or re-
placing fuses (
�page 379).
Fuse box in cargo compartment
The fuse box is located in the cargo com-
partment behind the passenger side trim
panel.
1Lock
2CoverRemoving/installing cover
�Open the tailgate (�page 122).
�Insert a suitable object such as a coin
into the slot of lock1 (
�page 544).
�Turn lock1 counterclockwise by 90°
in direction of arrow.
�Remove cover2.
�Install cover2 in reverse order.
!The fuse box cover must be installed
properly to prevent moisture and/or dirt from
entering the fuse box and possibly impairing fuse
operation.
164.boo Seite 544 Freitag, 30. März 2007 12:54 12
Page 546 of 601

545 Practical hints
Fuses
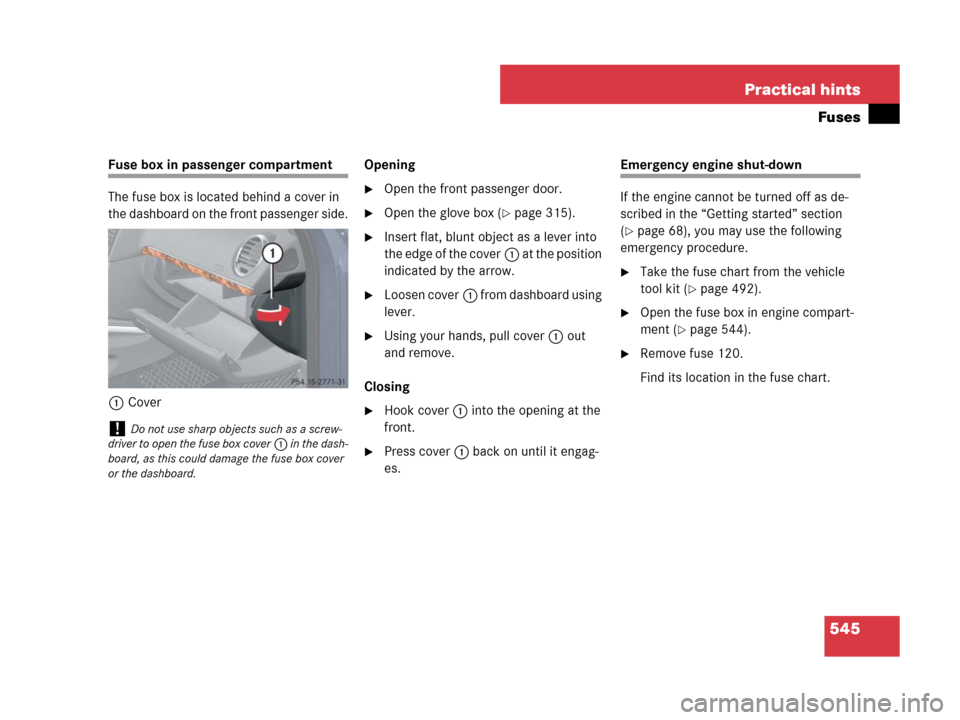
Fuse box in passenger compartment
The fuse box is located behind a cover in
the dashboard on the front passenger side.
1CoverOpening
�Open the front passenger door.
�Open the glove box (�page 315).
�Insert flat, blunt object as a lever into
the edge of the cover1 at the position
indicated by the arrow.
�Loosen cover1 from dashboard using
lever.
�Using your hands, pull cover1 out
and remove.
Closing
�Hook cover1 into the opening at the
front.
�Press cover1 back on until it engag-
es.
Emergency engine shut-down
If the engine cannot be turned off as de-
scribed in the “Getting started” section
(
�page 68), you may use the following
emergency procedure.
�Take the fuse chart from the vehicle
tool kit (
�page 492).
�Open the fuse box in engine compart-
ment (
�page 544).
�Remove fuse 120.
Find its location in the fuse chart.
!Do not use sharp objects such as a screw-
driver to open the fuse box cover1 in the dash-
board, as this could damage the fuse box cover
or the dashboard.
164.boo Seite 545 Freitag, 30. März 2007 12:54 12
Page 551 of 601
550 Technical data
Identification labels
1Certification label (on driver’s B-pillar)
The V
ehicle Identification Number (VIN)
can be found in the following locations:
�on the certification label
�embossed underneath the
passenger-side second-row rear seat
(
�page 551)
�on the lower edge of the windshield
(
�page 551)
Example certification label (U.S. vehicles)
2Paintwork code
3VIN
Example certification label
(Canada vehicles)
2Paintwork code
3VIN
iData shown on certification label are for
illustration purpose only. These data are specific
to each vehicle and may vary from data shown in
the illustration. Refer to certification label on
vehicle for actual data specific to your vehicle.
164.boo Seite 550 Freitag, 30. März 2007 12:54 12
Page 556 of 601

555 Technical data
Rims and tires
�Rims and tires
!Only use tires which have been tested and
approved by Mercedes-Benz. Tires approved by
Mercedes-Benz are developed to provide best
possible performance in conjunction with the
driving safety systems on your vehicle such as
ABS or ESP
®. Tires specially developed for your
vehicle and tested and approved by
Mercedes-Benz can be identified by finding the
following on the tire’s sidewall:
�MO = Mercedes-Benz Original equipment
tires
Using tires other than those approved by
Mercedes-Benz may result in damage that is not
covered by the Mercedes-Benz Limited
Warranty.
!Using tires other than those approved by
Mercedes-Benz can have detrimental effects,
such as
�poor handling characteristics
�increased noise
�increased fuel consumption
Moreover, tires and rims not approved by
Mercedes-Benz may, under load, exhibit dimen-
sional variations and different tire deformation
characteristics that could cause them to come
into contact with the vehicle body or axle parts.
Damage to the tires or the vehicle may be the
result.
iFurther information on tires and rims is
available at any authorized Mercedes-Benz Light
Truck Center. A placard with the recommended
tire inflation pressure is located on the driver’s
door B-pillar (
�page 550). Some vehicles may
have supplemental tire inflation pressure infor-
mation for driving at high speeds (
�page 394)
or for vehicle loads less than the maximum
loaded vehicle condition (
�page 394). If such
information is provided, it can be found on the
placard located on the inside of the fuel filler
flap.The tire inflation pressure should be checked
regularly and should only be adjusted on cold
tires. Follow tire manufacturer’s maintenance
recommendation included with vehicle.
iThe following pages also list the approved
wheel rim and tire sizes for equipping your
vehicles with winter tires. Winter tires are not
available as standard or optional factory equip-
ment, but can be purchased from an authorized
Mercedes-Benz Light Truck Center.
Depending on vehicle model and the standard or
optional factory-equipped wheel rim/tire
configuration on your vehicle (Appearance
Package, etc.), equipping your vehicle with win-
ter tires approved for your vehicle model may
also require the purchase of two or four wheel
rims of the recommended size for use with these
winter tires. See an authorized Mercedes-Benz
Light Truck Center for more information.
164.boo Seite 555 Freitag, 30. März 2007 12:54 12
Page 564 of 601

563 Technical data
Fuels, coolants, lubricants
ModelCapacityFuels, coolants, lubricants, etc.
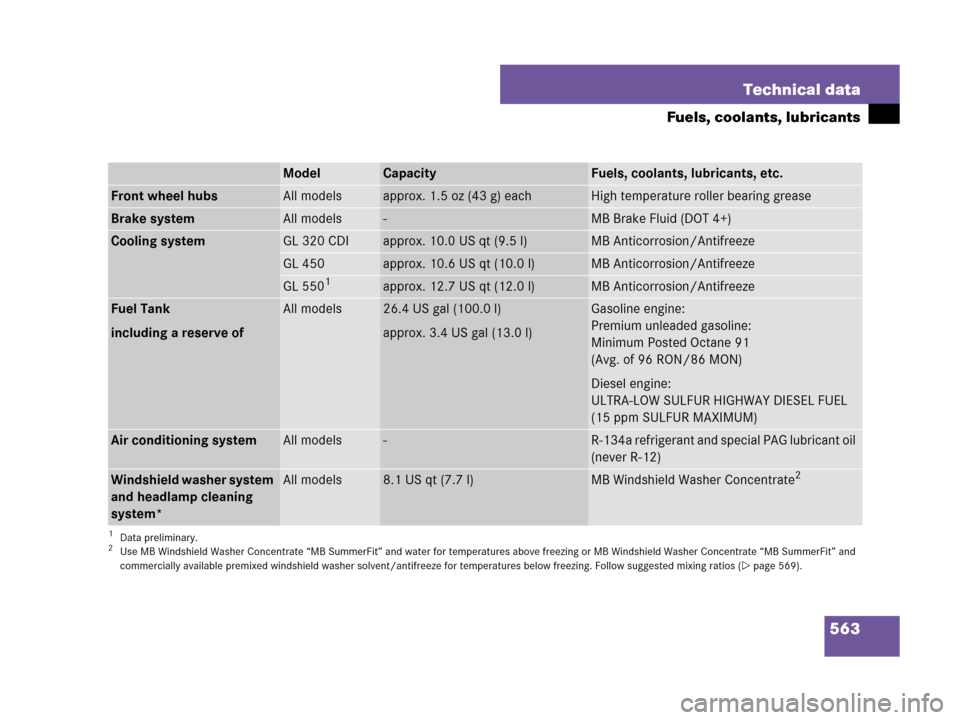
Front wheel hubsAll modelsapprox. 1.5oz (43g) eachHigh temperature roller bearing grease
Brake systemAll models-MB Brake Fluid (DOT 4+)
Cooling systemGL 320 CDIapprox. 10.0 US qt (9.5 l)MB Anticorrosion/Antifreeze
GL 450approx. 10.6 US qt (10.0 l)MB Anticorrosion/Antifreeze
GL 5501approx. 12.7 US qt (12.0 l)MB Anticorrosion/Antifreeze
Fuel Tank
including a reserve ofAll models26.4 US gal (100.0 l)
approx. 3.4 US gal (13.0 l)Gasoline engine:
Premium unleaded gasoline:
Minimum Posted Octane 91
(Avg. of 96 RON/86 MON)
Diesel engine:
ULTRA-LOW SULFUR HIGHWAY DIESEL FUEL
(15 ppm SULFUR MAXIMUM)
Air conditioning systemAll models-R-134a refrigerant and special PAG lubricant oil
(never R-12)
Windshield washer system
and headlamp cleaning
system*All models8.1 US qt (7.7 l)MB Windshield Washer Concentrate2
1Data preliminary.2Use MB Windshield Washer Concentrate “MB SummerFit” and water for temperatures above freezing or MB Windshield Washer Concentrate “MB SummerFit” and
commercially available premixed windshield washer solvent/antifreeze for temperatures below freezing. Follow suggested mixing ratios (�page 569).
164.boo Seite 563 Freitag, 30. März 2007 12:54 12