Page 375 of 601

374 Operation
At the gas station
Refueling
The fuel filler flap is located on the
right-hand side of the vehicle towards the
rear. Locking/unlocking the vehicle with
the SmartKey or the SmartKey with
KEYLESS-GO* automatically
locks/unlocks the fuel filler flap.1Fuel filler flap
2Fuel filler cap
�Turn off the engine.
�Vehicles with SmartKey: Remove the
SmartKey from the starter switch.
Vehicles with KEYLESS-GO*: Open the
driver’s door (this puts the starter
switch in position0, same as with the
SmartKey removed from the starter
switch). The driver’s door then can be
closed again.
Warning!G
Gasoline and diesel fuels are highly flamma-
ble and poisonous. They burn violently and
can cause serious personal injury.
Never allow sparks, flame or smoking mate-
rials near gasoline or diesel fuel!
Turn off the engine before refueling.
Whenever you are around gasoline or diesel
fuel, avoid inhaling fumes and skin or cloth-
ing contact, extinguish all smoking materi-
als.
Direct skin contact with gasoline or diesel
fuels and the inhalation of gasoline or diesel
fuel vapors are damaging to your health.
Warning!G
Do not fill diesel tanks with gasoline. Do not
mix diesel fuel with gasoline. Otherwise the
fuel system and engine could be damaged.
In addition, the vehicle could catch fire.
!Damage resulting from mixing gasoline with
diesel is not covered by the Mercedes-Benz
Limited Warranty.
!Diesel engine: When filling the diesel fuel
tank using fuel containers, place a filling filter, a
suede cloth or a clean flannel cloth as a filter.
Otherwise, particles from the fuel container
could clog the fuel lines and/or the diesel injec-
tion system.
iIn case the central locking system does not
release the fuel filler flap, see “Fuel filler flap”
(
�page 497).
164.boo Seite 374 Freitag, 30. März 2007 12:54 12
Page 391 of 601

390 Operation
Tires and wheels
Step 4
�The resulting figure equals the avail-
able amount of cargo and luggage load
capacity. For example, if the “XXX”
amount equals 1400 lbs and there will
be five 150 lbs passengers in your
vehicle, the amount of available cargo
and luggage load capacity is 650 lbs
(1400-750 (5 x150) = 650 lbs).
Step 5
�Determine the combined weight of
luggage and cargo being loaded on the
vehicle. That weight may not safely
exceed the available cargo and luggage
load capacity calculated in step 4.Step 6 (if applicable)
�If your vehicle will be towing a trailer,
load from your trailer will be trans-
ferred to your vehicle. Consult this
manual to determine how this reduces
the available cargo and luggage load
capacity of your vehicle (
�page 392).
The following table shows examples on
how to calculate total and cargo load
capacities with varying seating configura-
tions and number and size of occupants.
The following examples use a load limit
of 1500 lbs. This is for illustration
purposes only. Make sure you are using
the actual load limit for your vehicle stated
on the vehicle’s Tire and Loading
Information placard (
�page 388).
��
164.boo Seite 390 Freitag, 30. März 2007 12:54 12
Page 393 of 601

(
�page 392) as to not")
392 Operation
Tires and wheels
Certification label
Even after careful determination of the
combined weight of all occupants, cargo
and the trailer tongue load (if applicable)
(
�page 392) as to not exceed the permis-
sible load limit, you must make sure that
your vehicle never exceeds the Gross
Vehicle Weight Rating (GVWR) and the
Gross Axle Weight Rating (GAWR) for ei-
ther the front or rear axle. You can obtain
the GVWR and GAWR from the certification
label. The certification label can be found
on the driver’s door B-pillar, see “Technical
data” (
�page 547).Gross Vehicle Weight Rating (GVWR): The
total weight of the vehicle, all occupants,
all cargo, and the trailer tongue load
(
�page 392) must never exceed the
GVWR.
Gross Axle Weight Rating (GAWR): The to-
tal allowable weight that can be carried by
a single axle (front or rear).
To assure that your vehicle does not ex-
ceed the maximum permissible weight
limits (GVWR and GAWR for front and rear
axle), have the loaded vehicle (including
driver, passengers and all cargo and, if
applicable, trailer fully loaded) weighed on
a suitable commercial scale.Trailer tongue load
The tongue load of any trailer is an impor-
tant weight to measure because it affects
the load you can carry in your vehicle. If a
trailer is towed, the tongue load must be
added to the weight of all occupants riding
and any cargo you are carrying in the
vehicle. The tongue load typically is
between 8% and 15% of the trailer weight
and everything loaded in it.
For more information on trailer tongue
load, see “Loading a trailer” (
�page 365).
164.boo Seite 392 Freitag, 30. März 2007 12:54 12
Page 428 of 601

427 Operation
Vehicle care
Do not apply any of these products or wax
if your vehicle is parked in the sun or if the
hood is still hot.
�Use the appropriate MB-Touch-Up
Stick for quick and provisional repairs
of minor paint damage (i.e. chips from
stones, vehicle doors, etc.).
Engine cleaning
Prior to cleaning the engine compartment
make sure to protect electrical compo-
nents and connectors from the intrusion of
water and cleaning agents.
Corrosion protection, such as
MB Anticorrosion Wax, should be applied
to the engine compartment after every en-
gine cleaning. Before applying, all control
linkage bushings and joints should be lu-
bricated. The poly-V-belt and all pulleys
should be protected from any wax.Vehicle washing
In the winter, thoroughly remove all traces
of road salt as soon as possible.
When washing the vehicle underbody, do
not forget to clean the inner sides of the
wheels.
Hand-wash
Do not use hot water or wash your vehicle
in direct sunlight.
�Only use a mild car wash detergent,
such as Mercedes-Benz approved Car
Shampoo.
�Thoroughly spray the vehicle with a dif-
fused jet of water.
Direct only a very weak spray towards
the ventilation intake.
�Use plenty of water and rinse the
sponge and chamois frequently.
�Rinse with clean water and thoroughly
dry with a chamois.
Do not allow cleaning agents to dry on
the finish.iVehicles with KEYLESS-GO*:
If a door handle is hit by a strong jet of water, and
a SmartKey with KEYLESS-GO* is in close
proximity, i.e. within approximately 3 ft (approxi-
mately 1 m), the vehicle could be inadvertently
locked or unlocked.
!Do not use scouring agents on these parts.
Never apply strong force and only use a soft,
non-sratching cloth when cleaning the vehicle.
Do not attempt to wipe the surface with a dry
cloth or sponge.
Otherwise you may scratch or damage the paint.
164.boo Seite 427 Freitag, 30. März 2007 12:54 12
Page 436 of 601
435 Practical hints
What to do if …
Where will I find ...?
Unlocking/locking in an emergency
Resetting activated head restraints
Replacing SmartKey batteries
Replacing bulbs
Replacing wiper blades
Flat tire
Bleeding the fuel system
(diesel engine only)
Battery
Jump starting
Towing the vehicle
Fuses
164.boo Seite 435 Freitag, 30. März 2007 12:54 12
Page 487 of 601

486 Practical hints
What to do if …
Display symbolDisplay messagePossible cause/consequencePossible solution
nLevel Selection
Not PermittedThe selected vehicle level cannot adjust-
ed, because
�you are driving too fast for the desired
vehicle level
�you are towing a trailer
�you are using accessories that are
connected to the trailer power socket,
e.g. a bicycle rack
�Reduce vehicle speed.
�Set the desired vehicle level again
(
�page 279).
MalfunctionThe air suspension is malfunctioning.�Do not drive faster than 50 mph
(80 km/h) depending on the set vehi-
cle level.
�Have the vehicle checked at an autho-
rized Mercedes-Benz Light Truck
Center.
Compressor
Cooling DownYou have selected a higher vehicle level.
Due to frequent level changes within a
short period, the compressor must first
cool down.�Let the compressor cool until the
message disappears.
The selected level will be set once the
compressor has cooled down.
!When the message Compressor Cooling
Down
appears in the multifunction display,
driving is still possible. Keep in mind that theride height of the vehicle is not yet reached, so
you can damage the underbody of the vehicle.The selected level will be set once the compres-
sor has cooled.
164.boo Seite 486 Freitag, 30. März 2007 12:54 12
Page 491 of 601
490 Practical hints
Where will I find ...?
First aid kit
The first aid kit is located on the driver’s
side in the cargo compartment behind the
cover.
1Lock
2Cover in left side trim panel
�Turn lock1 90° in direction of arrow.
�Fold down cover2.
The first aid kit can be removed.
Vehicle tool kit
The vehicle tool kit is stored under the
cargo compartment floor.
The vehicle tool kit includes:
�Towing eye bolt
�Wheel wrench
�Alignment bolt
�Vehicle jack
�Fuse chart
�Collapsible wheel chock
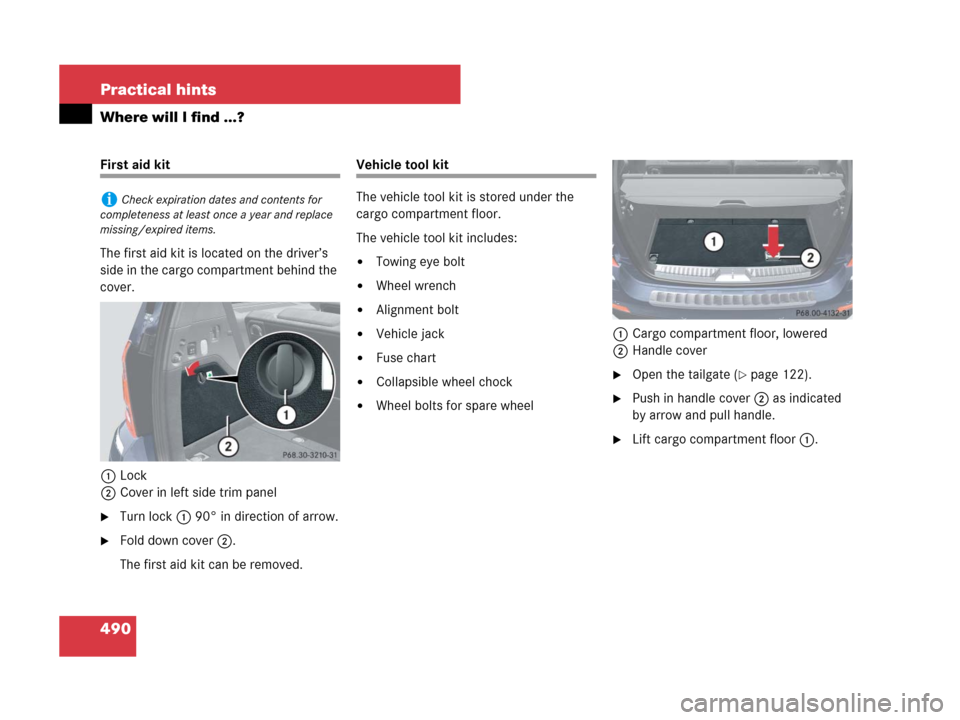
�Wheel bolts for spare wheel1Cargo compartment floor, lowered
2Handle cover
�Open the tailgate (�page 122).
�Push in handle cover2 as indicated
by arrow and pull handle.
�Lift cargo compartment floor1.
iCheck expiration dates and contents for
completeness at least once a year and replace
missing/expired items.
164.boo Seite 490 Freitag, 30. März 2007 12:54 12
Page 493 of 601

492 Practical hints
Where will I find ...?
Example illustration1
6Alignment bolt
7Towing eye bolt
8Wheel wrench
9Hook and loop fastener
aVehicle jack
2
bWheel bolts
cCollapsible wheel chock
dFuse chart
eVehicle tool kit storage well casing
�To remove vehicle jacka, loosen
hook and loop fastener9.Vehicle jack
The vehicle jack is located underneath the
cargo compartment floor.
1Depending on production date, your vehicle may
be equipped with a scissors-type vehicle jack.
Thus, appearance and alignment of the items may
vary.
2If your vehicle is equipped with a scissors-type
vehicle jack, a reversible ratchet is also included.
!Depending on vehicle production date your
vehicle may be equipped with a scissors-type
jack (located under the cargo compartment
floor). If so equipped, only use this jack when
jacking up the vehicle as otherwise the vehicle’s
underbody can be damaged. See separate
instructions for scissors-type jack.
!To prevent damage, always disengage the
strap of the securing hook and lower the cargo
compartment floor (
�page 490) before closing
the tailgate.
Warning!G
Only use the jack supplied with your vehicle
to lift the vehicle briefly for wheel changes.
If you use the jack for any other purpose,
you or others could be inj ure d, as the ja ck is
designed only for the purpose of changing a
wheel.
When using the jack, observe the safety
notes in the “Mounting the spare wheel”
section (
�page 520) and the notes on the
jack.
164.boo Seite 492 Freitag, 30. März 2007 12:54 12