Page 279 of 601

278 Controls in detail
Driving systems
The switch is located on the upper part of
the center console.
1Switch for off-road driving program
2Indicator lampSwitching Off-road driving program on
�Press switch1 (�page 278).
Indicator lamp2 comes on. The
symboly appears in the lower
multifunction display.
Switching Off-road driving program off
�Press switch1 again.
Indicator lamp2 goes out. The
symboly disappears.
Air suspension program
Your vehicle is factory equipped with
vehicle level control which regulates the
ride height of the vehicle. The Adaptive
Damping System (ADS)* optimizes your
vehicle’s suspension tuning.
�Suspension tuning: Adaptive Damping
System (ADS)* (
�page 278)
�Vehicle level control (�page 279)
Adaptive Damping System (ADS)*
The fine tuning of the damping and suspen-
sion is dependent on:
�your driving style
�road surface conditions
�your personal ADS settings
�your personal vehicle level settings
The ADS switch is located on the upper
part of the center console.
164.boo Seite 278 Freitag, 30. März 2007 12:54 12
Page 282 of 601

281 Controls in detail
Driving systems
Vehicles without enhanced Off-road
Package*
The switch is located on the upper part of
the center console.
1Vehicle level switch
2Indicator lampBasic settings
The following vehicle chassis ride heights
can be selected using the vehicle level
switch in the center console:The following is the approximate change in
ride height for each of the level settings:
LevelDriving situation
RaisedFor off-road driving or driv-
ing in rough terrain. The in-
dicator lamp is on.
HighwayFor driving on paved roads
in fair or better condition.
The indicator lamp is off.
iThe third available level is the high-speed
level that is set automatically.
LevelRide height
Raised+ 3.1 in (80 mm)
Highway+/- 0 in (0 mm)
High-speed- 0.6 in (-15 mm)
iVehicles with ADS*:
Depending on the ADS setting (
�page 278), the
vehicle will be lowered to the high-speed level
when traveling at higher speeds. At speeds
below 40 mph (64 km/h) at the latest, it will be
returned to the highway level.
iThe high-speed level is not available if tow-
ing a trailer. For more information on towing a
trailer, see “Trailer towing” (
�page 364).
164.boo Seite 281 Freitag, 30. März 2007 12:54 12
Page 284 of 601
 goes out. The
following message appears in the multi-
function display for 5 seconds:Vehicles")
283 Controls in detail
Driving systems
When the highway level is reached, indica-
tor lamp2 (
�page 281) goes out. The
following message appears in the multi-
function display for 5 seconds:Vehicles with enhanced Off-road
Package*
The switch is located on the upper part of
the center console.
1Rotatable outer adjustment ring
2Set higher vehicle level
3Indicator lamps
4Set lower vehicle levelBasic settings
The following vehicle chassis ride heights
can be selected using the vehicle level
switch in the center console:
iThe message can be cleared by pressing
theèÿk or buttonj on the
multifunction steering wheel.
iThe vehicle is lowered automatically to the
highway level if:
�the vehicle speed is above 55 mph
(88 km/h)
�the speed stays between 40 mph (64 km/h)
and 55 mph (88 km/h) for approximately
20 seconds
LevelDriving situation
Off-road 3For slow driving on
rough terrain. Lower,
middle and upper indi-
cator lamps are on.
Off-road 2Off-road driving. Lower
and middle indicator
lamps are on.
Off-road 1For driving on easy ter-
rain. Lower indicator
lamp is on.
HighwayFor normal driving. In-
dicator lamps are off.
iAnother available level is the high-speed
level that is set automatically.
164.boo Seite 283 Freitag, 30. März 2007 12:54 12
Page 292 of 601

291 Controls in detail
Driving systems
As your vehicle approaches an object, one
or more distance segments will illuminate,
depending on the distance. When the
seventh red distance segment illuminates,
you have reached the minimum distance.
�Front area: An intermittent acoustic
warning lasting a maximum of
2 seconds will sound as the first red
distance segment illuminates and a
constant acoustic warning lasting a
maximum of 2 seconds will sound for
the second red distance segment. The
signal is canceled when the automatic
transmission is set to positionP, or the
parking brake is set.
�Rear area: An intermittent acoustic
warning lasting a maximum of
2 seconds will sound as the first red
distance segment illuminates and a
constant acoustic warning lasting a
maximum of 2 seconds will sound for
the second red distance segment. The
signal is canceled when the automatic
transmission is set to positionD, P, or
the parking brake is set.Switching the Parktronic system*
on/off
You can switch off the Parktronic system
manually.
The Parktronic switch is located on the
upper part of the center console.
Vehicles without enhanced off-road
package*
1Parktronic switch
2Indicator lamp
Vehicles with enhanced off-road package*
1Parktronic switch
2Indicator lamp
164.boo Seite 291 Freitag, 30. März 2007 12:54 12
Page 318 of 601
317 Controls in detail
Useful features
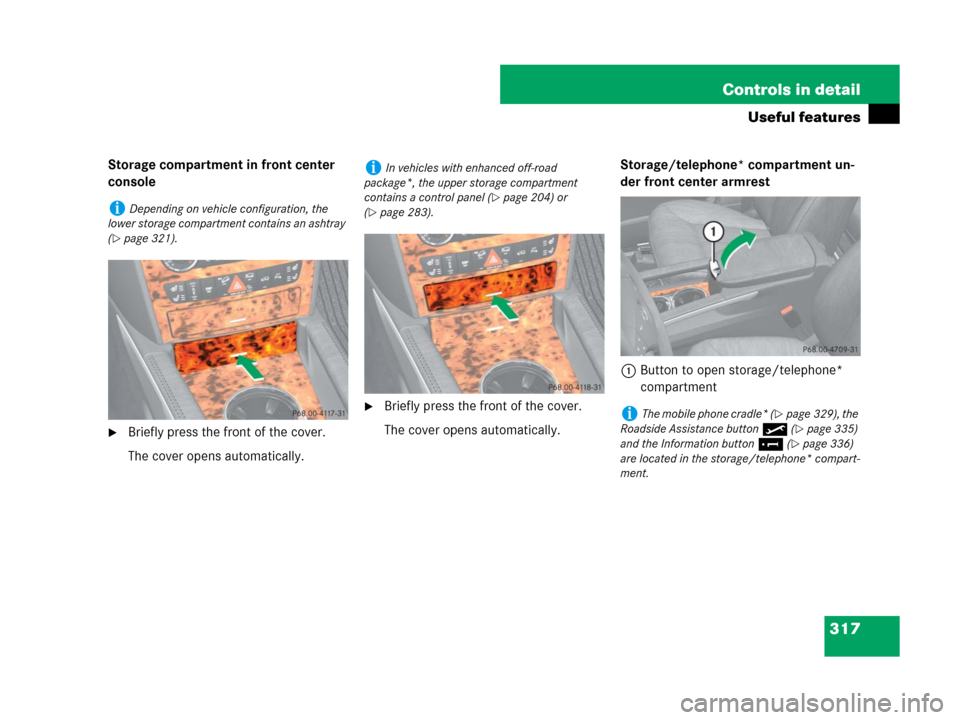
Storage compartment in front center
console
�Briefly press the front of the cover.
The cover opens automatically.
�Briefly press the front of the cover.
The cover opens automatically.Storage/telephone* compartment un-
der front center armrest
1Button to open storage/telephone*
compartment
iDepending on vehicle configuration, the
lower storage compartment contains an ashtray
(
�page 321).
iIn vehicles with enhanced off-road
package*, the upper storage compartment
contains a control panel (
�page 204) or
(
�page 283).
iThe mobile phone cradle* (�page 329), the
Roadside Assistance button• (
�page 335)
and the Information button¡ (
�page 336)
are located in the storage/telephone* compart-
ment.
164.boo Seite 317 Freitag, 30. März 2007 12:54 12
Page 321 of 601

320 Controls in detail
Useful features
Cup holders
Cup holder in front of armrest
A cup holder and a card/ticket holder are
located in the front center console.
1Cup holderCup holder in rear armrest (second-row
seats)
1Cup holder
�Pull the armrest down by its top.
Warning!G
In order to help prevent spilling liquids on
vehicle occupants and/or vehicle equip-
ment, only use containers that fit into the
cup holder. Use lids on open containers and
do not fill containers to a height where the
contents, especially hot liquids, could spill
during braking, vehicle maneuvers, or an
accident. Liquids spilled on vehicle occu-
pants may cause serious personal injury.
Liquids spilled on vehicle equipment may
cause damage not covered by the
Mercedes-Benz Limited Warranty.
When not in use, keep rear cup holder
closed. An open cup holder may cause injury
to you or others when contacted during
braking, vehicle maneuvers, or in an acci-
dent.
Keep in mind that objects placed in a cup
holder may come loose during braking,
vehicle maneuvers, or an accident and be
thrown around in the vehicle interior.
Objects thrown around in the vehicle interi-
or may cause an accident and/or serious
personal injury.
iThe front cup holder can be removed for
cleaning purposes (
�page 321).
!Close the cup holder before folding the arm-
rest upwards.
164.boo Seite 320 Freitag, 30. März 2007 12:54 12
Page 322 of 601
321 Controls in detail
Useful features
Cup holders in third-row side trim
Cup holders are located in the side trims of
the third-row seats.
1Cup holderRemoving and reinstalling cup holder
The front cup holder can be removed for
cleaning purposes.
1Cup holder
2Bridge with card, ticket holder
�Hold cup holder at its bridge2 and
pull out bridge in direction of arrow.
�Pull cup holder1 out in direction of ar-
row.
�First, insert the cup holder1 and then
insert bridge2.
Ashtrays
Depending on vehicle configuration your
vehicle is equipped with an ashtray and a
cigarette lighter (
�page 323) located in
the front center console and an ashtray lo-
cated in front of the second-row seats
(
�page 322).
Ashtray in the center console
1Ashtray insert
2Cover plate
iIf your vehicle is not equipped with an ash-
tray, it has a storage compartment (
�page 317)
with a power outlet (
�page 324) instead.
164.boo Seite 321 Freitag, 30. März 2007 12:54 12
Page 323 of 601

322 Controls in detail
Useful features
Opening the ashtray
�Briefly touch cover plate2.
The ashtray opens automatically.
Removing ashtray insert
�Grip the ashtray insert1 on the sides
and pull it out upwards.
Reinstalling ashtray insert
�Install ashtray insert1.
�Close ashtray cover plate2.Rear center console ashtray
(second-row)
1Ashtray
2Ashtray coverOpening rear ashtray
�Briefly press ashtray cover2.
The ashtray1 opens automatically.
Removing rear ashtray insert
�Grip the insert on the sides and pull it
out upwards.
Reinstalling rear ashtray insert
�Install ashtray insert.
�Close the ashtray.
Cigarette lighter
�Switch on the ignition (�page 42).
�Push in cigarette lighter.
The cigarette lighter will pop out auto-
matically when hot.
Warning!G
Remove ashtray only with vehicle standing
still. Set the parking brake to secure vehicle
from movement. Set automatic transmis-
sion toP. With the automatic transmission
set toP, turn off the engine.
!Close the ashtray when not in use and be-
fore folding the second-row seats
164.boo Seite 322 Freitag, 30. März 2007 12:54 12