Page 331 of 601

330 Controls in detail
Useful features
The mobile phone is linked to the
hands-free device and the multifunc-
tion steering wheel.
The battery is charged depending on its
charge status and the position of the
SmartKey in the starter switch. The
charge procedure will be indicated in
the mobile phone’s display.
You can place or receive phone calls. You
can control other functions of the mobile
phone via the control system
(
�page 186), the Voice Control System*
(see separate operating instructions), or
the COMAND system (see separate oper-
ating instructions).Removing mobile phone from mobile
phone cradleExample illustration
1Release catch for mobile phone
2Mobile phone cradle
�Press release catch in direction of
arrow1 and take mobile phone out of
mobile phone cradle2.Changing mobile phone cradle
If you require a different cradle for your
mobile phone, remove the present cradle
before installing a new one.
Removing an existing mobile phone
cradle
Example illustration
1To release the mobile phone cradle
2To remove the mobile phone cradle
3Mobile phone cradle
�Press release button in direction of
arrow1 and take mobile phone
cradle3 out in direction of arrow2.
iWhen you take the SmartKey or SmartKey
with KEYLESS-GO* out of the starter switch, the
mobile phone remains switched on for approxi-
mately 10 minutes. If you place or receive a call
during this time, the mobile phone switches off
10 minutes after the call has been completed.iWhen using a flip-style mobile phone, open
flip top before removing from the cradle while a
call is connected. Otherwise, the call will be dis-
connected.
��
164.boo Seite 330 Freitag, 30. März 2007 12:54 12
Page 436 of 601
435 Practical hints
What to do if …
Where will I find ...?
Unlocking/locking in an emergency
Resetting activated head restraints
Replacing SmartKey batteries
Replacing bulbs
Replacing wiper blades
Flat tire
Bleeding the fuel system
(diesel engine only)
Battery
Jump starting
Towing the vehicle
Fuses
164.boo Seite 435 Freitag, 30. März 2007 12:54 12
Page 498 of 601

497 Practical hints
Unlocking/locking in an emergency
Locking the vehicle
If you cannot lock the vehicle with the
SmartKey or KEYLESS-GO*, lock the vehi-
cle carrying out the following steps.
�Close the front passenger door, the
rear right door and the tailgate.
�Open the driver’s door and the rear left
door.
�Press the central locking switch on the
driver’s door (
�page 128).
The locking knobs of the front passen-
ger door and the rear doors move
down.
If the vehicle battery is disconnected or
drained:
�Press down the locking knobs of
the front passenger door and the
rear doors manually.
�Exit the vehicle.
�Close the driver’s door.
�Enter the vehicle through the rear left
door.
�Press down the locking knob of the
driver’s door.
�Exit the vehicle.
�Close the rear left door.
The vehicle is locked.
Fuel filler flap
�Open the tailgate (�page 122).
The fuel filler flap release is located behind
a cover in the right side trim panel of the
cargo compartment.
1Lock
2Cover
!To prevent inadvertent lockout, make sure
to have the SmartKey or SmartKey with
KEYLESS-GO* with you before proceeding with
the next step. The next step will lock the vehicle.
iThis procedure does not arm the anti-theft
alarm system, nor does it lock the fuel filler flap.
��
164.boo Seite 497 Freitag, 30. März 2007 12:54 12
Page 503 of 601

502 Practical hints
Replacing SmartKey batteries
If the batteries in the SmartKey or the
SmartKey with KEYLESS-GO* are dis-
charged, the vehicle can no longer be
locked or unlocked. It is recommended to
have the batteries replaced at an autho-
rized Mercedes-Benz Light Truck Center.
Batteries contain materials that can harm
the environment if disposed of improperly.
Recycling of batteries is the preferred
method of disposal. Many states require
sellers of batteries to accept old batteries
for recycling.Replacement batteries: Lithium, type
CR 2025 or equivalent.
�Remove mechanical key1 from the
SmartKey or SmartKey with
KEYLESS-GO* (
�page 496).1Mechanical key
2Battery compartment
�Insert mechanical key1 into opening.
�Press mechanical key1 in direction of
arrow.
The battery compartment2 is
unlatched.
�Pull battery compartment2 out of the
SmartKey housing.
Warning!G
Keep the batteries out of reach of children.
If a battery is swallowed, seek medical help
immediately.
iWhen inserting the batteries, make sure
they are clean and free of lint.
iWhen replacing batteries, always replace
both batteries.
The required replacement batteries are available
at any Mercedes-Benz Light Truck Center.
164.boo Seite 502 Freitag, 30. März 2007 12:54 12
Page 504 of 601
503 Practical hints
Replacing SmartKey batteries
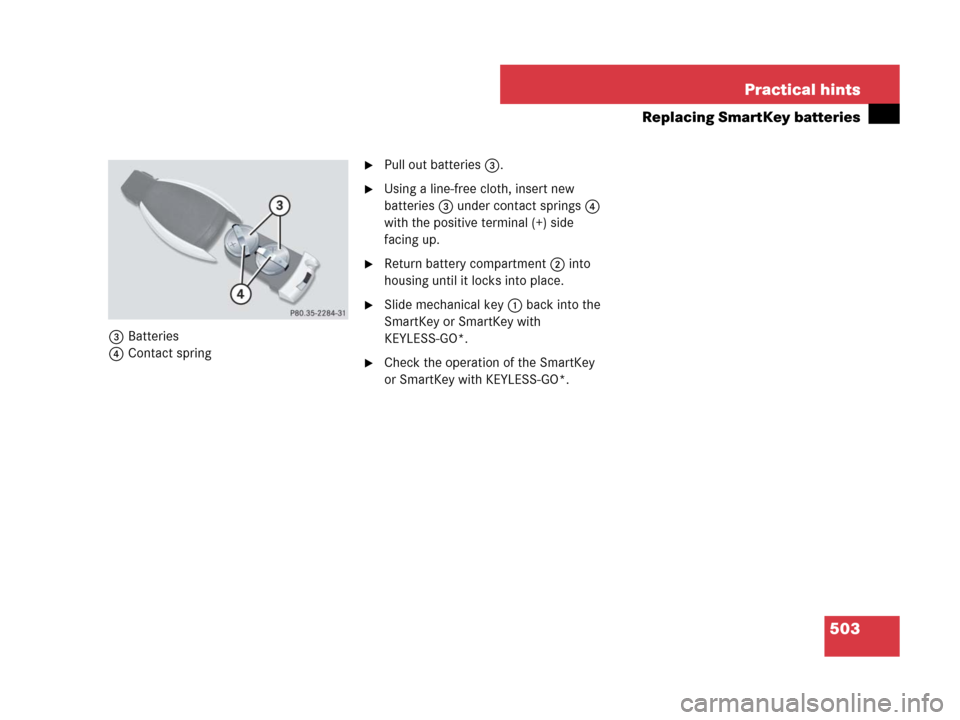
3Batteries
4Contact spring
�Pull out batteries3.
�Using a line-free cloth, insert new
batteries3 under contact springs4
with the positive terminal (+) side
facing up.
�Return battery compartment2 into
housing until it locks into place.
�Slide mechanical key1 back into the
SmartKey or SmartKey with
KEYLESS-GO*.
�Check the operation of the SmartKey
or SmartKey with KEYLESS-GO*.
164.boo Seite 503 Freitag, 30. März 2007 12:54 12
Page 531 of 601

�Set the automatic transmission to
positionP (
�page 191).
�Firmly depress the p")
530 Practical hints
Battery
Disconnecting, removing, reinstalling
and reconnecting the battery
Step 1 (Disconnecting)
�Set the automatic transmission to
positionP (
�page 191).
�Firmly depress the parking brake
(
�page 67).
�Turn off the engine (�page 68).
�Leave the ignition switched on
(
�page 42).
!Never loosen or detach battery terminal
clamps while the engine is running or the
SmartKey is in the starter switch. Otherwise the
alternator and other electronic components
could be severely damaged.
Have the battery checked regularly by an
authorized Mercedes-Benz Light Truck Center.
Contact your authorized Mercedes-Benz Light
Truck Center for further information.
Warning!G
Do not place metal objects on the battery as
this could result in a short circuit.
Use leak-proof battery only to avoid the risk
of acid burns in the event of an accident.
Warning!G
Disconnecting, removing, reinstalling and
reconnecting the battery is a complicated
and technically demanding procedure that
also requires safety precautions to avoid the
risk of injury. We strongly recommend that it
be performed by a qualified technician or an
authorized Mercedes-Benz Light Truck
Center only. Please read the instructions
fully before beginning operation and only
undertake it if you feel fully capable of
performing all of the tasks involved as de-
scribed in these instructions. Observe all
safety instructions and precautions when
handling automotive batteries
(
�page 528). Performing the tasks involved
incorrectly can cause damage to the vehicle
and impair the operating safety of the
vehicle, and/or cause severe injury to you
or others.
iWith a disconnected battery you will no
longer be able to turn the SmartKey in the starter
switch and pressing the KEYLESS-GO*
start/stop button will have no effect.
iIf your battery is discharged, the vehicle
must be jump started (
�page 536) using the
jump start contacts in the engine compartment,
or an accessory battery charge unit* approved
by Mercedes-Benz must be connected using the
jump start contacts in the engine compartment
(see separate instructions for the accessory bat-
tery charge unit*) before any of the following
steps can be performed. If the battery cannot be
jumped or charged, please contact an
authorized Mercedes-Benz Light Truck Center.
164.boo Seite 530 Freitag, 30. März 2007 12:54 12
Page 533 of 601

532 Practical hints
Battery
2Perforated floor carpet, unfolded
�Fold the floor carpet piece2 in
direction of the arrow.
�Move the front passenger seat to the
most forward and upward position
again (
�page 46).
�Switch off the ignition (�page 42).
�Remove SmartKey from starter switch.
Vehicles with KEYLESS-GO*:
�Make sure the vehicle’s on-board
electronics have status0 (Turn off
the engine or all electrical systems
using the KEYLESS-GO start/stop
button. Open the driver’s door. With
the driver’s door open, the vehicle’s
on-board electronics have status0,
same as with the SmartKey
removed from the starter switch).
�Enter the rear passenger compartment
again.Step 4 (Disconnecting)
3Air channel
4Clip with pin insert
�Pull pin out of clip4 in direction of
arrow.
�Pull clip with pin4 outwards.
�Remove air channel3 by pulling it out
in direction of arrow.
iIf the vehicle battery is discharged and you
had the vehicle jump started, turn off the engine.��
164.boo Seite 532 Freitag, 30. März 2007 12:54 12
Page 535 of 601

cBattery
�Tilt the batteryc with the negative
terminal side upwards.
�Take out the battery maintaining its
tilted position in the direction of the
arro")
534 Practical hints
Battery
Step 8 (Removing)
cBattery
�Tilt the batteryc with the negative
terminal side upwards.
�Take out the battery maintaining its
tilted position in the direction of the
arrow.Step 9 (Reinstalling)
�Carry out step 8 in reverse order
(
�page 534).
Battery, shown removed for illustration
9Battery ventilation hose
dVent plug
�Carry out step 10 to reconnect the
battery (
�page 534).
�Follow steps 5 to 1 in reverse order to
completely reinstall the battery
(
�page 533) to (�page 530).
Step 10 (Reconnecting)
�If the battery has been removed, first
carry out step 8 in reverse order
(
�page 534).
�Open the driver’s door.
�Make sure all electrical consumers are
turned off.
�Make sure the SmartKey is removed
from the starter switch.
Vehicles with KEYLESS-GO*:
�Make sure the vehicle’s on-board
electronics have status0 (Open the
driver’s door. With the driver’s door
open, the vehicle’s on-board elec-
tronics have status0, same as with
the SmartKey removed from the
starter switch (
�page 41)).
!The battery, the battery ventilation hose9
and the lateral plugd (
�page 534) must
always be securely installed when the vehicle is
in operation.
164.boo Seite 534 Freitag, 30. März 2007 12:54 12