Page 511 of 601

counterclockwise.
�Pull bulb socket5 out of the
headlamp housing.
�Pull the side marker bulb out of bulb
soc")
510 Practical hints
Replacing bulbs
Side marker lamp bulb
�Turn bulb socket5 (�page 507)
counterclockwise.
�Pull bulb socket5 out of the
headlamp housing.
�Pull the side marker bulb out of bulb
socket5.
�Insert the new side marker bulb into
bulb socket5.
�Insert bulb socket5 into the
headlamp housing.
�Turn bulb socket5 clockwise until it
engages.Front fog lamp bulbs
Removing front fog lamp cover:
1Cover
2Front fog lamp or corner-illuminating
front fog lamp*
�Insert a suitable object (e.g. screwdriv-
er) at point indicated by the arrow and
pry out cover1.
Cover1 is released.
�Swing cover1 outwards and take it
off.
You can now access the front fog lamp.
3Retaining screws
�Turn retaining screws3 counterclock-
wise.
�Remove front fog lamp2 out of the
bumper.
�Pull electrical connector off.
!If not done carefully and properly, damage
to the bumper can result. We therefore recom-
mend that you have this work carried out by an
authorized Mercedes-Benz Light Truck Center.
164.boo Seite 510 Freitag, 30. März 2007 12:54 12
Page 512 of 601

511 Practical hints
Replacing bulbs
4Bulb socket of front fog lamp bulb
�Turn bulb socket4 counterclockwise.
�Pull bulb socket4 out of the housing.
�Pull the front fog lamp bulb out of bulb
socket4.
�Insert the new front fog lamp bulb into
bulb socket4.
�Insert bulb socket4 into the housing.
�Turn bulb socket4 clockwise until it
engages.
�Plug in the electrical connector.
�Insert front fog lamp2 back into
bumper.
�Fasten retaining screws3.
�Reinsert cover1 and press it in until it
engages.
Additional turn signal lamps bulbs
The additional turn signal lamps in the
exterior rear view mirrors have LEDs.
If a malfunction occurs or LEDs fail to func-
tion, the entire turn signal unit must be re-
placed. Have the turn signal unit replaced
by an authorized Mercedes-Benz Light
Truck Center.
Replacing bulbs for rear lamps
Before you start to replace a bulb for a rear
lamp, do the following first:
�Turn the exterior lamp switch to
positionM (
�page 143).
Tail lamp unit
�Open the tailgate (�page 122).
iTo access the bulb socket, you have to
remove the cover in the corresponding side trim
panel of the cargo compartment.
164.boo Seite 511 Freitag, 30. März 2007 12:54 12
Page 513 of 601
512 Practical hints
Replacing bulbs
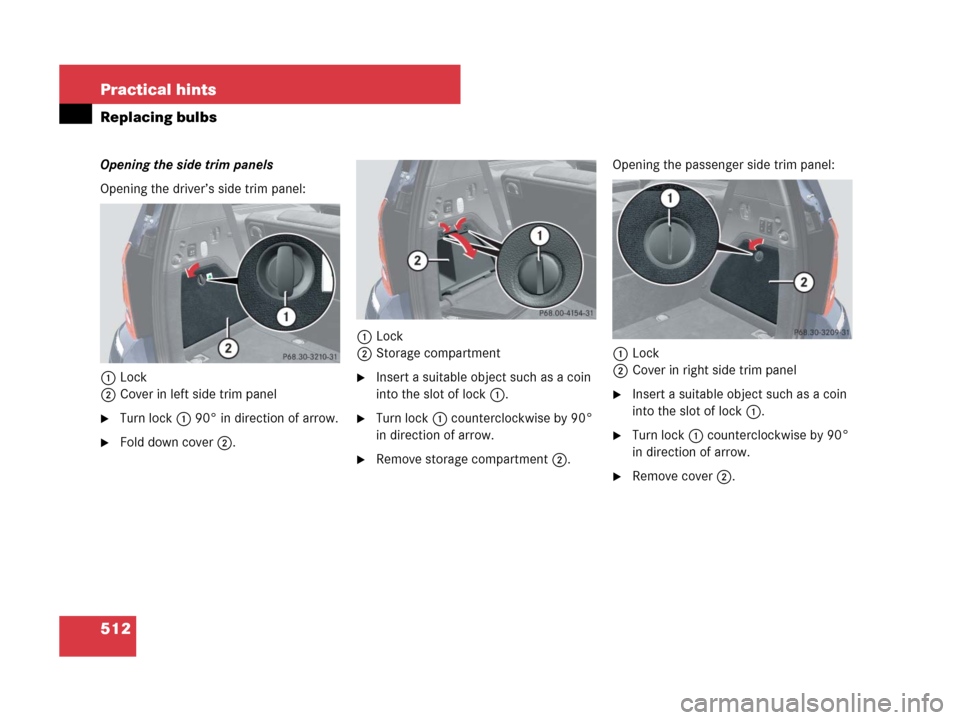
Opening the side trim panels
Opening the driver’s side trim panel:
1Lock
2Cover in left side trim panel
�Turn lock1 90° in direction of arrow.
�Fold down cover2.1Lock
2Storage compartment
�Insert a suitable object such as a coin
into the slot of lock1.
�Turn lock1 counterclockwise by 90°
in direction of arrow.
�Remove storage compartment2.Opening the passenger side trim panel:
1Lock
2Cover in right side trim panel
�Insert a suitable object such as a coin
into the slot of lock1.
�Turn lock1 counterclockwise by 90°
in direction of arrow.
�Remove cover2.
164.boo Seite 512 Freitag, 30. März 2007 12:54 12
Page 514 of 601
513 Practical hints
Replacing bulbs
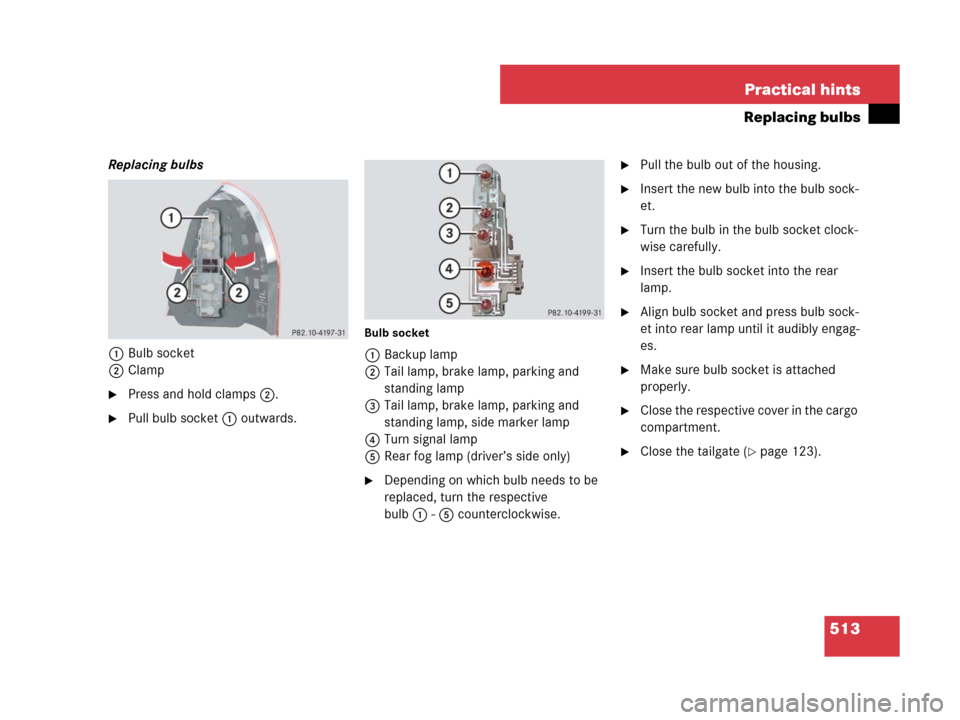
Replacing bulbs
1Bulb socket
2Clamp
�Press and hold clamps2.
�Pull bulb socket1 outwards.
Bulb socket
1Backup lamp
2Tail lamp, brake lamp, parking and
standing lamp
3Tail lamp, brake lamp, parking and
standing lamp, side marker lamp
4Turn signal lamp
5Rear fog lamp (driver’s side only)
�Depending on which bulb needs to be
replaced, turn the respective
bulb1-5 counterclockwise.
�Pull the bulb out of the housing.
�Insert the new bulb into the bulb sock-
et.
�Turn the bulb in the bulb socket clock-
wise carefully.
�Insert the bulb socket into the rear
lamp.
�Align bulb socket and press bulb sock-
et into rear lamp until it audibly engag-
es.
�Make sure bulb socket is attached
properly.
�Close the respective cover in the cargo
compartment.
�Close the tailgate (�page 123).
164.boo Seite 513 Freitag, 30. März 2007 12:54 12
Page 515 of 601
514 Practical hints
Replacing bulbs
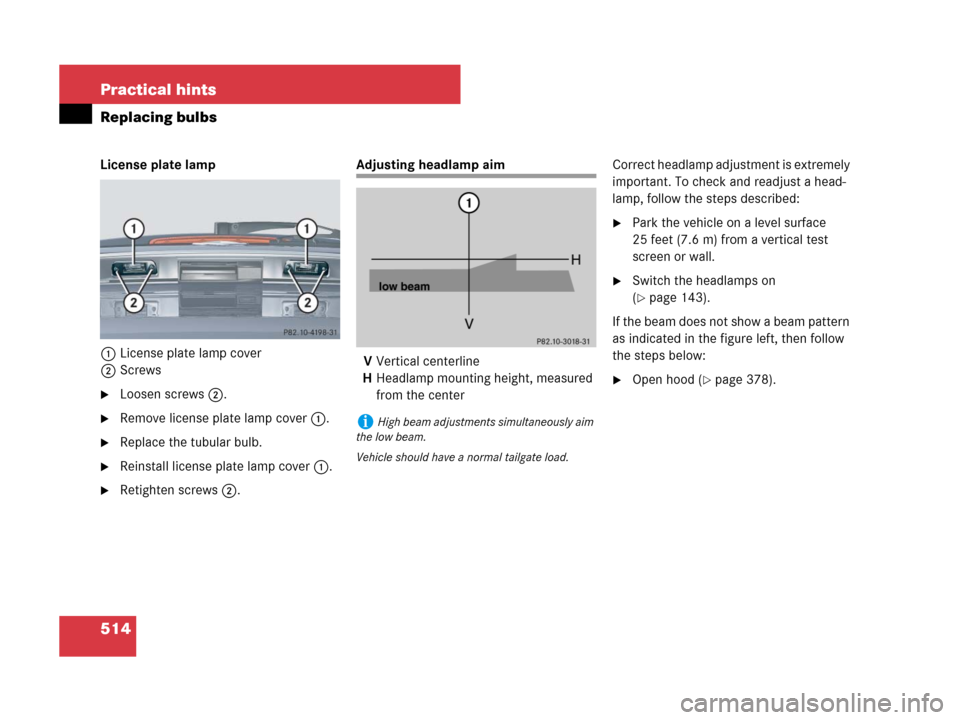
License plate lamp
1License plate lamp cover
2Screws
�Loosen screws2.
�Remove license plate lamp cover1.
�Replace the tubular bulb.
�Reinstall license plate lamp cover1.
�Retighten screws2.
Adjusting headlamp aim
VVertical centerline
HHeadlamp mounting height, measured
from the centerCorrect headlamp adjustment is extremely
important. To check and readjust a head-
lamp, follow the steps described:
�Park the vehicle on a level surface
25 feet (7.6 m) from a vertical test
screen or wall.
�Switch the headlamps on
(
�page 143).
If the beam does not show a beam pattern
as indicated in the figure left, then follow
the steps below:
�Open hood (�page 378).
iHigh beam adjustments simultaneously aim
the low beam.
Vehicle should have a normal tailgate load.
164.boo Seite 514 Freitag, 30. März 2007 12:54 12
Page 516 of 601
515 Practical hints
Replacing bulbs
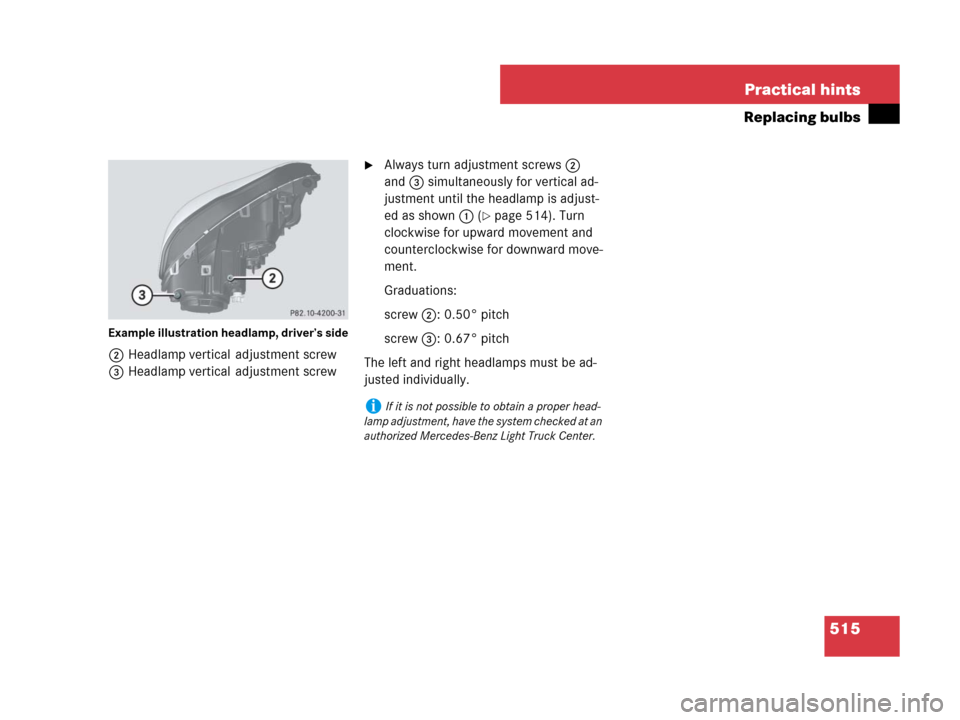
Example illustration headlamp, driver’s side
2Headlamp vertical adjustment screw
3Headlamp vertical adjustment screw
�Always turn adjustment screws2
and3 simultaneously for vertical ad-
justment until the headlamp is adjust-
ed as shown1 (
�page 514). Turn
clockwise for upward movement and
counterclockwise for downward move-
ment.
Graduations:
screw2:0.50° pitch
screw3:0.67° pitch
The left and right headlamps must be ad-
justed individually.
iIf it is not possible to obtain a proper head-
lamp adjustment, have the system checked at an
authorized Mercedes-Benz Light Truck Center.
164.boo Seite 515 Freitag, 30. März 2007 12:54 12
Page 573 of 601
* 228
Air conditioning refrigerant 563
Air conditioning, Cooling 239, 240
Air distribution, Front 234
Air distribution, Rear 243
Air recirculation mode 237")
572 Index
Automatic climate control (3-zone)* 228
Air conditioning refrigerant 563
Air conditioning, Cooling 239, 240
Air distribution, Front 234
Air distribution, Rear 243
Air recirculation mode 237
Air vents*, second-row seats 245
Air vents*, third-row seats 245
Air vents, Front 234
Air volume 235
Control panel, Front 230
Control panel, Rear 241
Deactivating system 232
Defogging 235
Defrosting 235
Maximum cooling, MAXCOOL 237
Rear passenger compartment 241
Rear window defroster 212
Residual engine heat (REST) 241
Using driver-side settings for
all temperature zones 240Automatic headlamp mode 144
Automatic lighting control, Interior
lighting 150
Automatic locking when driving 128
Automatic transmission 56
Accelerator position 195
Emergency operation
(limp-home mode) 200
Gear ranges 197
Gear selector lever 56, 189
Gear selector lever position 192
Gear shifting malfunctions 200
Hill start assist system 196
Kickdown 196
Shifting procedure 192
Starting the engine 56
Steering wheel gearshift control 198
Towing a trailer 197
Transmission fluid level 381
Transmission positions 193
Automatic Transmission Fluid see ATFB
Backrest
Seat 46
Seat, Lumbar support 137
Seat, Multicontour* 138
Backup lamps
Messages in the multifunction
display 477
Replacing bulbs 511
Bar 416
BAS 103
Lamps in instrument cluster 436
Messages in the multifunction
display 451
Batteries, SmartKey
Check lamp 112, 115
Checking battery condition 120
Messages in the multifunction
display 466
Replacing 502
164.boo Seite 572 Freitag, 30. März 2007 12:54 12
Page 574 of 601

573 Index
Battery, Vehicle 528
Charging 535
Disconnecting and connecting 530
Jump starting 536
Removing and installing 530
Bead 416
Beverage holder see Cup holder
Bi-Xenon headlamps* see headlamps
Bolts, Spare wheel 494
Brake fluid 564
Checking 376
Messages in the multifunction
display 469
Brake lamp
Cleaning lenses 429
Messages in the multifunction
display 477
Replacing bulbs 511
Brake pads 348
Messages in the multifunction
display 467
Brakes 348
Warning lamp 437
Break-in period 346
Bulbs, replacing see Replacing bulbsButton for Voice control* system 30,
156
C
California retail buyers and lessees,
Important notice for 11
Camera see Rear view camera*
Can holder see Cup holder
Capacities and recommended
fuel/lubricants 562
Card holder 33, 37, 320
Cargo compartment cover blind 310
Cargo net* 312
Cargo tie-down rings 302
Carpets, Cleaning 433
Carriers* 295
Catalytic converter
(gasoline engine) 371
CD changer 165, 315
CD player 165
Center console
Lower part 33
Upper part (Vehicles with
enhanced off-road package*) 32
Upper part (Vehicles without
enhanced off-road package*) 31Central locking
Automatic 128
Locking/unlocking from the
inside 128
Switch 128
Certification label 550
CHECK ENGINE malfunction indicator
lamp 439, 440
Checking tire pressure electronically with
the Advanced Tire Pressure Monitoring
System (Advanced TPMS)*,
(Canada only) 401
Checking tire pressure electronically with
the Tire Pressure Monitoring System
(TPMS), (USA only) 398
Checklist
Off-road driving 357
Returning from off-road driving 363
164.boo Seite 573 Freitag, 30. März 2007 12:54 12