Page 475 of 601

474 Practical hints
What to do if …
Display symbolDisplay messagePossible cause/consequencePossible solution
c You are driving with one or more
doors open.�Stop the vehicle in a safe location or as
soon as it is safe to do so.
�Close the door(s).
] Clean
Fuel Filter�Contact an authorized Mercedes-Benz
Light Truck Center.
AGas Cap OpenA loss of pressure has been
detected in the fuel system. The
fuel cap may not be closed
properly or the fuel system may
be leaky.�Check the fuel cap (�page 374).
If it is not closed properly:
�Close the fuel cap.
If it is closed properly:
�Have the fuel system checked by an
authorized Mercedes-Benz Light Truck
Center.
aYou are driving with the hood or
the tailgate open.�Carefully bring the vehicle to a halt as
soon as it is safe to do so in a safe
location.
�Close the hood (�page 379) or the
tailgate (
�page 123).
You are trying to lock the vehicle
with the KEYLESS-GO* function
with a door or the tailgate open.�Close all doors and/or the tailgate
(
�page 123).
164.boo Seite 474 Freitag, 30. März 2007 12:54 12
Page 491 of 601
490 Practical hints
Where will I find ...?
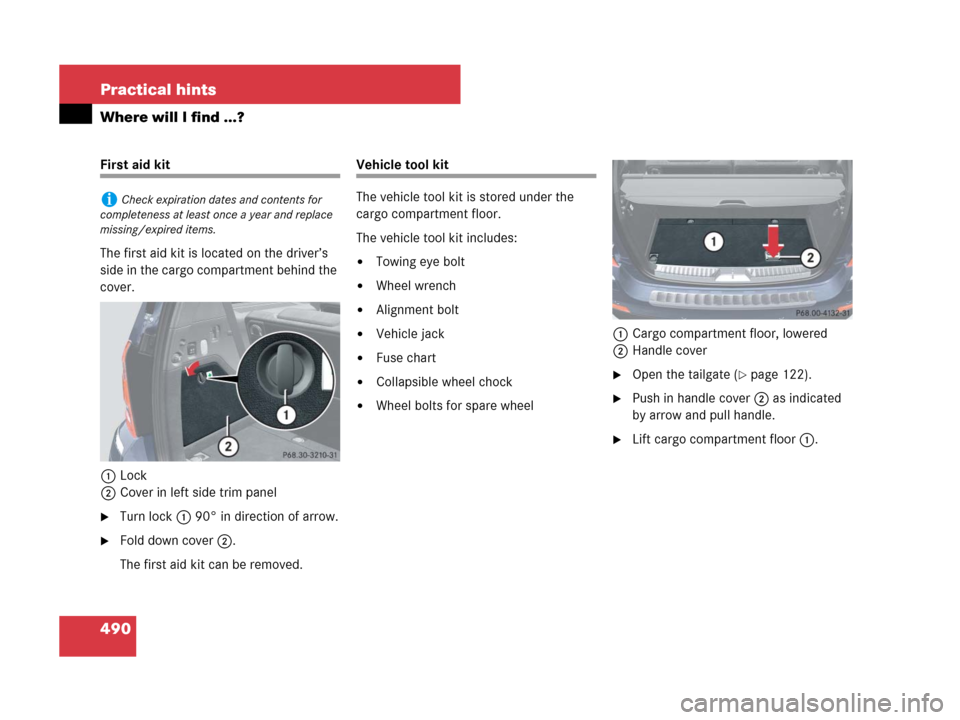
First aid kit
The first aid kit is located on the driver’s
side in the cargo compartment behind the
cover.
1Lock
2Cover in left side trim panel
�Turn lock1 90° in direction of arrow.
�Fold down cover2.
The first aid kit can be removed.
Vehicle tool kit
The vehicle tool kit is stored under the
cargo compartment floor.
The vehicle tool kit includes:
�Towing eye bolt
�Wheel wrench
�Alignment bolt
�Vehicle jack
�Fuse chart
�Collapsible wheel chock
�Wheel bolts for spare wheel1Cargo compartment floor, lowered
2Handle cover
�Open the tailgate (�page 122).
�Push in handle cover2 as indicated
by arrow and pull handle.
�Lift cargo compartment floor1.
iCheck expiration dates and contents for
completeness at least once a year and replace
missing/expired items.
164.boo Seite 490 Freitag, 30. März 2007 12:54 12
Page 493 of 601

492 Practical hints
Where will I find ...?
Example illustration1
6Alignment bolt
7Towing eye bolt
8Wheel wrench
9Hook and loop fastener
aVehicle jack
2
bWheel bolts
cCollapsible wheel chock
dFuse chart
eVehicle tool kit storage well casing
�To remove vehicle jacka, loosen
hook and loop fastener9.Vehicle jack
The vehicle jack is located underneath the
cargo compartment floor.
1Depending on production date, your vehicle may
be equipped with a scissors-type vehicle jack.
Thus, appearance and alignment of the items may
vary.
2If your vehicle is equipped with a scissors-type
vehicle jack, a reversible ratchet is also included.
!Depending on vehicle production date your
vehicle may be equipped with a scissors-type
jack (located under the cargo compartment
floor). If so equipped, only use this jack when
jacking up the vehicle as otherwise the vehicle’s
underbody can be damaged. See separate
instructions for scissors-type jack.
!To prevent damage, always disengage the
strap of the securing hook and lower the cargo
compartment floor (
�page 490) before closing
the tailgate.
Warning!G
Only use the jack supplied with your vehicle
to lift the vehicle briefly for wheel changes.
If you use the jack for any other purpose,
you or others could be inj ure d, as the ja ck is
designed only for the purpose of changing a
wheel.
When using the jack, observe the safety
notes in the “Mounting the spare wheel”
section (
�page 520) and the notes on the
jack.
164.boo Seite 492 Freitag, 30. März 2007 12:54 12
Page 498 of 601

497 Practical hints
Unlocking/locking in an emergency
Locking the vehicle
If you cannot lock the vehicle with the
SmartKey or KEYLESS-GO*, lock the vehi-
cle carrying out the following steps.
�Close the front passenger door, the
rear right door and the tailgate.
�Open the driver’s door and the rear left
door.
�Press the central locking switch on the
driver’s door (
�page 128).
The locking knobs of the front passen-
ger door and the rear doors move
down.
If the vehicle battery is disconnected or
drained:
�Press down the locking knobs of
the front passenger door and the
rear doors manually.
�Exit the vehicle.
�Close the driver’s door.
�Enter the vehicle through the rear left
door.
�Press down the locking knob of the
driver’s door.
�Exit the vehicle.
�Close the rear left door.
The vehicle is locked.
Fuel filler flap
�Open the tailgate (�page 122).
The fuel filler flap release is located behind
a cover in the right side trim panel of the
cargo compartment.
1Lock
2Cover
!To prevent inadvertent lockout, make sure
to have the SmartKey or SmartKey with
KEYLESS-GO* with you before proceeding with
the next step. The next step will lock the vehicle.
iThis procedure does not arm the anti-theft
alarm system, nor does it lock the fuel filler flap.
��
164.boo Seite 497 Freitag, 30. März 2007 12:54 12
Page 512 of 601

511 Practical hints
Replacing bulbs
4Bulb socket of front fog lamp bulb
�Turn bulb socket4 counterclockwise.
�Pull bulb socket4 out of the housing.
�Pull the front fog lamp bulb out of bulb
socket4.
�Insert the new front fog lamp bulb into
bulb socket4.
�Insert bulb socket4 into the housing.
�Turn bulb socket4 clockwise until it
engages.
�Plug in the electrical connector.
�Insert front fog lamp2 back into
bumper.
�Fasten retaining screws3.
�Reinsert cover1 and press it in until it
engages.
Additional turn signal lamps bulbs
The additional turn signal lamps in the
exterior rear view mirrors have LEDs.
If a malfunction occurs or LEDs fail to func-
tion, the entire turn signal unit must be re-
placed. Have the turn signal unit replaced
by an authorized Mercedes-Benz Light
Truck Center.
Replacing bulbs for rear lamps
Before you start to replace a bulb for a rear
lamp, do the following first:
�Turn the exterior lamp switch to
positionM (
�page 143).
Tail lamp unit
�Open the tailgate (�page 122).
iTo access the bulb socket, you have to
remove the cover in the corresponding side trim
panel of the cargo compartment.
164.boo Seite 511 Freitag, 30. März 2007 12:54 12
Page 514 of 601
513 Practical hints
Replacing bulbs
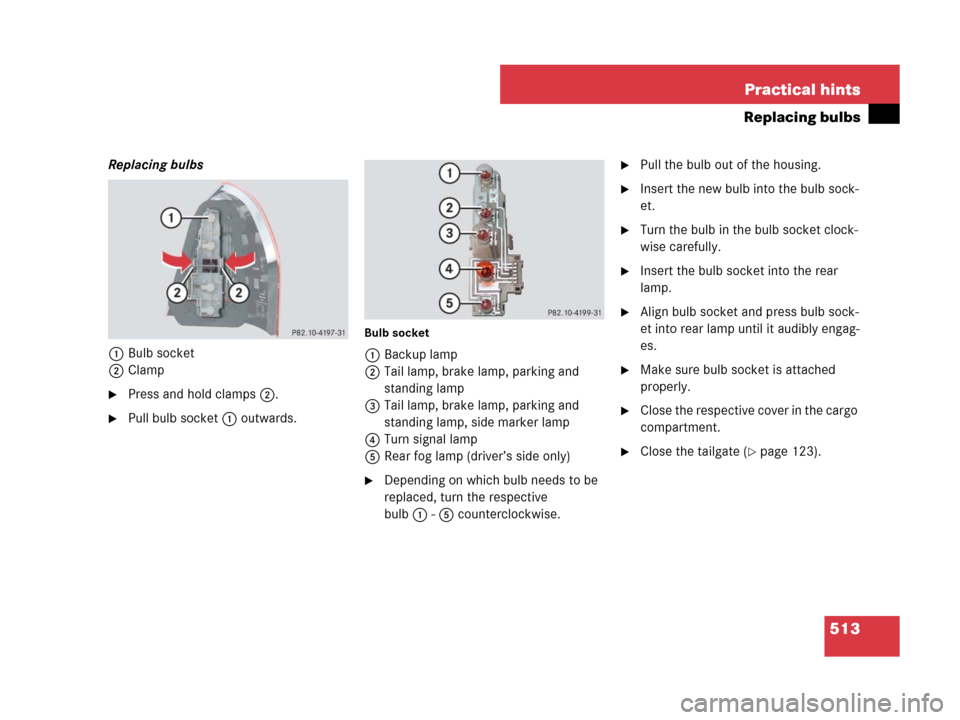
Replacing bulbs
1Bulb socket
2Clamp
�Press and hold clamps2.
�Pull bulb socket1 outwards.
Bulb socket
1Backup lamp
2Tail lamp, brake lamp, parking and
standing lamp
3Tail lamp, brake lamp, parking and
standing lamp, side marker lamp
4Turn signal lamp
5Rear fog lamp (driver’s side only)
�Depending on which bulb needs to be
replaced, turn the respective
bulb1-5 counterclockwise.
�Pull the bulb out of the housing.
�Insert the new bulb into the bulb sock-
et.
�Turn the bulb in the bulb socket clock-
wise carefully.
�Insert the bulb socket into the rear
lamp.
�Align bulb socket and press bulb sock-
et into rear lamp until it audibly engag-
es.
�Make sure bulb socket is attached
properly.
�Close the respective cover in the cargo
compartment.
�Close the tailgate (�page 123).
164.boo Seite 513 Freitag, 30. März 2007 12:54 12
Page 515 of 601
514 Practical hints
Replacing bulbs
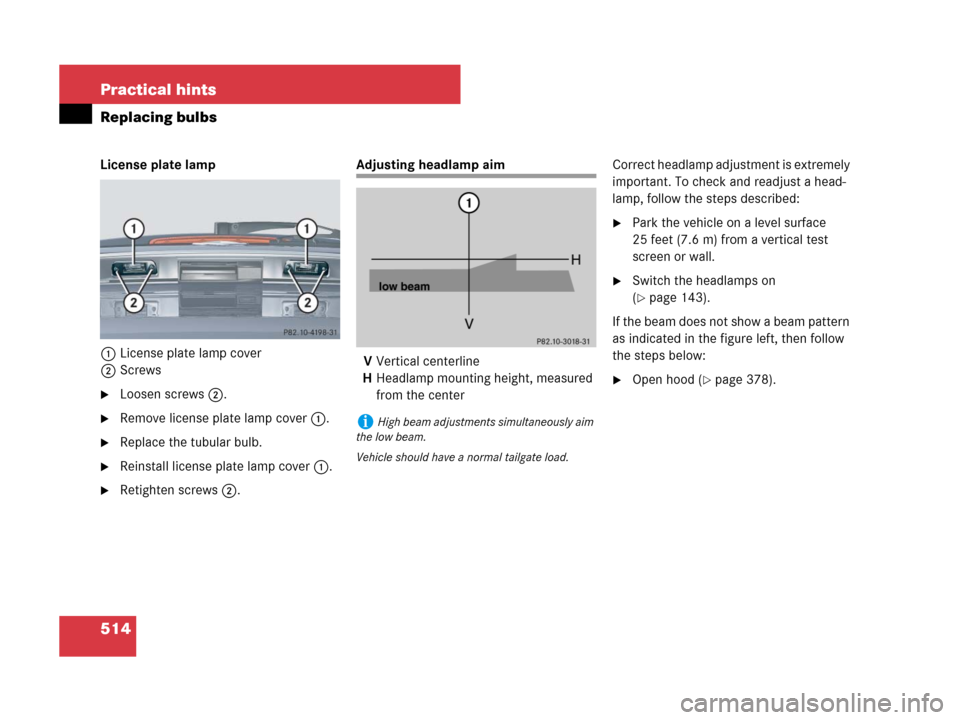
License plate lamp
1License plate lamp cover
2Screws
�Loosen screws2.
�Remove license plate lamp cover1.
�Replace the tubular bulb.
�Reinstall license plate lamp cover1.
�Retighten screws2.
Adjusting headlamp aim
VVertical centerline
HHeadlamp mounting height, measured
from the centerCorrect headlamp adjustment is extremely
important. To check and readjust a head-
lamp, follow the steps described:
�Park the vehicle on a level surface
25 feet (7.6 m) from a vertical test
screen or wall.
�Switch the headlamps on
(
�page 143).
If the beam does not show a beam pattern
as indicated in the figure left, then follow
the steps below:
�Open hood (�page 378).
iHigh beam adjustments simultaneously aim
the low beam.
Vehicle should have a normal tailgate load.
164.boo Seite 514 Freitag, 30. März 2007 12:54 12
Page 520 of 601
.
�Park the vehicle in a safe distance from
moving traffic on a hard, flat s")
519 Practical hints
Flat tire
�Flat tire
Preparing the vehicle
�Make sure the vehicle level is set to
highway (
�page 279).
�Park the vehicle in a safe distance from
moving traffic on a hard, flat surface
when possible.
�Turn on the hazard warning flasher
(
�page 149).
�Turn the steering wheel so that the
front wheels are in a straight-ahead
position.
�Set the parking brake (�page 59).
�Set the automatic transmission to park
positionP (
�page 191).
�Turn off the engine (�page 41).
�Have any passenger exit the vehicle at
a safe distance from the roadway.
�Vehicles with SmartKey: Remove the
SmartKey from the starter switch.
Vehicles with KEYLESS-GO*: Open the
driver’s door (this puts the starter
switch in position0, same as with the
SmartKey removed from the starter
switch). The driver’s door then can be
closed again.
�Remove the KEYLESS-GO*
start/stop button from the starter
switch.
Warning!G
The dimensions of the Minispare wheel are
different from those of the road wheels. As
a result, the vehicle handling characteristics
change when driving with a Minispare wheel
mounted. Adapt your driving style accord-
ingly.
The Minispare wheel is for temporary use
only. When driving with a Minispare wheel
mounted, ensure proper tire pressure and
do not exceed a vehicle speed of
50 mph (80 km/h).
Drive to the nearest Mercedes-Benz Light
Truck Center as soon as possible to have the
Minispare wheel replaced with a regular
road wheel.
Never operate the vehicle with more than
one spare wheel mounted.
Do not switch off the ESP
® when a
Minispare wheel is mounted.
Warning!G
Your vehicle is equipped with air suspen-
sion. Do not open or close any doors or the
tailgate while mounting a spare wheel. The
vehicle could rise or lower to a previously se-
lected level. You or others could be injured
as a result.
iOpen door only when conditions are safe to
do so.
164.boo Seite 519 Freitag, 30. März 2007 12:54 12