Page 307 of 601

306 Controls in detail
Loading
�Press and hold button2 for each side
until the third-row seats are fully fold-
ed.
If a third-row seat is not engaged properly,
for example, the message
3rd Row Of
Seats – Right Not Locked
appears in the
multifunction display (
�page 155).
�Press and hold button2 again, until
the message disappears.Expanding cargo compartment fully
Folding second-row seats
�Push in the head restraints of the
second-row seats all the way
(
�page 135).
Warning!G
Folded second-row seats are intended to
serve as a cargo compartment expansion in
conjunction with folded third-row seats only.
Do not fold the second-row seats and allow
third-row seat occupants to use folded sec-
ond-row seats as a footrest while driving.
Third-row seat occupants must, like all vehi-
cle occupants, keep both feet on the floor in
front of their seat. Otherwise, occupants
could slide under their seat belt in a colli-
sion. If occupants slide under the belt, it
would apply force at the abdomen or neck.
That could cause serious or even fatal inju-
ries. Do not fold the second-row seats and
allow third-row seat occupants to use folded
second-row seats as a table while driving.
Objects placed on folded second-row seats
may come loose during braking, vehicle ma-
neuvers, or an accident and be thrown
around the vehicle interior. Objects thrown
around the vehicle interior may cause an ac-
cident and/or serious personal injury.
!When the second-row seats are folded for-
ward, the front seats may not be moved to the re-
armost position. Otherwise you could damage
the front and second-row seats.
��
164.boo Seite 306 Freitag, 30. März 2007 12:54 12
Page 319 of 601
318 Controls in detail
Useful features
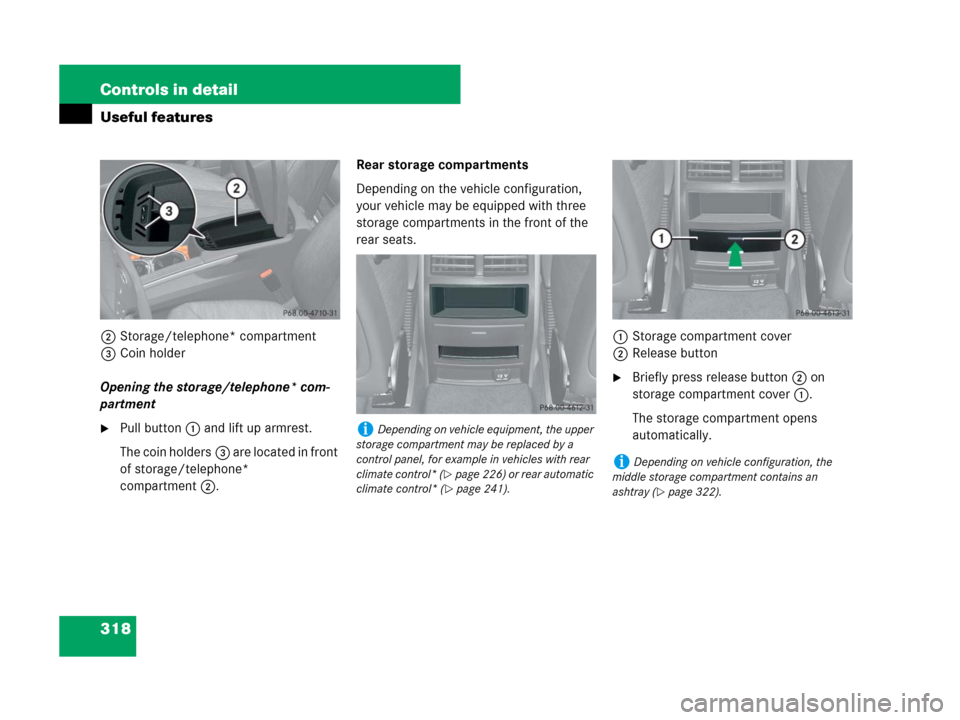
2Storage/telephone* compartment
3Coin holder
Opening the storage/telephone* com-
partment
�Pull button1 and lift up armrest.
The coin holders3 are located in front
of storage/telephone*
compartment2.Rear storage compartments
Depending on the vehicle configuration,
your vehicle may be equipped with three
storage compartments in the front of the
rear seats.
1Storage compartment cover
2Release button
�Briefly press release button2 on
storage compartment cover1.
The storage compartment opens
automatically.
iDepending on vehicle equipment, the upper
storage compartment may be replaced by a
control panel, for example in vehicles with rear
climate control* (
�page 226) or rear automatic
climate control* (
�page 241).
iDepending on vehicle configuration, the
middle storage compartment contains an
ashtray (
�page 322).
164.boo Seite 318 Freitag, 30. März 2007 12:54 12
Page 321 of 601

320 Controls in detail
Useful features
Cup holders
Cup holder in front of armrest
A cup holder and a card/ticket holder are
located in the front center console.
1Cup holderCup holder in rear armrest (second-row
seats)
1Cup holder
�Pull the armrest down by its top.
Warning!G
In order to help prevent spilling liquids on
vehicle occupants and/or vehicle equip-
ment, only use containers that fit into the
cup holder. Use lids on open containers and
do not fill containers to a height where the
contents, especially hot liquids, could spill
during braking, vehicle maneuvers, or an
accident. Liquids spilled on vehicle occu-
pants may cause serious personal injury.
Liquids spilled on vehicle equipment may
cause damage not covered by the
Mercedes-Benz Limited Warranty.
When not in use, keep rear cup holder
closed. An open cup holder may cause injury
to you or others when contacted during
braking, vehicle maneuvers, or in an acci-
dent.
Keep in mind that objects placed in a cup
holder may come loose during braking,
vehicle maneuvers, or an accident and be
thrown around in the vehicle interior.
Objects thrown around in the vehicle interi-
or may cause an accident and/or serious
personal injury.
iThe front cup holder can be removed for
cleaning purposes (
�page 321).
!Close the cup holder before folding the arm-
rest upwards.
164.boo Seite 320 Freitag, 30. März 2007 12:54 12
Page 322 of 601
321 Controls in detail
Useful features
Cup holders in third-row side trim
Cup holders are located in the side trims of
the third-row seats.
1Cup holderRemoving and reinstalling cup holder
The front cup holder can be removed for
cleaning purposes.
1Cup holder
2Bridge with card, ticket holder
�Hold cup holder at its bridge2 and
pull out bridge in direction of arrow.
�Pull cup holder1 out in direction of ar-
row.
�First, insert the cup holder1 and then
insert bridge2.
Ashtrays
Depending on vehicle configuration your
vehicle is equipped with an ashtray and a
cigarette lighter (
�page 323) located in
the front center console and an ashtray lo-
cated in front of the second-row seats
(
�page 322).
Ashtray in the center console
1Ashtray insert
2Cover plate
iIf your vehicle is not equipped with an ash-
tray, it has a storage compartment (
�page 317)
with a power outlet (
�page 324) instead.
164.boo Seite 321 Freitag, 30. März 2007 12:54 12
Page 324 of 601
 located in the
front center")
323 Controls in detail
Useful features
Cigarette lighter
Depending on vehicle configuration your
vehicle is equipped with a cigarette lighter
and an ashtray (
�page 321) located in the
front center console and an ashtray locat-
ed in front of the second-row seats
(
�page 322).
�Switch on the ignition (�page 42).
1Cigarette lighter
�Open the ashtray (�page 322).
�Push in cigarette lighter1.
The cigarette lighter will pop out auto-
matically when hot.
Warning!G
Never touch the heating element or sides of
the cigarette lighter; they are extremely hot.
Hold the knob only.
Make sure that any children traveling with
you do not injure themselves or start a fire
with the hot cigarette lighter.
When leaving the vehicle always remove the
SmartKey or SmartKey with KEYLESS-GO*
from the starter switch, take it with you, and
lock the vehicle. Do not leave children unat-
tended in the vehicle, or with access to an
unlocked vehicle. A child’s unsupervised
access to a vehicle could result in an
accident and/or serious personal injury.
!The lighter socket can accommodate
12V DC electrical accessories (up to a maximum
of 180 W) designed for use with the standard
“cigarette lighter” plug type. Keep in mind, how-
ever, that connecting accessories to the lighter
socket (for example extensive connecting and
disconnecting, or using plugs that do not fit prop-
erly) can damage the lighter socket. With the
socket damaged, the lighter may no longer be
able to be placed in the heating (pushed-in) posi-
tion, or the lighter may pop out too early with the
lighter not hot enough.
To help avoid damaging the cigarette lighter
socket, we recommend connecting 12V DC elec-
trical accessories designed for use with the stan-
dard “cigarette lighter” plug type to the 12V
power outlets (
�page 324) in your vehicle
whenever possible.
iIf the engine is off, and the cigarette lighter
is being used extensively, the vehicle battery
may become discharged.
164.boo Seite 323 Freitag, 30. März 2007 12:54 12
Page 435 of 601
 may cause
the upholstery to become permanen")
434 Operation
Vehicle care
Upholstery
Using aftermarket seat covers or wearing
clothing that have the tendency to give off
coloring (e.g. when wet, etc.) may cause
the upholstery to become permanently dis-
colored. By lining the seats with a proper
intermediate cover, contact-discoloration
will be prevented.Leather upholstery*
Please not that leather upholstery is a
natural product and is therefore subject to
a natural aging process. Leather
upholstery may also react to certain
ambient influences such as high humidity
or high temperature by showing wrinkles
for example.
�Wipe leather upholstery with a damp
cloth and dry thoroughly or clean with
Mercedes-Benz approved Leather
Care.MB Tex upholstery
�Use Mercedes-Benz approved Interior
Care onto a soft, lint-free cloth and
apply with light pressure for cleaning
the upholstery.
Wood trims
�Dampen cloth using water and use
damp cloth to clean wood trims in your
vehicle.
Warning!G
Only use seat or head restraint covers which
have been tested and approved by
Mercedes-Benz for your vehicle model.
Using other seat or head restraint covers
may interfere with or prevent
�deployment of the front side impact air
bags
�deployment of the rear side impact air
bags*
�activation of the active head restraints
Contact an authorized Mercedes-Benz Light
Truck Center for availability.
!To avoid damage to leather upholstery:
�Wipe with light pressure only.
�Do not clean with abrasive cleaning agents
such as scouring milk or powder.
�Do not soak the leather upholstery.
As leather is a natural product, it could
otherwise harden or become porous.
�Exercise particular care when cleaning
perforated leather as its underside should
not become wet.
!Do not use solvents like tar remover or
wheel cleaner nor polishes or waxes as these
may be abrasive.
164.boo Seite 434 Freitag, 30. März 2007 12:54 12
Page 444 of 601

443 Practical hints
What to do if …
ProblemPossible cause/consequenceSuggested solution
telltale flashes and you addition-
ally hear an intermittent warning
chime with increasing intensity.The vehicle’s speed once exceeded 15 mph
(25 km/h) and you and/or your front pas-
senger have forgotten to fasten your seat
belts.�Fasten your seat belts.
The seat belt telltale goes out and the
warning chime stops sounding.
There are items placed on the front passen-
ger seat and therefore the system senses the
front passenger seat as being occupied.�Remove the items from the front pas-
senger seat and put them in a safe
place.
The seat belt telltale goes out and the
warning chime stops sounding.
iAfter 60 seconds with an unfastened seat
belt on one of the front seats, the warning chime
stops sounding and the seat belt telltale
illuminates continuously. The seat belt telltale
will only go out if both, the driver and front
passenger’s seat belt are fastened, or the vehi-
cle is standing still and a front door is opened.
164.boo Seite 443 Freitag, 30. März 2007 12:54 12
Page 501 of 601
500 Practical hints
Resetting activated head restraints
�Repeat this procedure on the active
head restraint for the second front
seat.
For information on active head restraints,
see “Active head restraint” (
�page 90).
For information on head restraint adjust-
ment, see “Seats” (
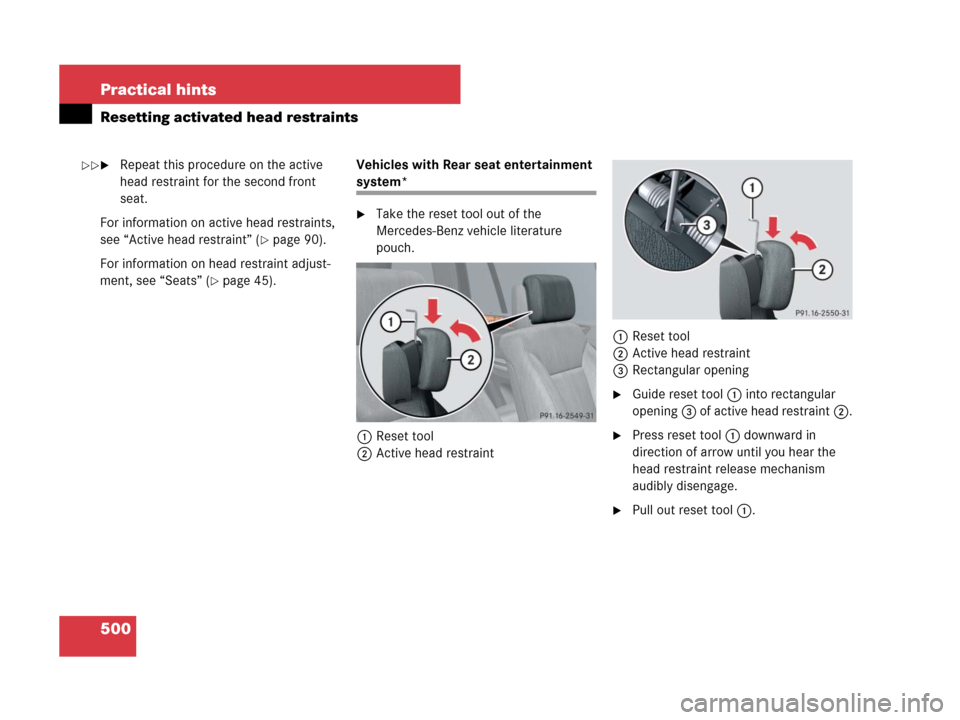
�page 45).Vehicles with Rear seat entertainment
system*
�Take the reset tool out of the
Mercedes-Benz vehicle literature
pouch.
1Reset tool
2Active head restraint1Reset tool
2Active head restraint
3Rectangular opening
�Guide reset tool1 into rectangular
opening3 of active head restraint2.
�Press reset tool1 downward in
direction of arrow until you hear the
head restraint release mechanism
audibly disengage.
�Pull out reset tool1.
��
164.boo Seite 500 Freitag, 30. März 2007 12:54 12