Page 378 of 601
.
For more information, see “Coolant level”
(
�page 381) and see “Fuels, coolant")
377 Operation
At the gas station
Brake fluid
Coolant
For normal replenishing, use water (pota-
ble water quality).
For more information, see “Coolant level”
(
�page 381) and see “Fuels, coolants, lu-
bricants” (
�page 562).Windshield/rear window washer
system and headlamp cleaning
system*
For more information on refilling the wash-
er reservoir, see “Windshield/rear window
washer system and headlamp cleaning
system*” (
�page 383).
Vehicle lighting
Check function and cleanliness. For infor-
mation on replacing light bulbs, see “Re-
placing bulbs” (
�page 504).
For more information, see “Exterior lamp
switch” (
�page 143).
Tire inflation pressure
For more information, see “Checking tire
inflation pressure” (
�page 395).
!If you find that the brake fluid in the brake
fluid reservoir has fallen to the minimum mark or
below, have the brake system checked for brake
pad thickness and leaks immediately. Notify an
authorized Mercedes-Benz Light Truck Center
immediately. Do not add brake fluid as this will
not solve the problem. For more information, see
“Brake fluid” (
�page 564).
164.boo Seite 377 Freitag, 30. März 2007 12:54 12
Page 505 of 601
504 Practical hints
Replacing bulbs
Bulbs
Safe vehicle operation depends on proper
exterior lighting and signaling. It is there-
fore essential that all bulbs and lamp as-
semblies are in good working order at all
times.
Correct headlamp adjustment is extremely
important. Have headlamps checked and
readjusted at regular intervals and when a
bulb has been replaced. See an authorized
Mercedes-Benz Light Truck Center for
headlamp adjustment.iIf the headlamps or front fog lamps are
fogged up on the inside as a result of high humid-
ity, driving the vehicle a distance with the lights
on should clear up the fogging.iSubstitute bulbs will be brought into use
when the following lamps malfunction:
�Turn signal lamps
�Brake lamps
�Parking lamps
�Tail lamps
Read and observe the messages in the multi-
function display (
�page 477).
164.boo Seite 504 Freitag, 30. März 2007 12:54 12
Page 506 of 601
505 Practical hints
Replacing bulbs
Front lamps
Rear lamps
LampType
1Parking and standing
lampW5W
2Headlamps:
High beam/high beam
flasher
H7 (55 W)
Bi-Xenon headlamps*:
High beam/high beam
flasher spot lamp
H7 (55 W)
3Headlamps:
Low beam
H7 (55 W)
Bi-Xenon headlamps*:
Low beam1
1Vehicles with Bi-Xenon* headlamps: Do not re-
place the Bi-Xenon bulbs yourself. Contact an
authorized Mercedes-Benz Light Truck Center.
D1S-35 W
4Additional turn signal
lampLED
5Side marker lampWY 5 W
LampType
6Turn signal lamp3457 AK
S-8
(30/2.2 cp
bulb)
7Front fog lampH11 (55 W)
Corner-illuminating
front fog lamp*
H11 (55 W)
LampType
8High mounted brake
lamp
LED
9Backup lampP21W
aTail, brake, parking,
standing, side marker
lampP21/4W
bTurn signal lampPY 21 W
cRear fog lamp (driver’s
side only)P21/4W
dLicense plate lampsC5W
164.boo Seite 505 Freitag, 30. März 2007 12:54 12
Page 507 of 601

506 Practical hints
Replacing bulbs
Notes on bulb replacement
�Only use 12-volt bulbs of the same type
and with the specified watt rating.
�Switch lights off before changing a bulb
to prevent short circuits.
�Always use a clean lint-free cloth when
handling bulbs.
�Your hands should be dry and free of oil
and grease.
�If the newly installed bulb does not
come on, visit an authorized
Mercedes-Benz Light Truck Center.Have the LEDs and bulbs for the following
lamps replaced by an authorized
Mercedes-Benz Light Truck Center:
�the additional turn signal lamps in the
exterior rear view mirrors
�the high mounted brake lamp
�the Bi-Xenon* low beam lamps
�the Bi-Xenon high beam flasher spot-
light*
Warning!G
Bulbs and bulb sockets can be very hot.
Allow the lamp to cool down before chang-
ing a bulb.
Keep bulbs out of reach of children.
Halogen lamps contain pressurized gas.
A bulb can explode if you:
�touch or move it when hot
�drop the bulb
�scratch the bulb
Wear eye and hand protection.
Because of high voltage in Xenon lamps, it is
dangerous to replace the bulb or repair the
lamp and its components. We recommend
that you have such work done by a qualified
technician.
!Do not replace the LEDs yourself. You could
otherwise damage the LEDs or parts of the vehi-
cle. Only have the LEDs replaced by a an autho-
rized Mercedes-Benz Light Truck Center.
iReplacing the bulbs for the front lamps is a
technically complex process. For your conve-
nience, we recommend that you have this work
carried out by an authorized Mercedes-Benz
Light Truck Center.
Have the headlamp adjustment checked
regularly.
164.boo Seite 506 Freitag, 30. März 2007 12:54 12
Page 511 of 601

counterclockwise.
�Pull bulb socket5 out of the
headlamp housing.
�Pull the side marker bulb out of bulb
soc")
510 Practical hints
Replacing bulbs
Side marker lamp bulb
�Turn bulb socket5 (�page 507)
counterclockwise.
�Pull bulb socket5 out of the
headlamp housing.
�Pull the side marker bulb out of bulb
socket5.
�Insert the new side marker bulb into
bulb socket5.
�Insert bulb socket5 into the
headlamp housing.
�Turn bulb socket5 clockwise until it
engages.Front fog lamp bulbs
Removing front fog lamp cover:
1Cover
2Front fog lamp or corner-illuminating
front fog lamp*
�Insert a suitable object (e.g. screwdriv-
er) at point indicated by the arrow and
pry out cover1.
Cover1 is released.
�Swing cover1 outwards and take it
off.
You can now access the front fog lamp.
3Retaining screws
�Turn retaining screws3 counterclock-
wise.
�Remove front fog lamp2 out of the
bumper.
�Pull electrical connector off.
!If not done carefully and properly, damage
to the bumper can result. We therefore recom-
mend that you have this work carried out by an
authorized Mercedes-Benz Light Truck Center.
164.boo Seite 510 Freitag, 30. März 2007 12:54 12
Page 512 of 601

511 Practical hints
Replacing bulbs
4Bulb socket of front fog lamp bulb
�Turn bulb socket4 counterclockwise.
�Pull bulb socket4 out of the housing.
�Pull the front fog lamp bulb out of bulb
socket4.
�Insert the new front fog lamp bulb into
bulb socket4.
�Insert bulb socket4 into the housing.
�Turn bulb socket4 clockwise until it
engages.
�Plug in the electrical connector.
�Insert front fog lamp2 back into
bumper.
�Fasten retaining screws3.
�Reinsert cover1 and press it in until it
engages.
Additional turn signal lamps bulbs
The additional turn signal lamps in the
exterior rear view mirrors have LEDs.
If a malfunction occurs or LEDs fail to func-
tion, the entire turn signal unit must be re-
placed. Have the turn signal unit replaced
by an authorized Mercedes-Benz Light
Truck Center.
Replacing bulbs for rear lamps
Before you start to replace a bulb for a rear
lamp, do the following first:
�Turn the exterior lamp switch to
positionM (
�page 143).
Tail lamp unit
�Open the tailgate (�page 122).
iTo access the bulb socket, you have to
remove the cover in the corresponding side trim
panel of the cargo compartment.
164.boo Seite 511 Freitag, 30. März 2007 12:54 12
Page 516 of 601
515 Practical hints
Replacing bulbs
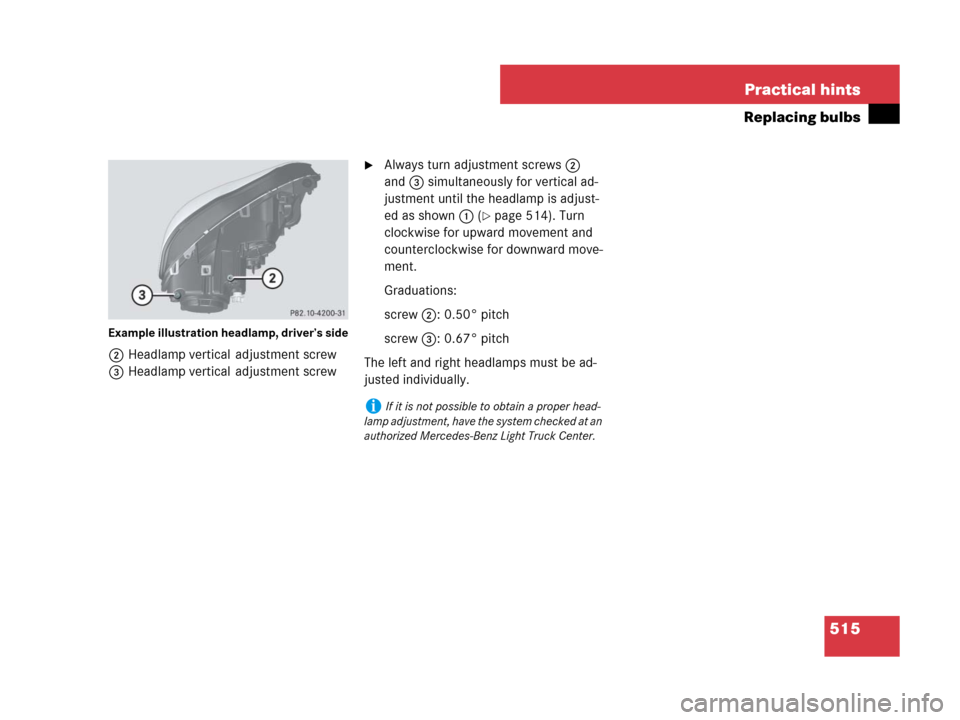
Example illustration headlamp, driver’s side
2Headlamp vertical adjustment screw
3Headlamp vertical adjustment screw
�Always turn adjustment screws2
and3 simultaneously for vertical ad-
justment until the headlamp is adjust-
ed as shown1 (
�page 514). Turn
clockwise for upward movement and
counterclockwise for downward move-
ment.
Graduations:
screw2:0.50° pitch
screw3:0.67° pitch
The left and right headlamps must be ad-
justed individually.
iIf it is not possible to obtain a proper head-
lamp adjustment, have the system checked at an
authorized Mercedes-Benz Light Truck Center.
164.boo Seite 515 Freitag, 30. März 2007 12:54 12
Page 573 of 601
* 228
Air conditioning refrigerant 563
Air conditioning, Cooling 239, 240
Air distribution, Front 234
Air distribution, Rear 243
Air recirculation mode 237")
572 Index
Automatic climate control (3-zone)* 228
Air conditioning refrigerant 563
Air conditioning, Cooling 239, 240
Air distribution, Front 234
Air distribution, Rear 243
Air recirculation mode 237
Air vents*, second-row seats 245
Air vents*, third-row seats 245
Air vents, Front 234
Air volume 235
Control panel, Front 230
Control panel, Rear 241
Deactivating system 232
Defogging 235
Defrosting 235
Maximum cooling, MAXCOOL 237
Rear passenger compartment 241
Rear window defroster 212
Residual engine heat (REST) 241
Using driver-side settings for
all temperature zones 240Automatic headlamp mode 144
Automatic lighting control, Interior
lighting 150
Automatic locking when driving 128
Automatic transmission 56
Accelerator position 195
Emergency operation
(limp-home mode) 200
Gear ranges 197
Gear selector lever 56, 189
Gear selector lever position 192
Gear shifting malfunctions 200
Hill start assist system 196
Kickdown 196
Shifting procedure 192
Starting the engine 56
Steering wheel gearshift control 198
Towing a trailer 197
Transmission fluid level 381
Transmission positions 193
Automatic Transmission Fluid see ATFB
Backrest
Seat 46
Seat, Lumbar support 137
Seat, Multicontour* 138
Backup lamps
Messages in the multifunction
display 477
Replacing bulbs 511
Bar 416
BAS 103
Lamps in instrument cluster 436
Messages in the multifunction
display 451
Batteries, SmartKey
Check lamp 112, 115
Checking battery condition 120
Messages in the multifunction
display 466
Replacing 502
164.boo Seite 572 Freitag, 30. März 2007 12:54 12


Bi-Xenon headlamps*:
High beam/high beam
flasher")