Page 52 of 601
51 Getting started
Adjusting
Make sure that
�you can reach the steering wheel with
your arms slightly bent at the elbows
�you can move your legs freely
�all displays (including malfunction and
indicator lamps) on the instrument
cluster are clearly visible
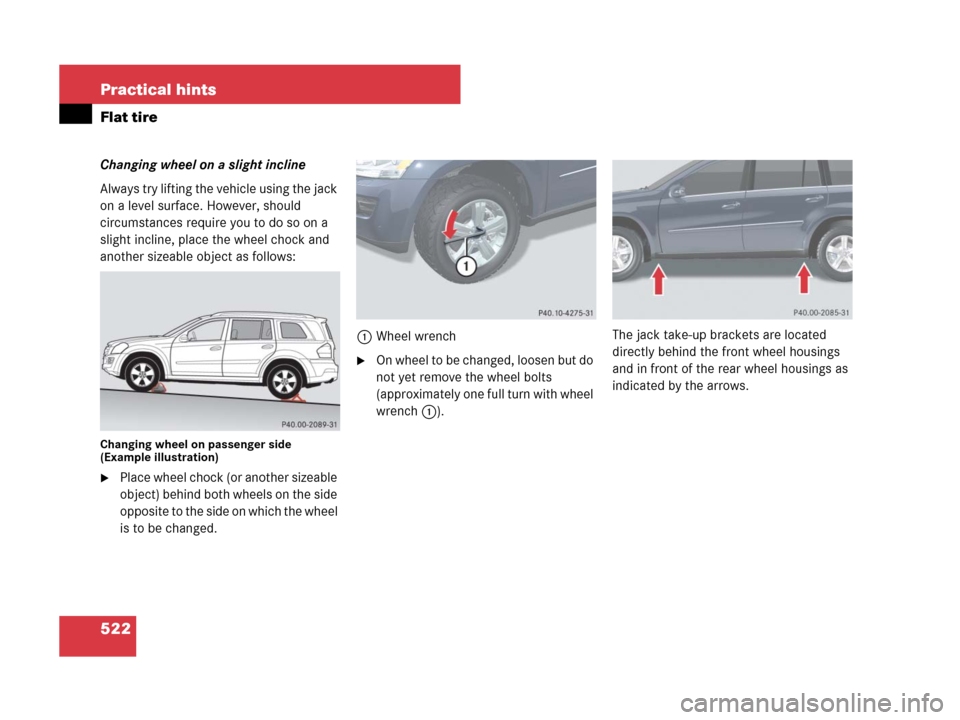
The steering wheel adjustment stalk is
located on the lower left of the steering
column.1Adjusting steering wheel, in or out
2Adjusting steering wheel, up or down
Adjusting steering column in or out
�Move stalk forward or back in direction
of arrow1.
Adjusting steering column up or down
�Move stalk up or down in direction of
arrow2.
Mirrors
Adjust the interior and exterior rear view
mirrors before driving so that you have a
good view of the road and traffic condi-
tions.
Interior rear view mirror
�Manually adjust the interior rear view
mirror.
For more information, see “Rear view mir-
rors” (
�page 208).
Exterior rear view mirrors
iThe memory function* (�page 141) lets
you store the settings for the steering wheel
together with the settings for seat positions and
the exterior rear view mirrors.
Warning!G
Exercise care when using the
passenger-side exterior rear view mirror.
The mirror surface is convex (outwardly
curved surface for a wider field of view). Ob-
jects in mirror are closer than they appear.
Check your interior rear view mirror or
glance over your shoulder before changing
lanes.
164.boo Seite 51 Freitag, 30. März 2007 12:54 12
Page 420 of 601
419 Operation
Tires and wheels
In some cases, such as when your vehicle
is equipped with mixed-size tires (different
tire dimension front vs. rear), tire rotation
is not possible.
If applicable to your vehicle’s tire configu-
ration, tires can be rotated according to
the tire manufacturer’s recommended in-
tervals in the tire manufacturer’s warranty
pamphlet located in your vehicle literature
portfolio. If none is available, tires should
be rotated every 3 000 to 6 000 miles
(5 000 to 10 000 km), or sooner if neces-
sary, according to the degree of tire wear.
The same rotation (spinning) direction
must be maintained (
�page 387).
Rotate tires before the characteristic tire
wear pattern becomes visible (shoulder
wear on front tires and tread center wear
on rear tires).
Thoroughly clean the mounting face of
wheels and brake disks, i.e. the inner side
of the wheels/tires, during each rotation.
Check for and ensure proper tire inflation
pressure.For information on wheel change, see the
“Practical hints” section (
�page 490) and
(
�page 519).
Warning!G
Have the tightening torque checked after
changing a wheel. Wheels could become
loose if not tightened with a torque of
110 lb-ft (150 Nm).
Only use genuine Mercedes-Benz wheel
bolts specified for your vehicle’s rims.
164.boo Seite 419 Freitag, 30. März 2007 12:54 12
Page 522 of 601
521 Practical hints
Flat tire
�Prevent the vehicle from rolling away
by blocking wheels with wheel chocks
or other sizeable objects.
One collapsible wheel chock is includ-
ed with the vehicle tool kit
(
�page 490). For information on set-
ting up the collapsible wheel chock,
see (
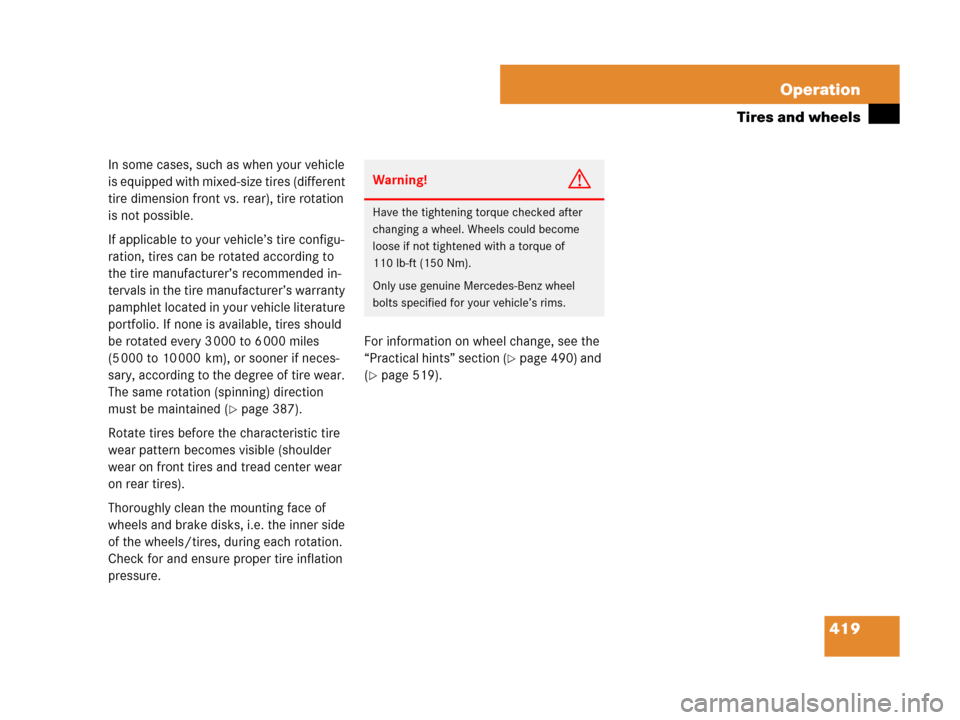
�page 494).Changing wheel on a level surface
Changing rear wheel on passenger side
(Example illustration)
�Place the wheel chock in front of and
another sizeable object behind the
wheel that is diagonally opposite to the
wheel being changed.Changing wheel on a slight decline
Always try lifting the vehicle using the jack
on a level surface. However, should
circumstances require you to do so on a
slight decline, place the wheel chock and
another sizeable object as follows:
Changing wheel on passenger side
(Example illustration)
�Place wheel chock (or another sizeable
object) in front of both wheels on the
side opposite to the side on which the
wheel is to be changed.
Warning!G
Only jack up the vehicle on level ground or
on slight inclines/declines. Otherwise, the
vehicle could fall off the jack and injure you
or others.
164.boo Seite 521 Freitag, 30. März 2007 12:54 12
Page 523 of 601
522 Practical hints
Flat tire
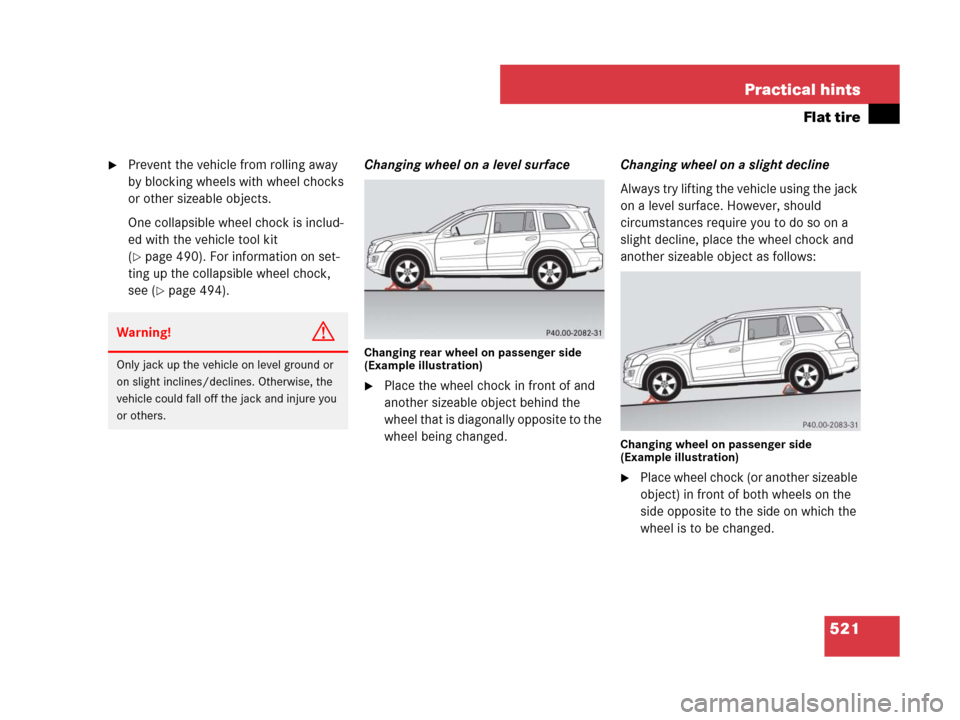
Changing wheel on a slight incline
Always try lifting the vehicle using the jack
on a level surface. However, should
circumstances require you to do so on a
slight incline, place the wheel chock and
another sizeable object as follows:
Changing wheel on passenger side
(Example illustration)
�Place wheel chock (or another sizeable
object) behind both wheels on the side
opposite to the side on which the wheel
is to be changed.1Wheel wrench
�On wheel to be changed, loosen but do
not yet remove the wheel bolts
(approximately one full turn with wheel
wrench1).The jack take-up brackets are located
directly behind the front wheel housings
and in front of the rear wheel housings as
indicated by the arrows.
164.boo Seite 522 Freitag, 30. März 2007 12:54 12
Page 584 of 601

583 Index
Lighter see Cigarette lighter (Depending
on vehicle configuration)
Lighting, Exterior and interior 143
Limp-Home Mode 200, 439, 440
Loading see Vehicle loading
Locator lighting 146, 176
Lock buttons, KEYLESS-GO*
Outside door handle 71
Locking the vehicle see Key
Loss of keys, Mechanical key 120
Loss of keys, SmartKey 120
Loss of keys, SmartKey with
KEYLESS-GO* 120
Loss of Service and Warranty Information
Booklet 549
Low beam headlamps
Messages in the multifunction
display 479
Replacing bulbs 505
Switching on 61, 143
LOW RANGE mode* 201
Messages in the multifunction
display 488
Lubricants 562
Lumbar support 137M
Main dimensions 560
Maintenance 12, 422
Calling up service indicator
display 424
Clearing service indicator
message 423
Maintenance System 422
Resetting service indicator 424
Service indicator message 422
Service term exceeded 423
Maintenance System 422
Manual headlamp mode see Headlamps
Maximum cooling, MAXCOOL* see
Automatic climate control
(3-zone)* 237
Maximum load rating, Tires 417
Maximum loaded vehicle weight,
Tires 417
MB Tex upholstery, Cleaning and
care of 434
Mechanical key 496Memory function* see Seats
Menus see Control system menus
Messages in display see Multifunction
display messages
Microphone, Hands-free 34
Minispare wheel see Spare wheel
Mirrors
Adjusting 51
Auto-dimming rear view
mirrors* 208
Exterior rear view mirror 51
Interior rear view mirror 51, 208
MON 375, 565
Multicontour seat* 138
Multifunction display 155
Changing settings see Control system
menus and Control system sub-
menus
Displaying current gear range 197
Selecting display 173
Selecting language 172
164.boo Seite 583 Freitag, 30. März 2007 12:54 12