Page 208 of 601
207 Controls in detail
Differential locks*
�Start the engine (�page 42).
�To select the required locking mode,
rotate adjustment ring2 to the
desired position3 or4
(
�page 205).
The indicator lamp on the adjustment
ring1 at the respective symbol
comes on.
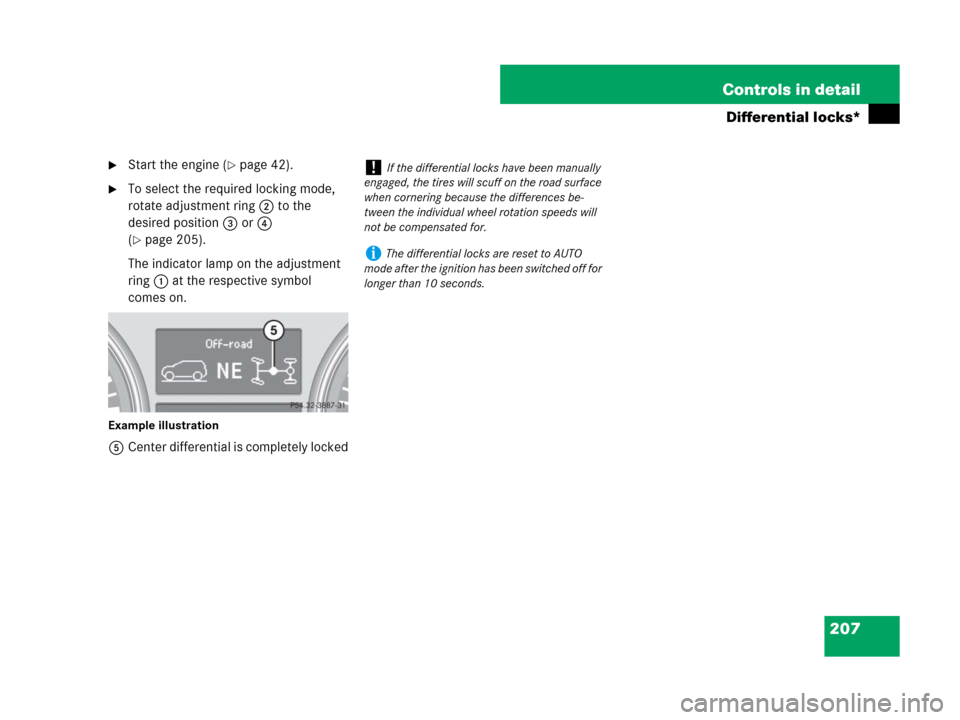
Example illustration
5Center differential is completely locked
!If the differential locks have been manually
engaged, the tires will scuff on the road surface
when cornering because the differences be-
tween the individual wheel rotation speeds will
not be compensated for.
iThe differential locks are reset to AUTO
mode after the ignition has been switched off for
longer than 10 seconds.
164.boo Seite 207 Freitag, 30. März 2007 12:54 12
Page 209 of 601
.
Headlamp cleaning system*
The headlamps will automatically be
cleaned with a hig")
208 Controls in detail
Good visibility
For information on windshield wipers, see
“Windshield wipers” (
�page 62).
Headlamp cleaning system*
The headlamps will automatically be
cleaned with a high-pressure water jet
when you have
�switched on the headlamps
and
�operated the windshield wipers with
windshield washer fluid five times
When you switch off the headlamps, the
counter resets.
For information on filling up the washer
reservoir, see “Windshield/rear window
washer system and headlamp cleaning
system*” (
�page 383).
Rear view mirrors
For more information on setting the rear
view mirrors, see “Mirrors” (
�page 51).
Interior rear view mirror, antiglare
position
1Lever
�Tilt the mirror to the antiglare position
by moving lever1 towards the wind-
shield.
The interior rear view mirror is dimmed.Auto-dimming rear view mirrors*
The reflection brightness of the exterior
rear view mirror on the driver’s side and
the interior rear view mirror will respond
automatically to glare when
�the ignition is switched on
and
�incoming light from headlamps falls on
the sensor in the interior rear view
mirror
The rear view mirror will not react if
�the automatic transmission is set to
positionR
�the interior lighting is turned on
164.boo Seite 208 Freitag, 30. März 2007 12:54 12
Page 210 of 601

209 Controls in detail
Good visibility
Power folding exterior rear view
mirrors*
Folding the exterior rear view mirrors
in and out automatically
When the corresponding function in the
control system is activated (
�page 182):
�The exterior rear view mirrors automat-
ically fold in as soon as the vehicle is
locked from the outside.
�The exterior rear view mirrors automat-
ically fold out as soon as the vehicle is
unlocked and the driver’s or front pas-
senger door are subsequently opened.Synchronizing exterior rear view
mirrors
The power folding rear view mirrors may
have to be synchronized after the vehicle
battery has been disconnected or dis-
charged. If the exterior rear view mirrors
do not fold properly upon locking or un-
locking the vehicle although the corre-
sponding function in the control system is
activated (
�page 182), do the following:
�Fold each exterior rear view mirror in
completely (
�page 210).
�Fold each exterior rear view mirror out
completely (
�page 210).
When the exterior rear view mirrors fold
properly upon locking the vehicle, the exte-
rior mirrors are synchronized. Otherwise
repeat the above steps.
Warning!G
The auto-dimming function does not react if
incoming light is not aimed directly at sen-
sors in the interior rear view mirror.
The interior rear view mirror and the exterior
rear view mirror on the driver’s side do not
react, for example, when transporting cargo
which covers the rear window.
Light hitting the mirror(s) at certain angles
(incident light) could blind you. As a result,
you may not be able to observe traffic con-
ditions and could cause an accident.
Warning!G
Exercise care when using the passen-
ger-side exterior rear view mirror. The mirror
surface is convex (outwardly curved surface
for a wider field of view). Objects in mirror
are closer than they appear. Check your
interior rear view mirror or glance over your
shoulder before changing lanes.
!Before you drive the vehicle through an
automatic car wash, fold the exterior rear view
mirrors in. Otherwise they may get damaged.
164.boo Seite 209 Freitag, 30. März 2007 12:54 12
Page 214 of 601
213 Controls in detail
Good visibility
Activating
�Press button1 on the climate con-
trol panel (
�page 216) or the automat-
ic climate control* panel (
�page 230).
The indicator lamp on the button
comes on.
Deactivating
�Press button1 once more.
The indicator lamp on the button goes
out.
!If the rear window defroster switches off too
soon and the indicator lamp starts flashing, too
many electrical consumers are operating simul-
taneously and there is insufficient voltage in the
battery. The system responds automatically by
switching the rear window defroster off.
As soon as the battery has sufficient voltage, the
rear window defroster switches back on auto-
matically.
164.boo Seite 213 Freitag, 30. März 2007 12:54 12
Page 221 of 601
 to the desired level.
The indi")
220 Controls in detail
Climate control
Adjusting air volume
Five blower speeds are available.
�Press button� to decrease or
buttonQ to increase air volume
(
�page 216) to the desired level.
The indicator lamp on buttonU
(
�page 216) goes out. The automatic
operation of air volume switches off.
The selected blower speed is shown in
the air volume displayb
(
�page 216).
Adjusting air volume for the center and
side air vents
Opening the center air vents
�Turn thumbwheels5 and8
(
�page 214) to the right.
The corresponding center air vents on
the left and right are open.Closing the center air vents
�Turn thumbwheels5 and8
(
�page 214) to the left.
The corresponding center air vents on
the left and right are closed.
Opening the side air vents
�Turn thumbwheels3 andb
(
�page 214) to the right.
The corresponding side air vents on the
left and right are open.
Closing the side air vents
�Turn thumbwheels3 andb
(
�page 214) to the left.
The corresponding side air vents on the
left and right are closed.Air vents in the roof liner over the
second-row seats*
1Thumbwheel for air volume control
2Air vent, adjustable
Adjusting air volume
�Turn thumbwheel1 d o w n t o d e c r e a s e
the air volume.
or
�Turn thumbwheel1 up to increase the
air volume.
164.boo Seite 220 Freitag, 30. März 2007 12:54 12
Page 224 of 601
.
The indicator lamp on the button
comes on.Deactivating�Press button:.
The indicator lamp on the button goes
out.Air reci")
223 Controls in detail
Climate control
Activating
�Press button: (�page 216).
The indicator lamp on the button
comes on.Deactivating�Press button:.
The indicator lamp on the button goes
out.Air recirculation mode with conve-
nience closing and opening feature
iThe air recirculation mode is activated auto-
matically at high outside temperatures.
The indicator lamp on button: is not lit when
the air recirculation mode is switched on auto-
matically.
A quantity outside air is added after
approximately 30 minutes.
If you have turned off the air conditioning
(
�page 224) or the outside temperature is
below 41°F (5°C), the air recirculation mode will
not switch on automatically.
iTo cool the interior as fast as possible, the
climate control automatically switches to air
recirculation. The indicator lamp on button:
is not lit when the air recirculation mode has
been switched on automatically.
iThe air recirculation mode is deactivated
automatically
�after 5 minutes if the outside temperature is
below approximately 41°F (5°C)
�after 5 minutes if the air conditioning and
air-drying is turned off
�after 30 minutes if the outside temperature
is above approximately 41°F (5°C)
Warning!G
Never operate the windows and tilt/sliding
sunroof* if there is the possibility of anyone
being harmed by the opening or closing pro-
cedure.
When using the air recirculation mode with
convenience closing feature, should the up-
ward movement of a window be blocked by
some obstruction including but not limited
to arms, hands, fingers, etc., the automatic
reversal feature will not operate.
In case the procedure causes potential
danger:
Vehicles with or without tilt/sliding sun-
roof*: The closing of the windows can be im-
mediately halted by pressing or pulling the
respective window switch. The closing of the
tilt/sliding sunroof* can be immediately
halted by moving the switch for the tilt/slid-
ing sunroof* in any direction.
��
164.boo Seite 223 Freitag, 30. März 2007 12:54 12
Page 235 of 601
 to separately adjust the air
temperature on each side of the passenger
co")
234 Controls in detail
3-zone automatic climate control*
Setting the temperature
Use temperature control1 and9
(
�page 230) to separately adjust the air
temperature on each side of the passenger
compartment. You should raise or lower
the temperature setting in small incre-
ments, preferably starting at 72°F (22°C).
The automatic climate control will adjust to
the set temperature as fast as possible.
Increasing
�Turn temperature control1
and/or9 slightly clockwise.
The automatic climate control system
will correspondingly adjust the interior
air temperature.
Decreasing
�Turn the temperature control1
and/or9 slightly counterclockwise.
The automatic climate control system
will correspondingly adjust the interior
air temperature.
Adjusting air distribution
Use the air distribution controls3,h,
orj for the driver’s side, or7,b, orc
(
�page 230) for the passenger side to
separately adjust the air distribution on
each side of the passenger compartment.
The following symbols are found on the
buttons:
�Press the desired air distribution but-
ton (
�page 230).
The indicator lamp on the desired but-
ton goes out.
Adjusting the air distribution for the
center and side air vents
Opening the center air vents
�Turn thumbwheels5 and8
(
�page 228) to the right.
The corresponding center air vents on
the left and right are open.
Closing the center air vents
�Turn thumbwheels5 and8
(
�page 228) to the left.
The corresponding center air vents on
the left and right are closed.
SymbolFunction
Driver’s
sidePassen-
ger side
6ZDirects air to the
windshield and side
air vents
7aDirects air through
the center, side and
rear passenger
compartment air
vents
8YDirects air to the
footwells and side
air vents
164.boo Seite 234 Freitag, 30. März 2007 12:54 12
Page 236 of 601
 to the right.
The corresponding side air vents on the
left and right are open")
235 Controls in detail
3-zone automatic climate control*
Opening the side air vents
�Turn thumbwheels3 andb
(
�page 228) to the right.
The corresponding side air vents on the
left and right are open.
Closing the side air vents
�Turn thumbwheels3 andb
(
�page 228) to the left.
The corresponding side air vents on the
left and right are closed.
Adjusting air volume
Five blower speeds are available.
�Press button� to decrease or
buttonQ to increase air volume
(
�page 230) to the desired level.
The indicator lamp on buttonU
goes out.
The automatic mode is switched off.
The selected blower speed appears in
the displaye (
�page 230).
Front defroster
You can use this setting to defrost the
windshield, such as when it is iced up. You
can also use it to defog the windshield and
door windows.
Activating
�Press button| (�page 230).
The indicator lamp on the button
comes on.
iKeep this setting selected only until the
windshield or the side windows are clear again.
164.boo Seite 235 Freitag, 30. März 2007 12:54 12