Page 123 of 601

122 Controls in detail
Locking and unlocking
Tailgate
Opening the tailgate from the outside
The handle is located above the rear
license plate recess.
�Pull on the handle.
The tailgate opens slightly.
�Pull tailgate upwards to open.Opening the tailgate from the inside
You can unlock the tailgate from the
third-row seats and then open it manually.
The handle is located on the right of the
tailgate’s window trim.
1Handle
2Push
3Lift
�Push handle1 in direction of
arrow2 and hold it there.
�Lift handle1 in direction of arrow3.
The tailgate is released and can be
opened manually.
iVehicles without KEYLESS-GO*:
The vehicle must be unlocked (
�page 40).iIf you do not open the tailgate within a few
seconds, the tailgate lock will automatically
engage again. Additionally, the tailgate will
relock automatically, if the vehicle was locked
when the tailgate was released from the inside.
If the tailgate lock does not engage automatically
and, if applicable, the tailgate does not relock
after a few seconds, you have to close the tail-
gate manually (
�page 123).
164.boo Seite 122 Freitag, 30. März 2007 12:54 12
Page 152 of 601

151 Controls in detail
Lighting
Switching second-row reading lamps on
and off
The second-row reading lamps are located
above the side windows.
Passenger side reading lamp
1Second-row reading lamp
�Press on reading lamp1 where indi-
cated by arrow.
The reading lamp comes on.
�Press on reading lamp1 once more.
The reading lamp goes out.
Door entry lamps
For better orientation in the dark, the
corresponding door entry lamps comes on
when you open a door and the automatic
control is activated.
The door entry lamps will switch off when
the corresponding door is closed.Cargo compartment lamp
The cargo compartment lamp comes on
when the tailgate is opened.
If you leave the tailgate open for an extend-
ed period of time, the cargo compartment
lamp will switch off automatically after ap-
proximately 5 minutes.
iIf you turn the SmartKey in the starter
switch to position0 or remove the SmartKey
from the starter switch, the door entry lamps will
remain lit for approximately 5 minutes.
164.boo Seite 151 Freitag, 30. März 2007 12:54 12
Page 180 of 601

179 Controls in detail
Control system
�Press buttonj ork repeatedly
until the message
Compass Setting
Zone
appears in the multifunction
display.
The selection marker is on the current
setting.
�Press buttonæ orç to set the
respective compass zone.
For information on how to call up the
compass, see “Compass” (
�page 344).Compass calibration
This function is not available if your vehicle
is equipped with the COMAND system and
navigation module*.
In order to calibrate the compass properly,
mind the following:
�Calibrate the compass in open terrain.
Nearby buildings, bridges, power lines
and large antenna masts, for example,
could impair compass calibration.
�Switch off electrical consumers (e.g.
climate control, windshield wipers, or
rear window defroster).
�Close all doors and the tailgate.
�Start the engine (�page 56).
�Press buttonæ orç to move
the selection marker to the
Vehicle
submenu.
�Press buttonj ork repeatedly
until the message
Compass Calibration appears in the
multifunction display.
The selection marker is on setting
switched Off.
�Press buttonæ to set the selection
marker to
Start.
The following message appears in the
multifunction display:
Compass Calibration Active
Please drive in a full circle.
iMake sure you are in area where you can
drive a full circle with your vehicle without dis-
turbing traffic in order to calibrate the compass.
��
164.boo Seite 179 Freitag, 30. März 2007 12:54 12
Page 209 of 601
.
Headlamp cleaning system*
The headlamps will automatically be
cleaned with a hig")
208 Controls in detail
Good visibility
For information on windshield wipers, see
“Windshield wipers” (
�page 62).
Headlamp cleaning system*
The headlamps will automatically be
cleaned with a high-pressure water jet
when you have
�switched on the headlamps
and
�operated the windshield wipers with
windshield washer fluid five times
When you switch off the headlamps, the
counter resets.
For information on filling up the washer
reservoir, see “Windshield/rear window
washer system and headlamp cleaning
system*” (
�page 383).
Rear view mirrors
For more information on setting the rear
view mirrors, see “Mirrors” (
�page 51).
Interior rear view mirror, antiglare
position
1Lever
�Tilt the mirror to the antiglare position
by moving lever1 towards the wind-
shield.
The interior rear view mirror is dimmed.Auto-dimming rear view mirrors*
The reflection brightness of the exterior
rear view mirror on the driver’s side and
the interior rear view mirror will respond
automatically to glare when
�the ignition is switched on
and
�incoming light from headlamps falls on
the sensor in the interior rear view
mirror
The rear view mirror will not react if
�the automatic transmission is set to
positionR
�the interior lighting is turned on
164.boo Seite 208 Freitag, 30. März 2007 12:54 12
Page 210 of 601

209 Controls in detail
Good visibility
Power folding exterior rear view
mirrors*
Folding the exterior rear view mirrors
in and out automatically
When the corresponding function in the
control system is activated (
�page 182):
�The exterior rear view mirrors automat-
ically fold in as soon as the vehicle is
locked from the outside.
�The exterior rear view mirrors automat-
ically fold out as soon as the vehicle is
unlocked and the driver’s or front pas-
senger door are subsequently opened.Synchronizing exterior rear view
mirrors
The power folding rear view mirrors may
have to be synchronized after the vehicle
battery has been disconnected or dis-
charged. If the exterior rear view mirrors
do not fold properly upon locking or un-
locking the vehicle although the corre-
sponding function in the control system is
activated (
�page 182), do the following:
�Fold each exterior rear view mirror in
completely (
�page 210).
�Fold each exterior rear view mirror out
completely (
�page 210).
When the exterior rear view mirrors fold
properly upon locking the vehicle, the exte-
rior mirrors are synchronized. Otherwise
repeat the above steps.
Warning!G
The auto-dimming function does not react if
incoming light is not aimed directly at sen-
sors in the interior rear view mirror.
The interior rear view mirror and the exterior
rear view mirror on the driver’s side do not
react, for example, when transporting cargo
which covers the rear window.
Light hitting the mirror(s) at certain angles
(incident light) could blind you. As a result,
you may not be able to observe traffic con-
ditions and could cause an accident.
Warning!G
Exercise care when using the passen-
ger-side exterior rear view mirror. The mirror
surface is convex (outwardly curved surface
for a wider field of view). Objects in mirror
are closer than they appear. Check your
interior rear view mirror or glance over your
shoulder before changing lanes.
!Before you drive the vehicle through an
automatic car wash, fold the exterior rear view
mirrors in. Otherwise they may get damaged.
164.boo Seite 209 Freitag, 30. März 2007 12:54 12
Page 212 of 601
211 Controls in detail
Good visibility
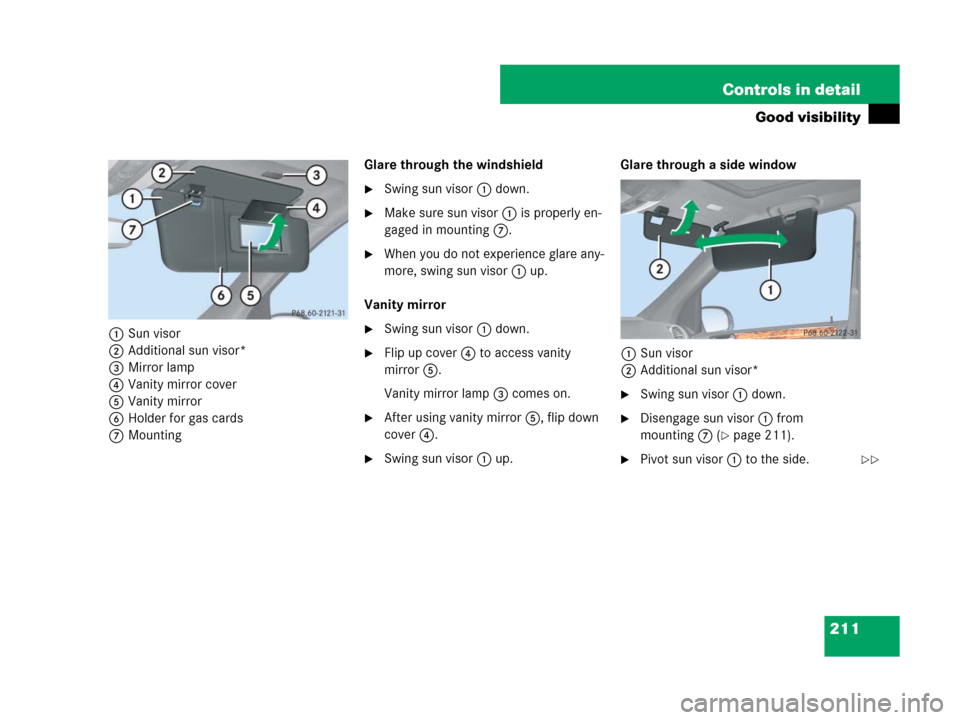
1Sun visor
2Additional sun visor*
3Mirror lamp
4Vanity mirror cover
5Vanity mirror
6Holder for gas cards
7MountingGlare through the windshield
�Swing sun visor1 down.
�Make sure sun visor1 is properly en-
gaged in mounting7.
�When you do not experience glare any-
more, swing sun visor1 up.
Vanity mirror
�Swing sun visor1 down.
�Flip up cover4 to access vanity
mirror5.
Vanity mirror lamp3 comes on.
�After using vanity mirror5, flip down
cover4.
�Swing sun visor1 up.Glare through a side window
1Sun visor
2Additional sun visor*
�Swing sun visor1 down.
�Disengage sun visor1 from
mounting7 (
�page 211).
�Pivot sun visor1 to the side.��
164.boo Seite 211 Freitag, 30. März 2007 12:54 12
Page 213 of 601

212 Controls in detail
Good visibility
�Adjust sun visor1 by pushing or pull-
ing in the direction of arrows.
�Swing down additional sun visor*2
when you experience additional glare
through the windshield.
Rear panorama roof sunshade
The rear panorama roof sunshade over the
third-row seats prevents the sun from shin-
ing directly into the vehicle.
You can open and close the sunshade by
hand.1Mounting
2Clip
3Handle
4Button
Closing
�Grasp on handle3 and insert clips2
into mounting1.
The third-row sunshade engages.
Opening
�Press on button4 to disengage the
third-row sunshade from mounting1.
Rear window defroster
The rear window defroster uses a large
amount of power. To keep battery drain to
a minimum, switch off the defroster as
soon as the rear window is clear. The de-
froster is automatically deactivated after
approximately 6 to 17 minutes of
operation depending on the outside tem-
perature.
�Switch on the ignition (�page 42).
!To avoid damage to vanity mirror cover4
(
�page 211), make sure it is closed before
pivoting sun visor1 to the side.
!Always guide the sunshade. Do not let it
snap back abruptly, as it could be damaged.
Warning!G
Any accumulation of snow and ice should be
removed from the rear window before driv-
ing. Visibility could otherwise be impaired,
endangering you and others.
��
164.boo Seite 212 Freitag, 30. März 2007 12:54 12
Page 214 of 601
213 Controls in detail
Good visibility
Activating
�Press button1 on the climate con-
trol panel (
�page 216) or the automat-
ic climate control* panel (
�page 230).
The indicator lamp on the button
comes on.
Deactivating
�Press button1 once more.
The indicator lamp on the button goes
out.
!If the rear window defroster switches off too
soon and the indicator lamp starts flashing, too
many electrical consumers are operating simul-
taneously and there is insufficient voltage in the
battery. The system responds automatically by
switching the rear window defroster off.
As soon as the battery has sufficient voltage, the
rear window defroster switches back on auto-
matically.
164.boo Seite 213 Freitag, 30. März 2007 12:54 12