Page 24 of 601

23 At a glance
Exterior view
ItemPage
1Tailgate122
Power tailgate*123
Cargo compartment
�Loading instructions301
�Cargo tie-down rings302
�Hooks304
�Expanding304
�Cover blind310
�Cargo net*312
Vehicle tool kit490
Spare wheel494
2Rear window defroster212
3Rear lamps505
4Fuel filler flap374
Refueling374
Fuel375,
565
ItemPage
5Exterior rear view mirrors
Adjusting51
Auto-dimming rear view
mirrors*208
Power folding*209
6Towing eye bolt
Installing towing eye bolt540
7Tires and wheels384,
555
Checking tire inflation
pressure395
General information384
Flat tire519
Spare wheel494
8Hood378
Opening378
Engine oil380
Coolant381
ItemPage
9Windshield wipers62
Wiper blades, replacing516
Wiper blades, cleaning431
aWindshield
Cleaning with wiper fluid64
Cleaning431
bRoof rails295
Carriers*296
cPower tilt/sliding sunroof*251
dDoors
Locking and unlocking112
Opening120
Unlocking/locking in an
emergency496
eFront lamps505
fHeadlamp cleaning system*208
164.boo Seite 23 Freitag, 30. März 2007 12:54 12
Page 26 of 601
25 At a glance
Cockpit
ItemPage
1Cruise control lever256
2Instrument cluster26
3Multifunction steering
wheel30
4Horn
5Steering wheel gearshift
buttons198
6Gear selector lever for
automatic transmission56
7Front Parktronic* warning
indicators290
8Overhead control panel34
9Glove box release
Glove box lock315
316
ItemPage
aGlove box315
CD changer315
AUX-socket315
bPower outlet324
cCenter console31
dStarter switch42
eSteering wheel adjustment,
manual49
fHood lock release378
gParking brake release59
hParking brake pedal67
jPower tailgate switch*124
ItemPage
kDoor control panel35
lExterior lamp switch61
143
mSteering wheel adjustment,
electrical*
Heated steering wheel*50
327
nCombination switch
�High beam
�Turn signals
�Windshield wipers
�Rear window wiper
147
61
62
62
64
164.boo Seite 25 Freitag, 30. März 2007 12:54 12
Page 31 of 601
30 At a glance
Multifunction steering wheel
ItemPage
1Multifunction display155
Operating the control
system156
2Telephone*:
Press button
sto take a call
to dial
to redial
tto end a call
to reject an
incoming call
3Selecting the submenu or
setting the volume:
Press button
æup/to increase
çdown/to decrease
ItemPage
4! Voice Control
System* on1, see separate
operating instructions
5Moving within a menu:
Press button
jfor next display
kfor previous display
60 Voice Control
System* off1, see separate
operating instructions
7Menu systems:
Press button
èfor next menu
ÿfor previous menu
1Vehicles without Voice Control System*: Button
without function.
164.boo Seite 30 Freitag, 30. März 2007 12:54 12
Page 38 of 601
37 At a glance
Storage compartments
ItemPage
1Parcel net in front passen-
ger footwell319
2Glove box/CD changer315
3Door pocket
4Parcel net on front passen-
ger seat backrest319
5Door pocket
6Cup holder321
7Vehicle tool kit, spare wheel490
8First aid kit490
9Cup holder321
aDoor pocket
bParcel net on driver’s seat
backrest319
ItemPage
cDoor pocket
dHolder for gas cards211
eDepending on vehicle con-
figuration:
Storage compartment
Ashtray
317
321
fCup holders320
gStorage/telephone* com-
partment with coin holder317
hRear storage compartment318
jCup holder in rear armrest320
164.boo Seite 37 Freitag, 30. März 2007 12:54 12
Page 46 of 601

45 Getting started
Adjusting
�Adjusting
Seats
Warning!G
All seat, head restraint, steering wheel, and
rear view mirror adjustments, as well as fas-
tening of seat belts, must be done before
the vehicle is put into motion.
Warning!G
Do not adjust the driver’s seat while driving.
Adjusting the seat while driving could cause
the driver to lose control of the vehicle.
Never ride in a moving vehicle with the seat
backrest in an excessively reclined position
as this can be dangerous. You could slide
under the seat belt in a collision. If you slide
under it, the belt would apply force at the ab-
domen or neck. That could cause serious or
fatal injuries. The seat backrest and seat
belts provide the best restraint when the
wearer is in a position that is as upright as
possible and belts are properly positioned
on the body.
Warning!G
Your seat must be adjusted so that you can
correctly fasten your seat belt (
�page 53).
Observe the following points:
�Adjust the backrest until your arms are
slightly angled when holding the steer-
ing wheel
�Adjust the seat to a comfortable seating
position that still allows you to reach the
accelerator/brake pedal safely. The po-
sition should be as far back as possible
with the driver still able to operate the
controls properly.
�Adjust the head restraint so that it is as
close to the head as possible and the
center of the head restraint supports the
back of the head at eye level.
�Never place hands under the seat or
near any moving parts while a seat is be-
ing adjusted.
Failure to do so could result in an accident
and/or serious personal injury.
Warning!G
When leaving the vehicle, always remove the
SmartKey or SmartKey with KEYLESS-GO*
from the starter switch, take it with you, and
lock the vehicle.
Even with the SmartKey or the SmartKey
with KEYLESS-GO* removed from the
starter switch or the SmartKey with
KEYLESS-GO* removed from the vehicle,
the power seats can be operated.
Therefore, do not leave children unattended
in the vehicle, or with access to an unlocked
vehicle. A child’s unsupervised access to a
vehicle could result in an accident and/or
serious personal injury.
164.boo Seite 45 Freitag, 30. März 2007 12:54 12
Page 48 of 601

47 Getting started
Adjusting
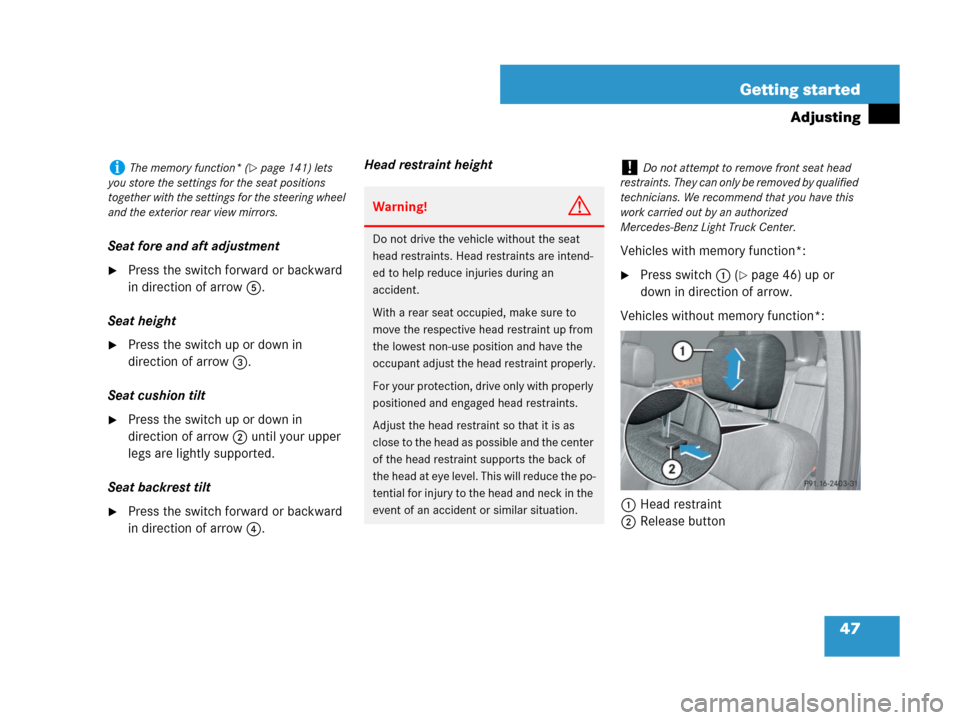
Seat fore and aft adjustment
�Press the switch forward or backward
in direction of arrow5.
Seat height
�Press the switch up or down in
direction of arrow3.
Seat cushion tilt
�Press the switch up or down in
direction of arrow2 until your upper
legs are lightly supported.
Seat backrest tilt
�Press the switch forward or backward
in direction of arrow4.Head restraint height
Vehicles with memory function*:
�Press switch1 (�page 46) up or
down in direction of arrow.
Vehicles without memory function*:
1Head restraint
2Release button
iThe memory function* (�page 141) lets
you store the settings for the seat positions
together with the settings for the steering wheel
and the exterior rear view mirrors.
Warning!G
Do not drive the vehicle without the seat
head restraints. Head restraints are intend-
ed to help reduce injuries during an
accident.
With a rear seat occupied, make sure to
move the respective head restraint up from
the lowest non-use position and have the
occupant adjust the head restraint properly.
For your protection, drive only with properly
positioned and engaged head restraints.
Adjust the head restraint so that it is as
close to the head as possible and the center
of the head restraint supports the back of
the head at eye level. This will reduce the po-
tential for injury to the head and neck in the
event of an accident or similar situation.
!Do not attempt to remove front seat head
restraints. They can only be removed by qualified
technicians. We recommend that you have this
work carried out by an authorized
Mercedes-Benz Light Truck Center.
164.boo Seite 47 Freitag, 30. März 2007 12:54 12
Page 49 of 601

48 Getting started
Adjusting
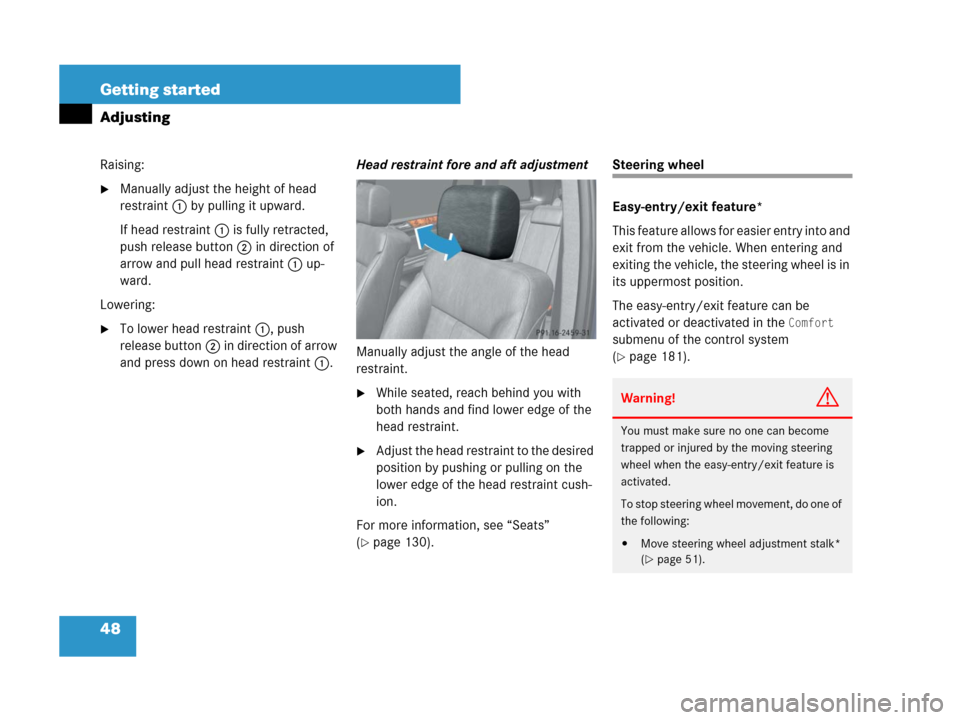
Raising:
�Manually adjust the height of head
restraint1 by pulling it upward.
If head restraint1 is fully retracted,
push release button2 in direction of
arrow and pull head restraint1 up-
ward.
Lowering:
�To lower head restraint1, push
release button2 in direction of arrow
and press down on head restraint1.Head restraint fore and aft adjustment
Manually adjust the angle of the head
restraint.
�While seated, reach behind you with
both hands and find lower edge of the
head restraint.
�Adjust the head restraint to the desired
position by pushing or pulling on the
lower edge of the head restraint cush-
ion.
For more information, see “Seats”
(
�page 130).
Steering wheel
Easy-entry/exit feature*
This feature allows for easier entry into and
exit from the vehicle. When entering and
exiting the vehicle, the steering wheel is in
its uppermost position.
The easy-entry/exit feature can be
activated or deactivated in the
Comfort
submenu of the control system
(
�page 181).
Warning!G
You must make sure no one can become
trapped or injured by the moving steering
wheel when the easy-entry/exit feature is
activated.
To stop steering wheel movement, do one of
the following:
�Move steering wheel adjustment stalk*
(
�page 51).
164.boo Seite 48 Freitag, 30. März 2007 12:54 12
Page 50 of 601

49 Getting started
Adjusting
With the easy-entry/exit feature activated,
the steering wheel will return to its last set
position when you
�close the driver’s door with the ignition
switched on
or
�insert the SmartKey into the starter
switch or press the KEYLESS-GO*
start/stop button (
�page 43) once
with the driver’s door closedWith the easy-entry/exit feature activated,
the steering wheel tilts upwards when you
�remove the SmartKey from the starter
switch
or
�open the driver’s door with the
SmartKey in starter switch position0
or1 (
�page 41) or the KEYLESS-GO*
start/stop button in position1
(
�page 43)Steering wheel adjustment, manual
�Press one of the stored position
buttons* or memory buttonM*
(
�page 141).
Do not leave children unattended in the ve-
hicle, or with access to an unlocked vehicle.
Children could open the driver’s door and
unintentionally activate the easy-entry/exit
feature, which could result in an accident
and/or serious personal injury.
iThe last set steering wheel position is stored
when
�the ignition is switched off (�page 41)
�the position is stored in memory
(
�page 141)
iIf the current position for the steering wheel
is in the uppermost tilt position, the steering
wheel will no longer be able to move upward
when the easy-entry/exit feature is activated.
The adjustment procedure is briefly interrupted,
when the engine is started.
Warning!G
Let the system complete the adjustment
procedure before setting the vehicle in mo-
tion. All steering wheel adjustment must be
completed before setting the vehicle in mo-
tion. Driving off with the steering wheel still
adjusting could cause the driver to lose con-
trol of the vehicle.
Warning!G
Only adjust the steering wheel with the vehi-
cle at a standstill and make sure the steer-
ing wheel is securely locked in place before
driving off.
��
164.boo Seite 49 Freitag, 30. März 2007 12:54 12