Page 522 of 601

521 Practical hints
Flat tire
�Prevent the vehicle from rolling away
by blocking wheels with wheel chocks
or other sizeable objects.
One collapsible wheel chock is includ-
ed with the vehicle tool kit
(
�page 490). For information on set-
ting up the collapsible wheel chock,
see (
�page 494).Changing wheel on a level surface
Changing rear wheel on passenger side
(Example illustration)
�Place the wheel chock in front of and
another sizeable object behind the
wheel that is diagonally opposite to the
wheel being changed.Changing wheel on a slight decline
Always try lifting the vehicle using the jack
on a level surface. However, should
circumstances require you to do so on a
slight decline, place the wheel chock and
another sizeable object as follows:
Changing wheel on passenger side
(Example illustration)
�Place wheel chock (or another sizeable
object) in front of both wheels on the
side opposite to the side on which the
wheel is to be changed.
Warning!G
Only jack up the vehicle on level ground or
on slight inclines/declines. Otherwise, the
vehicle could fall off the jack and injure you
or others.
164.boo Seite 521 Freitag, 30. März 2007 12:54 12
Page 523 of 601
522 Practical hints
Flat tire
Changing wheel on a slight incline
Always try lifting the vehicle using the jack
on a level surface. However, should
circumstances require you to do so on a
slight incline, place the wheel chock and
another sizeable object as follows:
Changing wheel on passenger side
(Example illustration)
�Place wheel chock (or another sizeable
object) behind both wheels on the side
opposite to the side on which the wheel
is to be changed.1Wheel wrench
�On wheel to be changed, loosen but do
not yet remove the wheel bolts
(approximately one full turn with wheel
wrench1).The jack take-up brackets are located
directly behind the front wheel housings
and in front of the rear wheel housings as
indicated by the arrows.
164.boo Seite 522 Freitag, 30. März 2007 12:54 12
Page 525 of 601
524 Practical hints
Flat tire
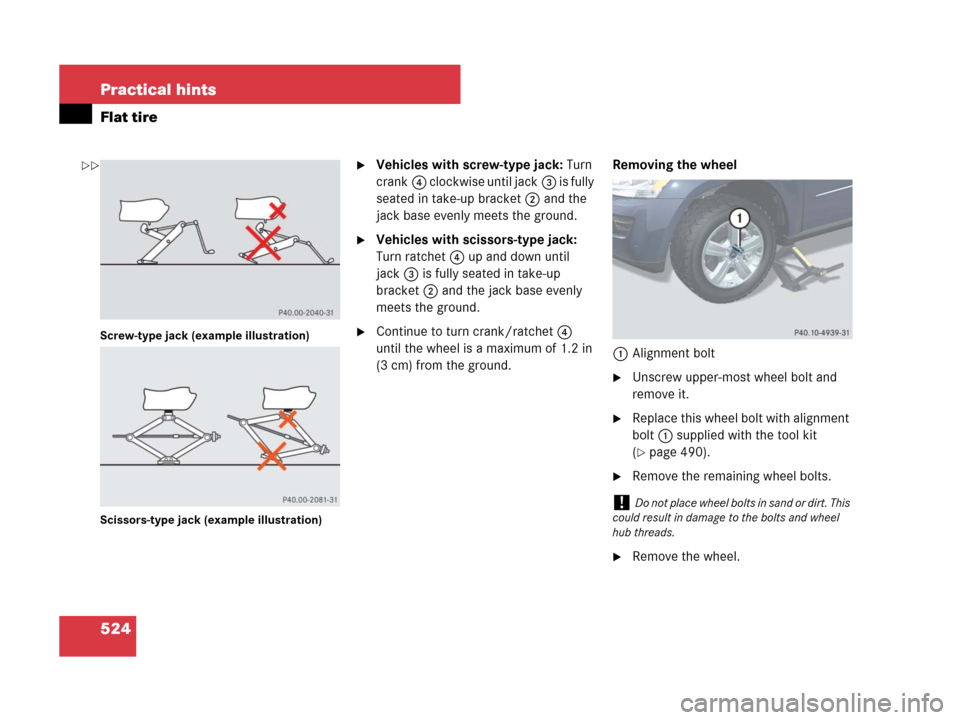
Screw-type jack (example illustration)
Scissors-type jack (example illustration)
�Vehicles with screw-type jack: Turn
crank4 clockwise until jack3 is fully
seated in take-up bracket2 and the
jack base evenly meets the ground.
�Vehicles with scissors-type jack:
Turn ratchet4 up and down until
jack3 is fully seated in take-up
bracket2 and the jack base evenly
meets the ground.
�Continue to turn crank/ratchet4
until the wheel is a maximum of 1.2 in
(3 cm) from the ground.Removing the wheel
1Alignment bolt
�Unscrew upper-most wheel bolt and
remove it.
�Replace this wheel bolt with alignment
bolt1 supplied with the tool kit
(
�page 490).
�Remove the remaining wheel bolts.
�Remove the wheel.
!Do not place wheel bolts in sand or dirt. This
could result in damage to the bolts and wheel
hub threads.
��
164.boo Seite 524 Freitag, 30. März 2007 12:54 12
Page 526 of 601
)
�Clean conta")
525 Practical hints
Flat tire
Mounting the new wheel
1Wheel bolt for 18", 19", 20" and 21"
light alloy wheels
2Wheel bolt for Minispare wheel (locat-
ed in vehicle tool kit (
�page 490))
�Clean contact surfaces of wheel and
wheel hub.
�Guide spare wheel onto the alignment
bolt and push it on the wheel hub.
�Insert wheel bolts and tighten them
slightly.
�Unscrew the alignment bolt, install last
wheel bolt and tighten slightly.
!Wheel bolts2 must be used when mount-
ing the Minispare wheel. The use of any wheel
bolts other than wheel bolts2 for the Minispare
wheel will damage the vehicle’s brakes.
!To avoid paint damage, place wheel flat
against hub and hold it there while installing first
wheel bolt.
Warning!G
Always replace wheel bolts that are
damaged or rusted.
Never apply oil or grease to wheel bolts.
Damaged wheel hub threads should be
repaired immediately. Do not continue to
drive under these circumstances! Contact
an authorized Mercedes-Benz Light Truck
Center or call Roadside Assistance.
Incorrect wheel bolts or improperly tight-
ened wheel bolts can cause the wheel to
come off. This could cause an accident.
Make sure to use the correct wheel bolts.
Warning!G
Only use genuine Mercedes-Benz wheel
bolts. Other wheel bolts may come loose.
Do not tighten the wheel bolts when the
vehicle is raised. Otherwise the vehicle
could fall off the jack.
164.boo Seite 525 Freitag, 30. März 2007 12:54 12
Page 527 of 601

526 Practical hints
Flat tire
Lowering the vehicle
�Vehicles with scissors-type jack:
Attach ratchet to vehicle jack in such a
way that the wordDOWN can be seen.
�Lower the vehicle until its resting fully
on its own weight.
�Vehicles with screw-type jack:
Turn crank counterclockwise.
�Vehicles with scissors-type jack:
Turn ratchet in Direction of DOWN.
�Remove the jack.
1-5Wheel bolts
�Tighten the five wheel bolts evenly, fol-
lowing the diagonal sequence illustrat-
ed (1 to 5), until all bolts are tight.
Observe a tightening torque of
110 lb-ft (150 Nm).
�Store jack and all other vehicle tool kit
items back into the storage well.
Warning!G
Have the tightening torque checked after
changing a wheel. The wheels could come
loose if they are not tightened to a torque of
110 lb-ft (150 Nm).
iThe removed road wheel cannot be stored in
the spare wheel well under the cargo compart-
ment floor, but should be transported in the car-
go compartment wrapped in a protective cover.
Vehicles with TPMS or Advanced TPMS*:
Do not activate the tire inflation pressure moni-
tor until a full size wheel/tire with functioning
sensor has been placed back into service on the
vehicle.
164.boo Seite 526 Freitag, 30. März 2007 12:54 12
Page 539 of 601

538 Practical hints
Towing the vehicle
Mercedes-Benz recommends that the
vehicle be transported with all wheels off
the ground using flatbed or appropriate
wheel lift/dolly equipment. This method is
preferable to other types of towing.If circumstances do not permit the recom-
mended towing methods, the vehicle may
be towed with all wheels on the ground
only so far as necessary to have the vehicle
moved to a safe location where the recom-
mended towing methods can be employed.
When towing the vehicle with all wheels on
the ground, the vehicle may be towed only
for distances up to 30 miles (50 km) and at
a speed not to exceed 30 mph (50 km/h).
!Do not tow-start the vehicle.
!Use flatbed or wheel lift/dolly equipment,
with the SmartKey in starter switch turned to
position0.
Do not tow with sling-type equipment. Towing
with sling-type equipment over bumpy roads will
damage radiator and supports.
To prevent damage during transport, do not tie
down vehicle by its chassis or suspension parts.
Use the towing eyes.
Switch off the ESP
® (�page 105) and the
automatic central locking (
�page 128).
!Do not tow with one axle raised. Doing so
could damage the transfer case, which is not
covered by the Mercedes-Benz Limited
Warranty.
All wheels must be on or off the ground. Observe
instructions for towing the vehicle with all
wheels on the ground.
Warning!G
If circumstances require towing the vehicle
with all wheels on the ground, always tow
with a tow bar if
�the engine will not run
�there is a malfunction in the brake
system
�there is a malfunction in the power
supply or in the vehicle’s electrical
system
This is necessary to adequately control the
towed vehicle.
Prior to towing the vehicle with all wheels on
the ground, make sure the automatic trans-
mission is in neutral positionN.
164.boo Seite 538 Freitag, 30. März 2007 12:54 12
Page 540 of 601

539 Practical hints
Towing the vehicle
If you want the gear position to remain in
neutral positionN, observe the following
instructions.Vehicles with SmartKey:
�With the vehicle at a standstill and the
ignition switched on shift the automatic
transmission to neutral positionN.
�If engaged, release the parking brake
(
�page 59).
�Switch off the ignition and leave the
SmartKey in the starter switch.
Vehicles with KEYLESS-GO*:
�With the vehicle at a standstill, depress
the brake pedal and keep it pressed.
�With the ignition switched on shift the
automatic transmission to park
positionP.
�Release the brake pedal.
Warning!G
With the engine not running, there is no
power assistance for the brake and steering
systems. In this case, it is important to keep
in mind that a considerably higher degree of
effort is necessary to brake and steer the
vehicle. Adapt your driving accordingly.
!When towing the vehicle with all wheels on
the ground, the automatic transmission must be
in neutral positionN.
If you turn off the engine
�using the SmartKey and
�remove the SmartKey from the starter
switch
or
�open a front door
�or when using the KEYLESS-GO* start/stop
button and open a front door
the automatic transmission will shift to park
positionP automatically.
Warning!G
When leaving the SmartKey or SmartKey
with KEYLESS-GO* in the starter switch, do
not leave children unattended in the vehicle.
It is possible for children to switch on the
ignition which could result in unsupervised
use of vehicle equipment.
A child’s unsupervised access to a vehicle
could result in an accident and/or serious
personal injury.
��
164.boo Seite 539 Freitag, 30. März 2007 12:54 12
Page 542 of 601
541 Practical hints
Towing the vehicle
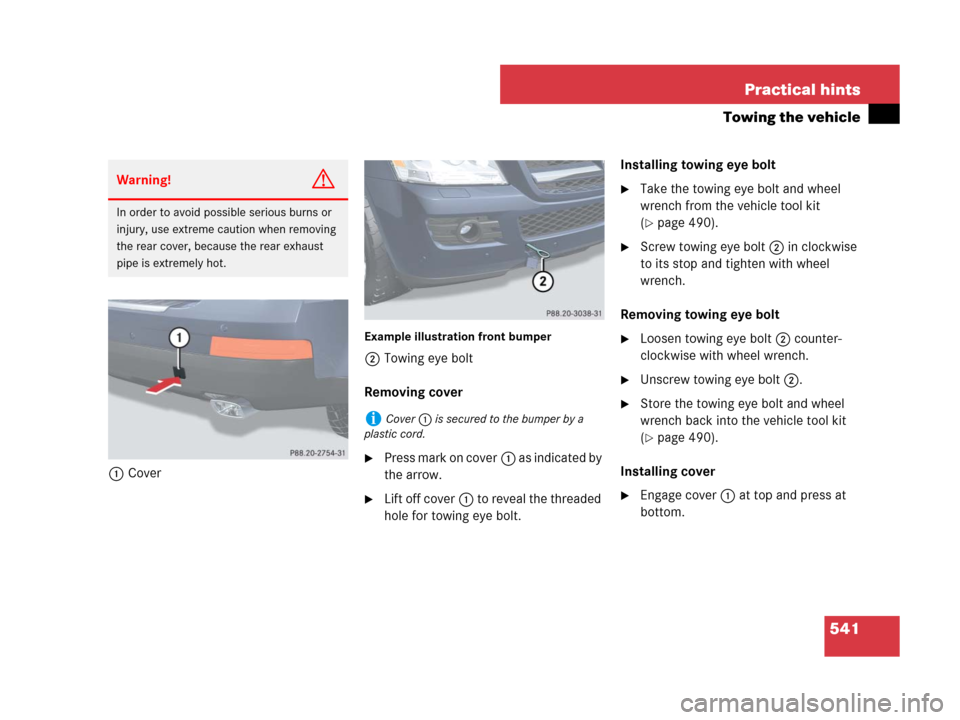
1Cover
Example illustration front bumper
2Towing eye bolt
Removing cover
�Press mark on cover1 as indicated by
the arrow.
�Lift off cover1 to reveal the threaded
hole for towing eye bolt.Installing towing eye bolt
�Take the towing eye bolt and wheel
wrench from the vehicle tool kit
(
�page 490).
�Screw towing eye bolt2 in clockwise
to its stop and tighten with wheel
wrench.
Removing towing eye bolt
�Loosen towing eye bolt2 counter-
clockwise with wheel wrench.
�Unscrew towing eye bolt2.
�Store the towing eye bolt and wheel
wrench back into the vehicle tool kit
(
�page 490).
Installing cover
�Engage cover1 at top and press at
bottom.
Warning!G
In order to avoid possible serious burns or
injury, use extreme caution when removing
the rear cover, because the rear exhaust
pipe is extremely hot.
iCover1 is secured to the bumper by a
plastic cord.
164.boo Seite 541 Freitag, 30. März 2007 12:54 12