Page 495 of 601

494 Practical hints
Where will I find ...?
Setting up the collapsible wheel chock
The collapsible wheel chock serves to ad-
ditionally secure the vehicle, e.g. while
changing the wheel.
1Tilt the plate upward
2Fold the lower plate outward
3Insert the plate�Tilt both plates upward1.
�Fold the lower plate outward2.
�Guide the tabs of the lower plate all the
way into the openings of base plate3.
For information on where to place wheel
chocks when changing a wheel, see “Lift-
ing the vehicle” (
�page 520).
Spare wheel
Warning!G
The dimensions of the Minispare wheel are
different from those of the road wheels. As
a result, the vehicle handling characteristics
change when driving with a Minispare wheel
mounted. Adapt your driving style accord-
ingly.
The Minispare wheel is for temporary use
only. When driving with a Minispare wheel
mounted, ensure proper tire inflation
pressure and do not exceed a vehicle speed
of 50 mph (80 km/h).
Drive to the nearest Mercedes-Benz Light
Truck Center as soon as possible to have the
Minispare wheel replaced with a regular
road wheel.
Never operate the vehicle with more than
one spare wheel mounted.
Do not switch off the ESP
® when a
Minispare wheel is mounted.
164.boo Seite 494 Freitag, 30. März 2007 12:54 12
Page 512 of 601

511 Practical hints
Replacing bulbs
4Bulb socket of front fog lamp bulb
�Turn bulb socket4 counterclockwise.
�Pull bulb socket4 out of the housing.
�Pull the front fog lamp bulb out of bulb
socket4.
�Insert the new front fog lamp bulb into
bulb socket4.
�Insert bulb socket4 into the housing.
�Turn bulb socket4 clockwise until it
engages.
�Plug in the electrical connector.
�Insert front fog lamp2 back into
bumper.
�Fasten retaining screws3.
�Reinsert cover1 and press it in until it
engages.
Additional turn signal lamps bulbs
The additional turn signal lamps in the
exterior rear view mirrors have LEDs.
If a malfunction occurs or LEDs fail to func-
tion, the entire turn signal unit must be re-
placed. Have the turn signal unit replaced
by an authorized Mercedes-Benz Light
Truck Center.
Replacing bulbs for rear lamps
Before you start to replace a bulb for a rear
lamp, do the following first:
�Turn the exterior lamp switch to
positionM (
�page 143).
Tail lamp unit
�Open the tailgate (�page 122).
iTo access the bulb socket, you have to
remove the cover in the corresponding side trim
panel of the cargo compartment.
164.boo Seite 511 Freitag, 30. März 2007 12:54 12
Page 514 of 601
513 Practical hints
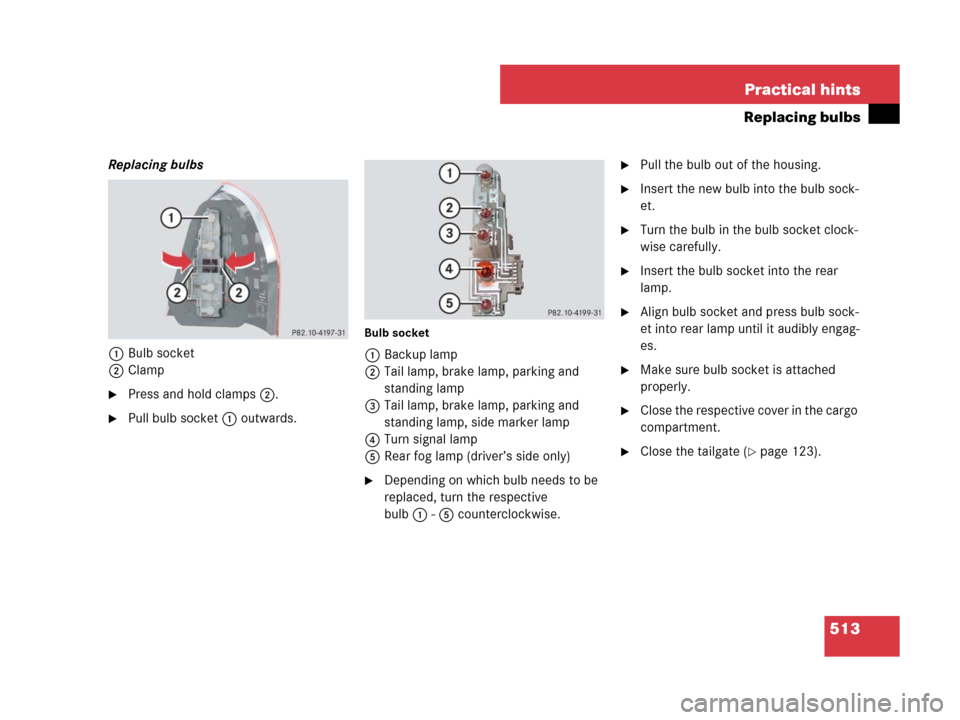
Replacing bulbs
Replacing bulbs
1Bulb socket
2Clamp
�Press and hold clamps2.
�Pull bulb socket1 outwards.
Bulb socket
1Backup lamp
2Tail lamp, brake lamp, parking and
standing lamp
3Tail lamp, brake lamp, parking and
standing lamp, side marker lamp
4Turn signal lamp
5Rear fog lamp (driver’s side only)
�Depending on which bulb needs to be
replaced, turn the respective
bulb1-5 counterclockwise.
�Pull the bulb out of the housing.
�Insert the new bulb into the bulb sock-
et.
�Turn the bulb in the bulb socket clock-
wise carefully.
�Insert the bulb socket into the rear
lamp.
�Align bulb socket and press bulb sock-
et into rear lamp until it audibly engag-
es.
�Make sure bulb socket is attached
properly.
�Close the respective cover in the cargo
compartment.
�Close the tailgate (�page 123).
164.boo Seite 513 Freitag, 30. März 2007 12:54 12
Page 520 of 601
.
�Park the vehicle in a safe distance from
moving traffic on a hard, flat s")
519 Practical hints
Flat tire
�Flat tire
Preparing the vehicle
�Make sure the vehicle level is set to
highway (
�page 279).
�Park the vehicle in a safe distance from
moving traffic on a hard, flat surface
when possible.
�Turn on the hazard warning flasher
(
�page 149).
�Turn the steering wheel so that the
front wheels are in a straight-ahead
position.
�Set the parking brake (�page 59).
�Set the automatic transmission to park
positionP (
�page 191).
�Turn off the engine (�page 41).
�Have any passenger exit the vehicle at
a safe distance from the roadway.
�Vehicles with SmartKey: Remove the
SmartKey from the starter switch.
Vehicles with KEYLESS-GO*: Open the
driver’s door (this puts the starter
switch in position0, same as with the
SmartKey removed from the starter
switch). The driver’s door then can be
closed again.
�Remove the KEYLESS-GO*
start/stop button from the starter
switch.
Warning!G
The dimensions of the Minispare wheel are
different from those of the road wheels. As
a result, the vehicle handling characteristics
change when driving with a Minispare wheel
mounted. Adapt your driving style accord-
ingly.
The Minispare wheel is for temporary use
only. When driving with a Minispare wheel
mounted, ensure proper tire pressure and
do not exceed a vehicle speed of
50 mph (80 km/h).
Drive to the nearest Mercedes-Benz Light
Truck Center as soon as possible to have the
Minispare wheel replaced with a regular
road wheel.
Never operate the vehicle with more than
one spare wheel mounted.
Do not switch off the ESP
® when a
Minispare wheel is mounted.
Warning!G
Your vehicle is equipped with air suspen-
sion. Do not open or close any doors or the
tailgate while mounting a spare wheel. The
vehicle could rise or lower to a previously se-
lected level. You or others could be injured
as a result.
iOpen door only when conditions are safe to
do so.
164.boo Seite 519 Freitag, 30. März 2007 12:54 12
Page 529 of 601

528 Practical hints
Battery
The battery is located under the front
passenger seat.
The battery should always be sufficiently
charged in order to achieve its rated ser-
vice life.
If you use your vehicle mostly for
short-distance trips, you will need to have
the battery charge checked more
frequently.
When replacing the battery, always use
batteries approved by Mercedes-Benz.
If you do not intend to operate your vehicle
for an extended period of time, consult an
authorized Mercedes-Benz Light Truck
Center about steps you need to observe.Batteries contain materials that can harm
the environment if disposed of improperly.
Recycling of batteries is the preferred
method of disposal. Many states require
sellers of batteries to accept old batteries
for recycling.
iMercedes-Benz recommends to have the
battery replaced at an authorized
Mercedes-Benz Light Truck Center.
Warning!G
Observe all safety instructions and precau-
tions when handling automotive batteries.
Risk of explosion.
Fire, open flames and smoking
are prohibited when handling
batteries. Avoid creating sparks.
Battery acid is caustic. Do not
allow it to come into contact
with skin, eyes or clothing.
Wear suitable protective cloth-
ing, especially gloves, apron and
faceguard.
Wear eye protection.
Rinse any acid spills immediate-
ly with clear water. Contact a
physician if necessary.
Keep children away.
Follow the instructions in this
Operator’s Manual.
164.boo Seite 528 Freitag, 30. März 2007 12:54 12
Page 539 of 601

538 Practical hints
Towing the vehicle
Mercedes-Benz recommends that the
vehicle be transported with all wheels off
the ground using flatbed or appropriate
wheel lift/dolly equipment. This method is
preferable to other types of towing.If circumstances do not permit the recom-
mended towing methods, the vehicle may
be towed with all wheels on the ground
only so far as necessary to have the vehicle
moved to a safe location where the recom-
mended towing methods can be employed.
When towing the vehicle with all wheels on
the ground, the vehicle may be towed only
for distances up to 30 miles (50 km) and at
a speed not to exceed 30 mph (50 km/h).
!Do not tow-start the vehicle.
!Use flatbed or wheel lift/dolly equipment,
with the SmartKey in starter switch turned to
position0.
Do not tow with sling-type equipment. Towing
with sling-type equipment over bumpy roads will
damage radiator and supports.
To prevent damage during transport, do not tie
down vehicle by its chassis or suspension parts.
Use the towing eyes.
Switch off the ESP
® (�page 105) and the
automatic central locking (
�page 128).
!Do not tow with one axle raised. Doing so
could damage the transfer case, which is not
covered by the Mercedes-Benz Limited
Warranty.
All wheels must be on or off the ground. Observe
instructions for towing the vehicle with all
wheels on the ground.
Warning!G
If circumstances require towing the vehicle
with all wheels on the ground, always tow
with a tow bar if
�the engine will not run
�there is a malfunction in the brake
system
�there is a malfunction in the power
supply or in the vehicle’s electrical
system
This is necessary to adequately control the
towed vehicle.
Prior to towing the vehicle with all wheels on
the ground, make sure the automatic trans-
mission is in neutral positionN.
164.boo Seite 538 Freitag, 30. März 2007 12:54 12
Page 543 of 601
542 Practical hints
Towing the vehicle
Stranded vehicle
Freeing a stranded vehicle, on which the
wheels are dug into sand or mud, should
be done with the greatest of care, especial-
ly if the vehicle is heavily loaded.
Avoid pulling the vehicle abruptly or diago-
nally, since it could result in damage to the
chassis alignment.
Never try to free a vehicle that is still cou-
pled to a trailer.
If possible, a vehicle equipped with trailer
hitch receiver should be pulled backward
in its own previously made tracks.
164.boo Seite 542 Freitag, 30. März 2007 12:54 12
Page 554 of 601

1The quoted data apply only to the standard vehicle. See an authorized Mercedes-Benz Light Truck Center for the corresponding data of all s")
553 Technical data
Engine
�Engine
ModelGL 320 CDI (164.8221)
1The quoted data apply only to the standard vehicle. See an authorized Mercedes-Benz Light Truck Center for the corresponding data of all special bodies and special
equipment.
GL 450 (164.8711)
Engine642273
Mode of operationDiesel 4-stroke engine4-stroke engine, gasoline injection
No. of cylinders68
Bore3.27 in (83.00 mm)3.66 in (92.90 mm)
Stroke3.62 in (92.00 mm)3.38 in (86.00 mm)
Total piston displacement182 cu in (2987 cm3)285 cu in (4663 cm3)
Compression ratio17.7:110.7:1
Output acc. to SAE J 1349215 hp/4000 rpm
(160 kW/4000 rpm)335 hp/6000 rpm2
(250 kW/6000 rpm)
2Premium fuel required. Performance may vary with fuel octane rating.
Maximum torque acc. to SAE J 1349400 lb-ft/1600 - 2400 rpm
(543 Nm/1600 - 2400 rpm)339 lb-ft/2700 - 5000 rpm
(460 Nm/2700 - 5000 rpm)
Maximum engine speed4500 rpm6500 rpm
Firing order1-4-2-5-3-61-5-4-2-6-3-7-8
Poly-V-belt2 035 mm2 404 mm
164.boo Seite 553 Freitag, 30. März 2007 12:54 12