Page 161 of 232
161 Navigation*
Destination input
Selecting a destination using the map
�Press c.
�Push the joystick to H, h, g, G,
F, f.
or
�Press the Map soft key, e.g. in the Start
route guidance menu (
�page 167).
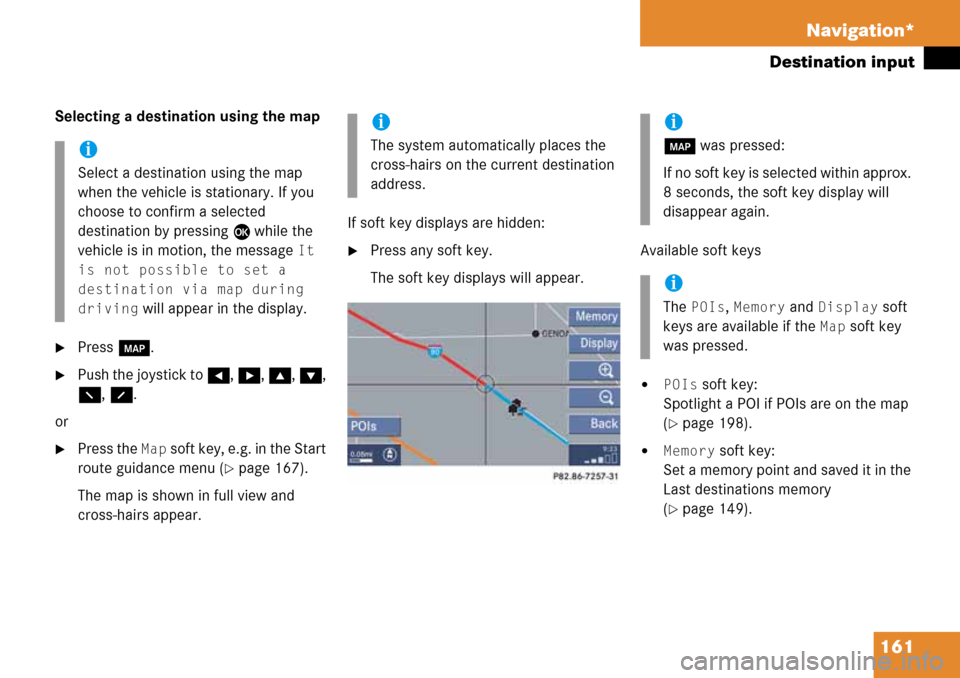
The map is shown in full view and
cross-hairs appear.If soft key displays are hidden:
�Press any soft key.
The soft key displays will appear.Available soft keys
�POIs soft key:
Spotlight a POI if POIs are on the map
(
�page 198).
�Memory soft key:
Set a memory point and saved it in the
Last destinations memory
(
�page 149).
i
Select a destination using the map
when the vehicle is stationary. If you
choose to confirm a selected
destination by pressing E while the
vehicle is in motion, the message
It
is not possible to set a
destination via map during
driving
will appear in the display.
i
The system automatically places the
cross-hairs on the current destination
address.
i
c was pressed:
If no soft key is selected within approx.
8 seconds, the soft key display will
disappear again.
i
The POIs, Memory and Display soft
keys are available if the
Map soft key
was pressed.
Page 162 of 232
162 Navigation*
Destination input
�Display soft key:
The Map view display will appear.
(
�page 185).
�Soft key +:
Enlarge visible map section.
�Soft key ):
Reduce visible map section.
�Back soft key:
Returns you to the previous menu.
�Push the joystick to H, h, g, G
to move the cross-hairs.
�Push the joystick to F or f to move
the cross-hairs diagonally.
This allows you to select your
destination.
�Release the button.
If the system is able to assign a street
name to the selected location, it is
displayed on the status bar.
If a street name can not be assigned,
COMAND increases the zoom by one
increment each time E is pressed
until a street name can be selected.
�Press E.
The system uses the point at the center
of the cross-hairs as destination.
The Start route guidance menu will
appear (
�page 167).
i
If you press the Back soft key, your
selection will be discarded. The system
then uses the data of the previous
destination.
i
If a POI is close to the center of the
cross-hairs, a selection list will appear.
You can now select between a POI and
the address destination.
Page 166 of 232
166 Navigation*
Destination input
Additional information for 1, 3 and 4
IndicationRemarks and
value range
1 Steering angle Pointer shows to the
left
-35° to 0°
Pointer shows to the
right
0° to +35°
3 Dynamic
compass card 0° to 360°
4 Height above
the sea level i
The white indicator
is fixed, the scale
scrolls as vehicle
altitude changes
Scale range:
The display unit is
set to miles
-328 ft. to 19680 ft.
The display unit is
set to km
-100 m to 6000 m
IndicationRemarks and
value rangei
Using the control system, the display
unit can be changed between km or
miles (see your vehicle’s Operator’s
Manual).
�When the instrument cluster
multifunction display is set to miles,
the COMAND will indicate
distances in miles (mi) or feet (ft.)
�When the instrument cluster
multifunction display is set to
kilometers, the COMAND will
indicate distances in kilometers
(km) or meters (m)
Page 167 of 232
167 Navigation*
Route guidance
� Route guidance
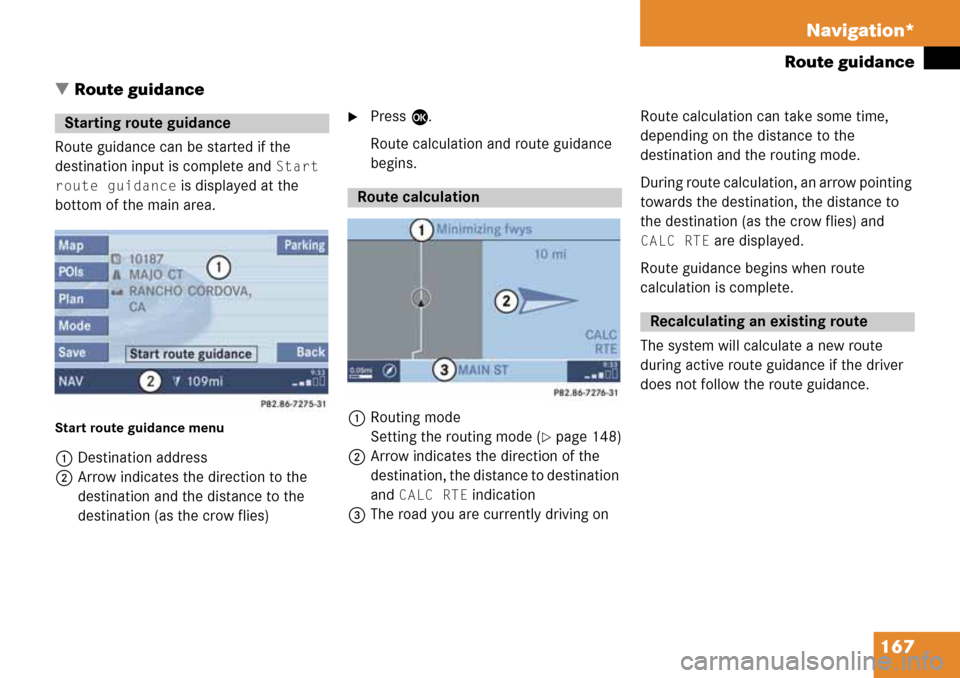
Route guidance can be started if the
destination input is complete and
Start
route guidance
is displayed at the
bottom of the main area.
Start route guidance menu
1Destination address
2Arrow indicates the direction to the
destination and the distance to the
destination (as the crow flies)
�Press E.
Route calculation and route guidance
begins.
1Routing mode
Setting the routing mode (
�page 148)
2Arrow indicates the direction of the
destination, the distance to destination
and
CALC RTE indication
3The road you are currently driving onRoute calculation can take some time,
depending on the distance to the
destination and the routing mode.
During route calculation, an arrow pointing
towards the destination, the distance to
the destination (as the crow flies) and
CALC RTE are displayed.
Route guidance begins when route
calculation is complete.
The system will calculate a new route
during active route guidance if the driver
does not follow the route guidance.
Starting route guidance
Route calculation
Recalculating an existing route
Page 168 of 232
168 Navigation*
Route guidance
After route calculation, the system assists
route guidance using pictorial displays
(
�page 169) and voice instructions. Repeating current voice instructions
If you have not understood a navigation
announcement, you can at any time have a
current announcement repeated.
�Press j.
The current navigation announcement
is repeated.
Switching voice instructions On/Off
Switching off
�Press J during a navigation
announcement.
The message
Voice announcements
muted
will appear briefly. Further route guidance takes place
using only the symbols in the display.
If a new route guidance cycle is started,
the announcements are automatically
switched on again.
Switching on again
�Press j.
Voice instructions
WarningG
Voice instructions are intended to direct you
while driving without diverting your atten-
tion from the road and driving.
Always use this feature instead of consulting
the map display for directions. Consulting
the map displays for directions may cause
you to divert your attention from driving and
increase the risk of an accident.
Page 169 of 232
169 Navigation*
Route guidance
The navigation displays are only visible
while route guidance is active.
To switch to the navigation display from
another display, e.g. from CD operation:
�Press b or c.
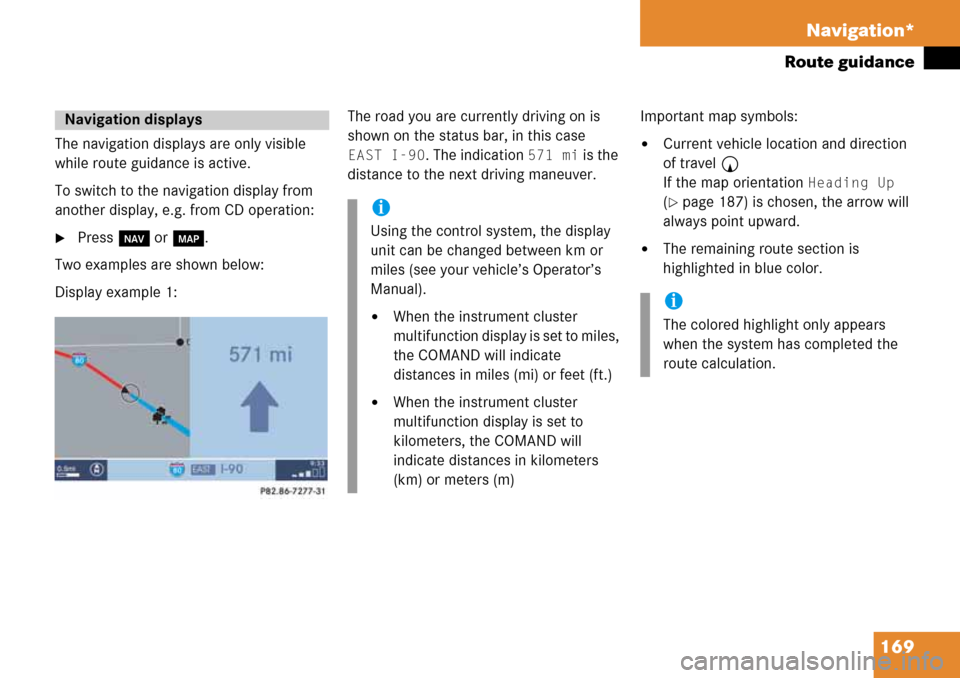
Two examples are shown below:
Display example 1:The road you are currently driving on is
shown on the status bar, in this case
EAST I-90. The indication 571 mi is the
distance to the next driving maneuver.Important map symbols:�Current vehicle location and direction
of travel y
If the map orientation
Heading Up
(�page 187) is chosen, the arrow will
always point upward.
�The remaining route section is
highlighted in blue color.
Navigation displays
i
Using the control system, the display
unit can be changed between km or
miles (see your vehicle’s Operator’s
Manual).
�When the instrument cluster
multifunction display is set to miles,
the COMAND will indicate
distances in miles (mi) or feet (ft.)
�When the instrument cluster
multifunction display is set to
kilometers, the COMAND will
indicate distances in kilometers
(km) or meters (m)
i
The colored highlight only appears
when the system has completed the
route calculation.
Page 170 of 232
170 Navigation*
Route guidance
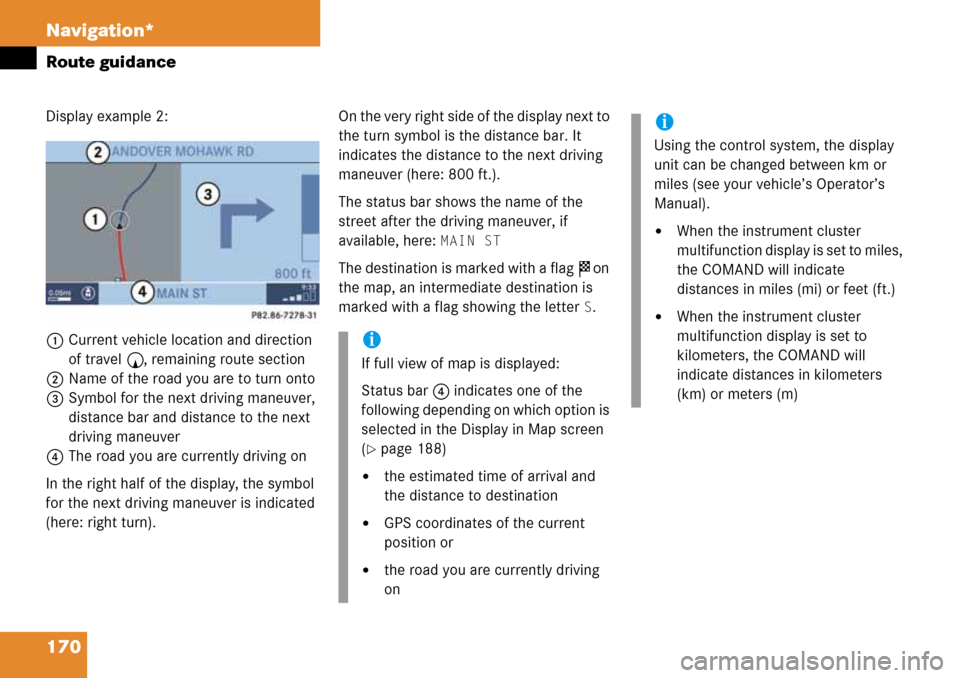
Display example 2:
1Current vehicle location and direction
of travel y, remaining route section
2Name of the road you are to turn onto
3Symbol for the next driving maneuver,
distance bar and distance to the next
driving maneuver
4The road you are currently driving on
In the right half of the display, the symbol
for the next driving maneuver is indicated
(here: right turn).On the very right side of the display next to
the turn symbol is the distance bar. It
indicates the distance to the next driving
maneuver (here: 800 ft.).
The status bar shows the name of the
street after the driving maneuver, if
available, here:
MAIN ST
The destination is marked with a flag $ on
the map, an intermediate destination is
marked with a flag showing the letter
S.
i
If full view of map is displayed:
Status bar 4 indicates one of the
following depending on which option is
selected in the Display in Map screen
(
�page 188)
�the estimated time of arrival and
the distance to destination
�GPS coordinates of the current
position or
�the road you are currently driving
on
i
Using the control system, the display
unit can be changed between km or
miles (see your vehicle’s Operator’s
Manual).
�When the instrument cluster
multifunction display is set to miles,
the COMAND will indicate
distances in miles (mi) or feet (ft.)
�When the instrument cluster
multifunction display is set to
kilometers, the COMAND will
indicate distances in kilometers
(km) or meters (m)
Page 173 of 232
173 Navigation*
Route guidance
Route guidance in these areas
When you are
�entering a partially digitized area
or
�starting route guidance within such an
area,
the navigation system will inform you that
turn by turn guidance cannot be provided
with corresponding navigation displays
and voice announcements.Map display
Within these areas the display shows a
split screen with the map on the left-hand
side and a direction arrow on the right side
pointing to the destination instead of the
symbol for the next driving maneuver
(�page 174).
Route presentation
Usually the map highlights the active route
on verified roads with a blue line.
After route calculation, the route may
contain unverified road sections. Here, the
exact route guidance is suppressed and
these route sections will appear as blue
dotted lines. This type of line e.g. connects
two verified road sections, which are
displayed as blue lines or connects the end
of a verified road with a stopover or
destination located on an unverified road.
i
Displayed or audible distance to the
beginning of such an area is an
estimation. The actual distance may
differ.
WarningG
If the origin and destination are located very
close to each other, the system may not pro-
vide the shortest path to the destination
when you are travelling in an unverified area.
In most cases you will be directed to a veri-
fied road closest to the destination. This
may appear to be a long and inconvenient
route but it is safer. At your own risk, you
may choose to drive on the unverified roads
to the destination.