Page 255 of 457
. The
message
Engine oil level OK must
appear")
254 Operation
Driving instructions
Checklist before off-road driving
Engine oil level
�Check the engine oil level with the
control system (
�page 270). The
message
Engine oil level OK must
appear in the multifunction display.
Only then can the vehicle obtain a
trouble-free oil supply, even on steep
gradients.
!Observe the following during off-road
driving:
�Keep doors, tailgate, windows, and
tilt/sliding sunroof closed.
�Switch cruise control off.
�Adjust vehicle speed to condition of terrain.
The more uneven, rutty, and steeper the
terrain, the lower the speed should be. Drive
through water slowly at an even speed,
avoiding a bow wave.
�Be especially careful when driving in
unknown territory. It may be necessary to
get out of the vehicle and scout the path you
intend to take.
�Watch out for obstacles, such as rocks,
holes, tree stumps, and ruts.
�Avoid excessive engine speeds – drive at
moderate engine speeds (max. 3 000 rpm).
�Before driving through water, determine its
depth.
�Do not stop vehicle while immersed in water,
and do not shut off the engine.
�In sandy soil, drive at a steady speed as
allowed by conditions. This helps overcome
the vehicle rolling resistance and reduces
the likelihood of the vehicle sinking into the
ground.
�Do not initiate jumps with the vehicle. It
interrupts the forward momentum of the
vehicle.
�Always drive on slopes with the engine
running and the vehicle in gear.
�Inspect the vehicle for possible damage after
each off-road trip.
Warning!G
Do not reduce the tire inflation pressure
before driving through sand. However, if you
do so, remember to correct the tire inflation
pressure (
�page 288) before continuing
your trip. Driving with reduced tire inflation
pressure increases the risk of losing control
of the vehicle and rolling over.
!If a engine oil level warning message
(
�page 349) appears in the multifunction
display while driving, stop the vehicle in a safe
location or as soon at is safe to do so. Check the
engine oil level (
�page 270).
The engine oil level warning messages should
not be ignored. Extended driving with the
message displayed could result in serious engine
damage that is not covered by the
Mercedes-Benz Limited Warranty.
W463.boo Seite 254 Montag, 19 . November 2007 8:41 08
Page 363 of 457
362 Practical hints
What to do if …
Display symbolDisplay messagePossible cause/consequencePossible solution
LTele Aid
inoperativeOne or more main functions of the
Tele Aid system are malfunctioning.Have the Tele Aid system checked at an
authorized Mercedes-Benz Light Truck
Center.
tFunction
unavailableThis message appears if buttont
or s on the multifunction steering
wheel is pressed and the vehicle is not
equipped with a telephone*.
ÊThis message will appear whenever the
tailgate is open.�Close the tailgate.
W463.boo Seite 362 Montag, 19 . November 2007 8:41 08
Page 366 of 457

365
Practical hints
Where will I find...?
Vehicle jack
The vehicle jack is stored in a storage com-
partment under the rear bench seat on the
passenger side.
1 Cover
2 Tab
3 Vehicle jack
�Fold the rear bench seat forward
(
�page 207).
�Open cover 1.
�Open tab 2 and remove vehicle
jack 3 from the compartment. Observe the safety guid
elines in the “Flat
tire” section (
�page 388) when using the
vehicle jack.
Warning!G
The jack is designed exclusively for jacking
up the vehicle under the axle housing. To
help avoid personal inju ry, use the jack only
to lift the vehicle during a wheel change.
Never get beneath the vehicle while it is
supported by the jack. Keep hands and feet
away from the area under the lifted vehicle.
Always firmly set parking brake and block
wheels before raising vehicle with jack.
Do not disengage park ing brake while the
vehicle is raised. Be certain that the jack is
always vertical (plumb line) when in use,
especially on hills. Always try to use the jack
on level surface.
Make sure the jack is positioned correctly
under the axle housin g. Always lower the
vehicle onto sufficient capacity jackstands
before working under the vehicle.
If the vehicle is not raised as described, it
could slip off the jack as a result of vibra-
tions (e.g. opening or closing a door or the
tailgate).
W463.boo Seite 365 Montag, 19 . November 2007 8:41 08
Page 367 of 457
366 Practical hints
Where will I find...?
CD changer
The CD changer is located on the driver’s
side of the cargo compartment.
CD changer
For information on CD changer operation,
see separate COMAND system operating
instructions.
Spare wheel
The spare wheel is located under a cover
on the outside of the vehicle’s tailgate.
For information on rim and tire specifica-
tions, see “Rims and tires” (
�page 414).
Removing cover
1 Lock
2 Tab
�Open lock 1 for cover ring 3 with
screwdriver or coin.
�Fold tab 2 downwards. 3
Cover ring
4 Cover plate
�Pull cover ring 3 slightly outwards in
direction of arrows and remove.
�Pull cover plate 4 towards you.
W463.boo Seite 366 Montag, 19 . November 2007 8:41 08
Page 369 of 457
368 Practical hints
Unlocking/locking in an emergency
Unlocking the vehicle
If you cannot unlock the vehicle with the
SmartKey, open the driver’s door and the
tailgate using the mechanical key.Removing the mechanical key
1 Mechanical key locking tab
2 Mechanical key
�Move locking tab 1 in direction of
arrow.
�Slide the mechanical key 2 out of the
housing. Unlocking the driver’s door
�Insert the mechanical key into the
driver’s door lock cy
linder until it stops.
�Turn the mechanical key counterclock-
wise until the locking knob moves up.
The driver’s door is unlocked.
�Remove the mechanical key.
�Press lock cylinder and pull on door
handle to open the driver’s door.
iUnlocking the driver’s door and the tailgate
with the mechanical key will trigger the anti-theft
alarm system.
To cancel the alarm:
�Press button Œ or‹ on the
SmartKey.
�Insert the SmartKey in the starter switch.
W463.boo Seite 368 Montag, 19 . November 2007 8:41 08
Page 370 of 457

369
Practical hints
Unlocking/locking in an emergency
Unlocking the tailgate�Insert the mechanical key into lock
cylinder
2.
�Turn the mechanical key counterclock-
wise to position 1 and release it.
�Remove the mechanical key.
�Press lock cylinder 2 and pull on door
handle 3 to open the tailgate.
Locking the vehicle
If you cannot lock the vehicle with the
SmartKey, lock the vehicle with the
mechanical key carrying out the following
steps:
�Close the front passenger door, the
rear doors and the tailgate.
�Open the driver’s door.
�Press the central locking switch in the
center console (
�page 107).
The locking knobs on the front
passenger door, the rear doors and the
tailgate move down.
If the vehicle battery is disconnected or
drained:
�Press down the locking knobs on
the front passenger door, the rear
doors and the tailgate manually.
�Exit the vehicle.
1Unlocking in an emergency
2Lock cylinder
3Door handle
Warning!G
The tailgate swings open to one side. Always
make sure there is sufficient clearance for
tailgate.
��
W463.boo Seite 369 Montag, 19 . November 2007 8:41 08
Page 371 of 457
370 Practical hints
Unlocking/locking in an emergency
�Close the driver’s door.
�Slide the mechanical key out of the
SmartKey (
�page 368).
�Insert the mechanical key into the
driver’s door lock cylinder until it stops.
�Turn the mechanical key clockwise.
The vehicle is locked.
�Check if the tailgate is locked. If
necessary lock the tailgate with the
mechanical key.
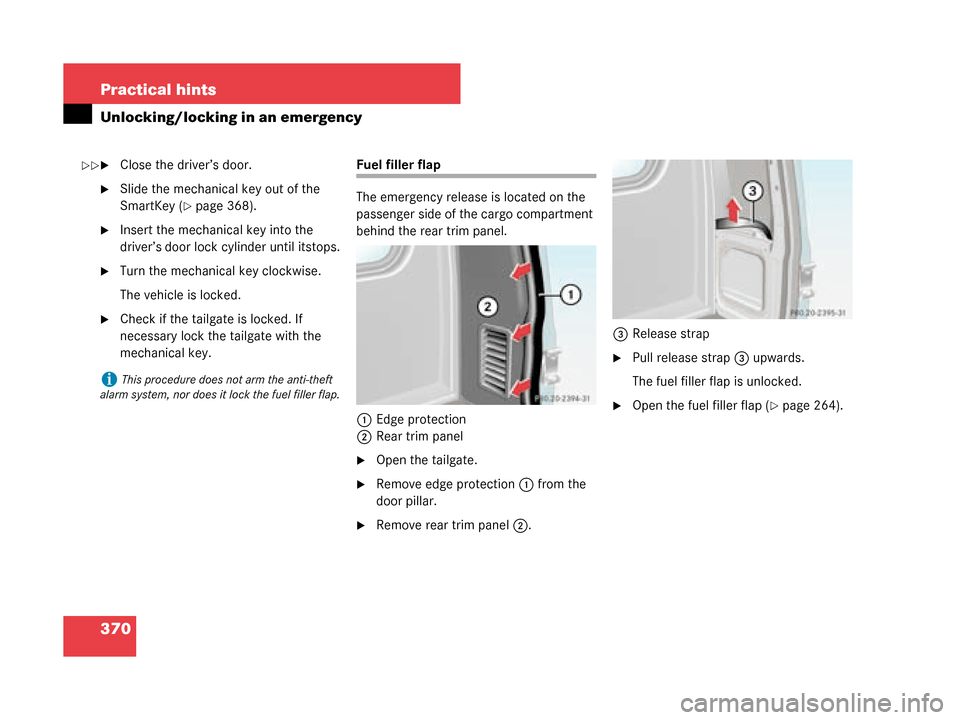
Fuel filler flap
The emergency release is located on the
passenger side of the cargo compartment
behind the rear trim panel.1 Edge protection
2 Rear trim panel
�Open the tailgate.
�Remove edge protection 1 from the
door pillar.
�Remove rear trim panel 2. 3
Release strap
�Pull release strap 3 upwards.
The fuel filler flap is unlocked.
�Open the fuel filler flap (�page 264).
iThis procedure does not arm the anti-theft
alarm system, nor does it lock the fuel filler flap.
��
W463.boo Seite 370 Montag, 19 . November 2007 8:41 08
Page 373 of 457
372 Practical hints
Opening/closing in an emergency
Tilt/sliding sunroof
You can open or close the tilt/sliding
sunroof manually should an electrical
malfunction occur.
The tilt/sliding sunroof drive is located on
the driver’s side of the cargo compartment
behind the rear trim panel.1 Edge protection
2 Rear trim panel�Open the tailgate.
�Remove edge protection 1 from the
door pillar.
�Remove rear trim panel 2.
3 Key
4 Screwdriver
�Take the vehicle tool kit out of its
storage compartment (
�page 364).
�Take key 3 and screwdriver 4 out of
the vehicle tool kit.
�Fit key 3 into hexagon nut of drive.
�Insert screwdriver 4 (as a lever) into
hole of key 3.
�Turn screwdriver 4 clockwise to
�slide sunroof closed
�raise sunroof at the rear
�Turn screwdriver 4 counterclockwise
to
�slide sunroof open
�lower sunroof at the reariDo not disconnect electrical connectors.
W463.boo Seite 372 Montag, 19 . November 2007 8:41 08