Page 140 of 457
139
Controls in detail
Control system
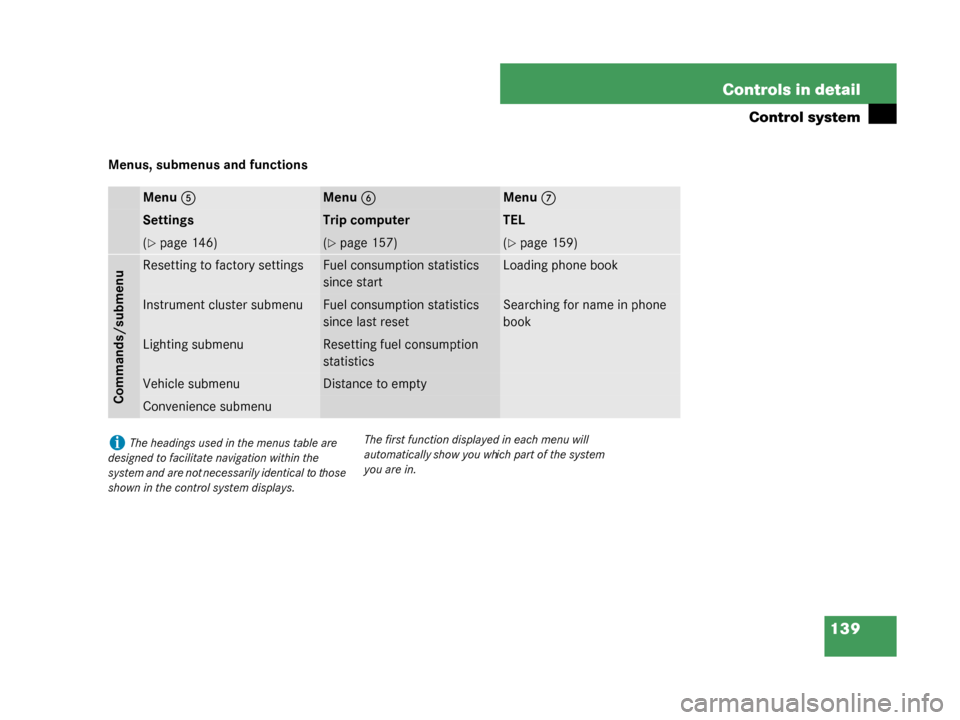
Menus, submenus and functions
Menu
5Menu6Menu7
SettingsTrip computerTEL
(�page 146)(�page 157)(�page 159)
Commands/submenu
Resetting to factory settingsFuel consumption statistics
since startLoading phone book
Instrument cluster submenuFuel consumption statistics
since last resetSearching for name in phone
book
Lighting submenuResetting fuel consumption
statistics
Vehicle submenuDistance to empty
Convenience submenu
iThe headings used in the menus table are
designed to facilitate navigation within the
system and are not necessarily identical to those
shown in the control system displays. The first function displayed in each menu will
automatically show you which part of the system
you are in.
W463.boo Seite 139 Montag, 19
. November 2007 8:41 08
Page 147 of 457

146 Controls in detail
Control system
Settings menu
In the
Settings menu there are two
functions:
�The function Reset to factory
settings
, with which you can reset all
the settings to the original factory
settings.
�A collection of submenus with which
you can make individual settings for
your vehicle.
�Press button è orÿ repeatedly
until the
Settings menu appears in the
multifunction display. The following settings and submenus are
available in the
Settings menu:
Resetting all settings
You can reset the functions of all
submenus to the factory settings.
�Press the reset button in the
instrument cluster (
�page 130) for
approximately 3 seconds.
The request to press the reset button
once more to confirm appears in the
multifunction display.
�Press the reset button once more.
The functions of all submenus will reset
to factory settings.
FunctionPage
Resetting all settings146
Submenus in the settings menu147
Instrument cluster submenu149
Lighting submenu151
Vehicle submenu154
Convenience submenu156
W463.boo Seite 146 Montag, 19 . November 2007 8:41 08
Page 149 of 457
148 Controls in detail
Control system
The table below shows what settings can
be changed within the various menus.
Detailed instructions on making individual
settings can be found on the following
pages.
Instrument clusterLightingVehicleConvenience
(�page 149)(�page 151)(�page 154)(�page 156)
Selecting speedometer
display modeSetting daytime
running lamp mode
(USA only)Selecting audio search
functionActivating
easy-entry/exit feature
Selecting languageSetting locator lightingSetting automatic
locking
Selecting display
(digital speedometer or
outside temperature)
for status indicatorSetting night security
illumination
Setting interior lighting
delayed shut-off
W463.boo Seite 148 Montag, 19. November 2007 8:41 08
Page 150 of 457

149
Controls in detail
Control system
Instrument cluster submenu
Access the
Inst. cluster submenu via
the
Settings menu. Use the Inst. clus-
ter
submenu to change the instrument
cluster display settings.
The following functions are available: Selecting speedometer display mode
�Move the selection marker with
button
æ orç to the
Inst.
cluster
submenu.
�Press button j ork repeatedly
until the message
Disp.Unit
Speed-/odom.
appears in the multi-
function display.
The selection marker is on the current
setting.
�Press button æ orç to set
speedometer unit to
km or miles. Selecting language
�Move the selection marker with
button
æ orç to the
Inst.
cluster
submenu.
�Press button j ork repeatedly
until the message
Language appears in
the multifunction display.
The selection marker is on the current
setting.
FunctionPage
Selecting speedometer display
mode149
Selecting language149
Selecting display (digital speed-
ometer or outside temperature)
for status indicator150
��
W463.boo Seite 149 Montag, 19 . November 2007 8:41 08
Page 159 of 457

158 Controls in detail
Control system
Fuel consumption statistics since last
reset
�Press button ÿ orè repeatedly
until the message
From start appears
in the multifunction display.
�Press button j ork repeatedly
until the message
Since reset appears
in the multifunction display.
1 Distance driven since last reset
2 Time elapsed since last reset
3 Average speed since last reset
4 Average fuel consumption since last
reset Resetting fuel consumption statistics
�Press button
ÿ orè repeatedly
until the message
From Start appears
in the multifunction display.
�Press button j ork repeatedly
until the reading that you want to reset
appears in the multifunction display.
�Press and hold the reset button in the
instrument cluster (
�page 130) until
the value is reset to
0. Distance to empty
�Press button
ÿ orè repeatedly
until the message
From start appears
in the multifunction display.
�Press button j ork repeatedly
until the message
Range: appears in
the multifunction display.
The calculated remaining driving range
based on the current fuel tank level
appears in the multifunction display.
iThe fuel consumption statistics From
Start
reset automatically to0 when either of
the following values is exceeded:
�distance covered: 9 999 miles
�time elapsed: 999 hours
The fuel consumption statistics
Since reset
reset automatically to
0 when either of the
following values is exceeded:
�distance covered: 99 999 miles
�time elapsed: 9 999 hoursiIf only very little fuel is left in the fuel tank,
the message
Range:--- appears in the multi-
function display.
W463.boo Seite 158 Montag, 19 . November 2007 8:41 08
Page 176 of 457
 differential lock
2 Rear a")
175
Controls in detail
Differential locks
Switching differential locks on and off
The switches are located on the upper part
of the center console.
1 Transfer case (center) differential lock
2 Rear axle differential lock
3 Front differential lock
4 Engagement indicator lamps (yellow)
5 Function indicator lamps (red) Switching differential locks on
Transfer case differential lock
�Press switch
1.
The yellow engagement indicator
lamp 4 for the transfer case
differential lock comes on.
The ESP
® warning lamp v comes
on. When the differential lock engagement
operation has been completed, the red
function indicator lamp
5 comes on.
The message
ABS not available
differential locked
appears in the
multifunction display.
The ESP
® warning lamp v and
the - indicator lamp in the
instrument cluster come on.
Once the transfer case differential lock
is switched on, you can now, if needed,
�switch on rear axle differential
lock 2
or
�switch on rear axle differential
lock 2 and front differential
lock 3.
iThe differential locks can only be switched
on in the sequence 1, 2, 3.
!To avoid damage to the transfer case and
differential locks:
�Engage differential locks only at low speed
(walking speed, not more than 5 mph
[8 km/h]).
�Do not engage differential locks if the driving
wheels are spinning due to lack of traction.
�Do not engage differential locks on paved
roads.
W463.boo Seite 175 Montag, 19 . November 2007 8:41 08
Page 177 of 457

176 Controls in detail
Differential locks
Rear axle differential lock
�Press switch2.
The yellow engagement indicator
lamp 4 comes on first, followed by the
red function indicator lamp 5.
The rear axle differential lock is
switched on.
Front differential lock
�Press switch 3.
The yellow engagement indicator
lamp 4 comes on first, followed by the
red function indicator lamp 5.
The front differential lock is switched
on. Switching differential locks off
There are two different methods to
disengage differential locks:
�You can switch the differential locks off
in reverse order (
3, 2 , 1 ).
�To switch off all differential locks at the
same time:
�Press switch 1.
The yellow engagement indicator
lamps 4 go out first. The red
function indicator lamps 5 go out
when the switching process has
been carried out in the differential.
To activate the ESP
®, BAS, and ABS
systems, drive again for 3 seconds using a
constant driving style. All messages in the multifunction display
disappear. The ESP
® warning lamp
v
and the - indicator lamp in the
instrument cluster go out.
iIf the red function indicator lamps 5 do not
go out when the differential locks are disen-
gaged, bring vehicle to a stop and then continue
driving. Changing the vehicle load can help to
disengage locks.
Warning!G
Always remember to disengage the differen-
tial locks when returning to drive on paved
roads, see “A few words about differentials
and differential locks” (
�page 174).
W463.boo Seite 176 Montag, 19 . November 2007 8:41 08
Page 231 of 457

230 Controls in detail
Useful features
System self-check
Initially, after switching on the ignition,
malfunctions are detected and indicated
(the indicator lamps in the SOS button, the
Roadside Assistance button• and the
Information button ¡ stay on longer
than 10 seconds or do not come on). The
message
Tele Aid inoperative appears
in the multifunction display. Emergency calls
An emergency call is initiated auto-
matically following an accident in which
the emergency tensioning devices (ETDs)
or air bags deploy.
An emergency call can also be initiated
manually by opening the cover next to the
interior rear view mirror labeled SOS, then
briefly pressing the button located under
the cover. See (
�page 231) for
instructions on initiating an emergency call
manually.
Once the emergency call is in progress, the
indicator lamp on the SOS button will
begin to flash. The message
Connecting
call
appears in the multifunction display.
When the connection is established, the
message
Call connected appears in the
multifunction display. All information
relevant to the emergency, such as the
location of the vehicle (determined by the
GPS satellite location system), vehicle
model, identification number and color are
generated.
iWhen a Tele Aid call has been initiated,
the COMAND system audio is muted and the
selected mode (radio, CD etc.) pauses.
The optional cellular phone (if installed) inserted
in cradle switches off. If you must use this
phone, we recommend that you use it only with
the vehicle at a standstill in a safe location.
Remove the phone from the cradle and place the
call. The navigation system (if engaged) will con-
tinue to run. The display in the instrument cluster
is available for use, and spoken commands are
only available by pressing the RPT button on the
COMAND system. A pop-up window will appear
in the COMAND system display to indicate that a
Tele Aid call is in progress. After the Tele Aid call
has ended, the optional cellular phone inserted
in the cradle switches on again. A PIN entry
might be necessary.
Warning!G
If the indicator lamps on the SOS button, on
the Roadside Assistance button, and/or on
the Information button remain illuminated
continuously in red and/or the message
Tele Aid inoperative is displayed in the
multifunction display after the system
self-check, a malfunctio n in the system has
been detected.
If a malfunction is indicated as outlined
above, the system may not operate as
expected. Have the system checked at the
nearest Mercedes-Benz Light Truck Center
as soon as possible.
W463.boo Seite 230 Montag, 19 . November 2007 8:41 08