Page 256 of 457
255
Operation
Driving instructions
Tires
�Check the tread depth and maintain
specified tire inflation pressure (the
Tire and Loading Information placard
with the recommended tire inflation
pressures is located on the driver’s
door B-pillar (
�page 280)).
�Check tires for possible damage and
remove foreign objects.
�Replace missing valve caps.
Rims
�Dented or bent rims can cause tire
inflation pressure loss and damage the
tire beads. For this reason, check and,
if necessary, change rims before
driving off-road.
Vehicle tool kit
�Check if the vehicle jack (�page 365)
is functional.
�In all cases take the vehicle tool kit,
a strong tow rope, a shovel, and a small
plank (to put under the vehicle jack on
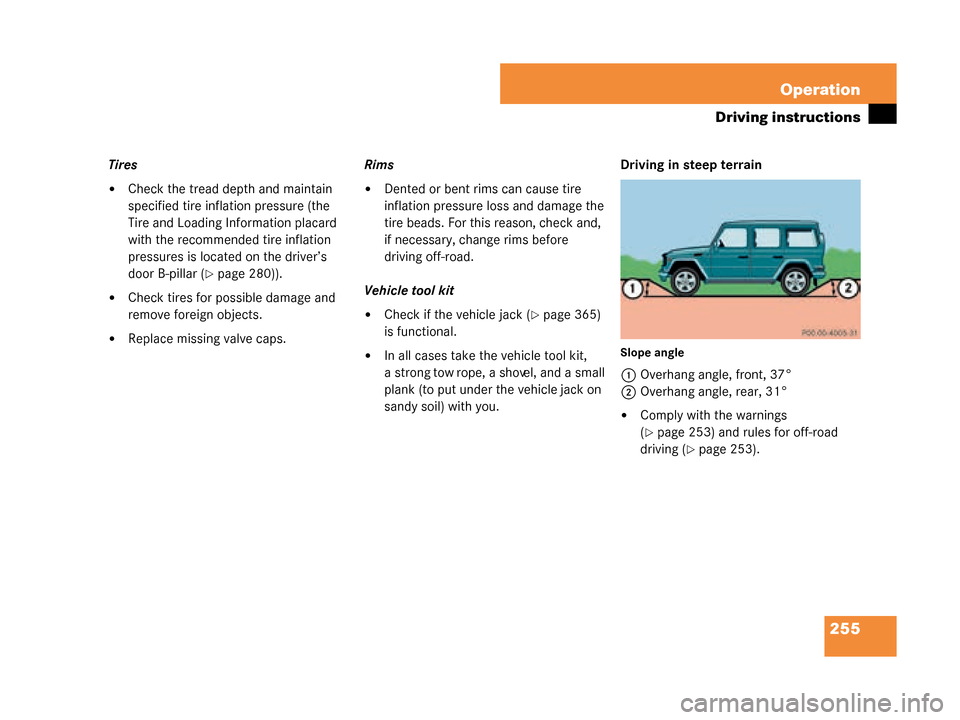
sandy soil) with you. Driving in steep terrainSlope angle
1
Overhang angle, front, 37°
2 Overhang angle, rear, 31°
�Comply with the warnings
(
�page 253) and rules for off-road
driving (
�page 253).
W463.boo Seite 255 Montag, 19 . November 2007 8:41 08
Page 261 of 457
 and rules for off-road
driving (
�page 253).
�Select gear range 1 on t")
260 Operation
Driving instructions
�Check the vehicle clearance before
driving in ruts.
�Comply with the warnings
(
�page 253) and rules for off-road
driving (
�page 253).
�Select gear range 1 on the automatic
transmission (
�page 167).
�Drive slowly next to the ruts rather than
through them if at all possible.
�If the ruts are too deep to drive in, drive
with one side of the vehicle on the
grassy center strip if the route permits. Returning from off-road driving
Off-road driving increases strain on the
vehicle.
We recommend that you inspect the vehi-
cle for possible damage after each off-road
trip. Recognizing any damage and a subse-
quent timely repair reduces the chance of
a possible breakdown or accident later on.
Proceed as follows:
�Switch the transfer case in position
HIGH (
�page 170).
�Switch differential locks off
(
�page 176).
�Clean all exterior lamps and check
them for possible damage.
�Clean the front and rear license plate.
�Remove excessive dirt from tires,
wheels, wheel housings, and under-
body.
For instance, after driving in mud, clean
the radiator, chassis, engine, brakes,
and wheels from extreme dirt using a
strong jet of water.
After off-road driving or crossing obstacles,
inspect vehicle for any damage, especially
vehicle underbody and suspension components.
Failure to do so can adversely affect the vehi-
cle’s future performance, including increased
chance of an accident.
Warning!G
Never drive on pavement with activated
differential locks. Engaged front axle differ-
ential locks limits ability to move around
curves.
If you feel a sudden significant vibration or
ride disturbance, or you suspect that possi-
ble damage to your vehicle has occurred,
you should turn on the hazard warning flash-
ers, carefully slow down, and drive with cau-
tio n to an a rea whic h is a s afe d ista nc e fro m
the roadway.
Inspect the tires and under the vehicle for
possible damage. If the vehicle or tires
appear unsafe, have it towed to the nearest
Mercedes-Benz Light Truck Center or tire
dealer for repairs.
Damage to the vehicle may influence driving
comfort and poses the risk of accident to
you and other drivers.
W463.boo Seite 260 Montag, 19 . November 2007 8:41 08
Page 265 of 457

264 Operation
At the gas station
RefuelingThe fuel filler flap is located on the
right-hand side of the vehicle towards the
rear.
Locking/unlocking the vehicle with the
SmartKey automatically locks/unlocks the
fuel filler flap.
1 Fuel filler flap
2 Fuel filler cap�Turn off the engine.
�Remove the SmartKey from the starter
switch.
�Push on fuel filler flap 1 at the
position indicated by the arrow.
Fuel filler flap 1 springs open.
�Turn fuel filler cap 2 to the left and
hold on to it until possible pressure is
released.
�Take off fuel filler cap 2.
�Set fuel filler cap 2 in the recess
(indicated by the arrow) on fuel filler
flap 1.
�To prevent fuel vapors from escaping
into open air, fully insert filler nozzle
unit.
Warning!G
Gasoline is highly flam mable and poisonous.
It burns violently and can cause serious
injury.
Never allow sparks, flame or smoking
materials near gasoline!
Turn off the engine before refueling.
Whenever you are around gasoline, avoid
inhaling fumes and skin or clothing contact,
extinguish all smoking materials.
Direct skin contact with fuels and the
inhalation of fuel vapors are damaging to
your health.
iIn case that the central locking system does
not release the fuel filler flap, or the opening
mechanism is clamping, you can open the fuel
filler flap using an emergency release in the
cargo compartment, see “Fuel filler flap”
(
�page 370).
!The fuel filler cap is tethered to the fuel filler
neck. Do not drop the cap. It could damage the
vehicle paint finish.
W463.boo Seite 264 Montag, 19 . November 2007 8:41 08
Page 284 of 457

283
Operation
Tires and wheels
Step 3
�Subtract the combined weight of the
driver and passengers from
XXX kilograms or XXX lbs.
Step 4
�The resulting figure equals the avail-
able amount of cargo and luggage load
capacity. For example, if the “XXX”
amount equals 1 400 lbs and there will
be five 150 lbs passengers in your
vehicle, the amount of available cargo
and luggage load capacity is 650 lbs
(1 400 - 750 (5 x 150) = 650 lbs). Step 5
�Determine the combined weight of
luggage and cargo being loaded on the
vehicle. That weig
ht may not safely
exceed the available cargo and luggage
load capacity calculated in step 4.
Step 6 (if applicable)
�If your vehicle will be towing a trailer,
load from your trailer will be trans-
ferred to your vehicle. Consult this
manual to determine how this reduces
the available cargo and luggage load
capacity of your vehicle (
�page 285). The following table shows examples on
how to calculate total and cargo load
capacities with varying seating configura-
tions and number and size of occupants.
The following examples use a load limit
of 1 500 lbs.
This is for illustration
purposes only . Make sure you are using
the actual load limit fo r your vehicle stated
on the vehicle’s Tire and Loading
Information placard (
�page 281).
W463.boo Seite 283 Montag, 19 . November 2007 8:41 08
Page 286 of 457

(
�page 285) as to not")
285
Operation
Tires and wheels
Certification label
Even after careful determination of the
combined weight of all occupants, cargo
and the trailer tongue load (if applicable)
(
�page 285) as to not exceed the permis-
sible load limit, you must make sure that
your vehicle never exceeds the Gross
Vehicle Weight Rating (GVWR) and the
Gross Axle Weight Rating (GAWR) for
either the front or rear axle. You can obtain
the GVWR and GAWR from the certification
label. The certification label can be found
on the driver’s door B- pillar, see “Technical
data” (
�page 410). Gross Vehicle Weight Rating (GVWR):
The total weight of the vehicle, all
occupants, all cargo, and the trailer tongue
load (if applicable) (
�page 285) must
never exceed the GVWR.
Gross Axle Weight Rating (GAWR):
The total allowable weight that can be
carried by a single axle (front or rear).
To assure that your vehicle does not
exceed the maximum permissible weight
limits (GVWR and GAWR for front and rear
axle), have the loaded vehicle (including
driver, passengers and all cargo and, if
applicable, trailer fully loaded) weighed on
a suitable commercial scale. Trailer tongue load
The tongue load of any trailer is an impor-
tant weight to measure because it affects
the load you can carry in your vehicle. If a
trailer is towed, the tongue load must be
added to the weight of all occupants riding
and any cargo you are carrying in the
vehicle. The tongue load typically is
10 percent of the trailer weight and
everything loaded in it.
If an approved Mercedes-Benz trailer hitch
is available for your G-Class vehicle model,
consult the instructions included in the
trailer hitch kit for vehicle towing capacity,
permissible gross trailer weight, trailer
tongue weight rating, and instructions on
loading and towing a trailer.
W463.boo Seite 285 Montag, 19
. November 2007 8:41 08
Page 317 of 457

316 Operation
Vehicle care
Paintwork, painted body components
Mercedes-Benz approved Paint Care
should be applied when water drops on the
paint surface do not “bead up”. This should
normally be done every 3 to 5 months,
depending on the climate and washing
detergent used.
Mercedes-Benz approved Paint Cleaner
should be applied if the paint surface
shows signs of dirt embedding (i.e. loss of
gloss).
Do not apply any of these products or wax
if your vehicle is parked in the sun or if the
hood is still hot.
�Use the appropriate MB-Touch-Up
Stick for quick and provisional repairs
of minor paint damage (i.e. chips from
stones, vehicle doors, etc.).Engine cleaning
Prior to cleaning the engine compartment,
make sure to protect electrical compo-
nents and connectors from the intrusion of
water and cleaning agents.
Corrosion protection, such as
MB Anticorrosion Wax, should be applied
to the engine compartment after every
engine cleaning. Before applying, all con-
trol linkage bushings and joints should be
lubricated. The poly-V-belt and all pulleys
should be protected from any wax.
Vehicle washing
In the winter, thoroughly remove all traces
of road salt as soon as possible.
When washing the vehicle underbody, do
not forget to clean the inner sides of the
wheels.
Hand-wash
Do not use hot water or wash your vehicle
in direct sunlight.
�Only use a mild car wash detergent,
such as Mercedes-Benz approved Car
Shampoo.
�Thoroughly spray the vehicle with a
diffused jet of water.
Direct only a very weak spray towards
the ventilation intake.
�Use plenty of water and rinse the
sponge and chamois frequently.
!Affixing stickers, adhesive tape or similar
materials to painted body components may
damage the paintwork.
W463.boo Seite 316 Montag, 19 . November 2007 8:41 08
Page 324 of 457
323
Practical hints
What to do if …
Where will I find...?
Unlocking/locking in an emergency
Opening/closing in an emergency
Brush guard
Replacing SmartKey batteries
Replacing bulbs
Replacing wiper blades
Flat tire
Battery
Jump starting
Towing the vehicle
Fuses
W463.boo Seite 323 Montag, 19. November 2007 8:41 08
Page 367 of 457
366 Practical hints
Where will I find...?
CD changer
The CD changer is located on the driver’s
side of the cargo compartment.
CD changer
For information on CD changer operation,
see separate COMAND system operating
instructions.
Spare wheel
The spare wheel is located under a cover
on the outside of the vehicle’s tailgate.
For information on rim and tire specifica-
tions, see “Rims and tires” (
�page 414).
Removing cover
1 Lock
2 Tab
�Open lock 1 for cover ring 3 with
screwdriver or coin.
�Fold tab 2 downwards. 3
Cover ring
4 Cover plate
�Pull cover ring 3 slightly outwards in
direction of arrows and remove.
�Pull cover plate 4 towards you.
W463.boo Seite 366 Montag, 19 . November 2007 8:41 08