Page 43 of 457
42 Getting started
Adjusting
Seat adjustment
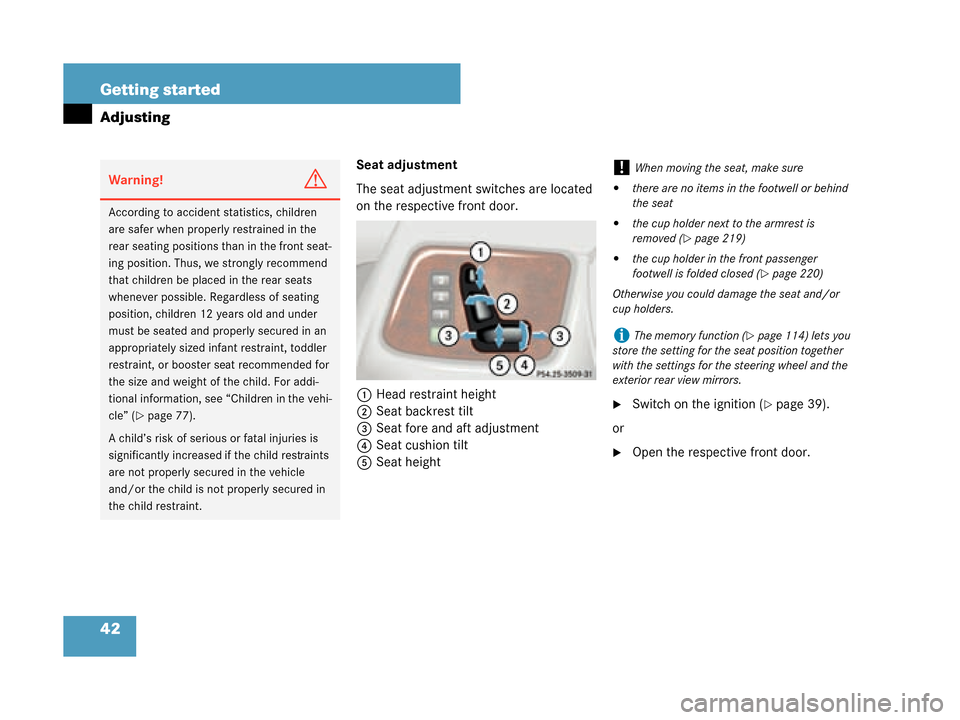
The seat adjustment switches are located
on the respective front door.1 Head restraint height
2 Seat backrest tilt
3 Seat fore and aft adjustment
4 Seat cushion tilt
5 Seat height
�Switch on the ignition (�page 39).
or
�Open the respective front door.
Warning!G
According to accident statistics, children
are safer when properly restrained in the
rear seating positions than in the front seat-
ing position. Thus, we strongly recommend
that children be placed in the rear seats
whenever possible. Regardless of seating
position, children 12 years old and under
must be seated and properly secured in an
appropriately sized infant restraint, toddler
restraint, or booster seat recommended for
the size and weight of the child. For addi-
tional information, see “Children in the vehi-
cle” (
�page 77).
A child’s risk of serious or fatal injuries is
significantly increased if the child restraints
are not properly secured in the vehicle
and/or the child is no t properly secured in
the child restraint.
!When moving the seat, make sure
�there are no items in the footwell or behind
the seat
�the cup holder next to the armrest is
removed (
�page 219)
�the cup holder in the front passenger
footwell is folded closed (
�page 220)
Otherwise you could damage the seat and/or
cup holders.
iThe memory function (�page 114) lets you
store the setting for the seat position together
with the settings for the steering wheel and the
exterior rear view mirrors.
W463.boo Seite 42 Montag, 19. November 2007 8:41 08
Page 45 of 457

44 Getting started
Adjusting
Steering wheelSteering wheel adjustment
Make sure that
�you can reach the steering wheel with
your arms slightly bent at the elbows,
�you can move your legs freely
�all displays (incl. malfunction and indi-
cator lamps) on the instrument cluster
are clearly visibleThe steering wheel adjustment stalk is
located on the lower left of the steering
column.
1 Adjusting steering wheel, in or out
2 Adjusting steering wheel, up or down
�Switch on the ignition (�page 39).
or
�Open the driver’s door.
Warning!G
Do not adjust the steering wheel while
driving. Adjusting the steering wheel while
driving could cause the dr iver to lose control
of the vehicle.
When leaving the vehicle, always remove the
SmartKey from the starter switch, take it
with you, and lock the vehicle.
Even with the SmartKey removed from the
starter switch, the steering wheel adjust-
ment feature can be operated when the
driver’s door is open. Therefore, do not leave
children unattended in the vehicle, or with
access to an unlocked vehicle. A child’s
unsupervised access to a vehicle could
result in an accident and/or serious
personal injury.
iThe memory function (�page 114) lets you
store the setting for the steering wheel together
with the settings for the seat position and the
exterior rear view mirrors.
W463.boo Seite 44 Montag, 19. November 2007 8:41 08
Page 47 of 457
46 Getting started
Adjusting
Mirrors
Adjust the interior and exterior rear view
mirrors before driving so that you have a
good view of the road and traffic condi-
tions.
Interior rear view mirror
�Manually adjust the interior rear view
mirror.
For more information, see “Rear view mir-
rors” (
�page 177). Exterior rear view mirrors
iIf the current position
for the steering wheel
is in the uppermost tilt position, the steering
wheel will no longer be able to move upward
when the easy-entry/exit feature is activated.
Warning!G
Let the system complete the adjustment
procedure before setting the vehicle in
motion. All steering wh eel adjustment must
be completed before setting the vehicle in
motion. Driving off wit h the steering wheel
still adjusting could cause the driver to lose
control of the vehicle.
Warning!G
Exercise care when using the passen-
ger-side exterior rear view mirror. The mirror
surface is convex (out wardly curved surface
for a wider field of view). Objects in mirror
are closer than they appear. Check your
interior rear view mirror or glance over your
shoulder before changing lanes.
W463.boo Seite 46 Montag, 19. November 2007 8:41 08
Page 48 of 457
47
Getting started
Adjusting
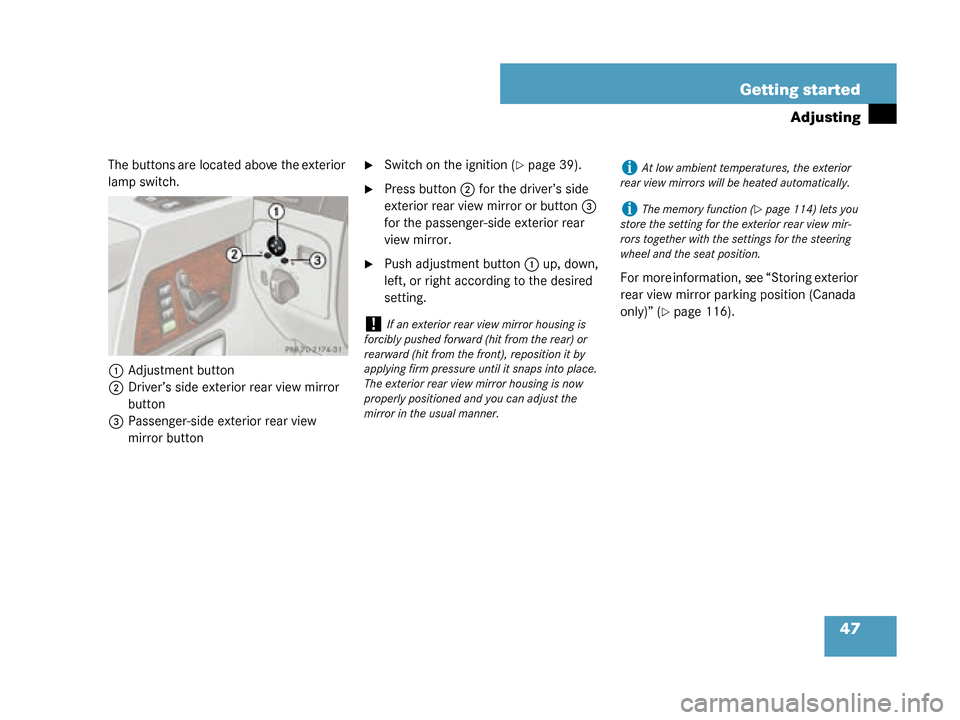
The buttons are located above the exterior
lamp switch.
1 Adjustment button
2 Driver’s side exterior rear view mirror
button
3 Passenger-side exterior rear view
mirror button�Switch on the ignition (�page 39).
�Press button 2 for the driver’s side
exterior rear view mirror or button 3
for the passenger-side exterior rear
view mirror.
�Push adjustment button 1 up, down,
left, or right according to the desired
setting. For more information, see “Storing exterior
rear view mirror parking position (Canada
only)” (
�page 116).!If an exterior rear view mirror housing is
forcibly pushed forward (hit from the rear) or
rearward (hit from the front), reposition it by
applying firm pressure until it snaps into place.
The exterior rear view mirror housing is now
properly positioned and you can adjust the
mirror in the usual manner.
iAt low ambient temperatures, the exterior
rear view mirrors will be heated automatically.
iThe memory function (�page 114) lets you
store the setting for the exterior rear view mir-
rors together with the settings for the steering
wheel and the seat position.
W463.boo Seite 47 Montag, 19. November 2007 8:41 08
Page 115 of 457
114 Controls in detail
Memory function
Prior to operating the vehicle, the driver
should check and adjust the seat height,
seat position fore and aft, and seat back-
rest angle if necessary, to ensure adequate
control, reach and comfort. The head
restraint should also be adjusted for
proper height. See also the section on
air bags (
�page 70) for proper seat
positioning.
In addition, adjust the steering wheel to
ensure adequate control, reach, operation
and comfort. Both the interior and exterior
rear view mirrors should be adjusted for
adequate rear vision.
Fasten seat belts. Infants and small
children should be se ated in a properly
secured restraint system that complies
with U.S. Federal Motor Vehicle Safety
Standards 213 and 225 and Canadian
Motor Vehicle Safety Standards 213 and
210.2. With the memory function you can store up
to three different configurations.
Each stored position on the driver’s side
includes the following settings:
�Seat position
�Multicontour seat*: previously saved
setting
�Steering wheel position
�Exterior rear view mirrors’ position
Each stored position on the passenger side
includes the following settings:
�Seat position
�Multicontour seat*: previously saved
setting
Warning!G
Do not activate the memory function while
driving. Activating the memory function
while driving could cause the driver to lose
control of the vehicle.
W463.boo Seite 114 Montag, 19
. November 2007 8:41 08
Page 116 of 457

115
Controls in detail
Memory function
The memory button and memory position
button are located on each front door.
1
Memory button
1, 2, 3 Memory position button
�Switch on the ignition (�page 39).
or
�Open the respective door.
Storing positions into memory
�Adjust the seats (�page 42).
�On the driver’s side, additionally adjust
the steering wheel (
�page 44) and
exterior rear view mirrors (
�page 46)
to the desired positions.
�Press memory button 1.
�Release memory button 1 and press
memory position button 1, 2 , or 3 with-
in 3 seconds.
All settings are stored to the selected
position.
Recalling positions from memory
�Press and hold memory position
button 1, 2 , or 3 until the seat, steering
wheel and exterior rear view mirrors
have fully moved to the stored posi-
tions.
!Do not operate the power seats using
memory button 1 if the seat backrest is in an
excessively reclined position. Doing so could
cause damage to front or rear seats.
Move seat backrest to an upright position first.
iReleasing the memory position button stops
movement to the stored positions immediately.
W463.boo Seite 115 Montag, 19 . November 2007 8:41 08
Page 117 of 457
116 Controls in detail
Memory function
Storing exterior rear view mirror
parking position (Canada only)
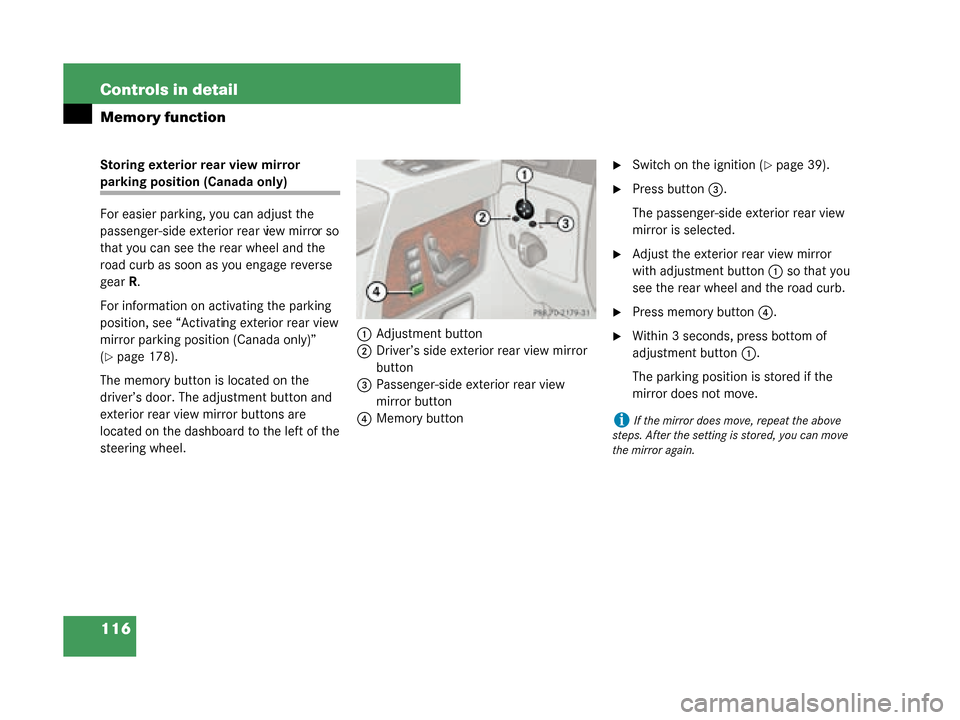
For easier parking, you can adjust the
passenger-side exterior rear view mirror so
that you can see the rear wheel and the
road curb as soon as you engage reverse
gearR.
For information on activating the parking
position, see “Activating exterior rear view
mirror parking position (Canada only)”
(
�page 178).
The memory button is located on the
driver’s door. The adjustment button and
exterior rear view mirror buttons are
located on the dashboard to the left of the
steering wheel. 1
Adjustment button
2 Driver’s side exterior rear view mirror
button
3 Passenger-side exterior rear view
mirror button
4 Memory button
�Switch on the ignition (�page 39).
�Press button 3.
The passenger-side exterior rear view
mirror is selected.
�Adjust the exterior rear view mirror
with adjustment button 1 so that you
see the rear wheel and the road curb.
�Press memory button 4.
�Within 3 seconds, press bottom of
adjustment button 1.
The parking position is stored if the
mirror does not move.
iIf the mirror does move, repeat the above
steps. After the setting is stored, you can move
the mirror again.
W463.boo Seite 116 Montag, 19 . November 2007 8:41 08
Page 121 of 457

120 Controls in detail
Lighting
When the engine is running, and you
�turn the exterior lamp switch to
positionC, the low beam head-
lamps, the tail and parking lamps, the
license plate lamps and the side mark-
er lamps switch on.
�turn the exterior lamp switch to
position B, the manual headlamp
mode has priority over the daytime
running lamp mode.
The corresponding exterior lamps
switch on (
�page 117). USA only:
When the engine is running, and you turn
the exterior lamp switch to position
C
or B , the manual headlamp mode has
priority over the daytime running lamp
mode.
The corresponding exterior lamps switch
on (
�page 117). Locator lighting and night security
illumination
The locator lighting and the night security
illumination are described in the “Control
system” section, see “Setting locator light-
ing” (
�page 152) and “Setting night secu-
rity illumination” (
�page 153).
Locator lighting lamps in exterior rear
view mirrors
If the vehicle is centrally unlocked in the
darkness, the locator lighting lamps in the
exterior rear view mirrors come on.
If a door is opened, the lamp on the
corresponding side goes out. If no doors
are opened, the lamps will go out:
�after a maximum of 40 seconds
�immediately, when you switch on the
ignition
iWith the exterior lamp switch in
position M, you cannot switch on the high
beam headlamps.
The high beam flasher is available at all times.
For nighttime driving turn the exterior lamp
switch to position B orU to permit
activation of the high beam headlamps.
W463.boo Seite 120 Montag, 19 . November 2007 8:41 08