Page 154 of 457

Use this function to set whether you would
like the exterior lamps to remain on for
15 seconds")
153
Controls in detail
Control system
Setting night security illumination
(Headlamps delayed shut-off)
Use this function to set whether you would
like the exterior lamps to remain on for
15 seconds during darkness after exiting
the vehicle and closing all doors.
With the headlamps delayed shut-off
feature activated and the exterior lamp
switch in position
U before the engine
is turned off, the following lamps will
switch on when the engine is turned off:
�Parking lamps
�Tail lamps
�License plate lamps
�Side marker lamps
�Front fog lamps
If after turning off the engine you do not
open a door or do not close an opened
door, the lamps will automatically switch
off after approxim ately 60 seconds.
�Move the selection marker with
buttonæ orç to the
Lighting
submenu.
�Press button j ork repeatedly
until the message
Headl. delayed
shut-off
appears in the multifunction
display.
The selection marker is on the current
setting.
�Press button æ orç to switch
the headlamps delayed shut-off feature
On or Off.
�Turn the exterior lamp switch to
position U before turning off the
engine.
The headlamps delayed shut-off
feature is activated.
You can temporarily deactivate the
headlamps delayed shut-off feature:
�Before exiting the vehicle, turn the
SmartKey in the starter switch to
position 0.
�Then turn it to position 2 and back to
position 0.
The headlamps delayed shut-off
feature is deactivated. It will reactivate
as soon as you reinsert the SmartKey in
the starter switch.
W463.boo Seite 153 Montag, 19 . November 2007 8:41 08
Page 191 of 457
 once
more.
The indicator lamp")
190 Controls in detail
Climate control
Activating
Moist air can fog up the windows. You can
dehumidify the air with the air condition-
ing.
�Press button9 (�page 183) once
more.
The indicator lamp on the button
comes on.
The air conditioning uses the refrigerant
R134a. This refrigerant is free of CFCs
which are harmful to the ozone layer.
Residual heat and ventilation
With the engine switched off, it is possible
to continue to heat or ventilate the interior
for up to 30 minutes. This feature makes
use of the residual he at produced by the
engine. Activating
�Turn the SmartKey in the starter switch
to position
0 or 1 (
�page 39).
or
�Remove the SmartKey from the starter
switch.
�Press button 9 (�page 183).
The indicator lamp on the button
comes on.
Deactivating
�Press button 9 (�page 183) once
more.
The indicator lamp on the button goes
out.!If the air conditioning cannot be turned on
again, this indicates that the air conditioning is
losing refrigerant. The compressor has turned
itself off.
Have the air conditioning checked at the nearest
authorized Mercedes-Benz Light Truck Center.
iHow long the system will provide heating
depends on
�the coolant temperature
�the battery voltage
Regardless of the temperature and air volume
set on the climate control panel, an interior
temperature is aimed at by 72°F (22°C) and the
blower runs on low speed to protect the vehicle
battery.
iThe residual heat is automatically turned off:
�when the ignition is switched on
�after about 30 minutes
�if the coolant temperature is too low
�if the battery voltage drops
W463.boo Seite 190 Montag, 19 . November 2007 8:41 08
Page 204 of 457

203
Controls in detail
Driving systems
Rear Parking Assist system
malfunction
If no distance segments illuminate and no
acoustic warning sounds, there is a mal-
function in the Rear Parking Assist system.
�Have the Rear Parking Assist system
checked at an authorized
Mercedes-Benz Light Truck Center as
soon as possible.
Rear view camera
Warning!G
The rear view camera is only an aid and may
display obstacles from a distorted perspec-
tive or inaccurately, or may not display ob-
stacles at all. The rear view camera does not
relieve you of the responsibility to be cau-
tious, take care and pay careful attention.
The rear view camera may not show objects
which are
�very close to the rear bumper
�under the rear bumper
�under the spare wheel
�nearby behind the spare wheel
You are responsible for safety at all times
and must continue to pay attention to the
immediate surroundings when parking and
maneuvering. This includes the area behind,
in front of and beside the vehicle. Otherwise
you could endanger yourself or others.
Warning!G
Make sure that no persons or animals are in
or near the area in which you are
parking/maneuvering. Otherwise, they
could be injured.
Warning!G
The rear view camera either will not function
or will not function to its full capability if
�the tailgate is open
�it is raining very hard, snowing or foggy
�it is night or you are parking/maneuver-
ing your vehicle in an area where it is
very dark
�the camera is exposed to a very bright
white light
�the immediate surroundings are illumi-
nated with fluorescent light (the display
may flicker)
��
W463.boo Seite 203 Montag, 19 . November 2007 8:41 08
Page 354 of 457
353
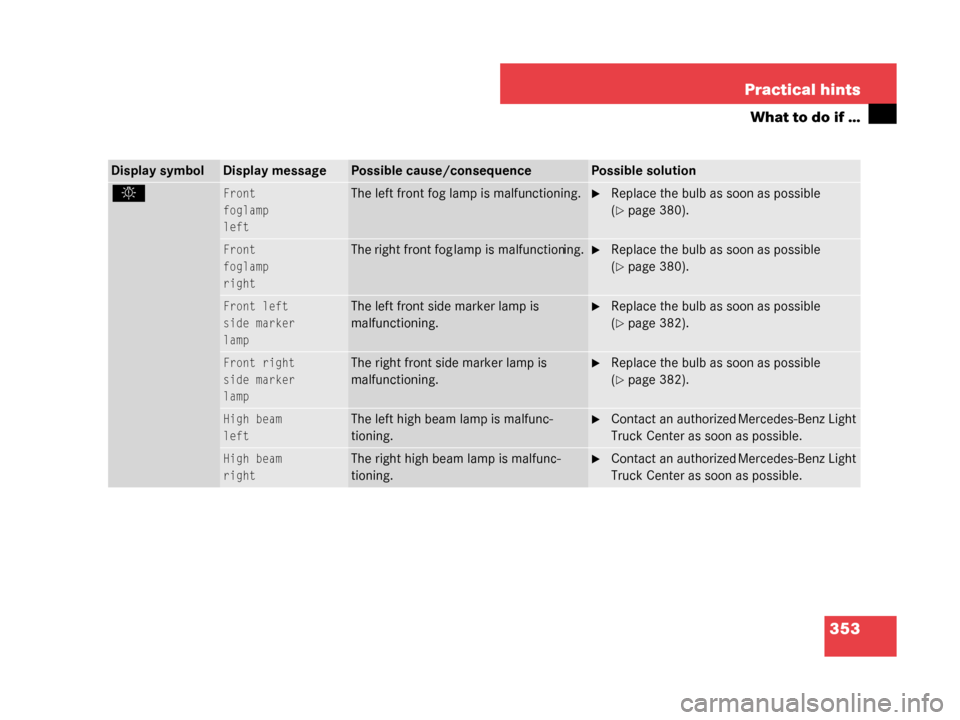
Practical hints
What to do if …
Display symbolDisplay messagePossible cause/consequencePossible solution
.Front
foglamp
leftThe left front fog lamp is malfunctioning.�Replace the bulb as soon as possible
(
�page 380).
Front
foglamp
rightThe right front fog lamp is malfunctioning.�Replace the bulb as soon as possible
(
�page 380).
Front left
side marker
lampThe left front side marker lamp is
malfunctioning.�Replace the bulb as soon as possible
(
�page 382).
Front right
side marker
lampThe right front side marker lamp is
malfunctioning.�Replace the bulb as soon as possible
(
�page 382).
High beam
leftThe left high beam lamp is malfunc-
tioning.�Contact an authorized
Mercedes-Benz Light
Truck Center as soon as possible.
High beam
rightThe right high beam lamp is malfunc-
tioning.�Contact an authorized Mercedes-Benz Light
Truck Center as soon as possible.
W463.boo Seite 353 Montag, 19 . November 2007 8:41 08
Page 356 of 457

355
Practical hints
What to do if …
Display symbolDisplay messagePossible cause/consequencePossible solution
.Rear
fog lampThe rear fog lamp is malfunctioning. �Replace the bulb as soon as possible
(
�page 384).
Rear
fog lamp
Auxiliary bulb
onA lamp is malfunctioning. A substitute
bulb has been brought into use.�Switch off the rear fog lamp (�page 121).
Reverse
lamp
right
The right backup lamp is malfunction-
ing.�Replace the bulb as soon as possible
(
�page 384).
Switch off
lightsYou have removed the SmartKey from
the starter switch, opened the driver’s
door and left the headlamps on.�Switch off the headlamps using the exterior lamp
switch (
�page 117).
Tail lamp
left
Auxiliary bulb
onThe left tail lamp is malfunctioning.
A substitute bulb has been brought into
use.�Replace the bulb as soon as possible
(
�page 383).
Tail lamp
right
Auxiliary bulb
onThe right tail lamp is malfunctioning.
A substitute bulb has been brought into
use.�Replace the bulb as soon as possible
(
�page 383).
W463.boo Seite 355 Montag, 19
. November 2007 8:41 08
Page 376 of 457
375
Practical hints
Replacing bulbs
� Replacing bulbs
Bulbs
Safe vehicle operation depends on proper
exterior lighting and signaling. It is there-
fore essential that all bulbs and lamp
assemblies are in good working order at all
times.
Correct headlamp adju stment is extremely
important. Have headlamps checked and
readjusted at regular intervals and when a
bulb has been replaced. See an authorized
Mercedes-Benz Light Truck Center for
headlamp adjustment.iIf the headlamps or front fog lamps are
fogged up on the inside as a result of high
humidity, driving the vehicle a distance with the
lights on should clear up the fogging.iSubstitute bulbs will be brought into use
when the following lamps malfunction:
�Turn signal lamps
�Tail lamps
�Parking lamps
�Rear fog lamp
Read and observe the messages in the
multifunction display (
�page 352).
W463.boo Seite 375 Montag, 19 . November 2007 8:41 08
Page 377 of 457
376 Practical hints
Replacing bulbs
Front lampsRear lamps
LampType
1Additional turn signal
lampLED
2Locator lighting lampW6W
3Turn signal lamp1156 NA
4Side marker lampT4W
5Bi-Xenon headlamp:
Low and high beam1
1Bi-Xenon headlamp: Low beam and high beam use
the same D1S-35 W lamp. Do not replace the
Bi-Xenon bulbs yourself. Contact an authorized
Mercedes-Benz Light Truck Center.
D1S-35 W
Parking and standing
lampW5W
Blue vision
6Front fog lampH11 (55 W)
LampType
7High mounted brake
lampLED
8Turn signal lampPY 21 W
Brake and tail lampP21/5W
Tail, parking and
standing lampW5W
9Backup lampP21W
aLicense plate lampsC5W
bRear fog lampP21W
cSide marker lampT4W
W463.boo Seite 376 Montag, 19 . November 2007 8:41 08
Page 381 of 457
380 Practical hints
Replacing bulbs
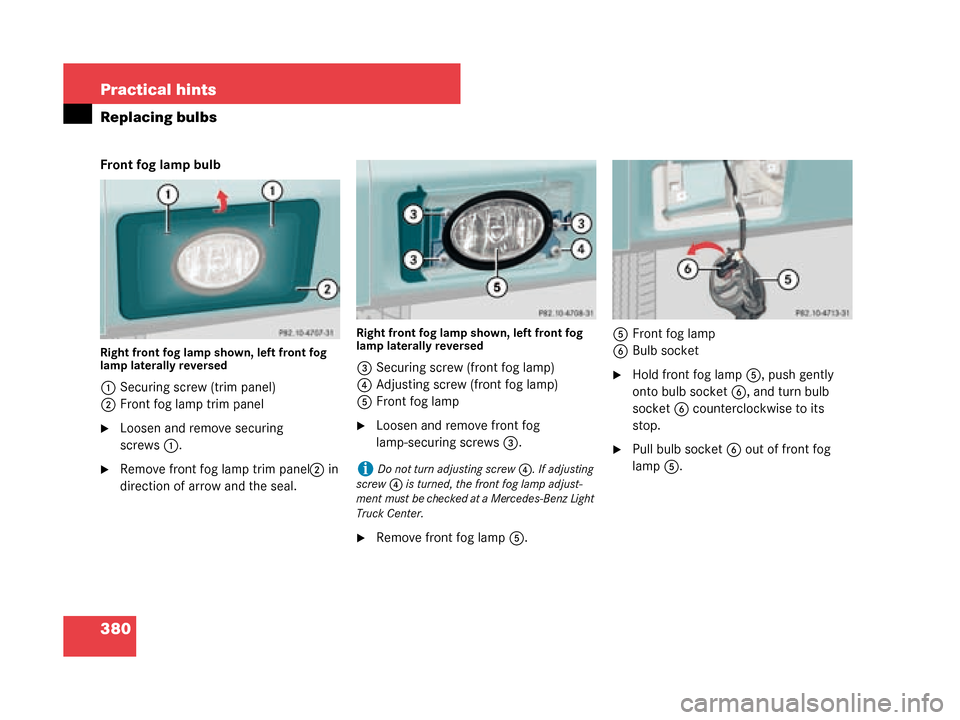
Front fog lamp bulb
Right front fog lamp shown, left front fog
lamp laterally reversed
1Securing screw (trim panel)
2 Front fog lamp trim panel
�Loosen and remove securing
screws 1.
�Remove front fog lamp trim panel 2 in
direction of arrow and the seal.
Right front fog lamp shown, left front fog
lamp laterally reversed
3 Securing screw (front fog lamp)
4 Adjusting screw (front fog lamp)
5 Front fog lamp
�Loosen and remove front fog
lamp-securing screws 3.
�Remove front fog lamp 5. 5
Front fog lamp
6 Bulb socket
�Hold front fog lamp 5, push gently
onto bulb socket 6, and turn bulb
socket 6 counterclockwise to its
stop.
�Pull bulb socket 6 out of front fog
lamp 5.
iDo not turn adjusting screw 4. If adjusting
screw 4 is turned, the front fog lamp adjust-
ment must be checked at a Mercedes-Benz Light
Truck Center.
W463.boo Seite 380 Montag, 19 . November 2007 8:41 08