2008 MERCEDES-BENZ E-CLASS SALOON radio controls
[x] Cancel search: radio controlsPage 70 of 401

Opening and closing
67
X
To change the setting: press thek
and j buttons simultaneously for
approximately six seconds until the battery
check lamp flashes twice.
The key now functions as follows:
X To unlock the driver's door: press the
k button once.
X To unlock centrally: press thekbut-
ton twice.
X To lock centrally: press thejbutton.
Restoring the factory settings X
Press the kandj buttons simulta-
neously for approximately six seconds until
the battery check lamp flashes twice. KEYLESS GO key*
The optional equipment supplied with your
vehicle includes two KEYLESS GO keys. KEY-
LESS GO allows you to lock/unlock and start
the vehicle simply by carrying the KEYLESS
GO key with you. When you touch the surface
of the sensors on the vehicle's door handles,
KEYLESS GO establishes a radio connection
between the vehicle and the key.
When you touch the inner surface of the door
handle or press the button on the tailgate
handle (Estate), your vehicle unlocks cen-
trally if the factory settings have not been
changed:
R the doors
R the boot lid/tailgate
R the fuel filler flap
When starting the engine and whilst driving,
KEYLESS GO also checks whether a valid
KEYLESS GO key is in the vehicle by periodi-
cally establishing radio contact. G
Risk of accident
If children are left unsupervised in the vehi-
cle, they could open a door from the inside,
even if it has been locked. Or they could
start the vehicle if a valid KEYLESS GO key is in the vehicle and they press the KEY-
LESS GO button on the gear selector lever.
They could endanger themselves and oth-
ers. Never leave children unsupervised in
the vehicle. Switch off the engine and take
the KEYLESS GO key with you, even if you
are only leaving the vehicle for a short time. 1
j To lock the vehicle
2 i To unlock the boot lid/tailgate*
3 k To unlock the vehicle
4 Battery check lamp
i You can also use the KEYLESS GO key to
open and close the side windows and the
sliding/tilting sunroof* or the panorama
sliding sunroof *.You can open them using
the summer opening feature Controls
* optional
211_AKB; 2; 5, en-GB
mkalafa,
Version: 2.9.4
2008-02-29T16:57:07+01:00 - Seite 67 ZDateiname: 6515_3416_02_buchblock.pdf; preflight
Page 125 of 401

On-board computer
122 Multi-function steering wheel
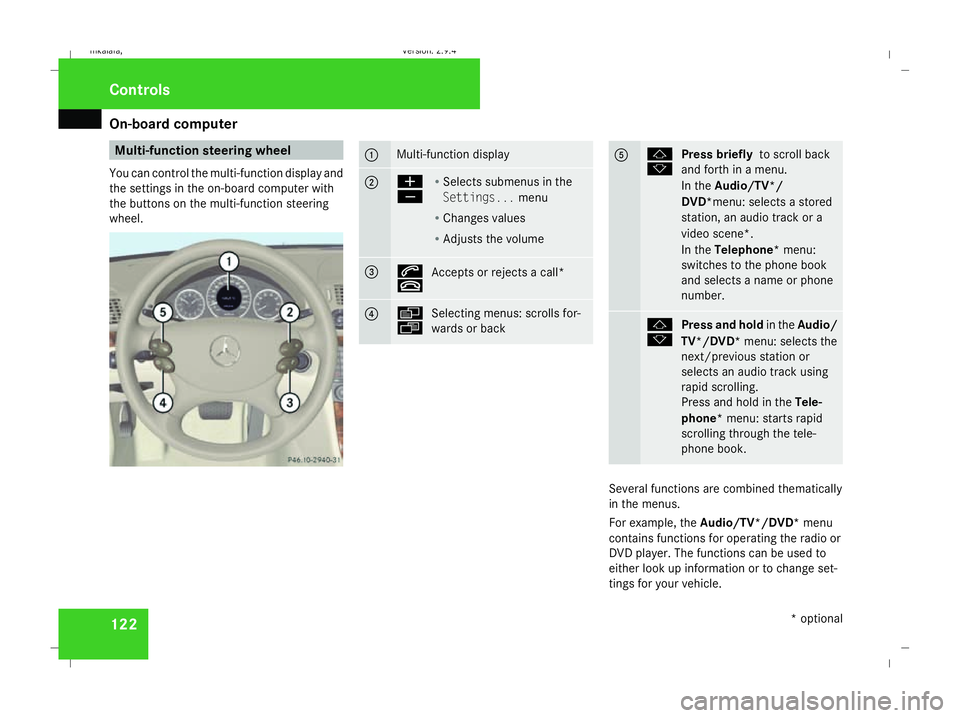
You can control the multi-function display and
the settings in the on-board computer with
the buttons on the multi-function steering
wheel. 1 Multi-function display
2 æ
ç
R
Selects submenus in the
Settings... menu
R Changes values
R Adjusts the volume 3 s
t
Accepts or rejects a call* 4 è
ÿ
Selecting menus: scrolls for-
wards or back 5 j
k
Press briefly
to scroll back
and forth in a menu.
In the Audio/TV*/
DVD*menu: selects a stored
station, an audio track or a
video scene*.
In the Telephone* menu:
switches to the phone book
and selects a name or phone
number. j
k
Press and hold
in theAudio/
TV*/DVD* menu: selects the
next/previous station or
selects an audio track using
rapid scrolling.
Press and hold in the Tele-
phone* menu: starts rapid
scrolling through the tele-
phone book. Several functions are combined thematically
in the menus.
For example, the Audio/TV*/DVD* menu
contains functions for operating the radio or
DVD player. The functions can be used to
either look up information or to change set-
tings for your vehicle. Controls
* optional
211_AKB; 2; 5, en-GB
mkalafa,
Version: 2.9.4 2008-02-29T16:57:07+01:00 - Seite 122Dateiname: 6515_3416_02_buchblock.pdf; preflight
Page 128 of 401

On-board computer
125Function
1 Basic display
menu (Ypage 125)
R Digital speedometer 17
(Y page 126)
R Outside tempera-
ture 17
(Y page 126)
R ASSYST PLUS service display
(Y page 243)
R Engine oil level* (Y page 223)
R Tyre pressure loss warning system
(Y page 230) or tyre pressure mon-
itor* (Y page 232) 2
AMG* menu (Y
page 126) 3
Audio/TV*/DVD*
(Ypage 129)
menu
R Radio station ( Ypage 129)
R Audio drive or media (Y page 129)
R TV* (Y page 130)
R DVD video* (Y page 130) Function
4
Navigation* menu (Y
page 130) 5
Distronic
* menu (distance display)
(Y page 145) 6
Message memory
menu18
(fault and
warning messages) (Y page 131) 7 Settings
menu (Ypage 131)
R Resetting to factory settings
(Y page 132)
R Selecting a submenu (Y page 132) 8 Trip computer
menu
R Consumption statistics
(Y page 140)
R Range (Y page 140) 9
Telephone*
menu (Ypage 141) This is what the displays look like when you
scroll through the menus.
The generic terms in the table overview are
intended to help you navigate through themenus. The terms themselves are not always
displayed in the multi-function display.
The Audio, Navi* and Tel* menus are dis-
played slightly differently in vehicles with
audio equipment and vehicles with COMAND
APS*. The examples given in this Owner's
Manual apply to vehicles equipped with
COMAND APS*. Standard display menu
i Menu overview: (Y page 124).
Use the buttons on the multi-function steer-
ing wheel.
X Press the èor· button to select the
basic display.
17 The sequence of the digital speedometer and the outside temperature display depends on the settings in the "Basic display" submenu.
18 This menu is only visible if there is a display message available. Controls
* optional
211_AKB; 2; 5, en-GB
mkalafa,
Version: 2.9.4
2008-02-29T16:57:07+01:00 - Seite 125 ZDateiname: 6515_3416_02_buchblock.pdf; preflight
Page 132 of 401

On-board computer
129Audio/TV*/DVD* menu
Use the functions in the Audio/TV/DVD
menu to operate the audio equipment or
COMAND APS*. If the audio equipment or
COMAND APS* is switched off, the multi-
function display shows the Audio offmes-
sage.
i Menu overview: see (Y page 124).
Use the buttons on the multi-function steer-
ing wheel.
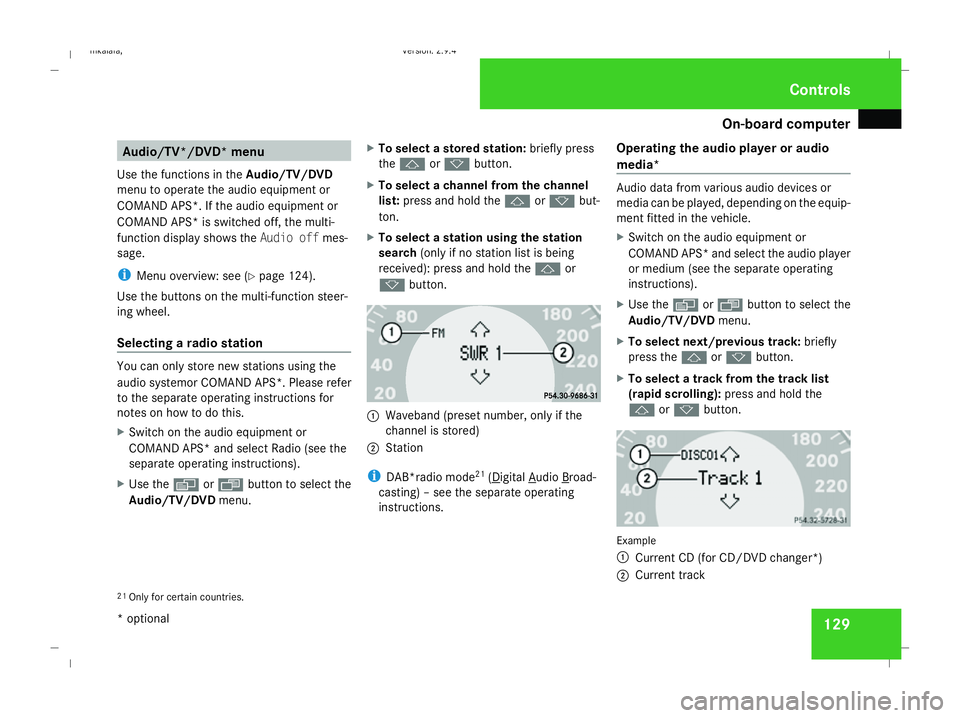
Selecting a radio station You can only store new stations using the
audio systemor COMAND APS *.Please refer
to the separate operating instructions for
notes on how to do this.
X Switch on the audio equipment or
COMAND APS* and select Radio (see the
separate operating instructions).
X Use the èor· button to select the
Audio/TV/DVD menu. X
To select a stored station: briefly press
the j ork button.
X To select a channel from the channel
list: press and hold the jork but-
ton.
X To select a station using the station
search (only if no station list is being
received): press and hold the jor
k button. 1
Waveband (preset number, only if the
channel is stored)
2 Station
i DAB*radio mode 21
( Digital Audio Broad-
casting) – see the separate operating
instructions. Operating the audio player or audio
media* Audio data from various audio devices or
media can be played, depending on the equip-
ment fitted in the vehicle.
X
Switch on the audio equipment or
COMAND APS* and select the audio player
or medium (see the separate operating
instructions).
X Use the èor· button to select the
Audio/TV/DVD menu.
X To select next/previous track: briefly
press the jork button.
X To select a track from the track list
(rapid scrolling): press and hold the
j ork button. Example
1
Current CD (for CD/DVD changer*)
2 Current track
21 Only for certain countries. Controls
* optional
211_AKB; 2; 5, en-GB
mkalafa,
Version: 2.9.4 2008-02-29T16:57:07+01:00 - Seite 129 ZDateiname: 6515_3416_02_buchblock.pdf; preflight
Page 181 of 401

Air conditioning
178
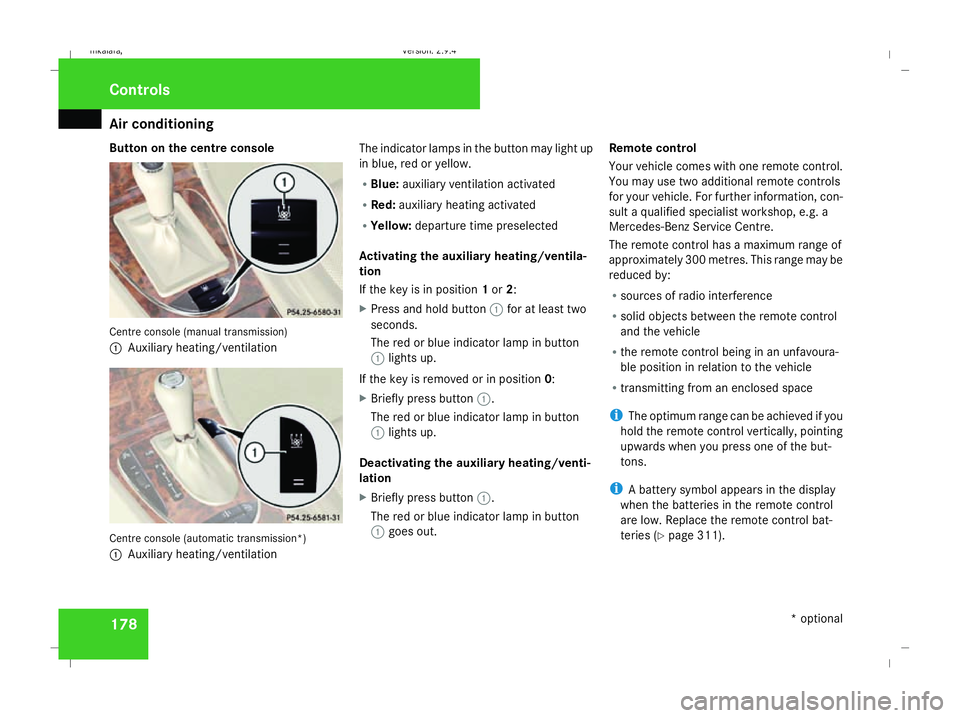
Button on the centre console
Centre console (manual transmission)
1
Auxiliary heating/ventilation Centre console (automatic transmission*)
1 Auxiliary heating/ventilation The indicator lamps in the button may light up
in blue, red or yellow.
R
Blue: auxiliary ventilation activated
R Red: auxiliary heating activated
R Yellow: departure time preselected
Activating the auxiliary heating/ventila-
tion
If the key is in position 1or 2:
X Press and hold button 1for at least two
seconds.
The red or blue indicator lamp in button
1 lights up.
If the key is removed or in position 0:
X Briefly press button 1.
The red or blue indicator lamp in button
1 lights up.
Deactivating the auxiliary heating/venti-
lation
X Briefly press button 1.
The red or blue indicator lamp in button
1 goes out. Remote control
Your vehicle comes with one remote control.
You may use two additional remote controls
for your vehicle. For further information, con-
sult a qualified specialist workshop, e.g. a
Mercedes-Benz Service Centre.
The remote control has a maximum range of
approximately 300 metres. This range may be
reduced by:
R sources of radio interference
R solid objects between the remote control
and the vehicle
R the remote control being in an unfavoura-
ble position in relation to the vehicle
R transmitting from an enclosed space
i The optimum range can be achieved if you
hold the remote control vertically, pointing
upwards when you press one of the but-
tons.
i A battery symbol appears in the display
when the batteries in the remote control
are low. Replace the remote control bat-
teries (Y page 311). Controls
* optional
211_AKB; 2; 5, en-GB
mkalafa
, Version: 2.9.4 2008-02-29T16:57:07+01:00 - Seite 178Dateiname: 6515_3416_02_buchblock.pdf; preflight
Page 217 of 401

Features
214 Infrared reflecting windscreen*
The infrared reflecting glass prevents the
vehicle interior from becoming too hot. It also
blocks radio waves up into the gigahertz
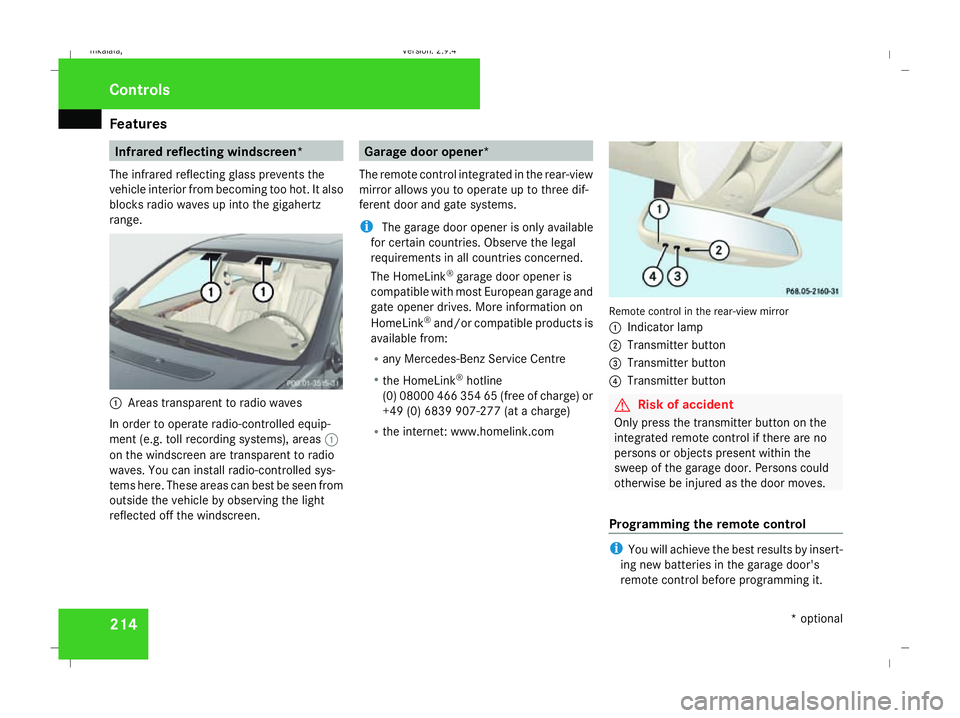
range. 1
Areas transparent to radio waves
In order to operate radio-controlled equip-
ment (e.g. toll recording systems), areas 1
on the windscreen are transparent to radio
waves. You can install radio-controlled sys-
tems here. These areas can best be seen from
outside the vehicle by observing the light
reflected off the windscreen. Garage door opener*
The remote control integrated in the rear-view
mirror allows you to operate up to three dif-
ferent door and gate systems.
i The garage door opener is only available
for certain countries. Observe the legal
requirements in all countries concerned.
The HomeLink ®
garage door opener is
compatible with most European garage and
gate opener drives. More information on
HomeLink ®
and/or compatible products is
available from:
R any Mercedes-Benz Service Centre
R the HomeLink ®
hotline
(0) 08000 466 354 65 (free of charge) or
+49 (0) 6839 907-27 7(at a charge)
R the internet: www.homelink.com Remote control in the rear-view mirror
1
Indicator lamp
2 Transmitter button
3 Transmitter button
4 Transmitter button G
Risk of accident
Only press the transmitter button on the
integrated remote control if there are no
persons or objects present within the
sweep of the garage door. Persons could
otherwise be injured as the door moves.
Programming the remote control i
You will achieve the best results by insert-
ing new batteries in the garage door's
remote control before programming it. Controls
* optional
211_AKB; 2; 5, en-GB
mkalafa,
Version: 2.9.4 2008-02-29T16:57:07+01:00 - Seite 214Dateiname: 6515_3416_02_buchblock.pdf; preflight