2008 MERCEDES-BENZ E-CLASS SALOON manual transmission
[x] Cancel search: manual transmissionPage 221 of 401
Refuelling
218 Running-in notes
The first 1,500 km
If you treat the engine with sufficient care
from the very start, it will reward you with
excellent performance for a very long period
afterwards.
R You should therefore drive at varying road
and engine speeds for the first 1,500 km.
R Avoid heavy loads, e.g. driving at full throt-
tle, during this time. Do not exceed 2
/ 3 of
the maximum permissible engine speed for
each gear.
R Change gear in good time.
R Do not shift down a gear manually in order
to brake.
Vehicles with automatic transmission*:
R Try to avoid depressing the accelerator
pedal beyond the pressure point (kick-
down).
R Only use ranges 3,2or 1for slow driving,
e.g. in mountainous terrain.
After 1,500 km you may gradually bring the
vehicle up to full road and engine speeds.
Additional driving tips for AMG vehicles: R
Do not drive faster than 140 km/h for the
first 1,500 km.
R Only bring the engine up to a maximum
speed of 4,500 rpm for a brief period.
i You should also observe these notes if the
engine or rear axle transmission on your
vehicle has been replaced. AMG vehicles with a rear axle differ-
ential lock*
Your vehicle is equipped with a self-locking
differential on the rear axle. To better protect
the differential gear on the rear axle, you
should perform an oil change after a running-
in phase of 3,000 km. This oil change will
increase the service life of your differential.
Have the oil change performed at a qualified
specialist workshop. Mercedes-Benz recom-
mends that you use a Mercedes-Benz Service
Centre for this purpose. Refuelling
Refuelling
G
Risk of explosion
Fuel is highly flammable. Fire, naked flames
and smoking are therefore prohibited when
handling fuels.
Switch off the engine and the auxiliary heat-
ing* before refuelling. G
Risk of injury
Do not come into direct contact with fuel.
Direct skin contact with fuels or the inha-
lation of fuel vapours is a health hazard. G
Risk of fire
Do not use petrol to refuel vehicles with a
diesel engine. Never mix diesel with petrol.
This causes damage to the fuel system and
engine and could result in the vehicle catch-
ing fire.
! Do not use petrol to refuel vehicles with a
diesel engine. Do not use diesel to refuel
vehicles with a petrol engine. Even small
amounts of the wrong fuel will cause dam-
age to the injection system. Damage result-
ing from adding the wrong fuel is not
covered by the warranty. Operation
* optional
211_AKB; 2; 5, en-GB
mkalafa
,V ersion: 2.9.4
2008-02-29T16:57:07+01:00 - Seite 218 Dateiname: 6515_3416_02_buchblock.pdf; preflight
Page 238 of 401
Winter driving
235that you use a Mercedes-Benz Service
Centre for this purpose. In particular, work
relevant to safety or on safety-related sys-
tems must be carried out at a qualified
specialist workshop.
Snow chains
For safety reasons, Mercedes-Benz recom-
mends that you only use snow chains which
have been specially approved for your vehicle
by Mercedes-Benz or are of a corresponding
standard of quality.
! Information about the use of snow chain-
compatible AMG winter tyres is applicable
for AMG tyres. Use of snow chains is only
permissible with these tyres.
If you intend to fit snow chains, please bear
the following points in mind:
R Snow chains cannot be fitted to all wheel/
tyre combinations.
R Snow chains must not be fitted to emer-
gency spare wheels, e.g. the "Minispare" or
collapsible emergency spare wheel.
R Always fit snow chains to both rear wheels,
even on vehicles with 4MATIC*. Comply with the manufacturer's installation
instructions.
! If snow chains are fitted to the front
wheels, they may come into contact with
the bodywork and axle components when
the vehicle is in motion and damage the
tyre or the vehicle.
On vehicles with AIRMATIC DC*, you must
only drive at raised vehicle level if snow
chains have been fitted (Y page 156).
Do not exceed the maximum permissible
speed of 50 km/h.
i You may wish to deactivate ESP ®
when
pulling away with snow chains fitted
(Y page 60). This way you can allow the
wheels to spin in a controlled manner, ach-
ieving an increased driving force (cutting
action). Winter driving
G
Risk of accident
Do not shift down for additional engine
braking on a slippery road surface. This
could cause the drive wheels to lose their
grip and the vehicle could skid.
You should drive particularly carefully on slip-
pery road surfaces. Avoid sudden accelera-
tion, steering and braking manoeuvres.
If the vehicle threatens to skid or cannot be
stopped when moving at low speed:
X Vehicles with manual transmission: engage
neutral.
X Vehicles with automatic transmission*:
shift the selector lever to N.
X Try to bring the vehicle under control using
corrective steering. Operation
* optional
211_AKB; 2; 5, en-GB
mkalafa,
Version: 2.9.4
2008-02-29T16:57:07+01:00 - Seite 235 ZDateiname: 6515_3416_02_buchblock.pdf; preflight
Page 272 of 401
Display
messages 269Display messages Possible cause/consequence Possible solution
3 Brake immediately A malfunction occurred with HOLD acti-
vated.
or
Vehicles with manual transmission: with
HOLD activated, you have either:
R
opened the driver’s door and released
the seat belt or
R switched off the engine or
R opened the bonnet
The horn may also sound at regular inter-
vals. The horn becomes louder if you
attempt to lock the vehicle.
The engine cannot be started. X
Immediately depress the brake pedal firmly
until the warning message in the multi-function
display disappears.
X Prevent the vehicle from rolling away before
you leave it (Y page 113).
The engine can be started again. 3 EBV, ABS, ESP inop-
erative See Own-
er's Manual G
Risk of accident
EBV, ABS and ESP ®
are unavailable due to
a malfunction. BAS has also been deacti-
vated. PRE-SAFE ®
is therefore also not
operational.
The brake system is still available with
complete brake boosting effect. X
Drive on carefully.
X Visit a qualified specialist workshop immedi-
ately. Practical advi
ce
211_AKB; 2; 5, en-GB
mkalafa,
Version: 2.9.4 2008-02-29T16:57:07+01:00 - Seite 269 ZDateiname: 6515_3416_02_buchblock.pdf; preflight
Page 320 of 401
Flat tyre
317
X
Remove the key from the ignition lock.
X Fold the wiper arm away from the rear win-
dow until it engages.
X Turn wiper blade 1at a right angle to wiper
arm.
X Press tab 2and push wiper blade 1off
the retainer in the direction of arrow 4.
X Remove wiper blade 1.
Fitting X
Insert the new wiper blade into retainer
3 in the opposite direction to arrow 4
until tab 2engages.
X Make sure that wiper blade 1is seated
correctly.
X Turn wiper blade 1parallel to the wiper
arm.
X Fold the wiper arm back onto the rear win-
dow. Flat tyre
Your vehicle may be equipped with:
R a TIREFIT kit (Y page 255)
R a "Minispare" emergency spare
wheel* (Y page 255)
R a collapsible emergency spare
wheel* (Y page 255)
R a spare wheel* (Y page 255)
R the MOExtended run-flat sys-
tem* (Y page 328) Preparing the vehicle
i Vehicle preparation is not necessary on
vehicles with MOE tyres*.
X Stop your vehicle as far away from traffic
as possible on solid, non-slippery, level
ground.
X Switch on the hazard warning lamps.
X Firmly depress the parking brake.
Vehicles with manual transmission X
Shift to either first or reverse gear. Vehicles with automatic transmission* X
Move the selector lever to P.
For all vehicles X
All occupants must get out of the vehicle.
Make sure that they are not endangered as
they do so.
X Make sure that no one is near the danger
area whilst a wheel is being changed. Any-
one who is not directly assisting in the
wheel change should, for example, stand
behind the barrier.
X Switch off the engine.
X Remove the key from the ignition lock.
X Place the warning triangle ( Ypage 252) or
warning lamps at a suitable distance.
Observe legal requirements. G
Risk of injury
The jack is designed only to raise the vehi-
cle for a short time while a wheel is being
changed.
If you intend to work under the vehicle, it
must be placed on stands. Practical advice
* optional
211_AKB; 2; 5, en-GB
mkalafa,
Version: 2.9.4
2008-02-29T16:57:07+01:00 - Seite 317 ZDateiname: 6515_3416_02_buchblock.pdf; preflight
Page 337 of 401

Jump-starting
334 G
Risk of injury
There is a risk of acid burns when jump-
starting a vehicle due to the gases which
escape from the battery. Do not lean over
the battery while the engine is being jump-
started. G
Risk of explosion
Gases escaping from the battery during
jump-starting may cause minor explosions.
Avoid creating sparks. Keep naked flames
away from the battery, and do not smoke.
Comply with safety precautions and take
protective measures when handling batter-
ies. You will find these under “Battery” in
the index.
X Make sure that the two vehicles do not
touch.
X Depress the parking brake.
X Manual transmission: engage neutral.
X Automatic transmission*: move the
selector lever to P.
X All vehicles: switch off all electrical con-
sumers. Saloon
1
Negative terminal on your vehicle
2 Positive terminal on your vehicle
3 Positive terminal of donor battery
4 Negative terminal of donor battery
X If your vehicle is being jump-started by
another vehicle, allow the other vehicle's
engine to idle.
X Connect positive terminal 2on your vehi-
cle to positive terminal 3of the donor
battery using the jump lead, beginning with
your own battery.
X Connect negative terminal 4of the donor
battery to negative terminal 1of your
vehicle's battery using the jump lead, con- necting the jump lead to the donor battery
first.
X Start the engine.
X When the engine is running, switch on a few
electrical consumers, e.g. the blower. Do
not switch on the lights.
X First disconnect the jump lead from nega-
tive terminals 1and 4, then from positive
terminals 2and 3each time beginning
with your vehicle's battery.
X Have the battery checked at a qualified
specialist workshop, e.g. a Mercedes-Benz
Service Centre. Practical advice
* optional
211_AKB; 2; 5, en-GB
mkalafa,
Version: 2.9.4
2008-02-29T16:57:07+01:00 - Seite 334 Dateiname: 6515_3416_02_buchblock.pdf; preflight
Page 339 of 401
Jump-starting
336 the battery while the engine is being jump-
started. G
Risk of explosion
Gases escaping from the battery during
jump-starting may cause minor explosions.
Avoid creating sparks. Keep naked flames
away from the battery, and do not smoke.
Comply with safety precautions and take
protective measures when handling batter-
ies. You will find these under “Battery” in
the index.
! You must not use the jump-start connec-
tors in the engine compartment to jump-
start another vehicle. The jump-start con-
nectors are not suitable for jump-starting
another vehicle. The vehicle could be dam-
aged by this.
X Make sure that the two vehicles do not
touch.
X Depress the parking brake.
X Vehicles with manual transmission: engage
neutral.
X Vehicles with automatic transmission*:
move the selector lever to P.X
Switch off all electrical consumers.
X Start the engine and allow it to idle. Saloon
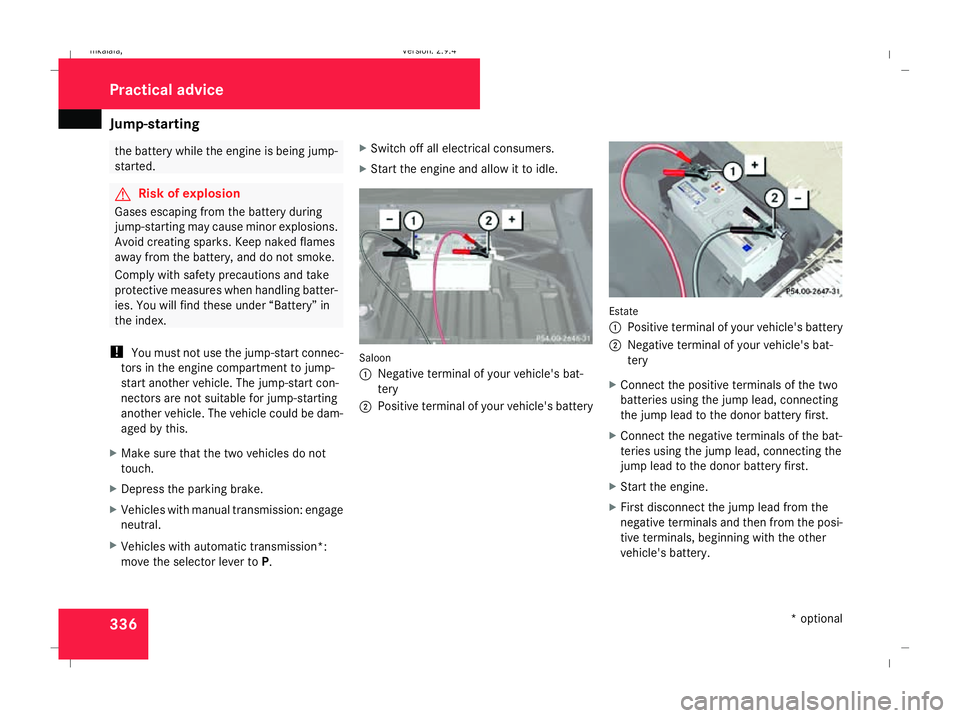
1
Negative terminal of your vehicle's bat-
tery
2 Positive terminal of your vehicle's battery Estate
1
Positive terminal of your vehicle's battery
2 Negative terminal of your vehicle's bat-
tery
X Connect the positive terminals of the two
batteries using the jump lead, connecting
the jump lead to the donor battery first.
X Connect the negative terminals of the bat-
teries using the jump lead, connecting the
jump lead to the donor battery first.
X Start the engine.
X First disconnect the jump lead from the
negative terminals and then from the posi-
tive terminals, beginning with the other
vehicle's battery. Practical advice
* optional
211_AKB; 2; 5, en-GB
mkalafa,
Version: 2.9.4 2008-02-29T16:57:07+01:00 - Seite 336Dateiname: 6515_3416_02_buchblock.pdf; preflight
Page 342 of 401
Towing and tow-starting
339Towing the vehicle
! You may tow the vehicle for a maximum
of 50 km. A towing speed of 50 km/h must
not be exceeded.
With towing distances over 50 km, the
entire vehicle needs to be lifted up and
transported.
! Vehicles with 4MATIC* may not be towed
with the front or rear axle raised.
! The engine must be switched off (key in
ignition lock in position 0or position 1) if
the vehicle is being towed with the rear axle
raised or if the parking brake is being tested
on a dynamometer. Intervention by ESP ®
could otherwise damage the brake system.
Vehicles with manual transmission X
Turn the key to position 2in the ignition
lock.
X Shift to neutral. Vehicles with automatic transmission* X
Turn the key to position 2in the ignition
lock.
X Move the selector lever to N. Tow-starting (emergency engine
starting)
Please note:
R Vehicles with an automatic transmission*
must not be tow-started.
R The battery must be connected.
R The engine and catalytic converter must be
cold.
R Avoid repeated and lengthy starting
attempts.
Vehicles with manual transmission X
Turn the key to position 2in the ignition
lock.
X Fully depress the clutch pedal.
X Shift to neutral. X
Tow the vehicle or let it roll.
X Shift to a suitable gear and bring the clutch
pedal up slowly. Do not depress the accel-
erator pedal.
The engine is started. Removing the towing eye
X Take the wheel wrench from the vehicle
tool kit ( Ypage 254).
X Insert the wheel wrench handle into the
towing eye and turn it anti-clockwise.
X Unscrew the towing eye.
X Replace the cover and press it until it
engages.
X Return the towing eye and the wheel
wrench to the vehicle tool kit. Practical advice
* optional
211_AKB; 2; 5, en-GB
mkalafa
,V ersion: 2.9.4
2008-02-29T16:57:07+01:00 - Seite 339 ZDateiname: 6515_3416_02_buchblock.pdf; preflight
Page 343 of 401

Fuses
340 Transporting the vehicle
The towing eyes can be used to pull the vehi-
cle onto a trailer or transporter for transport-
ing purposes.
! Only lash the vehicle down by the wheels
or wheel rims, not by parts of the vehicle
such as axle or steering components. The
vehicle could otherwise be damaged.
Vehicles with manual transmission X
Shift to neutral.
Vehicles with automatic transmission* X
Turn the key to position 2in the ignition
lock.
X Move the selector lever to N. Fuses
Notes on changing fuses
The fuses in your vehicle serve to close down
faulty circuits. If a fuse blows, all the compo-
nents on the circuit and their functions will
fail.
Blown fuses must be replaced with fuses of
the same rating, which you can recognise by
the colour and value. The fuse ratings are lis-
ted in the fuse allocation chart. A Mercedes-
Benz Service Centre will be happy to advise
you. G
Risk of fire
Only use fuses that have been approved for
Mercedes-Benz vehicles and which have
the correct fuse rating for the systems con-
cerned. Do not attempt to repair or bridge
faulty fuses. Otherwise, a circuit overload
could cause a fire. Have the cause traced
and rectified at a qualified specialist work-
shop, e.g. a Mercedes-Benz Service Centre.
If the newly inserted fuse also blows, have the
cause traced and rectified at a qualified spe-
cialist workshop, e.g. a Mercedes-Benz
Service Centre. !
Only use fuses that have been approved
for Mercedes-Benz vehicles and which
have the correct fuse rating for the system
concerned. Otherwise, components or sys-
tems could be damaged.
The fuses are located in various fuse boxes:
R Main fuse box on the driver's side of the
dashboard
R Fuse box in the boot/luggage compart-
ment on the left-hand side of the vehicle
Fuse allocation chart The fuse allocation chart is in the main fuse
box in the dashboard.
Before changing a fuse
X Park the vehicle.
X Switch off all electrical consumers.
X Remove the key from the ignition lock. Practical advice
* optional
211_AKB; 2; 5, en-GB
mkalafa,
Version: 2.9.4 2008-02-29T16:57:07+01:00 - Seite 340Dateiname: 6515_3416_02_buchblock.pdf; preflight