2008 MERCEDES-BENZ E-CLASS SALOON child lock
[x] Cancel search: child lockPage 58 of 401
Occupant safety
55dent. This can result in serious or even fatal
injury to the secured child in the event of
an accident, heavy braking or a sudden
change in direction.
For this reason, have child restraint sys-
tems and their anchorages which are dam-
aged or which have been subjected to a
load in an accident checked immediately at
a qualified specialist workshop.
! When fitting the child restraint system,
make sure that the seat belt for the middle
seat does not become trapped. It could
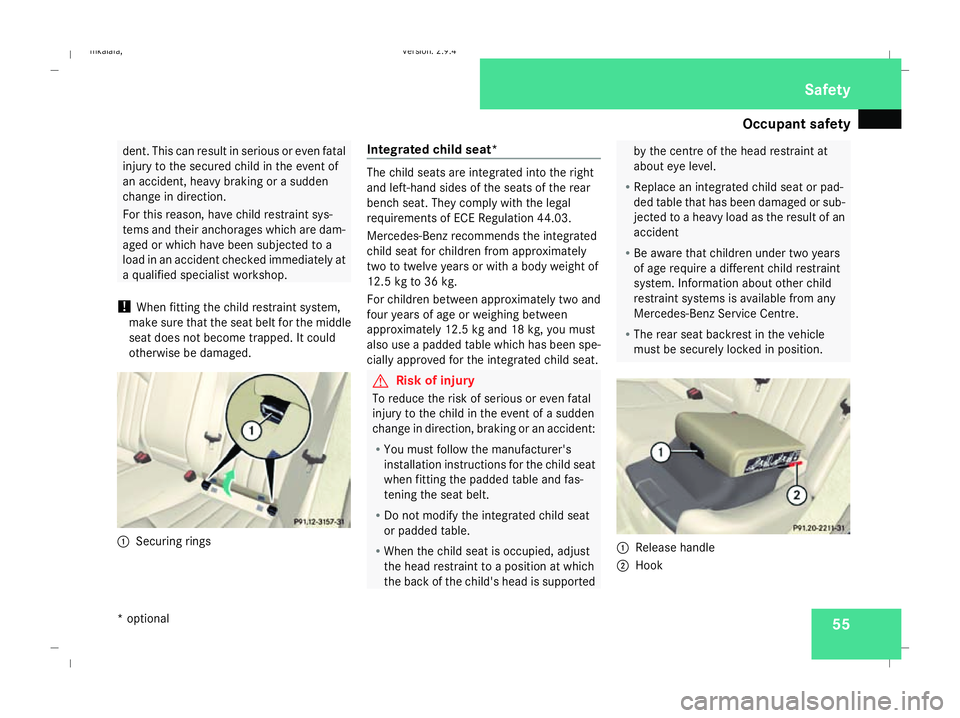
otherwise be damaged. 1
Securing rings Integrated child seat* The child seats are integrated into the right
and left-hand sides of the seats of the rear
bench seat. They comply with the legal
requirements of ECE Regulation 44.03.
Mercedes-Benz recommends the integrated
child seat for children from approximately
two to twelve years or with a body weight of
12.5 kg to 36 kg.
For children between approximately two and
four years of age or weighing between
approximately 12.5 kg and 18 kg, you must
also use a padded table which has been spe-
cially approved for the integrated child seat.
G
Risk of injury
To reduce the risk of serious or even fatal
injury to the child in the event of a sudden
change in direction, braking or an accident:
R You must follow the manufacturer's
installation instructions for the child seat
when fitting the padded table and fas-
tening the seat belt.
R Do not modify the integrated child seat
or padded table.
R When the child seat is occupied, adjust
the head restraint to a position at which
the back of the child's head is supported by the centre of the head restraint at
about eye level.
R Replace an integrated child seat or pad-
ded table that has been damaged or sub-
jected to a heavy load as the result of an
accident
R Be aware that children under two years
of age require a different child restraint
system. Information about other child
restraint systems is available from any
Mercedes-Benz Service Centre.
R The rear seat backrest in the vehicle
must be securely locked in position. 1
Release handle
2 Hook Safety
* optional
211_AKB; 2; 5, en-GB
mkalafa,
Version: 2.9.4 2008-02-29T16:57:07+01:00 - Seite 55 ZDateiname: 6515_3416_02_buchblock.pdf; preflight
Page 59 of 401
Occupant safety
56
Folding out the child seat
X
Pull release handle 1forwards.
X Push the child seat upwards and back until
it engages.
Fastening a child's seat belt G
Risk of injury
To reduce the risk of serious or even fatal
injury to the child in the event of a sudden
change in direction, braking or an accident:
R The shoulder belt section of the seat belt
must be routed across the middle of the
child's shoulder – never across the
child's neck – and be pulled tight against
the child's chest. The lap section of the
seat belt must be routed across the
child's pelvis – not across the abdomen
– and be pulled tight against the child's
body; retighten the belt strap if neces-
sary.
R Never secure more than one child at a
time in the child restraint system.
R The belt must be routed through the
hook.
R The belt strap must not be trapped or
twisted, nor rub against any sharp edges. Also observe the assembly instructions for
the padded table and the additional warn-
ings and information about risk of injury.
X Pull the belt smoothly from the belt reel.
X Guide the lower lap section of the belt
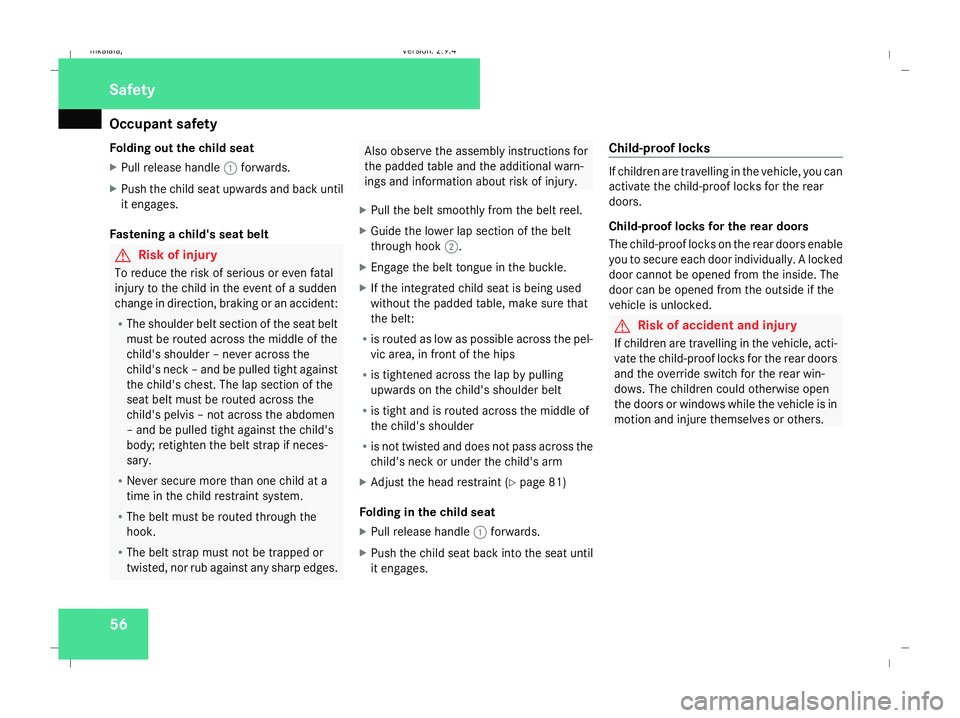
through hook 2.
X Engage the belt tongue in the buckle.
X If the integrated child seat is being used
without the padded table, make sure that
the belt:
R is routed as low as possible across the pel-
vic area, in front of the hips
R is tightened across the lap by pulling
upwards on the child's shoulder belt
R is tight and is routed across the middle of
the child's shoulder
R is not twisted and does not pass across the
child's neck or under the child's arm
X Adjust the head restraint (Y page 81)
Folding in the child seat
X Pull release handle 1forwards.
X Push the child seat back into the seat until
it engages. Child-proof locks If children are travelling in the vehicle, you can
activate the child-proof locks for the rear
doors.
Child-proof locks for the rear doors
The child-proof locks on the rear doors enable
you to secure each door individually. A locked
door cannot be opened from the inside. The
door can be opened from the outside if the
vehicle is unlocked.
G
Risk of accident and injury
If children are travelling in the vehicle, acti-
vate the child-proof locks for the rear doors
and the override switch for the rear win-
dows. The children could otherwise open
the doors or windows while the vehicle is in
motion and injure themselves or others. Safety
211_AKB; 2; 5, en-GB
mkalafa,
Version: 2.9.4 2008-02-29T16:57:07+01:00 - Seite 56Dateiname: 6515_3416_02_buchblock.pdf; preflight
Page 60 of 401
Occupant safety
57Saloon shown as an example
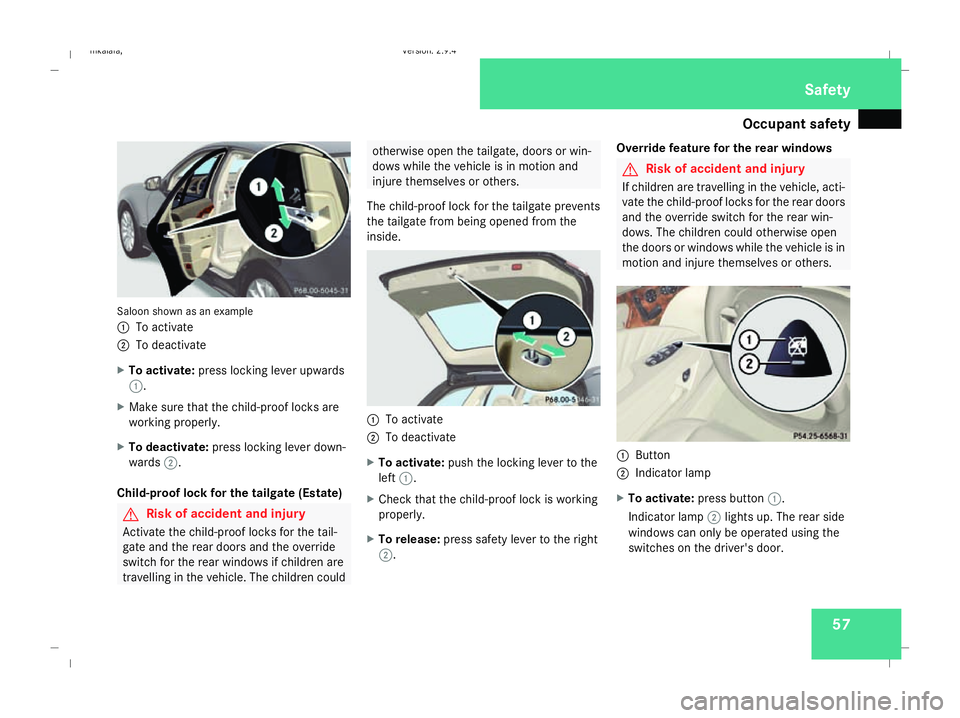
1
To activate
2 To deactivate
X To activate: press locking lever upwards
1.
X Make sure that the child-proof locks are
working properly.
X To deactivate: press locking lever down-
wards 2.
Child-proof lock for the tailgate (Estate) G
Risk of accident and injury
Activate the child-proof locks for the tail-
gate and the rear doors and the override
switch for the rear windows if children are
travelling in the vehicle. The children could otherwise open the tailgate, doors or win-
dows while the vehicle is in motion and
injure themselves or others.
The child-proof lock for the tailgate prevents
the tailgate from being opened from the
inside. 1
To activate
2 To deactivate
X To activate: push the locking lever to the
left 1.
X Check that the child-proof lock is working
properly.
X To release: press safety lever to the right
2. Override feature for the rear windows G
Risk of accident and injury
If children are travelling in the vehicle, acti-
vate the child-proof locks for the rear doors
and the override switch for the rear win-
dows. The children could otherwise open
the doors or windows while the vehicle is in
motion and injure themselves or others. 1
Button
2 Indicator lamp
X To activate: press button 1.
Indicator lamp 2lights up. The rear side
windows can only be operated using the
switches on the driver's door. Safety
211_AKB; 2; 5, en-GB
mkalafa,
Version: 2.9.4 2008-02-29T16:57:07+01:00 - Seite 57 ZDateiname: 6515_3416_02_buchblock.pdf; preflight
Page 69 of 401

Opening and closing
66 Opening and closing
Key
The vehicle's equipment includes two keys
with remote control. Each key contains an
emergency key element.
The key is configured at the factory to cen-
trally lock and unlock the following:
R the doors
R the boot lid/tailgate
R the fuel filler flap G
Risk of accident
If children are left unsupervised in the vehi-
cle, they could:
R open a door from the inside at any time,
even if it has been locked
R start the vehicle using a key which has
been left in the vehicle
R release the parking brake
They could endanger themselves and oth-
ers. Never leave children unsupervised in
the vehicle. Always take the key with you
when leaving the vehicle, even if you are
only leaving it for a short time. 1
j To lock the vehicle
2 i To unlock the boot lid/tailgate*
3 k To unlock the vehicle
4 Battery check lamp
i You can also open and close the side win-
dows and the sliding/tilting sunroof* or the
panorama sliding sunroof *with the key.
You can open them using the summer
opening feature (Y page 109). You can
close them using the convenience closing
feature (Y page 109). Factory settings X
To unlock centrally: press thekbut-
ton.
The turn signals flash once. The locking
knobs in the doors pop up. The anti-theft
alarm system* is deactivated.
When it is dark, the surround lighting also
comes on if it is activated in the on-board
computer.
i If you do not open either a door or the
boot lid/tailgate after you have unlocked
the vehicle, it will automatically relock after
approximately 40 seconds.
X To lock centrally: press thejbutton.
The turn signals flash three times if the
doors and boot lid/tailgate are closed. The
locking knobs in the doors drop down. The
anti-theft alarm system* and the immobil-
iser are primed.
Individual settings You can change the setting of the locking
system in such a way that pressing the
k
button only unlocks the driver's door
and the fuel filler flap. This could be useful if
you frequently travel on your own. Controls
* optional
211_AKB; 2; 5, en-GB
mkalafa, Version: 2.9.4 2008-02-29T16:57:07+01:00 - Seite 66Dateiname: 6515_3416_02_buchblock.pdf; preflight
Page 70 of 401

Opening and closing
67
X
To change the setting: press thek
and j buttons simultaneously for
approximately six seconds until the battery
check lamp flashes twice.
The key now functions as follows:
X To unlock the driver's door: press the
k button once.
X To unlock centrally: press thekbut-
ton twice.
X To lock centrally: press thejbutton.
Restoring the factory settings X
Press the kandj buttons simulta-
neously for approximately six seconds until
the battery check lamp flashes twice. KEYLESS GO key*
The optional equipment supplied with your
vehicle includes two KEYLESS GO keys. KEY-
LESS GO allows you to lock/unlock and start
the vehicle simply by carrying the KEYLESS
GO key with you. When you touch the surface
of the sensors on the vehicle's door handles,
KEYLESS GO establishes a radio connection
between the vehicle and the key.
When you touch the inner surface of the door
handle or press the button on the tailgate
handle (Estate), your vehicle unlocks cen-
trally if the factory settings have not been
changed:
R the doors
R the boot lid/tailgate
R the fuel filler flap
When starting the engine and whilst driving,
KEYLESS GO also checks whether a valid
KEYLESS GO key is in the vehicle by periodi-
cally establishing radio contact. G
Risk of accident
If children are left unsupervised in the vehi-
cle, they could open a door from the inside,
even if it has been locked. Or they could
start the vehicle if a valid KEYLESS GO key is in the vehicle and they press the KEY-
LESS GO button on the gear selector lever.
They could endanger themselves and oth-
ers. Never leave children unsupervised in
the vehicle. Switch off the engine and take
the KEYLESS GO key with you, even if you
are only leaving the vehicle for a short time. 1
j To lock the vehicle
2 i To unlock the boot lid/tailgate*
3 k To unlock the vehicle
4 Battery check lamp
i You can also use the KEYLESS GO key to
open and close the side windows and the
sliding/tilting sunroof* or the panorama
sliding sunroof *.You can open them using
the summer opening feature Controls
* optional
211_AKB; 2; 5, en-GB
mkalafa,
Version: 2.9.4
2008-02-29T16:57:07+01:00 - Seite 67 ZDateiname: 6515_3416_02_buchblock.pdf; preflight
Page 73 of 401

Opening and closing
70
X
Pull door handle 2.
If the door is locked, locking knob 1pops
up. The door is unlocked and can be
opened. Automatic locking feature
The vehicle will lock automatically once you
have pulled away.
You can switch off the automatic locking
function via the on-board computer
(Y page 137).
i The vehicle is locked automatically when
the ignition is switched on and the wheels
begin to turn. There is therefore a risk of
being locked out when the vehicle is being
pushed or tested on a dynamometer. Locking/unlocking the vehicle from
the inside
You can centrally lock or unlock the vehicle
from the inside. This feature may be useful if,
for example, you wish to unlock the
passenger door from the inside or lock the
vehicle before you pull away. G
Risk of accident
Do not leave children unsupervised in the
vehicle. They could open a door from the
inside – even if it is locked – and thereby
endanger themselves and others. 1
Unlocking button
2 Locking button
X To unlock: press button 1.
X To lock: press button 2. Boot/luggage compartment (vehicles
without remote boot lid closing fea-
ture*)
G
Risk of poisoning
Exhaust fumes could enter the vehicle inte-
rior if the engine is running and the boot lid
is open. This could poison you. Therefore,
you should make sure that the boot lid/
tailgate is always closed when the engine
is running. G
Risk of accident
Estate
Do not leave children unsupervised in the
vehicle. They could open the tailgate from
the inside and thereby endanger them-
selves and others.
! The boot lid/tailgate swings upwards and
to the rear when opened. Therefore, make
sure that there is sufficient clearance
above and behind the boot lid/tailgate.
Opening from the outside You can only open the boot lid/tailgate after
unlocking it first.Controls
* optional
211_AKB; 2; 5, en-GB
mkalafa,
Version: 2.9.4 2008-02-29T16:57:07+01:00 - Seite 70Dateiname: 6515_3416_02_buchblock.pdf; preflight
Page 75 of 401
Opening and closing
72
X
Pull the boot lid/tailgate down using
recess 1.
X Lock the vehicle if necessary using
the j button on the key or with KEY-
LESS GO*.
Opening from the inside (Saloon) You can simultaneously unlock and open the
boot from the driver's seat when the vehicle
is stationary. 1
Remote opening button
X Pull remote operating button 1until the
boot lid opens.
The indicator lamp in the button lights up
and stays lit until the boot is closed again. Opening the tailgate from inside the
vehicle (Estate with a folding bench
seat*) !
The tailgate swings upwards and to the
rear when opened. Therefore, ensure that
there is sufficient clearance above and
behind the tailgate.
i You can only open the tailgate from the
inside if the child-proof locks have not been
activated (Y page 56). 1
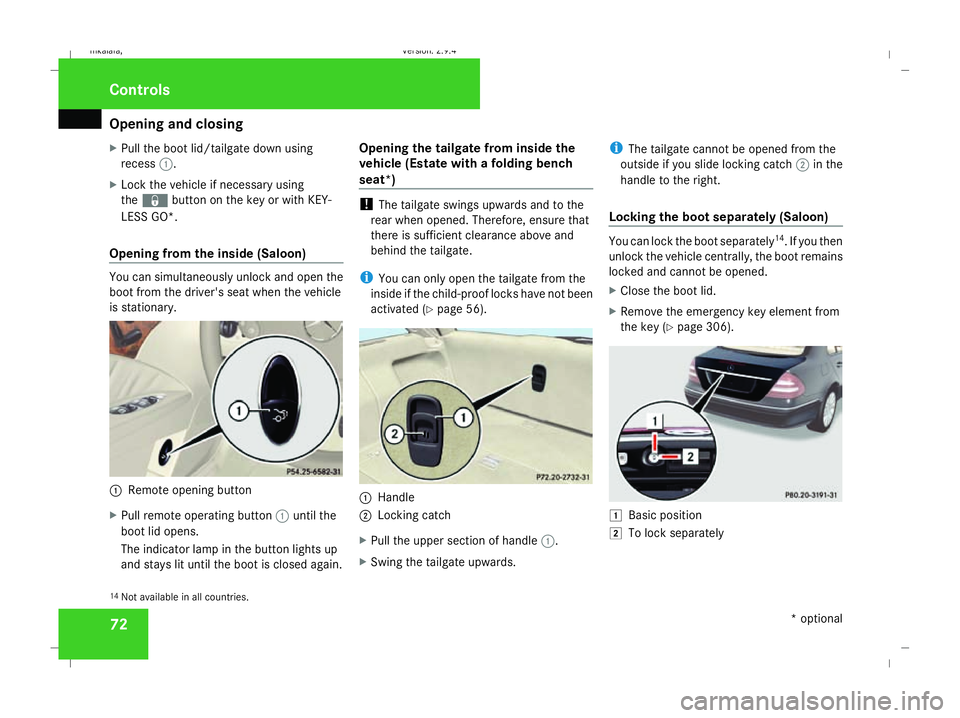
Handle
2 Locking catch
X Pull the upper section of handle 1.
X Swing the tailgate upwards. i
The tailgate cannot be opened from the
outside if you slide locking catch 2in the
handle to the right.
Locking the boot separately (Saloon) You can lock the boot separately
14
. If you then
unlock the vehicle centrally, the boot remains
locked and cannot be opened.
X Close the boot lid.
X Remove the emergency key element from
the key (Y page 306). $
Basic position
% To lock separately
14 Not available in all countries. Controls
* optional
211_AKB; 2; 5, en-GB
mkalafa,
Version: 2.9.4 2008-02-29T16:57:07+01:00 - Seite 72Dateiname: 6515_3416_02_buchblock.pdf; preflight
Page 76 of 401

Opening and closing
73
X
Insert the emergency key element fully into
the boot lock.
X Turn the emergency key element clockwise
to position %.
X Remove the emergency key element. Boot/luggage compartment (vehicles
with remote boot lid closing feature*)
The remote boot lid closing feature* opens
and closes the boot lid/tailgate automati-
cally. You can stop the automatic opening and
closing procedure at any time:
R Saloon: by pulling or pressing the remote
operating button at the driver's seat
Estate: by pulling the remote operating but-
ton at the driver's seat again
R by pressing the ibutton on the key
R by pulling the handle on the boot lid/tail-
gate
R by pressing the closing button in the boot
lid/tailgate
On Estate vehicles, you will hear a warning
tone as the tailgate is opening or closing. G
Risk of poisoning
Exhaust fumes could enter the vehicle inte-
rior if the engine is running and the boot lid
is open. This could poison you. Therefore,
you should make sure that the boot lid/
tailgate is always closed when the engine
is running. G
Risk of accident
Estate
Do not leave children unsupervised in the
vehicle. They could open the tailgate from
the inside and thereby endanger them-
selves and others.
! The boot lid/tailgate swings upwards and
to the rear when opened. Therefore, make
sure that there is sufficient clearance
above and behind the boot lid/tailgate.
Opening from the outside You can only open the boot lid/tailgate after
unlocking it first.
X
To unlock centrally: press thekbut-
ton on the key. Saloon
1
Handle Estate
1
Handle
X Pull handle 1.
The boot lid/tailgate opens. Controls
* optional
211_AKB; 2; 5, en-GB
mkalafa,
Version: 2.9.4 2008-02-29T16:57:07+01:00 - Seite 73 ZDateiname: 6515_3416_02_buchblock.pdf; preflight