Page 127 of 481

126 Controls in detail
Lighting
For information on how to switch on the
headlamps and use the turn signals, see
“Switching on headlamps” (
�page 55)
and see “Turn signals” (
�page 55).
Exterior lamp switch
Exterior lamp switch
iIf you drive in countries where vehicles drive
on the other side of the road than the country
where the vehicle is registered, you must have
the headlamps modified for symmetrical low
beams. Relevant information can be obtained at
any authorized Mercedes-Benz Center.
iVehicles equipped with active Bi-Xenon*
headlamps: The active Bi-Xenon headlamps
monitor your steering angle and driving speed,
then automatically shift their beams to either
side to better follow the curvature of the road
ahead, increasing usable illumination over con-
ventional headlamps.
1‚Standing lamps, left (turn left two
stops)
2ˆStanding lamps, right (turn left
one stop)
3MOff
Daytime running lamp mode
(
�page 128)
4UAutomatic headlamp mode
Daytime running lamp mode
(
�page 128)
5CParking lamps (also tail lamps, li-
cense plate lamps, side marker
lamps, instrument panel lamps)
6BLow beam headlamps or high
beam headlamps
7‡Front fog lamps
8†Rear fog lamp
iIf you hear a warning signal you have forgot-
ten to switch off the low beam headlamps or the
parking lamps before opening the driver’s door.
In addition the message
Switch Off Lights
appears in the multifunction display.
Switch off the low beam headlamps or the park-
ing lamps.
If the message
Switch Off Lights or
Remove Key
appears in the multifunction dis-
play remove the SmartKey from the starter
switch or switch off the automatic headlamp
mode.
!Failure to switch off the exterior lamps when
leaving the vehicle may result in a discharged
battery.
Page 134 of 481

133 Controls in detail
Lighting
Interior lighting in the front
The controls are located in the overhead
control panel.1Left front reading lamp on/off
2Rear interior lighting on/off
3Automatic control on/off
4Front interior lighting on/off
5Right front reading lamp on/off
6Interior lighting
7Ambient lighting
8Front reading lamps
Deactivating automatic control
�Press switch3.
The interior lighting remains switched
off in darkness, even when you:
�unlock the vehicle
�remove the SmartKey from the
starter switch
�open a door
�open the trunk
Activating automatic control
�Press switch3.
The interior lighting switches on in
darkness, when you:
�unlock the vehicle
�remove the SmartKey from the
starter switch
�open a door
�open the trunk
The interior lighting switches off after a
preset time (
�page 162).
!An interior lamp switched on manually does
not go out automatically.
Leaving an interior lamp switch in the ON posi-
tion for extended periods of time with the engine
turned off could result in a discharged battery.
iThe interior lighting is factory-set to auto-
matic mode.
iIf a door remains open, the interior lamps
switch off automatically after approximately
5minutes.
Page 187 of 481

186 Controls in detail
Good visibility
Rear window defroster
The rear window defroster uses a large
amount of power. To keep the battery
drain to a minimum, switch off the defrost-
er as soon as the rear window is clear. The
defroster is automatically deactivated
after approximately 6 to 20 minutes of
operation depending on the outside tem-
perature.
�Switch on the ignition (�page 38).Activating
�Press button F (�page 191) or
button1 (
�page 190) on the
respective climate control panel.
The indicator lamp on the button
comes on.
Deactivating
�Press buttonF (�page 191) or
button1 (
�page 190) again.
The indicator lamp on the button goes
out.
Warning!G
When operating the rear window sunshade,
be sure that there is no danger of anyone
being harmed by the raising or lowering pro-
cedure.
The raising or lowering procedure can be
immediately halted by briefly pressing
switch1. To reverse direction of move-
ment, press switch1 again.
Warning!G
When leaving the vehicle, always remove the
SmartKey or the SmartKey with
KEYLESS-GO* from the starter switch, take
it with you, and lock the vehicle. Do not
leave children unattended in the vehicle, or
with access to an unlocked vehicle. A child’s
unsupervised access to a vehicle could re-
sult in an accident and/or serious personal
injury.
Warning!G
Any accumulation of snow and ice should be
removed from the rear window before driv-
ing. Visibility could otherwise be impaired,
endangering you and others.
��
Page 188 of 481
187 Controls in detail
Good visibility
!If the rear window defroster switches off too
soon and the indicator lamp starts flashing, this
means that too many electrical consumers are
operating simultaneously and there is insuffi-
cient voltage in the battery. The system re-
sponds automatically by deactivating the rear
window defroster.
As soon as the battery has sufficient voltage, the
rear window defroster automatically turns itself
back on.
Page 203 of 481

202 Controls in detail
4-zone automatic climate control
Activating
�Switch off the ignition.
�Press buttonT (�page 191).
REST in display4 (�page 191) comes
on.
Deactivating
�Press buttonT (�page 191) again.
REST in display4 (�page 191) goes
out.
Rear climate control
The rear climate control is adjusted via the
front climate control panel (
�page 190) or
(
�page 191) or the rear climate control
panel.
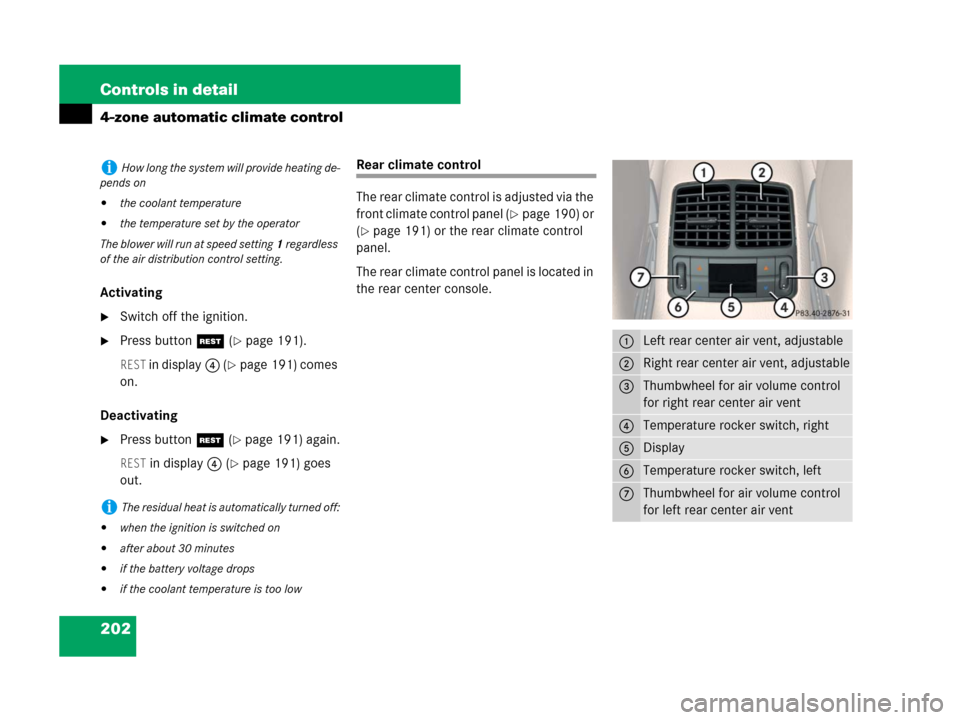
The rear climate control panel is located in
the rear center console.
iHow long the system will provide heating de-
pends on
�the coolant temperature
�the temperature set by the operator
The blower will run at speed setting1 regardless
of the air distribution control setting.
iThe residual heat is automatically turned off:
�when the ignition is switched on
�after about 30 minutes
�if the battery voltage drops
�if the coolant temperature is too low
1Left rear center air vent, adjustable
2Right rear center air vent, adjustable
3Thumbwheel for air volume control
for right rear center air vent
4Temperature rocker switch, right
5Display
6Temperature rocker switch, left
7Thumbwheel for air volume control
for left rear center air vent
Page 208 of 481

207 Controls in detail
Power windows
Fully opening the windows
(Express-open)
�Press switch2 to 5 past the resis-
tance point and release.
The corresponding window opens com-
pletely.
Fully closing the windows
(Express-close)
�Pull switch2 to 5 past the resis-
tance point and release.
The corresponding window closes com-
pletely.Stopping windows during Express-op-
eration
�Press or pull the respective power win-
dow switch again.
Synchronizing power windows
The power windows must be synchronized
�after the battery has been disconnect-
ed
�if the power windows cannot be fully
opened (Express-open) or closed
(Express-close)
Synchronizing
�Close all doors.
�Switch on the ignition (�page 38).
�Pull switch2 to 5 until the side win-
dows are completely closed.
�Hold on to switches2 to 5 for
approximately 1 second.
The power windows are synchronized.Warning!G
Driver’s door only:
If within 5 seconds switch is again pulled
past the resistance point and released, the
automatic reversal will not operate.
!If the upward movement of the window is
blocked during the closing procedure, the win-
dow will stop and open slightly.
Remove the obstruction, pull the respective pow-
er window switch again past the resistance point
and release.
If the window still does not close when there is
no obstruction, pull and hold the respective pow-
er window switch. The side window will then
close without the obstruction sensor function.
Page 213 of 481

212 Controls in detail
Power tilt/sliding sunroof
Fully opening (Express-open) and clos-
ing (Express-close) the power tilt/slid-
ing sunroof
�To open or close the tilt/sliding sun-
roof, move the sunroof switch past the
resistance point in direction of
arrow1to2 and release.
The tilt/sliding sunroof opens or closes
completely.
Stopping the power tilt/sliding sunroof
during Express-operation
�Move the sunroof switch in any direc-
tion.Synchronizing the power tilt/sliding
sunroof
The tilt/sliding sunroof must be synchro-
nized
�after the battery has been
disconnected or discharged
�after a malfunction
�if the tilt/sliding sunroof does not open
smoothly
�Remove the respective fuse from the
fuse box in passenger compartment
(
�page 428).
�Reinsert the fuse in the fuse box.
�Switch on the ignition (�page 38).
�Move and hold the sunroof switch in di-
rection of arrow3 until the tilt/sliding
sunroof is fully raised at the rear.
Keep holding the sunroof switch in di-
rection of arrow3 for approximately
1 second.
�Check the Express-open feature
(
�page 212).
If the tilt/sliding sunroof opens com-
pletely, the roof is synchronized. Other-
wise repeat the above steps.
iIf the movement of the tilt/sliding sunroof is
blocked during the closing procedure, the
tilt/sliding sunroof will stop and reopen slightly.
Page 255 of 481

254 Controls in detail
Useful features
The cradle is located in the center armrest.
�Open the telephone compartment un-
der center armrest (
�page 243).
Inserting mobile phone in mobile phone
cradle
Once the mobile phone has been inserted
in the mobile phone cradle, calls can only
be made via the Voice Control*.
�If applicable, remove the cover for the
external antenna connection from the
back of the mobile phone and store it in
a safe place. Be sure to comply with the
mobile phone’s operating instructions,
as well.
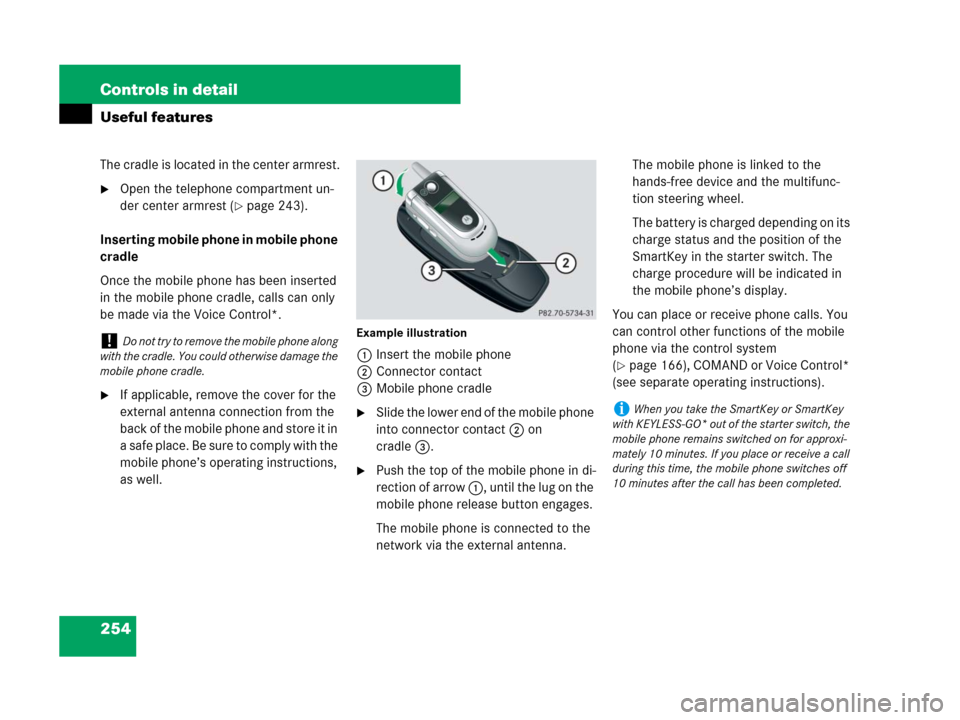
Example illustration
1Insert the mobile phone
2Connector contact
3Mobile phone cradle
�Slide the lower end of the mobile phone
into connector contact 2 on
cradle3.
�Push the top of the mobile phone in di-
rection of arrow 1, until the lug on the
mobile phone release button engages.
The mobile phone is connected to the
network via the external antenna. The mobile phone is linked to the
hands-free device and the multifunc-
tion steering wheel.
The battery is charged depending on its
charge status and the position of the
SmartKey in the starter switch. The
charge procedure will be indicated in
the mobile phone’s display.
You can place or receive phone calls. You
can control other functions of the mobile
phone via the control system
(
�page 166), COMAND or Voice Control*
(see separate operating instructions).
!Do not try to remove the mobile phone along
with the cradle. You could otherwise damage the
mobile phone cradle.
iWhen you take the SmartKey or SmartKey
with KEYLESS-GO* out of the starter switch, the
mobile phone remains switched on for approxi-
mately 10 minutes. If you place or receive a call
during this time, the mobile phone switches off
10 minutes after the call has been completed.