2008 MERCEDES-BENZ CLS COUPE flat tire
[x] Cancel search: flat tirePage 10 of 329

7
Temperature display (on-board
computer)
. . . . . . . . . . . . . . . . . . . 116
Topping up . . . . . . . . . . . . . . . . . . . 195
ESP ®
(Electronic Stability Program) . 59
Activating/deactivating . . . . . . . . . . 59
Display message . . . . . . . . . . 222, 231
Warning lamp . . . . . . . . . . . . . . 59, 244
Exterior lighting
Delayed switch-off (on-board
computer) . . . . . . . . . . . . . . . . . . . 126
Exterior mirror parking position
Storing . . . . . . . . . . . . . . . . . . . . 85, 87
Exterior mirrors
Adjusting . . . . . . . . . . . . . . . . . . . . . 84
Anti-dazzle mode (automatic) . . . . . 85
Folding in/out (automatically) . . . . . 84
Folding in/out (electrically) . . . . . . . 84
Folding in when locking (on-board
computer) . . . . . . . . . . . . . . . . . . . 128
Malfunction . . . . . . . . . . . . . . . . . . 260
Parking position . . . . . . . . . . . . . 85, 87
Resetting . . . . . . . . . . . . . . . . . . . . . 84
Storing settings . . . . . . . . . . . . . . . . 86
Exterior view
Overview . . . . . . . . . . . . . . . . . . . . . 20 F
Fire extinguisher
. . . . . . . . . . . . . . . . 217
First-aid kit . . . . . . . . . . . . . . . . . . . . . 216 Flat tyre
MOExtended run-flat system
. . . . . 287
Preparing the vehicle . . . . . . . . . . . 276
TIREFIT kit . . . . . . . . . . . . . . . . . . . 277
Floormat . . . . . . . . . . . . . . . . . . . . . . . 187
Foglamps
Display message . . . . . . . . . . . . . . 235
Fording . . . . . . . . . . . . . . . . . . . . . . . . 208
Frequencies Garage door opener . . . . . . . . . . . . 319
Telephone . . . . . . . . . . . . . . . . . . . 300
Front airbag . . . . . . . . . . . . . . . . . . . . . 46
Front-passenger airbag . . . . . . . . . . . . 46
Fuel . . . . . . . . . . . . . . . . . . . . . . . . . . . 311
Diesel . . . . . . . . . . . . . . . . . . . . . . . 192
Display message . . . . . . . . . . . . . . 231
Loss . . . . . . . . . . . . . . . . . . . . . . . . 253
Petrol . . . . . . . . . . . . . . . . . . . . . . . 191
Fuel consumption . . . . . . . . . . . 312, 313
Fuel filler flap Opening/closing . . . . . . . . . . . . . . 190
Fuel line
Malfunction . . . . . . . . . . . . . . . . . . 253
Fuel tank
Malfunction . . . . . . . . . . . . . . . . . . 253
Range (on-board computer) . . . . . . 130
Fuse allocation chart . . . . . . . . . . . . 295
Fuse box Boot . . . . . . . . . . . . . . . . . . . . . . . . 296
Dashboard . . . . . . . . . . . . . . . . . . . 296 Fuses
. . . . . . . . . . . . . . . . . . . . . . . . . . 295 G
Garage door Opening/closing
(with the remote
control) . . . . . . . . . . . . . . . . . . . . . 187
Garage door opener . . . . . . . . . . . . . . 186
Clearing the memory . . . . . . . . . . . 187
Frequencies . . . . . . . . . . . . . . . . . . 319
Programming the remote control . . 186
Gear indicator (on-board computer) 116
Gearshift program Manual . . . . . . . . . . . . . . . . . . . . . . 108
Genuine Mercedes-Benz parts . . . . . 298
Glove compartment . . . . . . . . . . . . . . 177
Gross vehicle weight, maximum
permissible . . . . . . . . . . . . . . . . . . . . . 310 H
Headlamp Misting up
. . . . . . . . . . . . . . . . . . . 259
Headlamp mode (automatic) . . . . . . . 92
Headlamps Cleaning . . . . . . . . . . . . . . . . . . . . . 212
Cleaning system . . . . . . . . . . . . . . . . 95
Headlamps delayed switch-off
see Exterior lighting delayed switch-off Index
219_AKB; 2; 4, en-GB
mkalafa,
2007-11-13T09:28:36+01:00 - Seite 7
Page 55 of 329
Occupant safety
52 inflated, the child could be seriously or even
fatally injured.
Proceed as follows:
R
Do not use a rearward-facing child
restraint system on the front-passenger
seat.
R Fit a rearward-facing child restraint sys-
tem on a suitable rear seat.
or
R Only use a forward-facing child seat on
the front-passenger seat and move the
front-passenger seat to its rearmost
position.
R Have the automatic child seat recogni-
tion checked at a qualified specialist
workshop. To ensure that the automatic child seat rec-
ognition on the front-passenger seat func-
tions correctly, never place objects (such
as a cushion) under the child restraint sys-
tem. The entire base of the child restraint
system
must always be resting on the seat
cushion. An incorrectly fitted child restraint
system cannot perform its intended pro-
tective function in the event of an accident,
and could even lead to injuries.
i The windowbag, the sidebag and the belt
tensioner on the front-passenger side are
still active even if the front-passenger front
airbag is disabled. G
Risk of injury
Do not place items of electronic equipment
on the front-passenger seat, e.g.:
R laptops, if switched on
R mobile phones
R cards with transponders, e.g. ski passes
or access passes
Signals from electronic equipment can
cause interference in the automatic child
seat recognition sensor system. This can
lead to a system malfunction. This may
cause the 5 PASSENGER AIRBAG OFF
warning lamp to light up without there
being
a child seat with automatic child seat
recognition fitted. This means the front-
passenger airbag is not deployed during an
accident. It is also possible that the
5 PASSENGER AIRBAG OFF warning
lamp will not light up if you turn the key in
the ignition lock to position 2.Safety
219_AKB; 2; 4, en-GB
mkalafa,
2007-11-13T09:28:36+01:00 - Seite 52
Page 202 of 329

Tyres and wheels
199
Notes on regularly inspecting wheels
and tyres R
Regularly check the wheels and tyres of
your
vehicle for damage (e.g. cuts, punctu-
res, tears, bumps on tyres and deforma-
tion, cracks or severe corrosion on wheels),
at least every 14 days, as well as after off-
road trips or after travelling on rough roads.
Damaged wheels could cause a loss of tyre
pressure.
R Regularly check the tyre tread depth and
the condition of the tread across the whole
width of the tyre (Y page 200). If neces-
sary, turn the front wheels to full lock in
order to inspect the inner side of the tyre
surface.
R All wheels must have a valve cap to protect
the valve against dirt and moisture.
R Regularly check the pressure of all your
tyres (including the spare tyre*), particu-
larly prior to long trips, and correct the
pressure as necessary ( Y page 200).
Notes on driving R
While driving, pay attention to vibrations,
noises and unusual handling characteris- tics, e.g. pulling to one side. This may indi-
cate
that the wheels or tyres are damaged.
If you suspect that a tyre is defective,
reduce your speed and stop the vehicle as
soon as possible to check the wheels and
tyres for damage. Hidden tyre damage
could also be causing the unusual handling
characteristics. If you find no signs of dam-
age, have the wheels and tyres inspected
at a specialist workshop, for example at a
Mercedes-Benz Service Centre.
R When parking your vehicle, make sure that
the tyres do not get deformed by the kerb
or other obstacles. If it is necessary to drive
over kerbs, speed humps or similar, try to
do so slowly and at an obtuse angle. Oth-
erwise, the tyres, particularly the sidewalls,
could get damaged. Direction of rotation
Direction of rotation Tyres with a specified direction of rotation
have
additional benefits, e.g. if there is a risk
of aquaplaning. You will only gain these ben-
efits if the correct direction of rotation is
observed.
An arrow on the sidewall of the tyre indicates
its correct direction of rotation.
i You may fit a spare tyre* against the
direction of rotation. MOExtended run-flat system*
The MOExtended run-flat system allows you
to
continue driving the vehicle even when one
or more tyres lose all air pressure.
The MOExtended run-flat system may only be
used in conjunction with the tyre pressure
loss warning system or the tyre pressure
monitor* and on wheels specifically tested by
Mercedes-Benz.
i Vehicles with MOExtended run-flat sys-
tem are not equipped with the TIREFIT
kit* 25
.
25 Only for certain countries Operation
* optional
219_AKB; 2; 4, en-GB
mkalafa,
2007-11-13T09:28:36+01:00 - Seite 199 Z
Page 203 of 329

Tyres and wheels
200It is therefore recommended to additionally
equip your vehicle with the TIREFIT kit*
when fitting tyres that do not feature run-
flat properties, e.g. winter tyres.
i A TIREFIT kit*
is available from any quali-
fied specialist workshop, e.g. a Mercedes-
Benz Service Centre.
You will find notes on driving with a flat tyre
in the "Practical advice" section
(Y page 287). Tyre tread
G
Risk of accident
Bear in mind that:
R tyre grip decreases rapidly on wet roads
when
the tread depth is less than 3 mm.
You should thus replace tyres that have
insufficient tread.
R winter tyres should be replaced when the
tread depth is 4 mm or less because oth-
erwise they no longer provide adequate
grip.
R the tread on a tyre may not wear evenly.
You should thus regularly check the tread
depth and the condition of the tread across the entire width of all tyres. If nec-
essary, turn the steering wheel so that
you can see the tyre tread more easily.
You could otherwise lose control of the
vehicle and cause an accident due to the
reduced grip of the tyres on the road. Tyre pressures
G
Risk of accident
Tyre pressure that is either too high or too
low has a negative effect on the vehicle’s
active
safety, which could lead you to cause
an accident. You should therefore regularly
check the pressure of all your tyres (includ-
ing the spare tyre*), particularly prior to
long trips, and correct the pressure as nec-
essary.
To test tyre pressure, use a suitable pressure
gauge. The outer appearance of a tyre does
not permit any reliable conclusion about the
tyre pressure. On vehicles fitted with the elec-
tronic tyre pressure monitor*, the tyre pres-
sure can be checked in the on-board com-
puter.
If the vehicle is to be heavily laden or driven
at high speeds, the tyre pressure must be adapted according to the specifications given
in the fuel filler flap
(Y page 190).
Use the highest specified tyre pressure for
the spare wheel*. G
Risk of accident
Should the tyre pressure drop repeatedly:
R Check the tyre for foreign bodies.
R Check whether the wheel is losing air or
the valve is leaking.
Tyre
pressure that is too low has a negative
effect on the vehicle’s active safety, which
could lead to your causing an accident.
Tyre pressure changes by approximately
0.1 bar for every 10 °C change in ambient
temperature.
If you measure the tyre pressure in enclosed
spaces where the temperature differs from
the outside temperature, you will have to cor-
rect the measured value accordingly.
When the vehicle is driven, the tyre tempera-
ture, and with it the tyre pressure, will
increase depending on the road speed and
the load on the tyres.
Therefore, you should only correct tyre pres-
sures when the tyres are cold. Operation
* optional
219_AKB; 2; 4, en-GB
mkalafa,
2007-11-13T09:28:36+01:00 - Seite 200
Page 220 of 329
Where will I find...?
217Fire extinguisher*
i Have the fire extinguisher refilled after
each use and checked every one or two
years. Otherwise, it may fail in an emer-
gency.
Observe the legal requirements in all coun-
tries concerned.
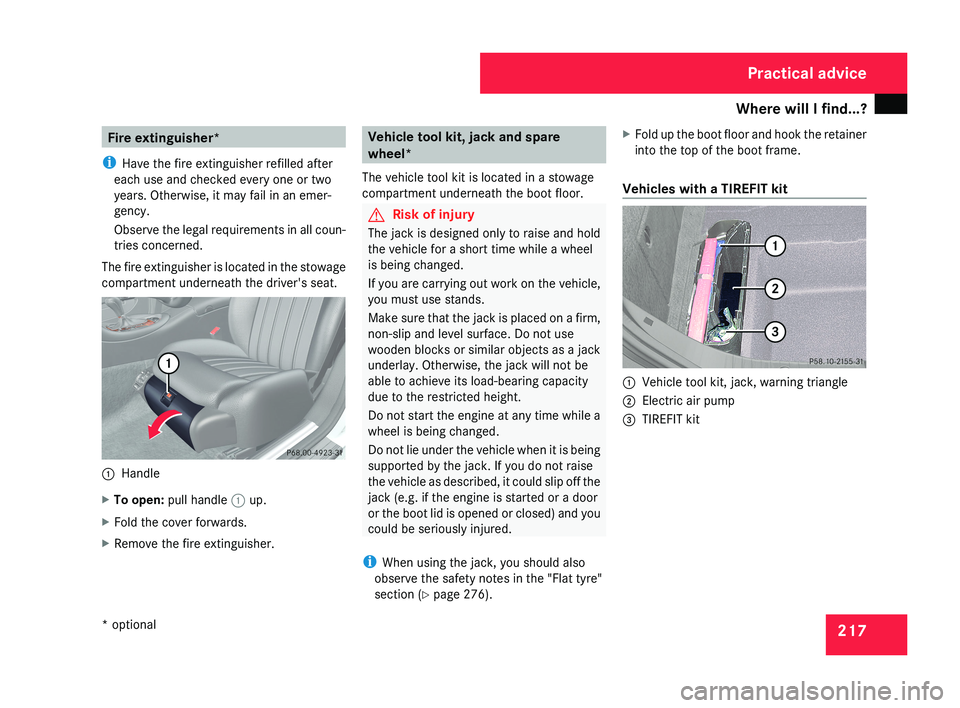
The fire extinguisher is located in the stowage
compartment underneath the driver's seat.1 Handle
X To open: pull handle 1 up.
X Fold the cover forwards.
X Remove the fire extinguisher.
Vehicle tool kit, jack and spare
wheel*
The vehicle tool kit is located in a stowage
compartment underneath the boot floor.
G Risk of injury
The jack is designed only to raise and hold
the vehicle for a short time while a wheel
is being changed.
If you are carrying out work on the vehicle,
you must use stands.
Make sure that the jack is placed on a firm,
non-slip and level surface. Do not use
wooden blocks or similar objects as a jack
underlay. Otherwise, the jack will not be
able to achieve its load-bearing capacity
due to the restricted height.
Do not start the engine at any time while a
wheel is being changed.
Do not lie under the vehicle when it is being
supported by the jack. If you do not raise
the vehicle as described, it could slip off the
jack (e.g. if the engine is started or a door
or the boot lid is opened or closed) and you
could be seriously injured.
i When using the jack, you should also
observe the safety notes in the "Flat tyre"
section ( Y page 276). X
Fold up the boot floor and hook the retainer
into the top of the boot frame.
Vehicles with a TIREFIT kit
1 Vehicle tool kit, jack, warning triangle
2 Electric air pump
3 TIREFIT kit
Practical advice
* optional
219_AKB; 2; 4, en-GB
mkalafa,
2007-11-13T09:28:36+01:00 - Seite 217
Page 279 of 329
Flat tyre
276 Fitting
X Slide the new wiper blade into the retainer
on the wiper arm in the opposite direction
to the arrow.
X Turn the wiper blade parallel to the wiper
arm.
X Fold the wiper arm back onto the wind-
screen. Flat tyre
Your vehicle may be equipped with:
R a TIREFIT kit (Y page 217)
R a "Minispare" emergency spare
wheel*
(Y page 218)
R a collapsible emergency spare
wheel* (Y page 218)
R a spare wheel* (Y page 218)
R the MOExtended run-flat sys-
tem* (Y page 287) Preparing the vehicle
i Vehicle preparation is not necessary on
vehicles with MOE tyres*.
X Stop your vehicle as far away from traffic
as possible on solid, non-slippery, level
ground.
X Switch on the hazard warning lamps.
X Firmly depress the parking brake.
X Move the selector lever to P. X
All occupants must get out of the vehicle.
Make
sure that they are not endangered as
they do so.
X Make sure that no one is near the danger
area whilst a wheel is being changed. Any-
one who is not directly assisting in the
wheel change should, for example, stand
behind the barrier.
X Switch off the engine.
X Remove the key from the ignition lock.
X Place the warning triangle ( Y page 216) or
warning lamps at a suitable distance.
Observe legal requirements. G
Risk of injury
The jack is designed only to raise the vehi-
cle for a short time while a wheel is being
changed.
If you intend to work under the vehicle, it
must be placed on stands.
Make
sure that the jack is placed on a firm,
non-slip, level surface. Do not use wooden
blocks or similar as jacking supports. Oth-
erwise, the jack will not be able to achieve
its load-bearing capacity due to the restric-
ted height. Practical advice
* optional
219_AKB; 2; 4, en-GB
mkalafa,
2007-11-13T09:28:36+01:00 - Seite 276
Page 280 of 329
Flat tyre
277Do not start the engine at any time while
the wheel is being changed.
Do not lie under the vehicle when it is being
supported by the jack. If you do not raise
the vehicle as described, it could slip off the
jack (e.g. if the engine is started or a door
or the boot lid are opened or closed) and
you could be seriously injured.
Using the TIREFIT kit
You can use the TIREFIT kit to seal small
punctures, particularly those in the tyre tread.
You can use TIREFIT in outdoor temperatures
down to -20 °C. G
Risk of accident
In the following situations, your safety is at
particular risk and TIREFIT is unable to pro-
vide breakdown assistance:
R if there are cuts or punctures in the tyre
greater than 4 mm
R if the wheel rim is damaged
R if you have driven at very low tyre pres-
sures or on a flat tyre
Do not drive any further. Consult a qualified
specialist workshop which has the neces- sary specialist knowledge and tools to carry
out the work required.
Mercedes-Benz recommends that you use
a Mercedes-Benz Service Centre for this
purpose. In particular, work relevant to
safety or on safety-related systems must be
carried out at a qualified specialist work-
shop.
X Do not remove any foreign objects which
have penetrated the tyre, e.g. screws or
nails.
X Remove TIREFIT, the accompanying "max.
80 km/h" sticker and the electric air pump
from the stowage well underneath the boot
floor ( Y page 217).1
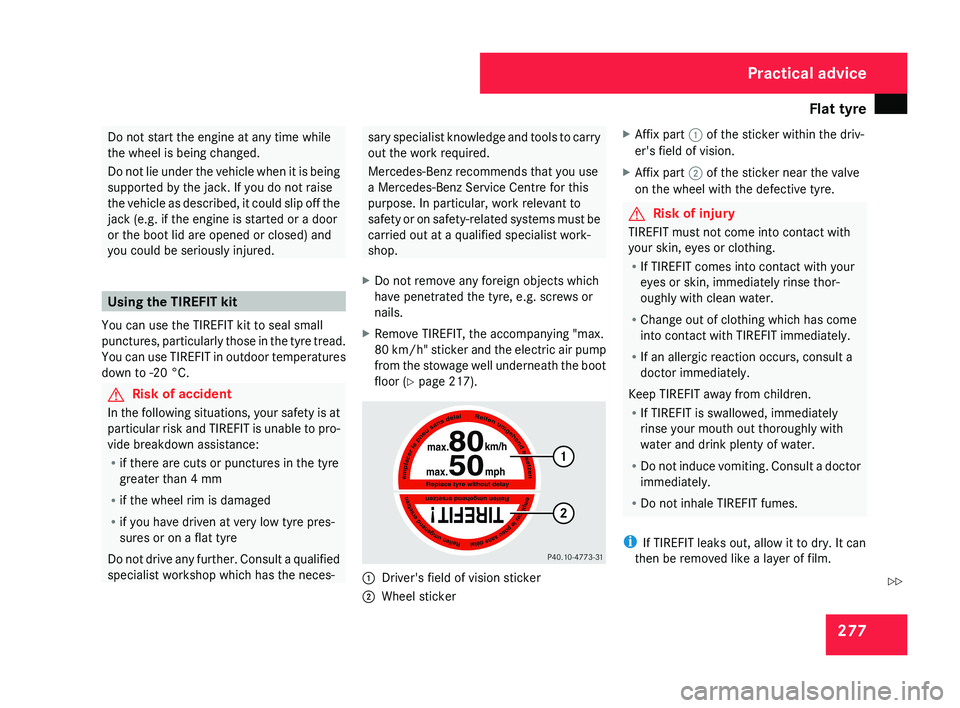
Driver's field of vision sticker
2 Wheel sticker X
Affix part 1 of the sticker within the driv-
er's field of vision.
X Affix part 2 of the sticker near the valve
on the wheel with the defective tyre.
G Risk of injury
TIREFIT must not come into contact with
your skin, eyes or clothing.
R If TIREFIT comes into contact with your
eyes or skin, immediately rinse thor-
oughly with clean water.
R Change out of clothing which has come
into contact with TIREFIT immediately.
R If an allergic reaction occurs, consult a
doctor immediately.
Keep TIREFIT away from children.
R If TIREFIT is swallowed, immediately
rinse your mouth out thoroughly with
water and drink plenty of water.
R Do not induce vomiting. Consult a doctor
immediately.
R Do not inhale TIREFIT fumes.
i If TIREFIT leaks out, allow it to dry. It can
then be removed like a layer of film.
Practical advice
219_AKB; 2; 4, en-GB
mkalafa,
2007-11-13T09:28:36+01:00 - Seite 277
Z
Page 281 of 329
Flat tyre
278If you get TIREFIT on your clothing, have it
cleaned as soon as possible with perchloro-
ethylene. G
Risk of injury
Comply with the manufacturer's safety
instructions shown on the sticker on the
electric air pump.
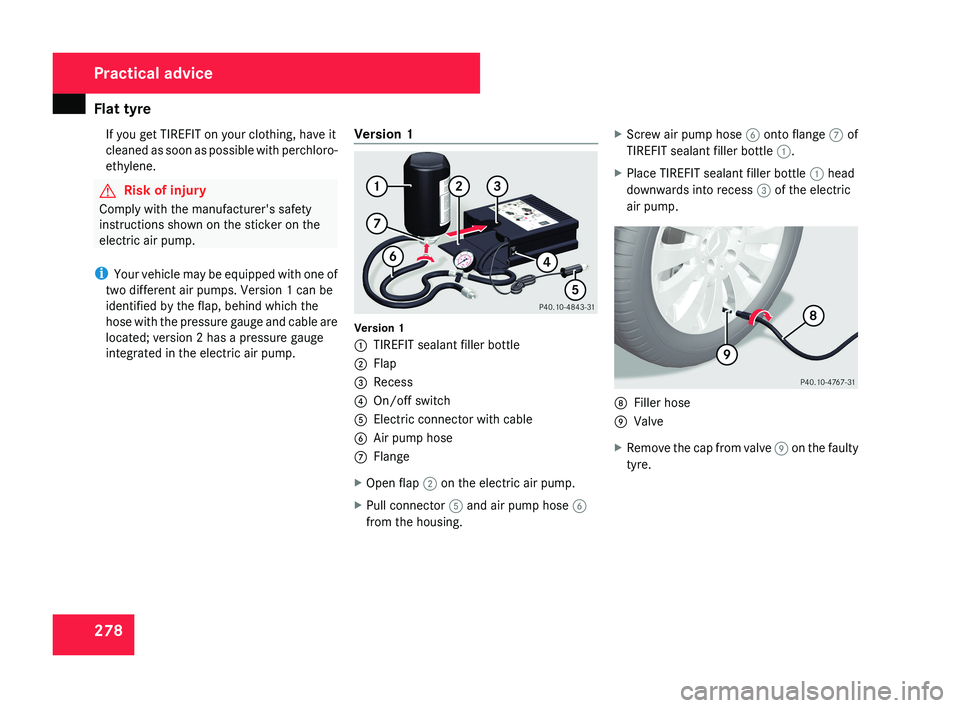
i Your vehicle may be equipped with one of
two different air pumps. Version 1 can be
identified by the flap, behind which the
hose with the pressure gauge and cable are
located; version 2 has a pressure gauge
integrated in the electric air pump. Version 1 Version 1
1
TIREFIT sealant filler bottle
2 Flap
3 Recess
4 On/off switch
5 Electric connector with cable
6 Air pump hose
7 Flange
X Open flap 2 on the electric air pump.
X Pull connector 5 and air pump hose 6
from the housing. X
Screw air pump hose 6 onto flange 7 of
TIREFIT sealant filler bottle 1.
X Place TIREFIT sealant filler bottle 1 head
downwards into recess 3 of the electric
air pump. 8
Filler hose
9 Valve
X Remove the cap from valve 9 on the faulty
tyre. Practical advice
219_AKB; 2; 4, en-GB
mkalafa,
2007-11-13T09:28:36+01:00 - Seite 278