Page 377 of 769

376 Controls in detailSeatsSeat ventilation*
The buttons for seat ventilation are located
on the respective door. The blue indicator
lamps on the button come on show the
ventilation level selected.
1Seat ventilation button
�
Switch on the ignition (
�page 365).
�
Switching on: Press button1 repeat-
edly until the desired ventilation level is
set.
One or more blue indicator lamps on
the button show the selected ventila-
tion level.
�
Switching off: Press button1 repeat-
edly until all indicator lamps go out.
Head restraints
Level3
Three indicator lamps on
(highest level)
2
Two indicator lamps on
1
One indicator lamp on
(lowest level)
off
No indicator lamp on
i
The seat ventilation for the driver’s seat can
be activated using summer opening feature
(
�page 404).
i
If one or more of the lamps on the seat ven-
tilation button are flashing, there is insufficient
voltage available since too many electrical con-
sumers are turned on. The seat ventilation
switches off automatically.
The seat ventilation will switch back on again au-
tomatically as soon as sufficient voltage is avail-
able.Warning!
G
For your protection, drive only with properly
positioned head restraints.
Adjust the head restraint so that it is as
close to the head as possible and the center
of the head restraint supports the back of
the head at eye level. This will reduce the po-
tential for injury to the head and neck in the
event of an accident or similar situation.
Do not drive the vehicle without the seat
head restraints. Head restraints are intend-
ed to help reduce injuries during an acci-
dent.
Page 378 of 769
377 Controls in detailSeats
Front power head restraints
Head restraint height
1Head restraint height�
Press the switch up or down in the di-
rection of arrow1.Head restraint tilt
Manually adjust the angle of the head re-
straint.
�
Push or pull on the upper edge of the
head restraint cushion.Rear seat head restraints
i
Adjust the head restraint in such a way that
it is as close to the head as possible.
i
Depending on the seat’s set fore and aft po-
sition, the head restraint height is automatically
pre-set.
Warning!
G
For safety reasons, always drive with the
rear head restraints in the upright position
when the rear seats are occupied.
Otherwise, the back of the head will not be
supported in the event of a collision. That
could cause serious or even fatal injuries.
Rear seat occupants can be seriously in-
jured or killed.Warning!
G
Keep the area around head restraints clear
of articles (e.g. clothing) to not obstruct the
folding operation of the head restraints.
Page 379 of 769

378 Controls in detailSeatsFolding head restraints back
The rear seat head restraints can be folded
backward for increased visibility.
1Switch in the front center console�
Switch on the ignition (
�page 365).
�
Press switch1 in the front center con-
sole briefly.
The rear seat head restraints will fold
backward.Placing head restraints upright
�
Switch on the ignition (
�page 365).
�
Press and hold switch1 in the front
center console (
�page 378).
The rear seat head restraints will place
upright.Manually placing head restraints
upright
�
Pull the rear seat head restraint upright
until it locks into place.
i
When fasten a rear seat belt (
�page 388),
the respective rear seat head restraint places
upright automatically.
Warning!
G
Make sure the rear seat head restraints en-
gage when placing them upright manually.
Otherwise their protective function cannot
be ensured.
The back of the head will not be supported
in the event of a collision. That could cause
serious or even fatal injuries. Rear seat oc-
cupants can be seriously injured or killed.
Page 387 of 769

386 Controls in detailMemory functionThe following settings are stored when us-
ing the buttons on the passenger door:�
Front passenger seat, head restraint
high and backrest position
�
Lumbar support (CL 550)
�
Drive-dynamic multicontour seat*:
activation/deactivation
MMemory button
1 2 3Memory position buttons
Storing positions into memory�
Adjust the seat (
�page 368) to the de-
sired position.
�
On the driver’s side: adjust the steering
wheel (
�page 379) and the exterior
rear view mirrors (
�page 381) to the
desired position.
�
Press memory buttonM.
�
Release memory buttonM and press
one of the memory position buttons
1,2or3 within 3 seconds.
All the settings are stored at the
selected position.
Recalling positions from memory�
Press and hold one of the memory
position buttons1,2or3 until the
seat, steering wheel and exterior rear
view mirrors have completely moved to
the stored positions.
!
Do not operate the power seats using a
memory position button if the seat backrest is in
an excessively reclined position. Doing so could
cause damage to front or rear seats.
First move seat backrest to an upright position.
i
Releasing the memory position button
immediately stops movement to the stored
positions.
The drive-dynamic multicontour front seat*
and/or lumbar support (CL 550) will continue to
be adjusted.
Page 389 of 769

388 Controls in detailFastening the seat beltsWarning!
G
Always fasten your seat belt before driving
off. Always make sure all of your passengers
are properly restrained.
Failure to wear and properly fasten and
position your seat belt greatly increases
your risk of injuries and their likely severity
in an accident. You and your passengers
should always wear seat belts.
If you are ever in an accident, your injuries
can be considerably more severe without
your seat belt properly buckled. Without
your seat belt buckled, you are much more
likely to hit the interior of the vehicle or be
ejected from it. You can be seriously injured
or killed.
In the same crash, the possibility of injury or
death is lessened if you are wearing your
seat belt. The air bags can only provide the
protection they were designed to afford if
the occupants are using their seat belts
(�page 42).
Warning!
G
According to accident statistics, children
are safer when properly restrained in the
rear seating positions than in the front seat-
ing position. Thus, we strongly recommend
that children be placed in the rear seats
whenever possible. Regardless of seating
position, children 12 years old and under
must be seated and properly secured in an
appropriately sized infant restraint, toddler
restraint, or booster seat recommended for
the size and weight of the child. For addi-
tional information, see “Children in the vehi-
cle” (
�page 57).
A child’s risk of serious or fatal injuries is
significantly increased if the child restraints
are not properly secured in the vehicle and
the child is not properly secured in the child
restraint.
Warning!
G
Never let more people ride in the vehicle
than there are seat belts available. Be sure
everyone riding in the vehicle is correctly re-
strained with a separate seat belt. Never use
a seat belt for more than one person at a
time.Warning!
G
Never ride in a moving vehicle with the seat
backrest in an excessively reclined position
as this can be dangerous. You could slide
under the seat belt in a collision. If you slide
under it, the belt would apply force at the ab-
domen or neck. That could cause serious or
even fatal injuries. The seat backrest and
seat belt provide the best restraint when the
wearer is in a nearly upright position and the
belt is properly positioned on the body.
Page 403 of 769

402 Controls in detailPower windowsOpening and closing power windows
The side windows are opened and closed
electrically. The switches �
for all side windows are on the driver’s
door
�
for the passenger door window are on
the passenger door
�
for each rear side window are on the re-
spective rear side trim panel
1Left front window
2Right front window
3Left rear window
4Right rear window
Warning!
G
When closing the windows, make sure there
is no danger of anyone being harmed by the
closing procedure.
Activate the override switch (
�page 63)
when children are riding in the back seats of
the vehicle. The children may otherwise in-
jure themselves, e.g. by becoming trapped
in the window opening.
The closing of the side windows can be im-
mediately halted by releasing the switch or,
if the switch was pressed past the resis-
tance point and released, by pressing the
lower part of the respective switch again.
The door windows are equipped with the ex-
press-close and automatic reversal func-
tion. If a door window encounters an
obstruction that blocks its path in a circum-
stance where you pressed the switch past
the resistance point and released it to close
the window, the automatic reversal function
will stop the window and open it slightly.
If a door window encounters an obstruction
that blocks its path in a circumstance where
you are closing the window by pressing and
holding the switch, by pressing and holding
button ‹ on the SmartKey or SmartKey
with KEYLESS-GO*, by pressing and holding
the sensor surface (vehicles with
KEYLESS-GO*) on an outside door handle,
or by pressing and holding button, on
the climate control panel, the automatic re-
versal function will not operate.
When leaving the vehicle, always remove the
SmartKey or SmartKey with KEYLESS-GO*
from the starter switch, take it with you, and
lock the vehicle. Do not leave children unat-
tended in the vehicle, or with access to an
unlocked vehicle. A child’s unsupervised ac-
cess to a vehicle could result in an accident
and/or serious personal injury.
Page 512 of 769
511 Controls in detail
Loading and storing
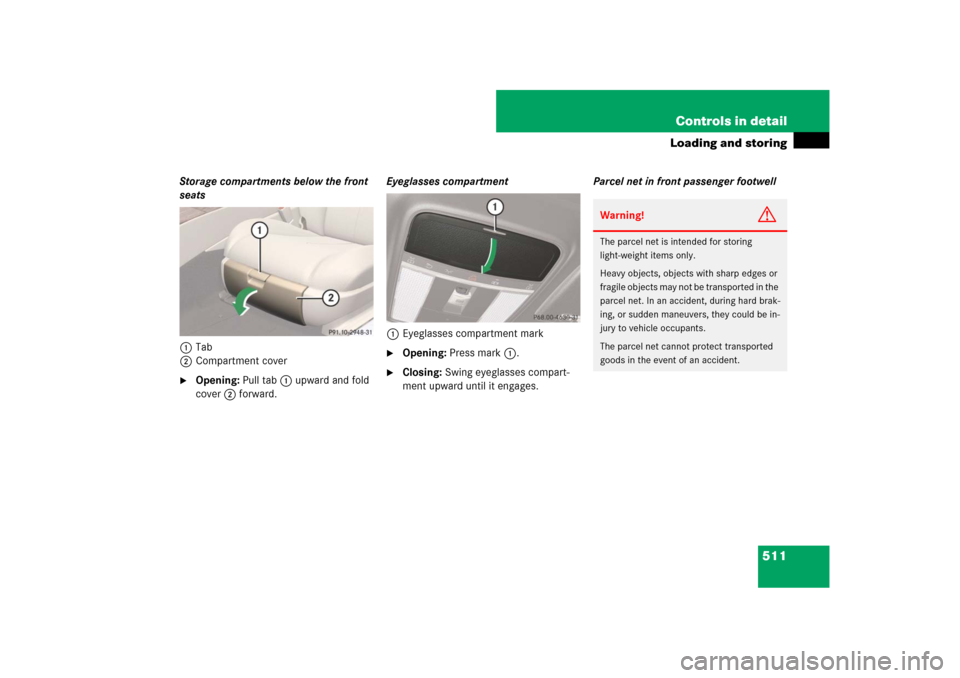
Storage compartments below the front
seats
1Tab
2Compartment cover�
Opening: Pull tab1 upward and fold
cover2 forward.Eyeglasses compartment
1Eyeglasses compartment mark
�
Opening: Press mark1.
�
Closing: Swing eyeglasses compart-
ment upward until it engages.Parcel net in front passenger footwell
Warning!
G
The parcel net is intended for storing
light-weight items only.
Heavy objects, objects with sharp edges or
fragile objects may not be transported in the
parcel net. In an accident, during hard brak-
ing, or sudden maneuvers, they could be in-
jury to vehicle occupants.
The parcel net cannot protect transported
goods in the event of an accident.
Page 513 of 769
512 Controls in detailLoading and storingA small convenience parcel net is located
in the front passenger footwell. It is for
small and light items, such as road maps,
mail, etc.Storage compartments in rear
passenger compartment
Armrest with integrated storage
compartment
1Release catch
�
Opening: Pull release catch1 and
swing the cover upward.Storage compartment between rear
seats
1Handle
�
Opening: Pull handle1 backward in
the direction of arrow.
!
Before storing the armrest in the backrest,
close the storage compartment cover.
!
Do not sit on or lean your body weight
against the armrest when it is folded down, as
you could otherwise damage it.