Page 126 of 769
125 Control systems
COMAND AUX
�COMAND AUX
You can connect an external audio or video
source (AUX) to COMAND.Audio and Video AUX jacks
The Audio and Video AUX jacks to which
external audio/video sources can be con-
nected are located in the glove box.
1Video AUX jack
2Audio AUX jack, left channel
3Audio AUX jack, right channel
Audio AUX
Switching to Audio AUX mode�
Select “Audio” � “Audio”� “AUX”.
The Audio AUX menu appears. You will
hear the medium in the external audio
source if it has been connected and
switched to play.You can adjust the following settings in Au-
dio AUX mode:
�
Volume (
�page 94)
�
Balance and fader (
�page 96)
�
Treble and bass (
�page 95)
�
Surround sound (
�page 96)
i
Please refer to the corresponding operating
instructions for information about how to oper-
ate the external audio source.
Page 127 of 769
126 Control systemsCOMAND AUXVideo AUX
Automatic picture fade-out
If a video is playing when the vehicle is
shifted from park positionP into neutral
position N, drive positionD or reverse
gearR the picture is faded out automati-
cally and the following message appears in
the display: “In order not to distract driver,
picture is faded out while the vehicle is in
motion”.
When the vehicle is shifted back intoP, the
picture comes on again.
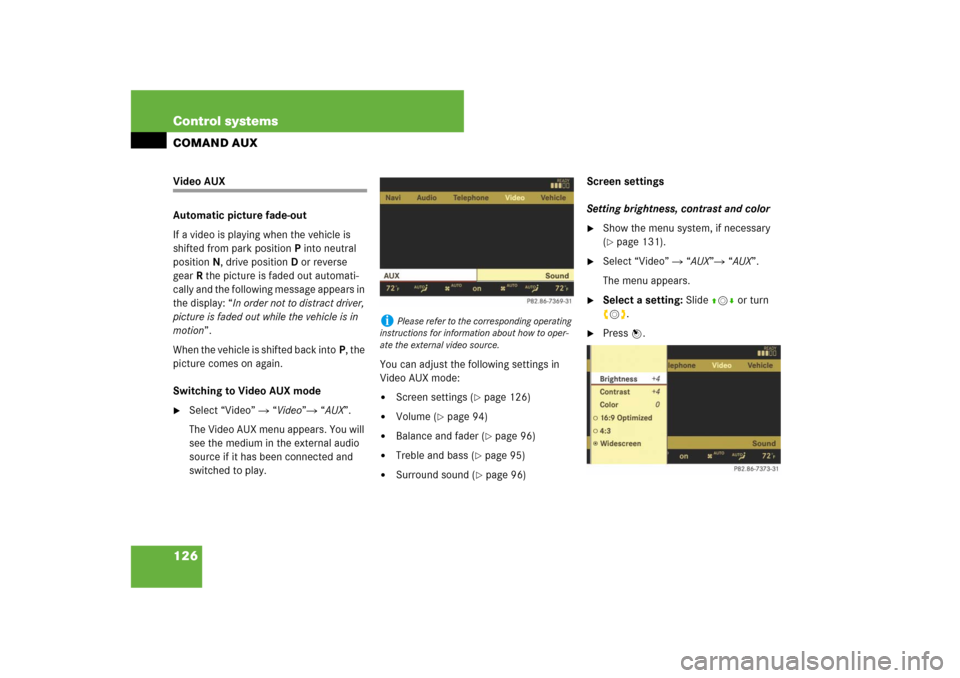
Switching to Video AUX mode�
Select “Video” � “Video”� “AUX”.
The Video AUX menu appears. You will
see the medium in the external audio
source if it has been connected and
switched to play.You can adjust the following settings in
Video AUX mode:
�
Screen settings (
�page 126)
�
Volume (
�page 94)
�
Balance and fader (
�page 96)
�
Treble and bass (
�page 95)
�
Surround sound (
�page 96)Screen settings
Setting brightness, contrast and color
�
Show the menu system, if necessary
(�page 131).
�
Select “Video” � “AUX”� “AUX”.
The menu appears.
�
Select a setting: Slide qmr or turn
ymz.
�
Press n.
i
Please refer to the corresponding operating
instructions for information about how to oper-
ate the external video source.
Page 136 of 769
135 Control systems
COMAND video DVD
Switching to the next highest DVD menu level�
Press the L back button in the cen-
ter console.
or
�
Select the corresponding menu item in
the DVD menu.
or
�
Select a menu item of your choice from
the DVD menu.
�
Select the menu item “Go up” in the se-
lection menu.
Back to the film�
Press the L back button until you
can see the film.
or
�
Select the corresponding menu item in
the DVD menu.
or
�
Select a menu item of your choice from
the DVD menu.
�
Select the menu item “Back (to the
film)” in the selection menu.
Setting the language and audio format�
Select “Video” � “Video” � “Video
DVD”.
�
Show the menu system, if necessary
(�page 131).
�
Select “DVD-V” � “DVD Functions”.
�
Select “Menu Language” or “Audio Lan-
guage”.
In both cases a selection list will ap-
pear. The dotRin front of an entry
indicates the current language.
i
Depending on the DVD, it is possible the
menu items H and G either have no func-
tion or have no function in certain parts of the
DVD menu.
i
Depending on the DVD, it is possible the
menu item “Go up” either has no function or has
no function in certain parts of the DVD menu.
i
Depending on the DVD, it is possible the
menu item “Back (to the film)” either has no
function or has no function in certain parts of the
DVD menu.
i
This function is not available for all DVDs. If
it is available, you can set the language for the
DVD menu and the audio language and/or the
audio format. The number of settings you can
make is determined by the content of the DVD. It
may also be possible to make the settings in the
DVD menu (
�page 134).
��
Page 144 of 769
143 Control systems
COMAND telephone*
Entering the PIN2
The phone may request the PIN2 in order
to use certain functions. A corresponding
message appears in the display.�
Enter PIN2 digits into mobile phone.
Entering the PUK/PUK2
If you enter the PIN or PIN2 incorrectly
three times, the SIM card will be locked.
A corresponding message appears in the
display. It is necessary to enter the
PUK/PUK2 to unlock it. The PUK and/or
PUK2 are provided by your telephone ser-
vice provider.�
Enter PUK/PUK2 digits into mobile
phone.
Entering the unlock code
Many mobile phones can be protected
from unauthorized use with an unlock code
(see mobile phone operating instructions).
If you wish to use the phone functions
when the unlock code is active, a screen
appears requesting that you enter the un-
lock code. You cannot use the phone func-
tions (except “911” emergency call) until
you have entered the unlock code.�
Proceed in the same way as entering
the PIN (
�page 142).
i
The PIN2 entry applies only to GSM mobile
phones.
i
The PUK/PUK2 entry (P
ersonal U
nblocking
K
ey) applies only to GSM mobile phones.
Page 147 of 769
146 Control systemsCOMAND telephone*Call lists
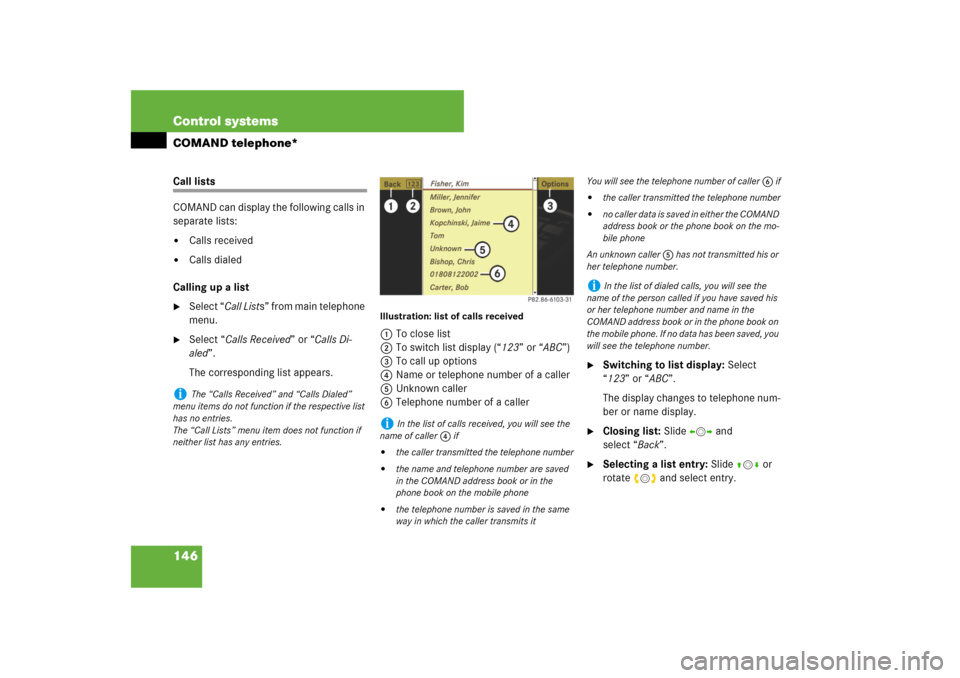
COMAND can display the following calls in
separate lists:�
Calls received
�
Calls dialed
Calling up a list
�
Select “Call Lists ” f r o m m a i n t e l e p h o ne
menu.
�
Select “Calls Received” or “Calls Di-
aled”.
The corresponding list appears.
Illustration: list of calls received1To close list
2To switch list display (“123” or “ABC”)
3To call up options
4Name or telephone number of a caller
5Unknown caller
6Telephone number of a caller
�
Switching to list display: Select
“123” or “ABC”.
The display changes to telephone num-
ber or name display.
�
Closing list: Slide omp and
select “Back”.
�
Selecting a list entry: Slide qmr or
rotate ymz and select entry.
i
The “Calls Received” and “Calls Dialed”
menu items do not function if the respective list
has no entries.
The “Call Lists” menu item does not function if
neither list has any entries.
i
In the list of calls received, you will see the
name of caller 4 if
�
the caller transmitted the telephone number
�
the name and telephone number are saved
in the COMAND address book or in the
phone book on the mobile phone
�
the telephone number is saved in the same
way in which the caller transmits it
You will see the telephone number of caller 6 if�
the caller transmitted the telephone number
�
no caller data is saved in either the COMAND
address book or the phone book on the mo-
bile phone
An unknown caller 5 has not transmitted his or
her telephone number.
i
In the list of dialed calls, you will see the
name of the person called if you have saved his
or her telephone number and name in the
COMAND address book or in the phone book on
the mobile phone. If no data has been saved, you
will see the telephone number.
Page 152 of 769
151 Control systems
COMAND telephone*
�
Entering number of a speed-dial pre-
set: Select all the digits in sequence.�
Deleting individual digits:
Select) and briefly press n.
�
Deleting entire number:
Select) and press n until the
number is deleted.
�
Connecting a call (speed-dial pre-
sets 1 -99): Select “S”.
or
�
Connecting a call (speed-dial pre-
sets 100 - 999): Select “#” after the
digits � “S”.
In both cases, the telephone connects
the call to the saved telephone num-
ber. If the speed-dial memory contains
no telephone numbers, you will see a
corresponding message.
�
Deleting message: Press n.Calling up speed-dial numbers using the
telephone keypad
�
Switching screen to telephone
mode: Call up main telephone menu
(�page 145).
�
Single-digit numbers: Press and hold
the A- 9 buttons.
or
�
Single- and two-digit numbers: Enter
number using the A- 9 buttons.
�
Press s.
or
�
Three-digit numbers: Enter number
using the A- 9 buttons.
�
Press #, and then s.
In all three cases, COMAND connects
the call to the saved telephone num-
ber. If the speed-dial memory contains
no telephone numbers, you will see a
corresponding message.
�
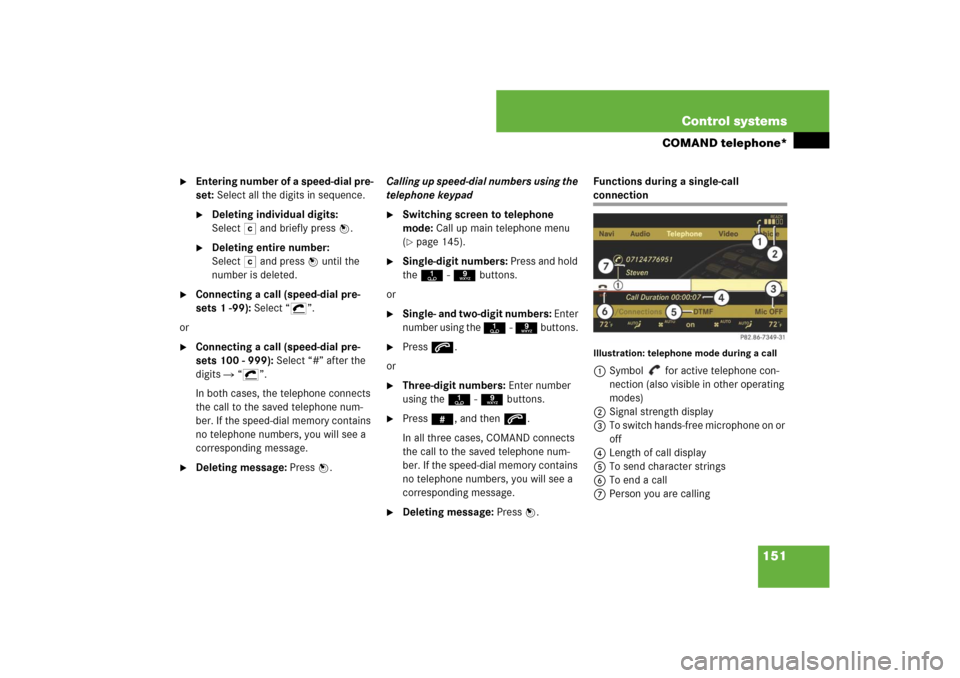
Deleting message: Press n.Functions during a single-call
connectionIllustration: telephone mode during a call1Symbol for active telephone con-
nection (also visible in other operating
modes)
2Signal strength display
3To switch hands-free microphone on or
off
4Length of call display
5To send character strings
6To end a call
7Person you are calling
Page 154 of 769
153 Control systems
COMAND telephone*
�
Sending a phone book entry as a
character string: Select “Name”.
�
Select desired phone book entry.
The entry is immediately sent as a char-
acter string.
�
Switching back to the call display:
Select “Y”.
Sending character strings via the tele-
phone keypad
�
Press corresponding button on tele-
phone keypad.
Each character you select is immedi-
ately sent.Ending an active call
�
Ending a call: Select “4END” in the
call display.
or
�
Press t on the telephone keypad or
on the multifunction steering wheel.
The COMAND display will change to
the previously selected display, if
applicable.
Transferring a call
From the hands-free system to the
Bluetooth
® headset
The call transfer is controlled by pressing
the PTT button on the Bluetooth
® headset
(see headset operating instructions). Nor-
mally, it is sufficient to press the PTT but-
ton once, but under certain circumstances
you may have to press it a second time.
Once the call has been transferred to the
Bluetooth
® headset, all the functions will
be available to you which are described in
the “Functions during a single-call connec-
tion” section (
�page 151).
Exception: “Switching the hands-free mi-
crophone on or off” function (
�page 152).
i
Telephone numbers containing the + char-
acter may impair the function.
i
The + character may impair the function.
i
The use of a Bluetooth
® headset requires
Bluetooth
® to be activated and the Bluetooth
®
headset to be authorized (
�page 176).
Page 168 of 769
167 Control systems
COMAND telephone*
Entries with the symbol contain com-
plete, navigable address data from the nav-
igation system that correspond to digital
map data. It is possible to quickly start
route guidance to these types of entry
(�page 172).
Switching from the smart speller to the
list
�
Slide mq repeatedly or press n until
the smart speller is hidden.
or
�
Select ?.
Switching from the list to the smart
speller
�
Select “Back” from the list.Searching via the smart speller
�
Switch from the list to the smart speller
if necessary.
�
Changing smart speller language:
Select!.
�
Select desired language.
�
Changing smart speller character
set: Select#.
Depending on the previous setting, you
will change to letters with special char-
acters or to numbers with special char-
acters.
�
Entering characters: Select the char-
acters one by one of the entry you are
searching for.
�
Deleting individual characters:
Select) and briefly press n.
Each time you enter or delete a charac-
ter, the closest match will be displayed
at the top of the list.
�
Deleting an entire entry: Select)
and press and hold n until the entry is
deleted.
�
Canceling search: Switch from the
smart speller to the list (
�page 167).
The entry at the top of the list is auto-
matically highlighted.
�
Going back to main address book
display: If necessary, switch from the
list to the smart speller (
�page 167)
and select “Back” in the smart speller.
Searching via the list
�
If necessary, switch from the smart
speller to the list (
�page 167).
�
Rotate ymz or slide qmr until desired
entry is highlighted on the list.