Page 432 of 509
431 Practical hints
Replacing bulbs
Bulbs Front lamps Rear lamps
LampType
1Additional turn signal
lampLED
2Turn signal lampPY 21 W
3Halogen headlamp:
Low beam
Bi-Xenon* headlamp:
Low and high beam
1
1Regarding vehicles with Bi-Xenon headlamps*, do
not replace the Bi-Xenon bulbs yourself.
H7 (55 W)
D1S-35 W
4Halogen headlamp:
High beam/high beam
flasher
Bi-Xenon* headlamp:
High beam flasher
H7 (55 W)
H7 (55 W)
5Front fog lamp
Corner-illuminating
front fog lamp*H11 (55 W)
H11 (55 W)
6Side marker lampW 5 W
7Parking and standing
lamp2 x
W5W-BV
LampType
8High mounted brake
lampLED
9Side markerW 5 W
aTurn signal lampPY 21 W
bBrake lamp, parking
and standing lamp, tail
lamp2 x P 21 W
cBackup lampP 21 W
dLicense plate lampsW 5 W
eRear fog lamp
(driver’s side only),
Side markerP 21 W
W 5 W
Page 433 of 509
432 Practical hints
Replacing bulbs
Notes on bulb replacement
�Only use 12 volt bulbs of the same type
and with the specified watt rating.
�Switch lights off before changing a bulb
to prevent short circuits.
�Always use a clean lint-free cloth when
handling bulbs.
�Your hands should be dry and free of oil
and grease.
�If the newly installed bulb does not
come on, visit an authorized
Mercedes-Benz Center.Have the LEDs and bulbs for the following
lamps replaced at an authorized
Mercedes-Benz Center.
�Additional turn signal lamps in the exte-
rior rear view mirrors
�High mounted brake lamp
�Bi-Xenon* lamps
�Front fog lamps
�Front side marker lamps
�License plate lamps
Replacing bulbs for front lamps
Before you start to replace a bulb for a
front lamp, do the following first:
�Turn the exterior lamp switch to
positionM (
�page 108).
�Open the hood (�page 325).
Warning!G
Keep bulbs out of reach of children.
Bulbs and bulb sockets can be very hot. Al-
low the lamp to cool down before changing
a bulb.
Halogen lamps contain pressurized gas. A
bulb can explode if you:
�touch or move it when hot
�drop the bulb
�scratch the bulb
Wear eye and hand protection.
Because of high voltage in Xenon lamps, it is
dangerous to replace the bulb or repair the
lamp and its components. We recommend
that you have such work done by a qualified
technician.!Do not replace the LEDs yourself. You could
otherwise damage the LEDs or parts of the
vehicle. Only have the LEDs replaced at an au-
thorized Mercedes-Benz Center.
Page 434 of 509
433 Practical hints
Replacing bulbs
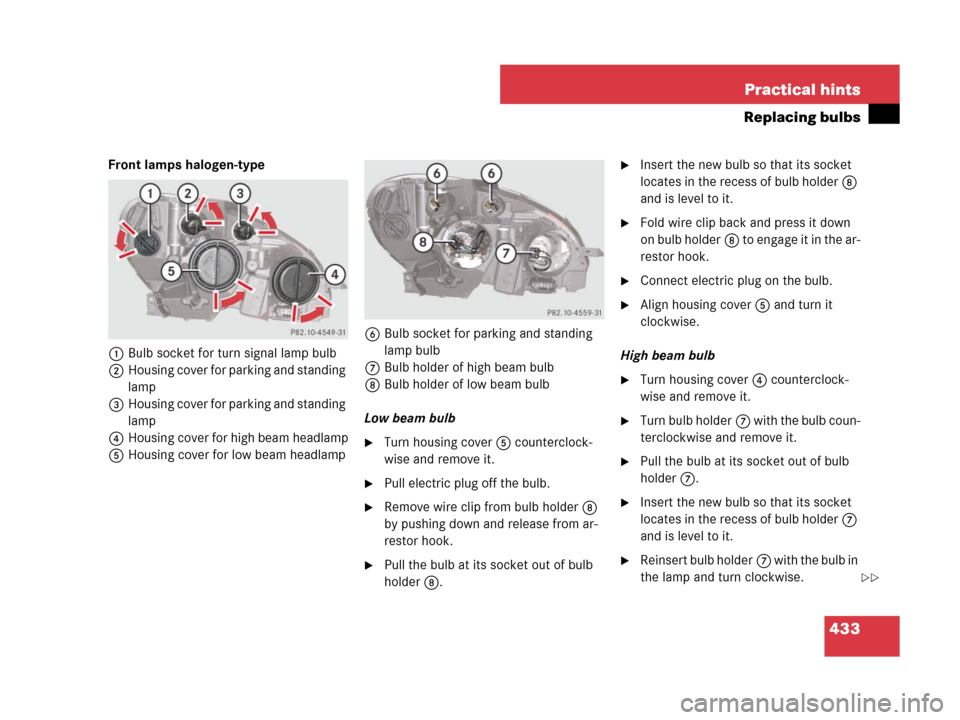
Front lamps halogen-type
1Bulb socket for turn signal lamp bulb
2Housing cover for parking and standing
lamp
3Housing cover for parking and standing
lamp
4Housing cover for high beam headlamp
5Housing cover for low beam headlamp6Bulb socket for parking and standing
lamp bulb
7Bulb holder of high beam bulb
8Bulb holder of low beam bulb
Low beam bulb
�Turn housing cover5 counterclock-
wise and remove it.
�Pull electric plug off the bulb.
�Remove wire clip from bulb holder8
by pushing down and release from ar-
restor hook.
�Pull the bulb at its socket out of bulb
holder8.
�Insert the new bulb so that its socket
locates in the recess of bulb holder8
and is level to it.
�Fold wire clip back and press it down
on bulb holder8 to engage it in the ar-
restor hook.
�Connect electric plug on the bulb.
�Align housing cover5 and turn it
clockwise.
High beam bulb
�Turn housing cover4 counterclock-
wise and remove it.
�Turn bulb holder7 with the bulb coun-
terclockwise and remove it.
�Pull the bulb at its socket out of bulb
holder7.
�Insert the new bulb so that its socket
locates in the recess of bulb holder7
and is level to it.
�Reinsert bulb holder7 with the bulb in
the lamp and turn clockwise.
��
Page 435 of 509
434 Practical hints
Replacing bulbs
�Align housing cover4 and turn it
clockwise.
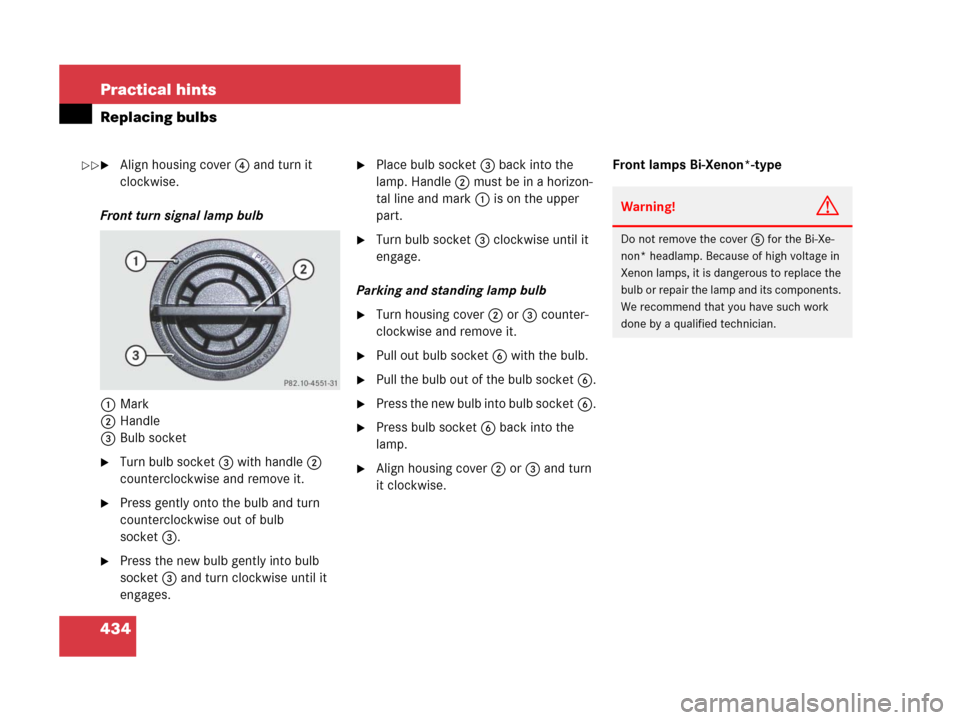
Front turn signal lamp bulb
1Mark
2Handle
3Bulb socket
�Turn bulb socket3 with handle2
counterclockwise and remove it.
�Press gently onto the bulb and turn
counterclockwise out of bulb
socket3.
�Press the new bulb gently into bulb
socket3 and turn clockwise until it
engages.
�Place bulb socket3 back into the
lamp. Handle2 must be in a horizon-
tal line and mark1 is on the upper
part.
�Turn bulb socket3 clockwise until it
engage.
Parking and standing lamp bulb
�Turn housing cover2 or3 counter-
clockwise and remove it.
�Pull out bulb socket6 with the bulb.
�Pull the bulb out of the bulb socket6.
�Press the new bulb into bulb socket6.
�Press bulb socket6 back into the
lamp.
�Align housing cover2 or3 and turn
it clockwise.Front lamps Bi-Xenon*-type
Warning!G
Do not remove the cover5 for the Bi-Xe-
non* headlamp. Because of high voltage in
Xenon lamps, it is dangerous to replace the
bulb or repair the lamp and its components.
We recommend that you have such work
done by a qualified technician.
��
Page 436 of 509
435 Practical hints
Replacing bulbs
1Bulb socket for turn signal lamp bulb
2Housing cover for parking and standing
lamp
3Housing cover for parking and standing
lamp
4Housing cover for high beam flasher
5Housing cover for Bi-Xenon headlamp6Bulb socket for parking and standing
lamp bulb
7Bulb holder for high beam flasher bulb
7Bulb holder for high beam bulbHigh beam bulb for high beam flasher
�Turn housing cover4 counterclock-
wise and remove it.
�Pull electric plug off the bulb.
�Pull out bulb holder7 with the bulb.
�Pull the bulb at its socket out of bulb
holder7.
�Insert the new bulb so that its socket
locates in the recess of bulb holder7
and is level to it.
�Reinsert bulb holder7 with the bulb in
the lamp.
�Connect electric plug on the bulb.
�Align housing cover4 and turn it
clockwise.
Page 437 of 509
436 Practical hints
Replacing bulbs
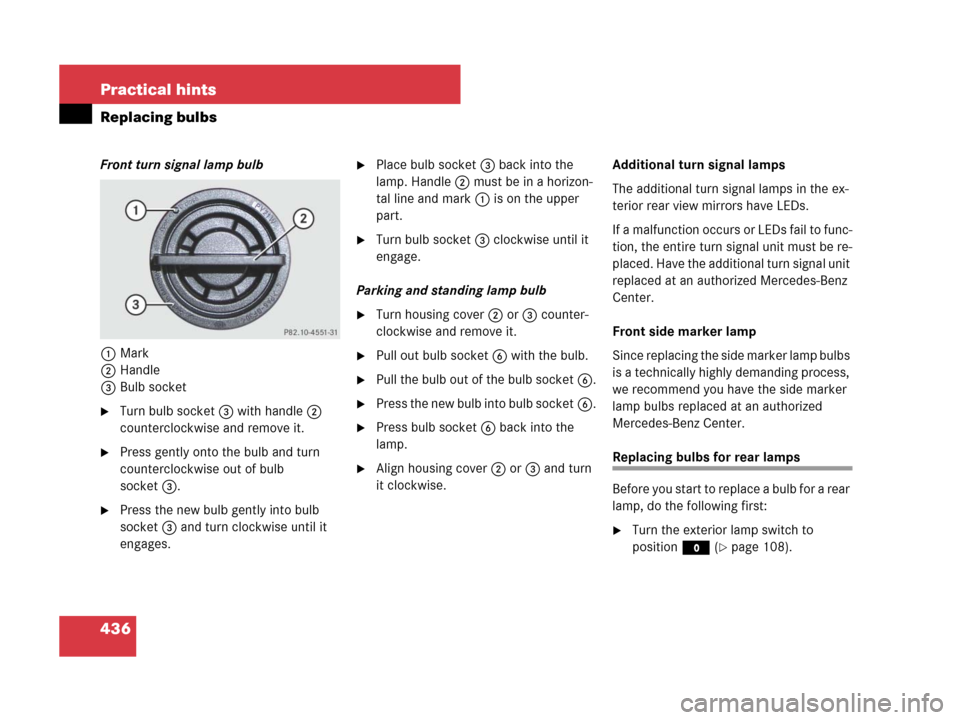
Front turn signal lamp bulb
1Mark
2Handle
3Bulb socket
�Turn bulb socket3 with handle2
counterclockwise and remove it.
�Press gently onto the bulb and turn
counterclockwise out of bulb
socket3.
�Press the new bulb gently into bulb
socket3 and turn clockwise until it
engages.
�Place bulb socket3 back into the
lamp. Handle2 must be in a horizon-
tal line and mark1 is on the upper
part.
�Turn bulb socket3 clockwise until it
engage.
Parking and standing lamp bulb
�Turn housing cover2 or3 counter-
clockwise and remove it.
�Pull out bulb socket6 with the bulb.
�Pull the bulb out of the bulb socket6.
�Press the new bulb into bulb socket6.
�Press bulb socket6 back into the
lamp.
�Align housing cover2 or3 and turn
it clockwise.Additional turn signal lamps
The additional turn signal lamps in the ex-
terior rear view mirrors have LEDs.
If a malfunction occurs or LEDs fail to func-
tion, the entire turn signal unit must be re-
placed. Have the additional turn signal unit
replaced at an authorized Mercedes-Benz
Center.
Front side marker lamp
Since replacing the side marker lamp bulbs
is a technically highly demanding process,
we recommend you have the side marker
lamp bulbs replaced at an authorized
Mercedes-Benz Center.Replacing bulbs for rear lamps
Before you start to replace a bulb for a rear
lamp, do the following first:
�Turn the exterior lamp switch to
positionM (
�page 108).
Page 438 of 509
437 Practical hints
Replacing bulbs
Tail lamp unit
�Open trunk lid.
�For driver side: Lift up the bottom and
pull out the trim panel covering the
driver side rear light.
�For passenger side: Open the fuse box
in the trunk (
�page 458).
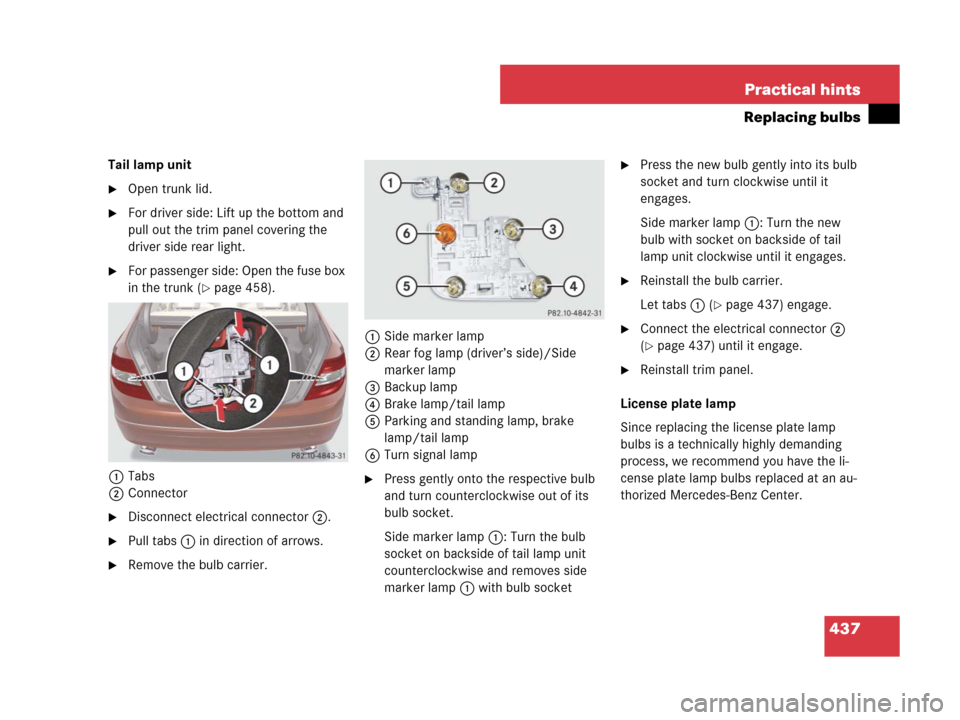
1Tabs
2Connector
�Disconnect electrical connector2.
�Pull tabs1 in direction of arrows.
�Remove the bulb carrier.1Side marker lamp
2Rear fog lamp (driver’s side)/Side
marker lamp
3Backup lamp
4Brake lamp/tail lamp
5Parking and standing lamp, brake
lamp/tail lamp
6Turn signal lamp
�Press gently onto the respective bulb
and turn counterclockwise out of its
bulb socket.
Side marker lamp1: Turn the bulb
socket on backside of tail lamp unit
counterclockwise and removes side
marker lamp1 with bulb socket
�Press the new bulb gently into its bulb
socket and turn clockwise until it
engages.
Side marker lamp1: Turn the new
bulb with socket on backside of tail
lamp unit clockwise until it engages.
�Reinstall the bulb carrier.
Let tabs1 (
�page 437) engage.
�Connect the electrical connector2
(
�page 437) until it engage.
�Reinstall trim panel.
License plate lamp
Since replacing the license plate lamp
bulbs is a technically highly demanding
process, we recommend you have the li-
cense plate lamp bulbs replaced at an au-
thorized Mercedes-Benz Center.
Page 455 of 509
454 Practical hints
Towing the vehicle
Warning!G
Without the engine running, there is no pow-
er assistance for the brake and steering sys-
tems. In this case, it is important to keep in
mind that a considerably higher degree of
effort is necessary to brake and steer the
vehicle. Adapt your driving accordingly.
iWhen towing the vehicle with all wheels on
the ground, please note the following:
With the automatic central locking activated and
the SmartKey or SmartKey with KEYLESS-GO*
(Canada only) in starter switch position 2, the ve-
hicle doors lock if the left front wheel as well as
the right rear wheel are turning at vehicle speeds
of approximately 9 mph (15 km/h) or more.
To prevent the vehicle doors from locking,
deactivate the automatic central locking
(
�page 173).
!If the vehicle is towed with the front axle
raised (not permissible for vehicles with
4MATIC), the gear selector lever must be in
positionN (manual transmission: gear shift lever
in neutral position) and the engine must be shut
off (SmartKey or SmartKey with KEYLESS-GO*
(Canada only) in starter switch position0 or1).
Active braking action through the ESP
® may
otherwise seriously damage the brake system.
While towing, the battery must be connected and
charged. Otherwise:
�you will not be able to switch on the ignition
�you will not be able to engage the automatic
transmission* in positionN (
�page 127)
When towing the vehicle with all wheels on the
ground, the gear selector lever must be in
positionN (manual transmission: gear shift lever
in neutral position) and the SmartKey or
SmartKey with KEYLESS-GO* (Canada only)
must be in starter switch position2.
!Towing of the vehicle should only be done
using the properly installed towing eye bolt.
Never attach tow cable, tow rope or tow rod to
vehicle chassis, frame or suspension parts.
iTo signal turns while being towed with the
hazard warning flasher in use, turn SmartKey or
SmartKey with KEYLESS-GO* (Canada only) in
starter switch to position2 and activate the
combination switch for the left or right turn sig-
nal in the usual manner – only the selected turn
signal will operate.
Upon canceling the turn signal, the hazard
warning flasher will operate again.
!Make sure the parking brake is released.
iIf the battery is disconnected or discharged
�the SmartKey or SmartKey with KEY-
LESS-GO* (Canada only) will not turn in the
starter switch
�Vehicles with automatic transmission*: the
gear selector lever will remain locked in
positionP (
�page 127).
For more information see “Battery”
(
�page 446) and see “Jump starting”
(
�page 451).