Page 315 of 509
314 Operation
Driving instructions
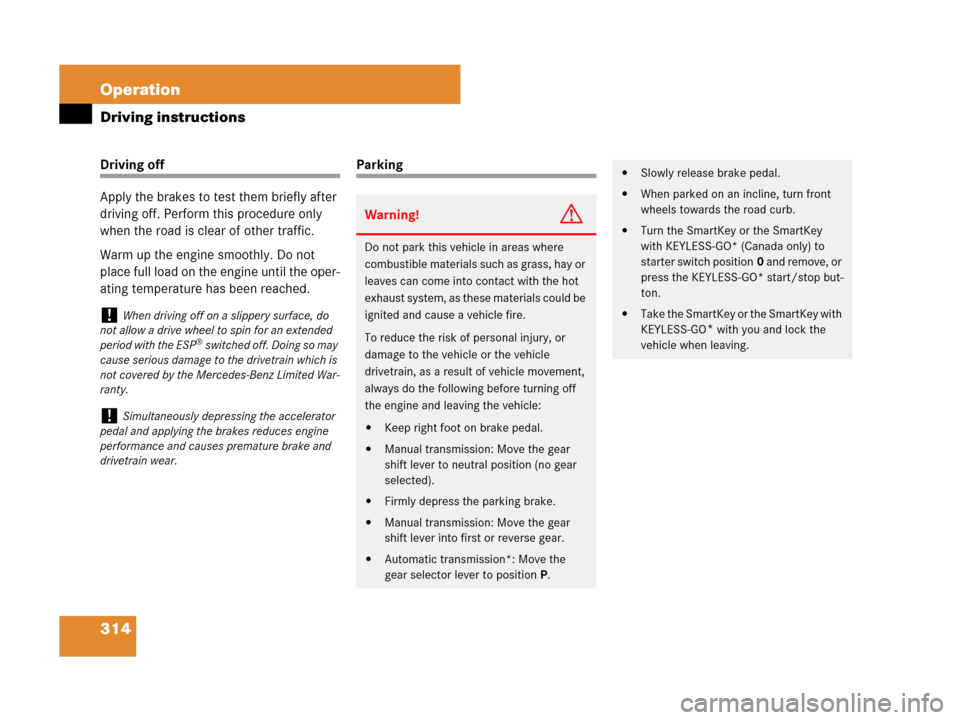
Driving off
Apply the brakes to test them briefly after
driving off. Perform this procedure only
when the road is clear of other traffic.
Warm up the engine smoothly. Do not
place full load on the engine until the oper-
ating temperature has been reached.Parking
!When driving off on a slippery surface, do
not allow a drive wheel to spin for an extended
period with the ESP
® switched off. Doing so may
cause serious damage to the drivetrain which is
not covered by the Mercedes-Benz Limited War-
ranty.
!Simultaneously depressing the accelerator
pedal and applying the brakes reduces engine
performance and causes premature brake and
drivetrain wear.
Warning!G
Do not park this vehicle in areas where
combustible materials such as grass, hay or
leaves can come into contact with the hot
exhaust system, as these materials could be
ignited and cause a vehicle fire.
To reduce the risk of personal injury, or
damage to the vehicle or the vehicle
drivetrain, as a result of vehicle movement,
always do the following before turning off
the engine and leaving the vehicle:
�Keep right foot on brake pedal.
�Manual transmission: Move the gear
shift lever to neutral position (no gear
selected).
�Firmly depress the parking brake.
�Manual transmission: Move the gear
shift lever into first or reverse gear.
�Automatic transmission*: Move the
gear selector lever to positionP.
�Slowly release brake pedal.
�When parked on an incline, turn front
wheels towards the road curb.
�Turn the SmartKey or the SmartKey
with KEYLESS-GO* (Canada only) to
starter switch position0 and remove, or
press the KEYLESS-GO* start/stop but-
ton.
�Take the SmartKey or the SmartKey with
KEYLESS-GO
* with you and lock the
vehicle when leaving.
Page 378 of 509
377 Practical hints
What to do if …?
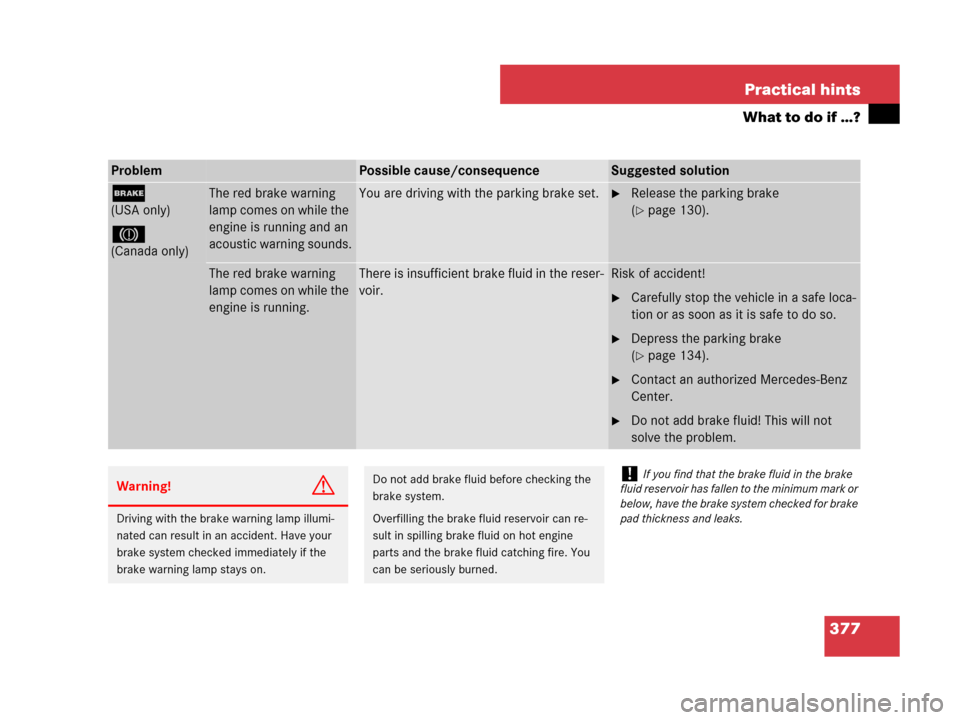
ProblemPossible cause/consequenceSuggested solution
;
(USA only)
3
(Canada only)
The red brake warning
lamp comes on while the
engine is running and an
acoustic warning sounds.You are driving with the parking brake set.�Release the parking brake
(
�page 130).
The red brake warning
lamp comes on while the
engine is running.There is insufficient brake fluid in the reser-
voir.Risk of accident!
�Carefully stop the vehicle in a safe loca-
tion or as soon as it is safe to do so.
�Depress the parking brake
(
�page 134).
�Contact an authorized Mercedes-Benz
Center.
�Do not add brake fluid! This will not
solve the problem.
Warning!G
Driving with the brake warning lamp illumi-
nated can result in an accident. Have your
brake system checked immediately if the
brake warning lamp stays on.
Do not add brake fluid before checking the
brake system.
Overfilling the brake fluid reservoir can re-
sult in spilling brake fluid on hot engine
parts and the brake fluid catching fire. You
can be seriously burned.!If you find that the brake fluid in the brake
fluid reservoir has fallen to the minimum mark or
below, have the brake system checked for brake
pad thickness and leaks.
Page 379 of 509
378 Practical hints
What to do if …?
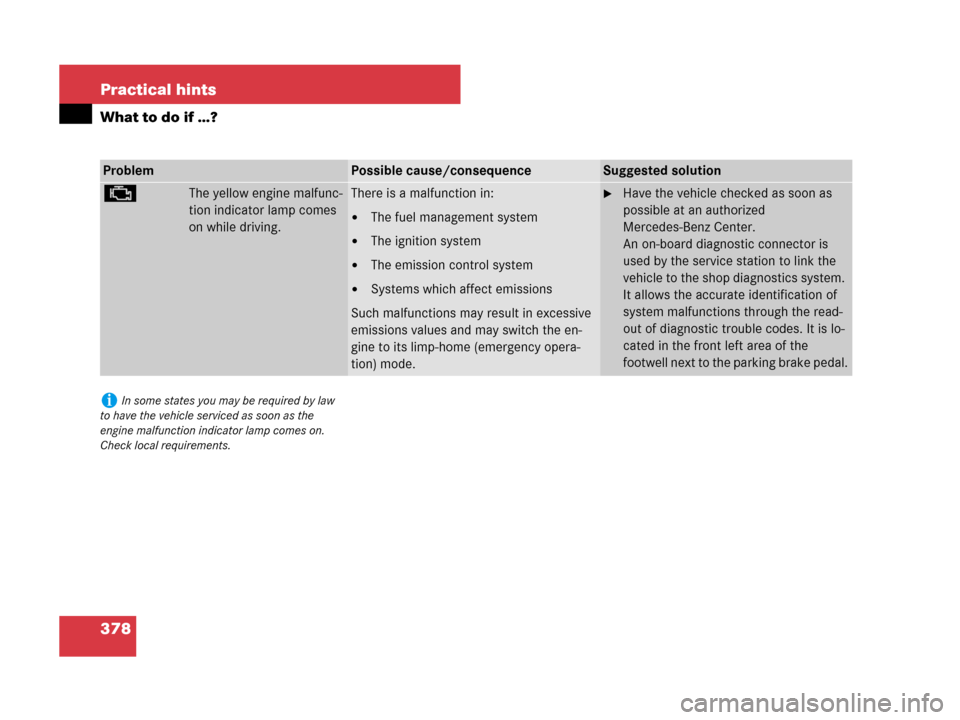
ProblemPossible cause/consequenceSuggested solution
±The yellow engine malfunc-
tion indicator lamp comes
on while driving.There is a malfunction in:
�The fuel management system
�The ignition system
�The emission control system
�Systems which affect emissions
Such malfunctions may result in excessive
emissions values and may switch the en-
gine to its limp-home (emergency opera-
tion) mode.
�Have the vehicle checked as soon as
possible at an authorized
Mercedes-Benz Center.
An on-board diagnostic connector is
used by the service station to link the
vehicle to the shop diagnostics system.
It allows the accurate identification of
system malfunctions through the read-
out of diagnostic trouble codes. It is lo-
cated in the front left area of the
footwell next to the parking brake pedal.
iIn some states you may be required by law
to have the vehicle serviced as soon as the
engine malfunction indicator lamp comes on.
Check local requirements.
Page 401 of 509
400 Practical hints
What to do if …?
Display Possible cause/consequencePossible solution
;Check
Brake Fluid LevelThere is insufficient brake fluid in the reser-
voir.Risk of accident!
�Carefully stop the vehicle in a safe location or
as soon as it is safe to do so.
�Depress the parking brake (�page 134).
�Contact an authorized Mercedes-Benz Cen-
ter.
�Do not add brake fluid! This will not solve the
problem.
(USA only)
3
(Canada only)
Warning!G
Driving with the message Check Brake
Fluid Level
displayed can result in an ac-
cident. Have your brake system checked im-
mediately. Do not add brake fluid before
checking the brake system. Overfilling the
brake fluid reservoir can result in spilling
brake fluid on hot engine parts and the
brake fluid catching fire. You can be serious-
ly burned.
!If you find that the brake fluid in the brake
fluid reservoir has fallen to the minimum mark or
below, have the brake system checked for brake
pad thickness and leaks.
Page 402 of 509
401 Practical hints
What to do if …?
Display Possible cause/consequencePossible solution
;ReleaseYou are driving with the parking brake set.�Release the parking brake (�page 130).
(USA only)Parking Brake
!
(Canada only)
;
(USA only)
3
EBR, ABS, and ESP
Inoperative
See Operator’s Manu-
alEBP, ABS and ESP® are switched off due to
a malfunction. BAS and the hill start assist
are also switched off.
The brake system still functions normally
but without the ABS and ESP
® available.
�Continue driving with added caution.
Wheels may lock during hard braking, re-
ducing steering capability.
�Have the system checked at an authorized
Mercedes-Benz Center as soon as possible.
Failure to follow these instructions increases
the risk of an accident.
(Canada only)
Page 412 of 509
411 Practical hints
What to do if …?
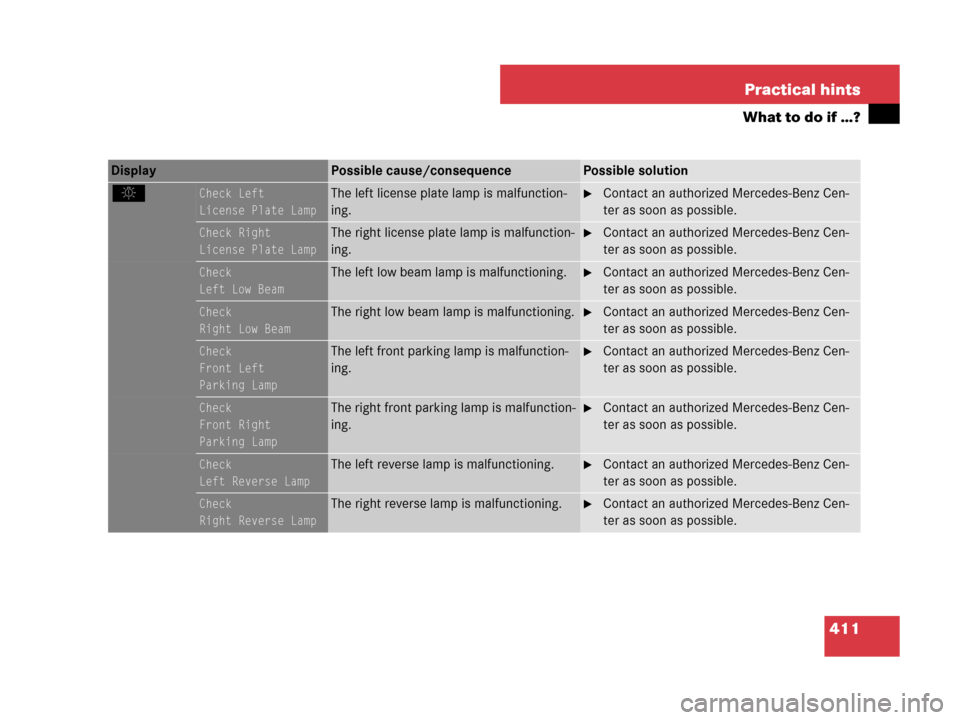
Display Possible cause/consequencePossible solution
.Check Left
License Plate LampThe left license plate lamp is malfunction-
ing.�Contact an authorized Mercedes-Benz Cen-
ter as soon as possible.
Check Right
License Plate LampThe right license plate lamp is malfunction-
ing.�Contact an authorized Mercedes-Benz Cen-
ter as soon as possible.
Check
Left Low BeamThe left low beam lamp is malfunctioning.�Contact an authorized Mercedes-Benz Cen-
ter as soon as possible.
Check
Right Low BeamThe right low beam lamp is malfunctioning.�Contact an authorized Mercedes-Benz Cen-
ter as soon as possible.
Check
Front Left
Parking LampThe left front parking lamp is malfunction-
ing.�Contact an authorized Mercedes-Benz Cen-
ter as soon as possible.
Check
Front Right
Parking LampThe right front parking lamp is malfunction-
ing.�Contact an authorized Mercedes-Benz Cen-
ter as soon as possible.
Check
Left Reverse LampThe left reverse lamp is malfunctioning.�Contact an authorized Mercedes-Benz Cen-
ter as soon as possible.
Check
Right Reverse LampThe right reverse lamp is malfunctioning.�Contact an authorized Mercedes-Benz Cen-
ter as soon as possible.
Page 415 of 509
414 Practical hints
What to do if …?
Display Possible cause/consequencePossible solution
.Check
Left Mirror
Turn SignalThe turn signal in the left exterior rear view
mirror is malfunctioning. This message will
only appear if all light emitting diodes have
stopped working.�Have the LEDs replaced as soon as possible.
Check
Right Mirror
Turn SignalThe turn signal in the right exterior rear view
mirror is malfunctioning. This message will
only appear if all light emitting diodes have
stopped working.�Have the LEDs replaced as soon as possible.
Switch Off LightsYou are getting out of the vehicle and the
lights are still switched on.�Switch off the headlamps (�page 108).
Turn Lights Off
Or
Remove KeyThe exterior lamp switch is set to * and
you have forgotten to take out the
SmartKey. The parking lamps remain
switched on.�Switch off the headlamps (�page 108).
or
�Remove the SmartKey from the starter
switch.
Page 422 of 509
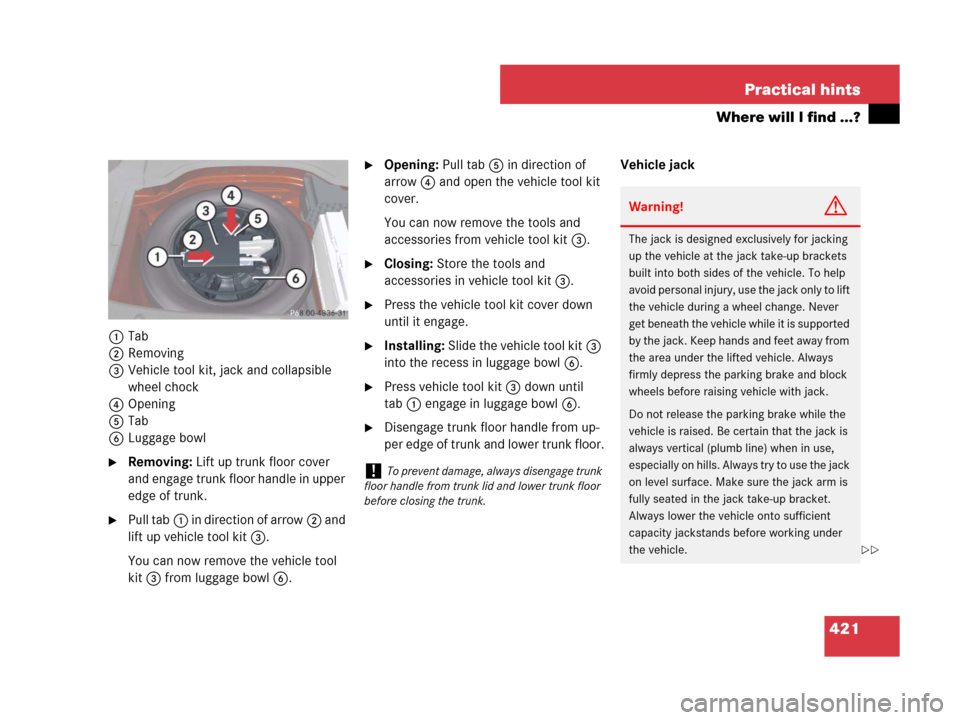
421 Practical hints
Where will I find ...?
1Tab
2Removing
3Vehicle tool kit, jack and collapsible
wheel chock
4 Opening
5Tab
6Luggage bowl
�Removing: Lift up trunk floor cover
and engage trunk floor handle in upper
edge of trunk.
�Pull tab1 in direction of arrow2 and
lift up vehicle tool kit3.
You can now remove the vehicle tool
kit3 from luggage bowl6.
�Opening: Pull tab5 in direction of
arrow4 and open the vehicle tool kit
cover.
You can now remove the tools and
accessories from vehicle tool kit3.
�Closing: Store the tools and
accessories in vehicle tool kit3.
�Press the vehicle tool kit cover down
until it engage.
�Installing: Slide the vehicle tool kit3
into the recess in luggage bowl6.
�Press vehicle tool kit3 down until
tab1 engage in luggage bowl6.
�Disengage trunk floor handle from up-
per edge of trunk and lower trunk floor.Vehicle jack
!To prevent damage, always disengage trunk
floor handle from trunk lid and lower trunk floor
before closing the trunk.
Warning!G
The jack is designed exclusively for jacking
up the vehicle at the jack take-up brackets
built into both sides of the vehicle. To help
avoid personal injury, use the jack only to lift
the vehicle during a wheel change. Never
get beneath the vehicle while it is supported
by the jack. Keep hands and feet away from
the area under the lifted vehicle. Always
firmly depress the parking brake and block
wheels before raising vehicle with jack.
Do not release the parking brake while the
vehicle is raised. Be certain that the jack is
always vertical (plumb line) when in use,
especially on hills. Always try to use the jack
on level surface. Make sure the jack arm is
fully seated in the jack take-up bracket.
Always lower the vehicle onto sufficient
capacity jackstands before working under
the vehicle.
��