Page 410 of 509
409 Practical hints
What to do if …?
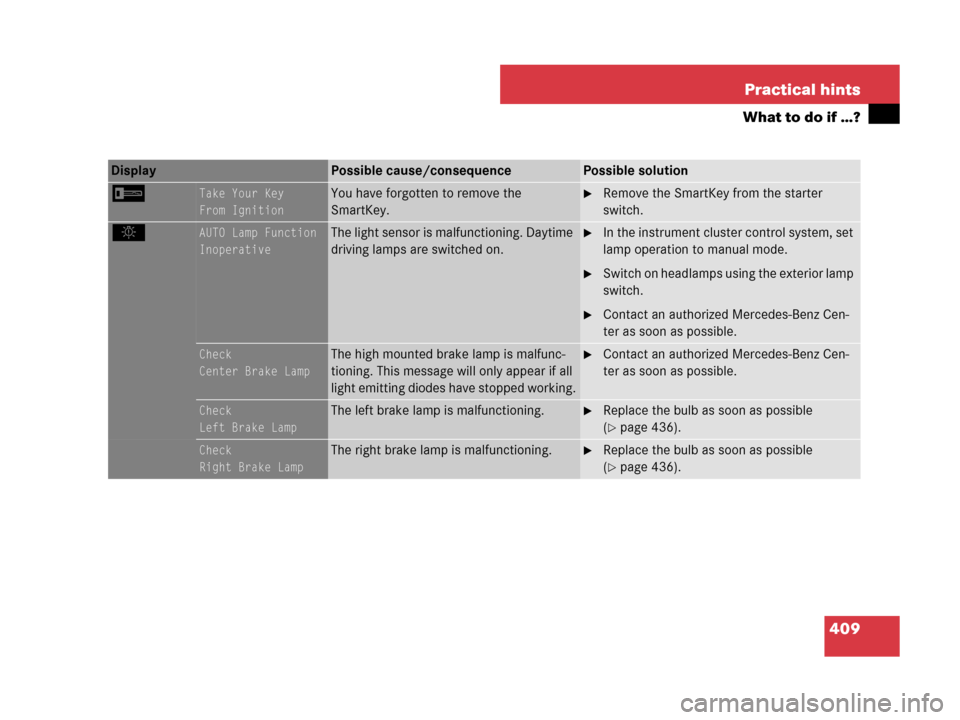
ITake Your Key
From IgnitionYou have forgotten to remove the
SmartKey.�Remove the SmartKey from the starter
switch.
.AUTO Lamp Function
InoperativeThe light sensor is malfunctioning. Daytime
driving lamps are switched on.�In the instrument cluster control system, set
lamp operation to manual mode.
�Switch on headlamps using the exterior lamp
switch.
�Contact an authorized Mercedes-Benz Cen-
ter as soon as possible.
Check
Center Brake LampThe high mounted brake lamp is malfunc-
tioning. This message will only appear if all
light emitting diodes have stopped working.�Contact an authorized Mercedes-Benz Cen-
ter as soon as possible.
Check
Left Brake LampThe left brake lamp is malfunctioning.�Replace the bulb as soon as possible
(
�page 436).
Check
Right Brake LampThe right brake lamp is malfunctioning.�Replace the bulb as soon as possible
(
�page 436).
Display Possible cause/consequencePossible solution
Page 415 of 509
414 Practical hints
What to do if …?
Display Possible cause/consequencePossible solution
.Check
Left Mirror
Turn SignalThe turn signal in the left exterior rear view
mirror is malfunctioning. This message will
only appear if all light emitting diodes have
stopped working.�Have the LEDs replaced as soon as possible.
Check
Right Mirror
Turn SignalThe turn signal in the right exterior rear view
mirror is malfunctioning. This message will
only appear if all light emitting diodes have
stopped working.�Have the LEDs replaced as soon as possible.
Switch Off LightsYou are getting out of the vehicle and the
lights are still switched on.�Switch off the headlamps (�page 108).
Turn Lights Off
Or
Remove KeyThe exterior lamp switch is set to * and
you have forgotten to take out the
SmartKey. The parking lamps remain
switched on.�Switch off the headlamps (�page 108).
or
�Remove the SmartKey from the starter
switch.
Page 431 of 509
430 Practical hints
Replacing bulbs
Safe vehicle operation depends on proper
exterior lighting and signaling. It is there-
fore essential that all bulbs and lamp
assemblies are in good working order at all
times.Correct headlamp adjustment is extremely
important. Have headlamps checked and
readjusted at regular intervals and when a
bulb has been replaced. See an authorized
Mercedes-Benz Center for headlamp
adjustment.iIf the headlamps or front fog lamps are
fogged up on the inside as a result of high
humidity, driving the vehicle a distance with the
lights on should clear up the fogging.
iBackup bulbs will be brought into use when
lamps malfunction. Read and observe the mes-
sages in the multifunction display (
�page 413).
Page 432 of 509
431 Practical hints
Replacing bulbs
Bulbs Front lamps Rear lamps
LampType
1Additional turn signal
lampLED
2Turn signal lampPY 21 W
3Halogen headlamp:
Low beam
Bi-Xenon* headlamp:
Low and high beam
1
1Regarding vehicles with Bi-Xenon headlamps*, do
not replace the Bi-Xenon bulbs yourself.
H7 (55 W)
D1S-35 W
4Halogen headlamp:
High beam/high beam
flasher
Bi-Xenon* headlamp:
High beam flasher
H7 (55 W)
H7 (55 W)
5Front fog lamp
Corner-illuminating
front fog lamp*H11 (55 W)
H11 (55 W)
6Side marker lampW 5 W
7Parking and standing
lamp2 x
W5W-BV
LampType
8High mounted brake
lampLED
9Side markerW 5 W
aTurn signal lampPY 21 W
bBrake lamp, parking
and standing lamp, tail
lamp2 x P 21 W
cBackup lampP 21 W
dLicense plate lampsW 5 W
eRear fog lamp
(driver’s side only),
Side markerP 21 W
W 5 W
Page 434 of 509

433 Practical hints
Replacing bulbs
Front lamps halogen-type
1Bulb socket for turn signal lamp bulb
2Housing cover for parking and standing
lamp
3Housing cover for parking and standing
lamp
4Housing cover for high beam headlamp
5Housing cover for low beam headlamp6Bulb socket for parking and standing
lamp bulb
7Bulb holder of high beam bulb
8Bulb holder of low beam bulb
Low beam bulb
�Turn housing cover5 counterclock-
wise and remove it.
�Pull electric plug off the bulb.
�Remove wire clip from bulb holder8
by pushing down and release from ar-
restor hook.
�Pull the bulb at its socket out of bulb
holder8.
�Insert the new bulb so that its socket
locates in the recess of bulb holder8
and is level to it.
�Fold wire clip back and press it down
on bulb holder8 to engage it in the ar-
restor hook.
�Connect electric plug on the bulb.
�Align housing cover5 and turn it
clockwise.
High beam bulb
�Turn housing cover4 counterclock-
wise and remove it.
�Turn bulb holder7 with the bulb coun-
terclockwise and remove it.
�Pull the bulb at its socket out of bulb
holder7.
�Insert the new bulb so that its socket
locates in the recess of bulb holder7
and is level to it.
�Reinsert bulb holder7 with the bulb in
the lamp and turn clockwise.
��
Page 435 of 509

434 Practical hints
Replacing bulbs
�Align housing cover4 and turn it
clockwise.
Front turn signal lamp bulb
1Mark
2Handle
3Bulb socket
�Turn bulb socket3 with handle2
counterclockwise and remove it.
�Press gently onto the bulb and turn
counterclockwise out of bulb
socket3.
�Press the new bulb gently into bulb
socket3 and turn clockwise until it
engages.
�Place bulb socket3 back into the
lamp. Handle2 must be in a horizon-
tal line and mark1 is on the upper
part.
�Turn bulb socket3 clockwise until it
engage.
Parking and standing lamp bulb
�Turn housing cover2 or3 counter-
clockwise and remove it.
�Pull out bulb socket6 with the bulb.
�Pull the bulb out of the bulb socket6.
�Press the new bulb into bulb socket6.
�Press bulb socket6 back into the
lamp.
�Align housing cover2 or3 and turn
it clockwise.Front lamps Bi-Xenon*-type
Warning!G
Do not remove the cover5 for the Bi-Xe-
non* headlamp. Because of high voltage in
Xenon lamps, it is dangerous to replace the
bulb or repair the lamp and its components.
We recommend that you have such work
done by a qualified technician.
��
Page 436 of 509
435 Practical hints
Replacing bulbs
1Bulb socket for turn signal lamp bulb
2Housing cover for parking and standing
lamp
3Housing cover for parking and standing
lamp
4Housing cover for high beam flasher
5Housing cover for Bi-Xenon headlamp6Bulb socket for parking and standing
lamp bulb
7Bulb holder for high beam flasher bulb
7Bulb holder for high beam bulbHigh beam bulb for high beam flasher
�Turn housing cover4 counterclock-
wise and remove it.
�Pull electric plug off the bulb.
�Pull out bulb holder7 with the bulb.
�Pull the bulb at its socket out of bulb
holder7.
�Insert the new bulb so that its socket
locates in the recess of bulb holder7
and is level to it.
�Reinsert bulb holder7 with the bulb in
the lamp.
�Connect electric plug on the bulb.
�Align housing cover4 and turn it
clockwise.
Page 453 of 509

452 Practical hints
Jump starting
The battery is located in the engine com-
partment on the right hand side. For jump
starting, use the under hood terminals in
front of the battery.
�Make sure the two vehicles do not
touch.
�Turn off all electrical consumers,
except hazard warning flashers or work
lights.
�Apply the parking brake (�page 134).
�Make sure gear selector lever* is set to
positionP (manual transmission to
Neutral).
�Open the hood (�page 326).
�Slide red cover2 from positive under
hood terminal3 in direction of arrow. 1Positive terminal of charged battery
2Positive under hood terminal cover
3Positive under hood terminal in front of
discharged battery
4Negative under hood terminal
5Negative terminal of charged battery
�Connect positive terminal1 of the
charged battery with positive under
hood terminal3 in front of the dis-
charged battery with the jumper cable.
Clamp cable to charged battery1
first.
�Start the engine of the vehicle with the
charged battery and run at idle speed.
�Connect negative terminal5 of the
charged battery to jumper cables and
attach other end to negative under
hood terminal4 on the vehicle. Clamp
cable to charged battery5 first
�Start the engine of the disabled
vehicle.
You can now turn on the electrical con-
sumers. Do not switch on the headlamps
under any circumstances.
�Remove the jumper cables first from
the negative terminals4 and5 and
then from the positive terminals3
and1.
You can now switch on the headlamps.
�Slide red cover2 from positive under
hood terminal3 back.
�Close the hood (�page 326).
�Have the battery checked at the near-
est authorized Mercedes-Benz Center.
!Never invert the terminal connections.