Page 230 of 509

229 Controls in detail
Audio system
Displaying details on a telephone
�h � Tel � Phone List.
�Select the telephone from the list.
�Select Options � Details.
The details screen for the device is
shown in the audio display.
�To close details screen:
Slideompthe audio controller or
press buttoní in the center
console.
De-authorizing a Bluetooth
® device
�h � Tel � Phone List.
�Select authorized device.
�Select Options � De-Authorize.
A prompt appears asking whether you
really want to de-authorize this device.
�Select Yes or No.
If you select
Yes, the device will be
de-authorized.Activating another telephone
If you have several authorized telephones,
you can switch between the individual tele-
phones.
When you authorize a new telephone, it is
automatically activated. Only one tele-
phone can be active at a time.
�h � Tel � Phone List.
�Select an authorized telephone from
the list.
�Press n to confirm.
The selected phone will be searched
for and connected if it is located in the
Bluetooth
® range and Bluetooth® is ac-
tivated on the corresponding device.
The selected telephone is activated.
A dotR in front of the entry, indicates
the current active telephone in the
phone list.
Receiving business cards
You can import business cards (vCards)
into the address book from external Blue-
tooth
® devices (�page 233).
iIf you de-authorize a device which has been
authorized in the past and which is not detected
in the search, this device will no longer be dis-
played in the device list.
Devices which have been authorized in the past
but which are not detected in the search are ei-
ther not switched on or not in the vehicle.
iYou cannot switch to another authorized
phone during a call.
Page 250 of 509
249 Controls in detail
Air vents
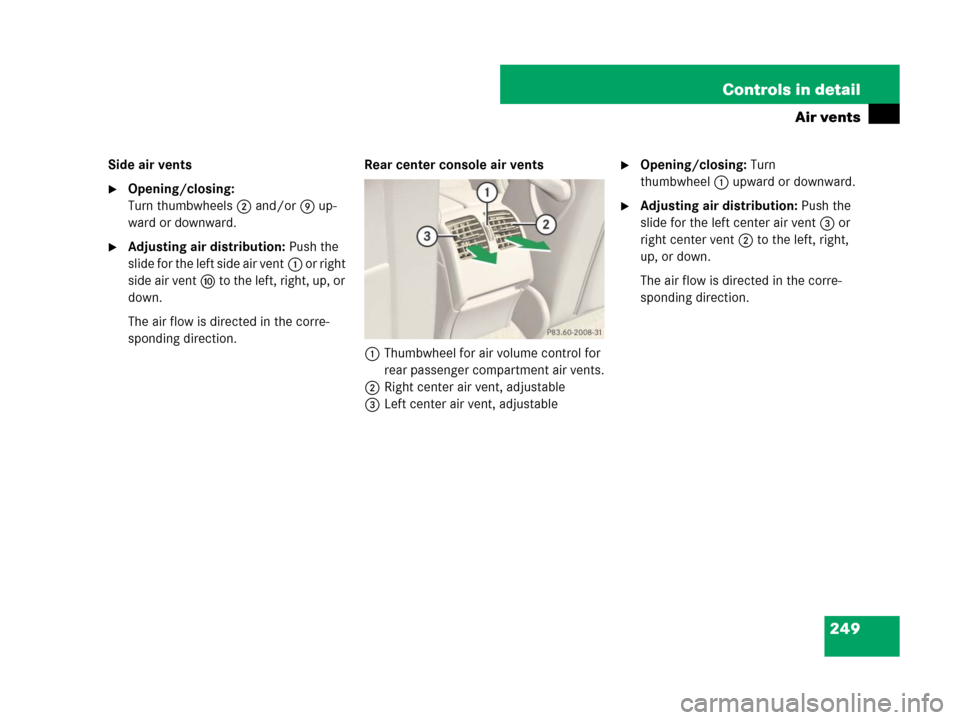
Side air vents
�Opening/closing:
Turn thumbwheels2 and/or9 up-
ward or downward.
�Adjusting air distribution: Push the
slide for the left side air vent1 or right
side air venta to the left, right, up, or
down.
The air flow is directed in the corre-
sponding direction.Rear center console air vents
1Thumbwheel for air volume control for
rear passenger compartment air vents.
2Right center air vent, adjustable
3Left center air vent, adjustable
�Opening/closing: Turn
thumbwheel1 upward or downward.
�Adjusting air distribution: Push the
slide for the left center air vent3 or
right center vent2 to the left, right,
up, or down.
The air flow is directed in the corre-
sponding direction.
Page 269 of 509

Rear climate control
The rear climate control panel is located in
the rear center console.
Setting temperature
Use temperature c")
268 Controls in detail
3-zone automatic climate control* (Canada only)
Rear climate control
The rear climate control panel is located in
the rear center console.
Setting temperature
Use temperature control 5 to adjust the
air temperature in the rear passenger com-
partment. You should raise or lower the
temperature setting in small increments,
preferably starting at 22°C (72°F). The cli-
mate control will adjust to the set temper-
ature as fast as possible.�Increasing/decreasing: Press the re-
spective temperature control
button5.
The 3-zone automatic climate control
system will correspondingly adjust the
temperature in the rear passenger
compartment.
Adjusting air volume
Use button· orQ (
�page 268) to
adjust the air volume.
�Press button· to decrease, or
buttonQ to increase air volume to
the desired level.
The air volume is adjusted correspond-
ing to the set blower speed.
Warning!G
Follow the recommended settings for heat-
ing and cooling as given in the instructions
for the front 3-zone automatic climate con-
trol (
�page 259). Otherwise the windows
could fog up, impairing visibility for the driv-
er and endangering you and others.
Item
1Decreasing/increasing air volume
for rear center air vents
2Right rear center air vent, adjustable
3Decreasing/increasing air volume
for rear center air vents
4Display
5Temperature control
6Left rear center air vent, adjustable
iAt low outside temperatures or if you have
switched off the cooling function, you cannot
cool the rear passenger compartment.
iIf you have switched off the cooling function
with the front 3-zone automatic climate control
panel, the cooling of the rear passenger com-
partment is also switched off. Adjusting with the
rear control panel is not possible.
Page 288 of 509

287 Controls in detail
Loading and storing
Cup holders
Cup holder in front center console
1Cup holderCup holder in rear center armrest
1Release button
2Cup holder
�Opening: Pull down the armrest.
�Pull the release catch and swing the
armrest storage compartment cover
upward.
�Press release button1.
�Cup holder2 swing out and open au-
tomaticaly.
Warning!G
In order to help prevent spilling liquids on
vehicle occupants and/or vehicle equip-
ment, only use containers that fit into the
cup holder. Use lids on open containers and
do not fill containers to a height where the
contents, especially hot liquids, could spill
during braking, vehicle maneuvers, or in an
accident. Liquids spilled on vehicle occu-
pants may cause serious personal injury.
Liquids spilled on vehicle equipment may
cause damage not covered by the
Mercedes-Benz Limited Warranty.
When not in use, keep the cup holders
closed. An open cup holder may cause injury
to you or others when contacted during
braking, vehicle maneuvers, or in an
accident.
Keep in mind that objects placed in the cup
holder may come loose during braking, vehi-
cle maneuvers, or in an accident and be
thrown around in the vehicle interior.
Objects thrown around in the vehicle interi-
or may cause an accident and/or serious
personal injury.
iYou can now close the armrest storage
compartment.
Page 291 of 509

290 Controls in detail
Useful features
Rear window sunshade*
The switch is located in the center console.
1Rear window sunshade switch
�Switch on the ignition.
Always raise the sunshade fully for its sup-
port against the window frame.
�Raising: Press switch1 briefly.
The sunshade is raised completely.
�Stopping the raising procedure:
Press switch1 again.
The sunshade stops.
�Lowering: Press switch1 briefly.
The sunshade is lowered completely.
�Stopping the lowering procedure:
Press switch1 again.
The sunshade stops.
!Make sure the movement of the rear win-
dow sunshade is not restricted by objects on the
rear window shelf. Otherwise, the sunshade or
the objects could be damaged.
Warning!G
When operating the rear window sunshade,
make sure there is no danger of anyone be-
ing harmed by the raising or lowering
procedure.
The raising or lowering procedure can be
immediately halted by briefly pressing the
switch1.
Briefly press switch1 again to raise or low-
er the rear window sunshade completely.
Warning!G
When leaving the vehicle, always remove the
SmartKey or SmartKey with KEYLESS-GO*
(Canada only) from the starter switch, take
it with you, and lock the vehicle. Do not
leave children unattended in the vehicle, or
with access to an unlocked vehicle. Unsu-
pervised use of vehicle equipment may
cause an accident and/or serious personal
injury.
Page 292 of 509
291 Controls in detail
Useful features
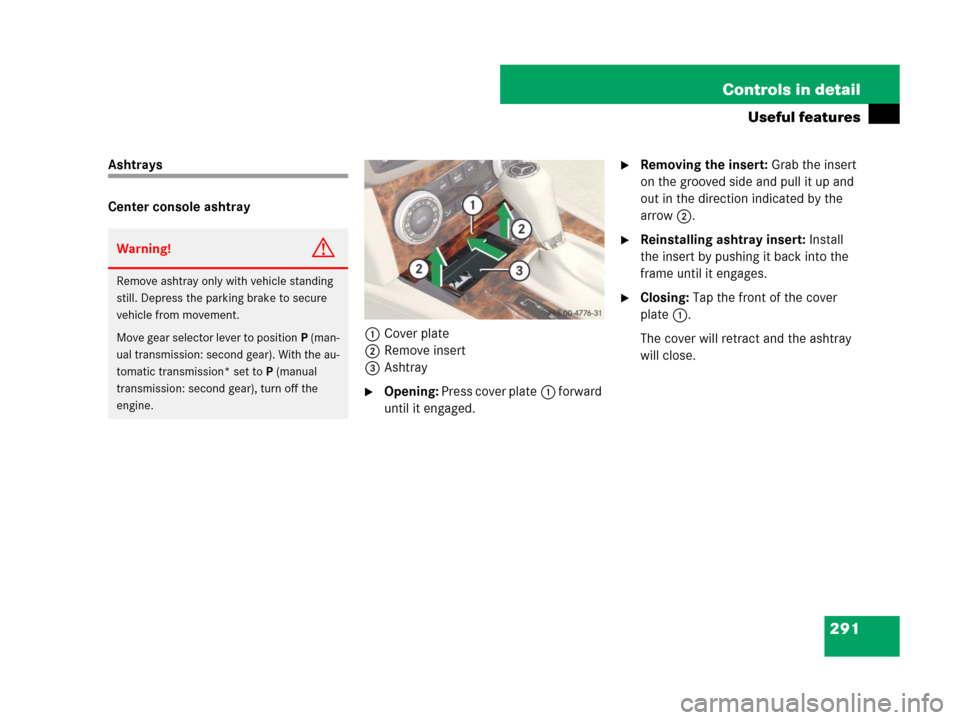
Ashtrays
Center console ashtray
1Cover plate
2Remove insert
3Ashtray
�Opening: Press cover plate1 forward
until it engaged.
�Removing the insert: Grab the insert
on the grooved side and pull it up and
out in the direction indicated by the
arrow2.
�Reinstalling ashtray insert: Install
the insert by pushing it back into the
frame until it engages.
�Closing: Tap the front of the cover
plate1.
The cover will retract and the ashtray
will close.
Warning!G
Remove ashtray only with vehicle standing
still. Depress the parking brake to secure
vehicle from movement.
Move gear selector lever to positionP (man-
ual transmission: second gear). With the au-
tomatic transmission* set toP (manual
transmission: second gear), turn off the
engine.
Page 488 of 509

487 Index
A
ABS 27, 59
Indicator lamp 59, 374
Messages in display 389, 398
Accelerator position, automatic
transmission 142
Accessory weight 356
Accident 132
Air bags 36
Children 51
Front 39
Front passenger front air bag off
indicator lamp 29, 45
OCS 41
Safety guidelines 38
Side impact 40
Window curtain 40, 41
Air conditioning system see Climate con-
trol system
Air conditioning, Cooling 258, 267
Air conditioning, Refrigerant 478, 480
Air distribution 254, 263
Air pressure see Tire inflation pressure
Air recirculation mode 257, 265Air vents 247
Center air vents 248
Rear center console air vents 249
Air volume 254, 263, 268
Alarm
Audible alarm and flashing exterior
lamps (Panic alarm) 58
Alarm system see Anti-theft systems
Antiglare
Rear view mirrors 100
Anti-theft systems 66
Alarm, visual and audible 66
Anti-theft alarm system 66
Immobilizer 66
Aquaplaning see Hydroplaning
Armrest 284, 286
Ashtrays 291, 292
Aspect ratio 356
Audio Aux mode 220
AUDIO menu (Control system) 158Audio system 176
“911” emergency call 231
Audio and telephone, operation 176
Audio Aux mode 220
Audio control unit 177
Audio display 180
Bluetooth
® operation 222
Call lists 236
CD changer* 208, 214
CD operation 208
CD player 160, 208
CD, fast forward/rewind 219
CD, pause function 218
CD, submenu overview 208
Components 177
Controller 182
Example, how to use 187
Functions during a single call 240
Making calls 237
On/Off 188
Operating 185
Operating and display elements 178
Operating CD player 213
Operating safety 177
Operation 188
Overview 176
Page:
< prev 1-8 9-16 17-24