Page 9 of 509

Contents
Flat tire .............................................. 440
Preparing the vehicle.................... 440
Mounting the Minispare wheel ..... 441
Battery ............................................... 446
Disconnecting the battery ............ 448
Removing the battery ................... 449
Charging and reinstalling
the battery.................................... 449
Reconnecting the battery ............. 450
Jump starting ..................................... 451
Towing the vehicle ............................. 453
Installing towing eye bolt.............. 455
Fuses ................................................. 456
Fuse box
in passenger compartment .......... 457
Fuse box
in engine compartment ................ 457
Fuse box
in the trunk................................... 458
Technical data................................. 459
Parts service ...................................... 460
Warranty coverage............................. 461
Loss of Service and
Warranty Information Booklet ...... 461
Identification labels ........................... 462
Layout of poly-V-belt drive ................. 464
C 300/C 350 ............................... 464
Engine................................................ 465
Rims and tires.................................... 467
Same size tires ............................. 468
Mixed size tires ............................ 469
Minispare wheel ........................... 471
Electrical system ............................... 473
Main dimensions and weights............ 474
Main dimensions .......................... 474
Weights ........................................ 475
Fuels, coolants, lubricants, etc. ......... 476
Capacities .................................... 476
Engine oils.................................... 480
Engine oil additives ...................... 480
Air conditioning refrigerant .......... 480
Brake fluid .................................... 480
Premium unleaded gasoline ......... 481
Gasoline additives ........................ 481Fuel requirements ........................ 482
Flexible Fuel Vehicles (USA only) . 482
Coolants ...................................... 484
Windshield washer system
and headlamp cleaning system* .. 486
Index................................................. 487
Page 367 of 509

366 Operation
Vehicle care
Engine cleaning
Prior to cleaning the engine compartment,
make sure to protect electrical compo-
nents and connectors from contact with
water and cleaning agents.
Corrosion protection, such as
MB Anticorrosion Wax, should be applied
to the engine compartment after every
engine cleaning. Before applying, all
control linkage bushings and joints should
be lubricated. The poly-V-belt and all pul-
leys should be protected from any wax. Vehicle washing
In the winter, thoroughly remove all traces
of road salt as soon as possible.
When washing the vehicle underbody, do
not forget to clean the inner sides of the
wheels.Hand-wash
Do not use hot water or wash your vehicle
in direct sunlight.
�Only use a mild car wash detergent,
such as Mercedes-Benz approved Car
Shampoo.
�Thoroughly spray the vehicle with a dif-
fused jet of water.
Direct only a very weak spray towards
the ventilation intake.
�Use plenty of water and rinse the
sponge and chamois frequently.
�Rinse with clean water and thoroughly
dry with a chamois.
Do not allow cleaning agents to dry on
the finish.
iVehicles with KEYLESS-GO* (Canada only):
If a door handle is hit by a strong jet of water, and
a SmartKey with KEYLESS-GO* is in close prox-
imity, i.e. within approximately 3 ft (approxi-
mately 1 m), the vehicle could be inadvertently
locked or unlocked.
!Do not use scouring agents on these parts.
Never apply strong force and only use a soft,
non-scratching cloth when cleaning the vehicle.
Do not attempt to wipe the surface with a dry
cloth or sponge.
Otherwise you may scratch or damage the paint.
Page 374 of 509
373 Practical hints
What to do if …?
Where will I find ...?
Unlocking/locking in an emergency
Resetting activated head restraints
Replacing SmartKey batteries
Replacing bulbs
Replacing wiper blades
Flat tire
Battery
Jump starting
Towing the vehicle
Fuses
Page 427 of 509
426 Practical hints
Unlocking/locking in an emergency
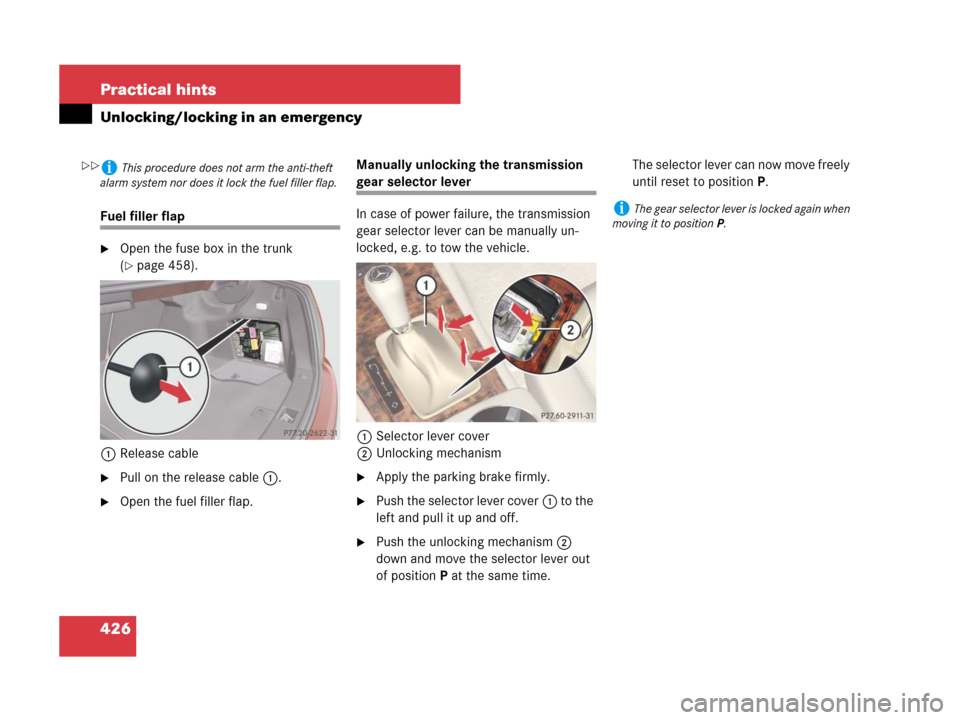
Fuel filler flap
�Open the fuse box in the trunk
(
�page 458).
1Release cable
�Pull on the release cable1.
�Open the fuel filler flap.Manually unlocking the transmission
gear selector lever
In case of power failure, the transmission
gear selector lever can be manually un-
locked, e.g. to tow the vehicle.
1Selector lever cover
2Unlocking mechanism
�Apply the parking brake firmly.
�Push the selector lever cover1 to the
left and pull it up and off.
�Push the unlocking mechanism2
down and move the selector lever out
of positionP at the same time.The selector lever can now move freely
until reset to positionP.
iThis procedure does not arm the anti-theft
alarm system nor does it lock the fuel filler flap.
iThe gear selector lever is locked again when
moving it to positionP.
��
Page 438 of 509

437 Practical hints
Replacing bulbs
Tail lamp unit
�Open trunk lid.
�For driver side: Lift up the bottom and
pull out the trim panel covering the
driver side rear light.
�For passenger side: Open the fuse box
in the trunk (
�page 458).
1Tabs
2Connector
�Disconnect electrical connector2.
�Pull tabs1 in direction of arrows.
�Remove the bulb carrier.1Side marker lamp
2Rear fog lamp (driver’s side)/Side
marker lamp
3Backup lamp
4Brake lamp/tail lamp
5Parking and standing lamp, brake
lamp/tail lamp
6Turn signal lamp
�Press gently onto the respective bulb
and turn counterclockwise out of its
bulb socket.
Side marker lamp1: Turn the bulb
socket on backside of tail lamp unit
counterclockwise and removes side
marker lamp1 with bulb socket
�Press the new bulb gently into its bulb
socket and turn clockwise until it
engages.
Side marker lamp1: Turn the new
bulb with socket on backside of tail
lamp unit clockwise until it engages.
�Reinstall the bulb carrier.
Let tabs1 (
�page 437) engage.
�Connect the electrical connector2
(
�page 437) until it engage.
�Reinstall trim panel.
License plate lamp
Since replacing the license plate lamp
bulbs is a technically highly demanding
process, we recommend you have the li-
cense plate lamp bulbs replaced at an au-
thorized Mercedes-Benz Center.
Page 457 of 509
 and
systems secured by that fuse will stop op-")
456 Practical hints
Fuses
The electrical fuses in your vehicle serve to
switch off malfunctioning power circuits.
If a fuse is blown, the component(s) and
systems secured by that fuse will stop op-
erating.If a newly inserted fuse blows again, have
the cause determined and rectified at an
authorized Mercedes-Benz Center.
A fuse chart explains the fuse allocation
and fuse amperages. It is located in the
main fuse box in the passenger compart-
ment (
�page 457).
The electrical fuses are located in different
fuse boxes:
�Fuse box in passenger compartment
(
�page 457)
�Fuse box in engine compartment
(
�page 457)
�Fuse box in trunk (�page 458)Before replacing fuses:
�Depress the parking brake
(
�page 134).
�Make sure the manual transmission is
in Neutral (
�page 136), automatic
transmission* is set to P (
�page 140).
The gear position indicator in the ta-
chometer display should be on P.
�Turn off all electrical consumers.
�Turn off the engine (�page 134).
�Remove the SmartKey from the starter
switch.
Vehicles with KEYLESS-GO*
(Canada only):
�Open the driver’s door.
Warning!G
Only use fuses approved by Mercedes-Benz
with the specified amperage for the system
in question and do not attempt to repair or
bridge a blown fuse. Using other than ap-
proved fuses or using repaired or bridged
fuses may cause an overload leading to a
fire, and/or cause damage to electrical
components and/or systems. Have the
cause determined and remedied at an au-
thorized Mercedes-Benz Center.
iA blown fuse must be replaced by an appro-
priate spare fuse (recognizable by its color or the
fuse rating given on the fuse) of the amperage
recommended in the fuse chart.
Any Mercedes-Benz Center will be glad to advise
you on this subject.
!Switch off the vehicle’s internal electrical
functions (
�page 448) when you are working on
the fuses.
iIn case of a blown fuse contact Roadside
Assistance or an authorized Mercedes-Benz
Center.
Page 458 of 509
457 Practical hints
Fuses
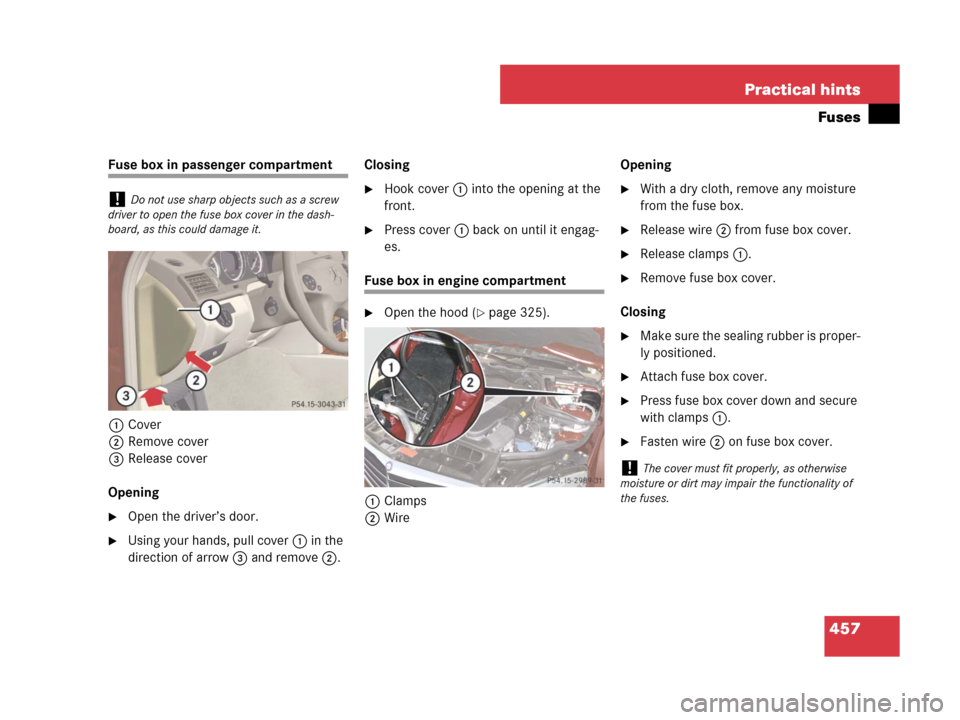
Fuse box in passenger compartment
1Cover
2Remove cover
3Release cover
Opening
�Open the driver’s door.
�Using your hands, pull cover1 in the
direction of arrow3 and remove2.Closing
�Hook cover1 into the opening at the
front.
�Press cover1 back on until it engag-
es.
Fuse box in engine compartment
�Open the hood (�page 325).
1Clamps
2WireOpening
�With a dry cloth, remove any moisture
from the fuse box.
�Release wire2 from fuse box cover.
�Release clamps1.
�Remove fuse box cover.
Closing
�Make sure the sealing rubber is proper-
ly positioned.
�Attach fuse box cover.
�Press fuse box cover down and secure
with clamps1.
�Fasten wire2 on fuse box cover.
!Do not use sharp objects such as a screw
driver to open the fuse box cover in the dash-
board, as this could damage it.
!The cover must fit properly, as otherwise
moisture or dirt may impair the functionality of
the fuses.
Page 459 of 509
458 Practical hints
Fuses
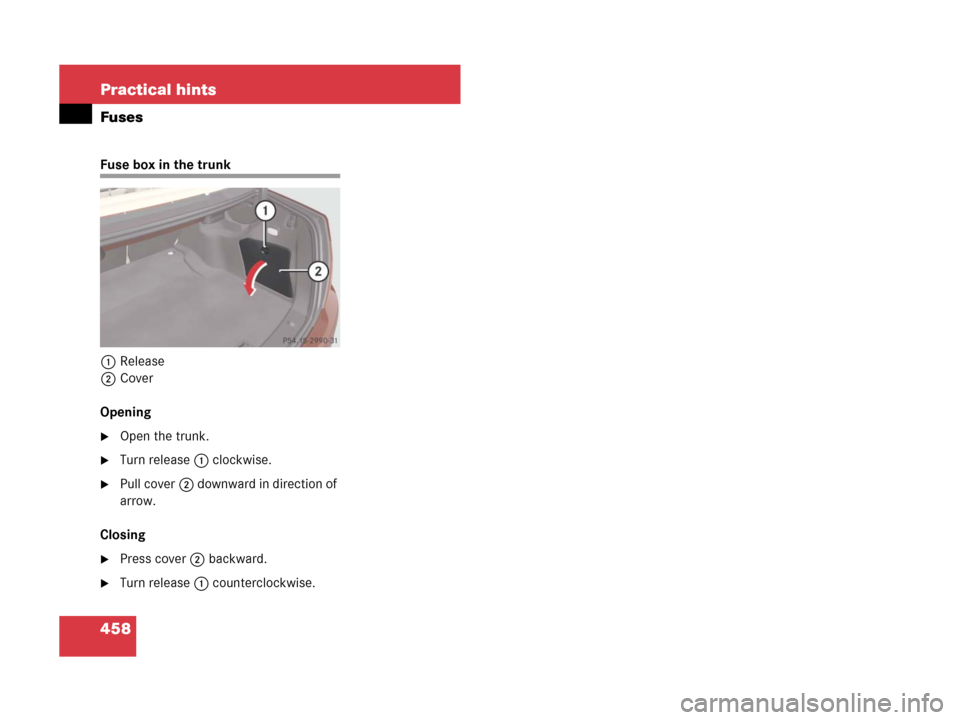
Fuse box in the trunk
1Release
2Cover
Opening
�Open the trunk.
�Turn release1 clockwise.
�Pull cover2 downward in direction of
arrow.
Closing
�Press cover2 backward.
�Turn release1 counterclockwise.