Page 424 of 509
423 Practical hints
Where will I find ...?
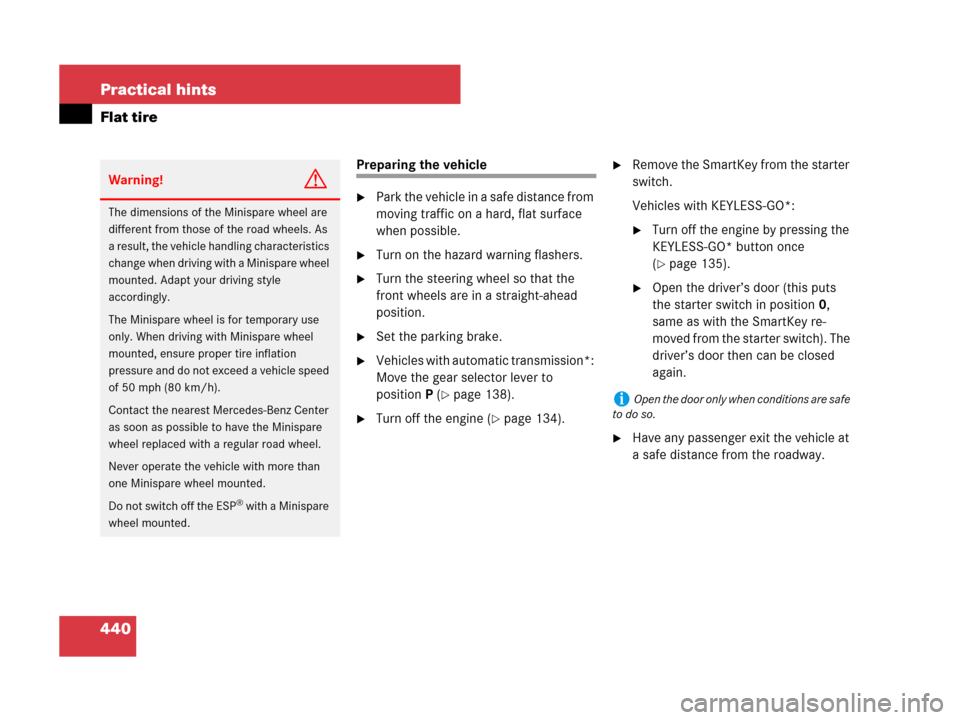
Removing the Minispare wheel
�Remove vehicle tool kit1
(
�page 421).
�Turn luggage bowl2 counterclock-
wise and remove it.
�Remove Minispare wheel3.Setting up the collapsible wheel chock
The collapsible wheel chock serves to
additionally secure the vehicle, e.g. while
changing the wheel.
1Tilt the plates upward
2Fold the lower plate outward
3Insert the plate
�Tilt both plates upward1.
�Fold the lower plate outward2.
�Guide the tabs of the lower plate all the
way into the openings of the base
plate3.
For information on where to place wheel
chocks when changing a wheel, see “Lift-
ing the vehicle” (
�page 441).
Page 441 of 509

440 Practical hints
Flat tire
Preparing the vehicle
�Park the vehicle in a safe distance from
moving traffic on a hard, flat surface
when possible.
�Turn on the hazard warning flashers.
�Turn the steering wheel so that the
front wheels are in a straight-ahead
position.
�Set the parking brake.
�Vehicles with automatic transmission*:
Move the gear selector lever to
positionP (
�page 138).
�Turn off the engine (�page 134).
�Remove the SmartKey from the starter
switch.
Vehicles with KEYLESS-GO*:
�Turn off the engine by pressing the
KEYLESS-GO* button once
(
�page 135).
�Open the driver’s door (this puts
the starter switch in position0,
same as with the SmartKey re-
moved from the starter switch). The
driver’s door then can be closed
again.
�Have any passenger exit the vehicle at
a safe distance from the roadway.
Warning!G
The dimensions of the Minispare wheel are
different from those of the road wheels. As
a result, the vehicle handling characteristics
change when driving with a Minispare wheel
mounted. Adapt your driving style
accordingly.
The Minispare wheel is for temporary use
only. When driving with Minispare wheel
mounted, ensure proper tire inflation
pressure and do not exceed a vehicle speed
of 50 mph (80 km/h).
Contact the nearest Mercedes-Benz Center
as soon as possible to have the Minispare
wheel replaced with a regular road wheel.
Never operate the vehicle with more than
one Minispare wheel mounted.
Do not switch off the ESP
® with a Minispare
wheel mounted.
iOpen the door only when conditions are safe
to do so.
Page 442 of 509

441 Practical hints
Flat tire
Mounting the Minispare wheel
Preparing the vehicle
�Prepare the vehicle as described
(
�page 440).
�Take vehicle tool kit tray and vehicle
jack out of trunk (
�page 420).
�Take the Minispare wheel from the
wheel well under the trunk floor
(
�page 422).Lifting the vehicle
Warning!G
When jacking up the vehicle, only use the
jack which has been specifically approved
by Mercedes-Benz for your vehicle.
The jack is designed exclusively for jacking
up the vehicle at the jack take-up brackets
built into both sides of the vehicle. Make
sure the jack arm is fully seated in the jack
take-up bracket.
The jack is intended only for lifting the
vehicle briefly for wheel changes. It is not
suited for performing maintenance work
under the vehicle. To help avoid personal
injury, use the jack only to lift the vehicle
during a wheel change.
Never get beneath the vehicle while it is sup-
ported by the jack. Keep hands and feet
away from the area under the lifted vehicle.
Always lower the vehicle onto sufficient
capacity jackstands before working under
the vehicle.
Always firmly set the parking brake and
block wheels with wheel chocks or other
sizeable objects before raising vehicle with
jack. Do not release the parking brake while
the vehicle is raised.
Make sure that the ground on which the
vehicle is standing and where you place the
jack is solid, level and not slippery. If neces-
sary, use a large underlay. On slippery
surfaces, such as tiled floors, you should
use a non-slip underlay, for example a
rubber mat.
Do not use wooden blocks or similar objects
to support the jack. Otherwise the jack may
not be able to achieve its load-bearing
capacity if it is not at its full height.
Be certain that the jack is always vertical
(plumb line) when in use, especially on hills.
Always try to use the jack on level surface.
Never start the engine when the vehicle is
raised.
Also observe the notes on the jack.
Page 445 of 509

444 Practical hints
Flat tire
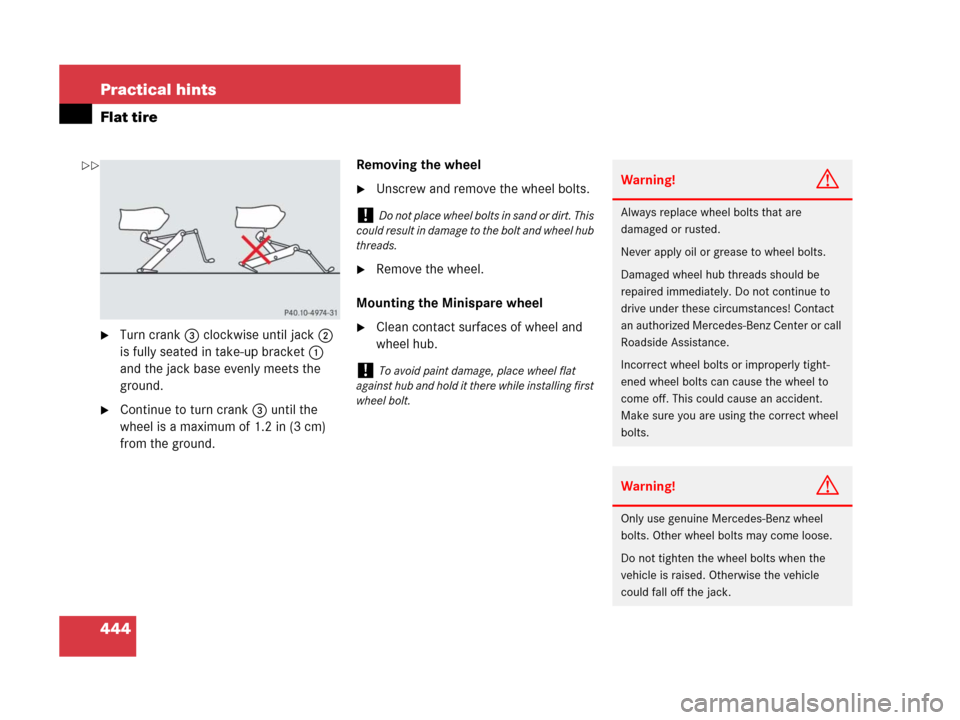
�Turn crank3 clockwise until jack 2
is fully seated in take-up bracket1
and the jack base evenly meets the
ground.
�Continue to turn crank 3 until the
wheel is a maximum of 1.2 in (3 cm)
from the ground.Removing the wheel
�Unscrew and remove the wheel bolts.
�Remove the wheel.
Mounting the Minispare wheel
�Clean contact surfaces of wheel and
wheel hub.
!Do not place wheel bolts in sand or dirt. This
could result in damage to the bolt and wheel hub
threads.
!To avoid paint damage, place wheel flat
against hub and hold it there while installing first
wheel bolt.
Warning!G
Always replace wheel bolts that are
damaged or rusted.
Never apply oil or grease to wheel bolts.
Damaged wheel hub threads should be
repaired immediately. Do not continue to
drive under these circumstances! Contact
an authorized Mercedes-Benz Center or call
Roadside Assistance.
Incorrect wheel bolts or improperly tight-
ened wheel bolts can cause the wheel to
come off. This could cause an accident.
Make sure you are using the correct wheel
bolts.
Warning!G
Only use genuine Mercedes-Benz wheel
bolts. Other wheel bolts may come loose.
Do not tighten the wheel bolts when the
vehicle is raised. Otherwise the vehicle
could fall off the jack.
��
Page 446 of 509

445 Practical hints
Flat tire
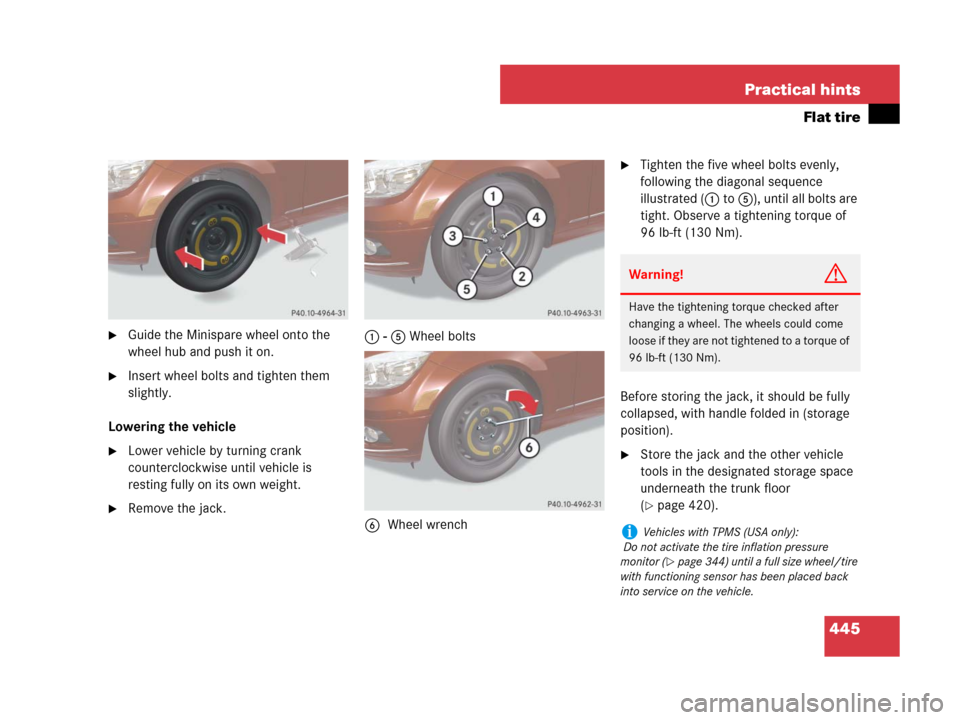
�Guide the Minispare wheel onto the
wheel hub and push it on.
�Insert wheel bolts and tighten them
slightly.
Lowering the vehicle
�Lower vehicle by turning crank
counterclockwise until vehicle is
resting fully on its own weight.
�Remove the jack.1 - 5 Wheel bolts
6 Wheel wrench
�Tighten the five wheel bolts evenly,
following the diagonal sequence
illustrated (1 to 5), until all bolts are
tight. Observe a tightening torque of
96 lb-ft (130 Nm).
Before storing the jack, it should be fully
collapsed, with handle folded in (storage
position).
�Store the jack and the other vehicle
tools in the designated storage space
underneath the trunk floor
(
�page 420).
Warning!G
Have the tightening torque checked after
changing a wheel. The wheels could come
loose if they are not tightened to a torque of
96 lb-ft (130 Nm).
iVehicles with TPMS (USA only):
Do not activate the tire inflation pressure
monitor (
�page 344) until a full size wheel/tire
with functioning sensor has been placed back
into service on the vehicle.
Page 472 of 509
471 Technical data
Rims and tires
Minispare wheel
ModelC 2301
C 230 Sport1
C 230 4MATIC1
C 230 4MATIC Sport1
C 300
C 300 Sport
C 300 4MATIC
C 300 4MATIC Sport
1Canada only.
C 3501
C 350 Sport
C 350 4MATIC1
C 350 4MATIC Sport1
Rim (steel)3.5 B x 16 H23.5 B x 17 H2
Wheel offset0.79 in (20 mm)0.79 in (20 mm)
Tire2
2Must not be used with snow chains.
T 125/90 R16 98MT 125/80 R17 99M
Page 473 of 509
472 Technical data
Rims and tires
!Please compare the recommended tire in-
flation pressure for your vehicle with the tire in-
flation pressure on the yellow label located on
the Minispare wheel rim.
If the tire inflation pressure on the yellow label
on the Minispare wheel rim differs from the
values given in this Operator’s Manual, inflate
the Minispare wheel tire to the recommended
tire inflation pressure given on the yellow label
on the Minispare wheel rim.
iPlease note that the tire inflation pressure
of the Minispare differs from the tire inflation
pressure of the road tires.
Make sure the Minispare tire is inflated to
approximately 61 psi (4.2 bar).
Page 494 of 509

493 Index
ESP®62
Four wheel electronic traction system
with ESP
®65
Messages in display 389, 397, 398
Warning lamp 27, 376, 379, 380
ETD 49
Safety guidelines 38
Ethanol fuel
At the gas station 322
Switching fuels 483
Exterior rear view mirrors
Adjusting 97
Auto-dimming on the driver’s
side 99, 100
Fold-in settings 175
Power folding* 98F
Fahrenheit see Temperature display
mode 167
First aid kit 420
Flat tire 440
Lowering the vehicle 445
Mounting the Minispare wheel 441
Preparing the vehicle 440
Flexible fuel vehicles 482
At the gas station 322
Switching fuels 483
Floormats* 294
Fluids
Automatic transmission fluid 476,
477
Brake fluid 478, 480
Capacities 476
Engine coolant 329, 478, 484
Engine oil 328, 476, 480
Power steering fluid 478
Windshield washer and headlamp
cleaning system 479, 486
Fog lamps 431
Messages in display 410
Replacing bulbs 431, 432, 436Four wheel electronic traction system
(4MATIC) with ESP
®65
4MATIC 65
Front air bags 39
Front lamps see headlamps
Front passenger front air bag 39
Messages in display 393
Front passenger front air bag off indicator
lamp 29, 45, 385
Front seats
Heating* 91
Fuel 322, 478, 481
Additives 481
Capacity, Fuel tank 478
Cruising range 483
E85 (Ethanol fuel) 478, 483
Filling the tank 322
Fuel filler flap and cap 322
Fuel reserve warning lamp 27, 150,
380
Gauge 27, 150
Premium unleaded gasoline 478,
481
Requirements, Octane rating 482
Switching (Flexible fuel vehicle) 483